

Here are 10+ fun and creative Earth Day craft ideas that are perfect for kids, families, or classrooms — all focused on recycling, reusing, and celebrating our planet! 🌎♻️
🌿 1. Paper Plate Earth Craft
Paint or color a paper plate blue and green to look like the Earth. Add a sweet message like “Love Our Planet” and hang it up as a reminder to care for nature.
🌻 2. Birdseed Ornaments
Mix birdseed with gelatin, shape them with cookie cutters, and hang them outside to feed the birds — a fun way to help local wildlife!
🌞 3. Cardboard Sun Craft
Cut a sun shape out of recycled cardboard, paint it bright yellow, and add positive Earth Day messages like “Shine for the Planet!”
🌎 4. Paper Quilled Earth Craft
Use strips of blue and green paper to quill (roll and shape) into a stunning 3D Earth. It’s artistic and eco-friendly!
🌸 5. Newspaper Flowers
Reuse old newspapers to create paper flowers. Paint or color them, and display them in a vase made from an old jar.
🐢 6. Plastic Bottle Planters
Cut and decorate empty plastic bottles, then fill them with soil and small plants. Great for teaching kids about reusing and growing their own greenery.
💧 7. Water Cycle in a Bag
Draw and label the water cycle on a ziplock bag, fill it with a bit of water, and tape it to a sunny window — a fun mini science experiment!
🍃 8. Nature Collage
Take a walk outside and collect leaves, twigs, and flowers. Glue them onto recycled paper or cardboard to make a nature-themed collage.
🦋 9. Coffee Filter Butterflies
Color coffee filters with markers, spray lightly with water to blend colors, then pinch them in the center with a clothespin to make butterflies.
🌱 10. Egg Carton Seed Starters
Cut up old egg cartons, fill each cup with soil, and plant seeds. Once they sprout, you can transplant them into your garden!
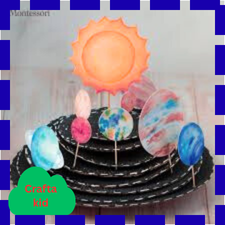
🌍 Bonus: Upcycled Earth Mobile
Use old CDs, cardboard circles, or bottle caps to create mini planets and hang them from a stick or hanger to form a “solar system” mobile.
Would you like me to format this list as a blog-style article (with an intro, tips, and closing paragraph) or a classroom handout (simple, step-by-step version)?
Aslo Like:-
- Pebble Art
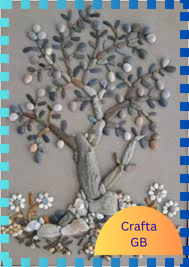

Pebbles may be used to create art and are found everywhere! Gather flat, smooth stones of all sizes and shapes.
This is genuinely one of the greatest methods to express your creativity. They may be painted to look like flowers, animals, or even adorable small dwellings.
For those who want to try something more abstract, arrange the pebbles into patterns or pictures on a piece of cardboard.
Glue them down and voilà! Aah, a unique piece of art. You can even use them as garden markers by writing plant names on them with paint or a permanent marker.
2. Felt Fishing Game


🎣 Felt Fishing Game Craft — a fun, hands-on activity that’s perfect for playtime and helps kids work on coordination and counting skills!
Here’s how to make your own DIY Felt Fishing Game using simple, eco-friendly materials.
🧵 What You’ll Need
- Colorful felt sheets (for fish shapes)
- Scissors
- Needle and thread or fabric glue
- Paper clips (for fish “hooks”)
- Wooden stick or dowel (for the fishing pole)
- String or yarn
- Magnet (small but strong)
- Optional: Googly eyes, marker, and Velcro dots
🎨 Instructions
- Cut Out the Fish
Draw and cut out fish shapes from colorful felt. You can use different colors or sizes to make the game more fun. - Add Paper Clips
Attach one paper clip to the mouth of each felt fish — this is what the magnet will catch! - Decorate the Fish
Add googly eyes, fins, or spots using fabric scraps or markers. Let kids get creative! - Make the Fishing Rod
Tie a string to one end of the stick or dowel. Attach the magnet to the other end of the string — you can glue or tape it securely. - Set Up Your Pond
Place the felt fish in a blue felt “pond” (or a shallow box painted blue). - Go Fishing!
Use your magnetic rod to “catch” fish by picking them up with the magnet.
💡 Extra Ideas
- Learning game: Write letters, numbers, or sight words on the fish for an educational twist.
- Color match: Match fish to colored “buckets.”
- Counting challenge: Award points based on fish color or size!
Would you like me to turn this into a printable instruction sheet (for a classroom or craft fair display) or a blog post format (with intro and closing paragraph)?
3. Floral Pop-Up Card


Making pop-up cards is enjoyable, especially if you have assistance! This flower pattern is a simple way to honor the beauty of Earth and the ideal craft for spring.
4. Tissue Paper Earth
A Tissue Paper Earth craft is a fun and simple activity — perfect for Earth Day or any lesson about our planet 🌎. Here’s how you can make it:
🌍 Tissue Paper Earth Craft
🧰 Materials:
- Blue and green tissue paper
- White paper plate or sturdy white cardstock
- Scissors
- Glue stick or liquid glue
- Pencil
- Optional: string for hanging
🪄 Instructions:
- Draw the Earth:
Draw a big circle on your paper plate or cardstock. This will be your Earth outline. - Tear Tissue Paper:
Tear or cut blue tissue paper for oceans and green tissue paper for land areas into small squares (about 1 inch). - Crumple Pieces:
Gently crumple each piece of tissue paper into small balls for a fun, textured look. - Glue the Oceans:
Apply glue to the circle area and start adding blue tissue paper for the oceans. - Add the Continents:
Fill in the remaining areas with green tissue paper to create the landmasses. - (Optional) Add a Hanger:
If you want to display it, tape or glue a piece of string to the back to hang it up.
✨ Tips & Ideas:
- Add cotton balls for clouds!
- Write a message like “Love Our Earth” or “Protect Our Planet.”
- Use recycled materials for an eco-friendly twist.
Would you like me to make a printable instruction sheet or classroom activity version (with template and steps for kids)?
5. Unicorn Planters
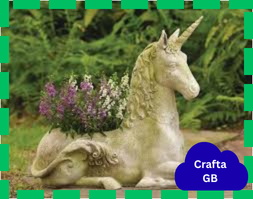
With these unicorn planters, let children’s imaginations run wild. To decorate, get little white pots. After that, have them add glitter gold paper, vibrant felt, and paper rainbows to their drawings of the eyes using a black marker.
6. Faux Greenery Spring Wreath
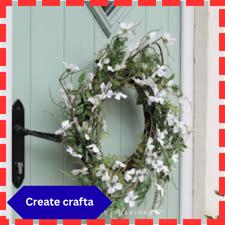
A Faux Greenery Spring Wreath is a beautiful, long-lasting decoration that brings a touch of spring indoors — no watering required! 🌿✨
Here’s how to make one:
💐 Faux Greenery Spring Wreath
🧰 Materials:
- Grapevine or foam wreath base
- Faux greenery (eucalyptus, ferns, boxwood, etc.)
- Faux flowers (optional: daisies, tulips, peonies, or wildflowers)
- Floral wire or hot glue gun
- Wire cutters and scissors
- Ribbon for hanging or bow decoration
🪄 Instructions:
- Prepare Your Wreath Base:
Start with a plain grapevine wreath (for a rustic look) or foam wreath (for a neat, full style). - Arrange Your Greenery:
Before gluing, lay out your faux greenery around the wreath base to plan the design. You can go for:- Full circle (greenery all around)
- Half wreath (greenery on one side for a modern look)
- Attach the Greenery:
Secure stems using floral wire or hot glue. Tuck the ends into the wreath base for a natural look. - Add Faux Flowers:
Insert colorful faux blooms between greenery for a bright spring vibe. Mix sizes and textures for depth. - Add a Ribbon or Bow:
Tie a ribbon at the bottom or top. Soft pastel colors (lavender, blush, mint, yellow) look great for spring. - Hang and Enjoy:
Use a wreath hanger or loop ribbon to hang your wreath on a door, window, or wall.
🌸 Tips & Variations:
- Add small decorative eggs or butterflies for an Easter theme.
- Mix in faux lavender or baby’s breath for a delicate touch.
- Use scented faux greenery or add a few drops of essential oil for a fresh smell.
Would you like me to create a printable instruction card or DIY guide sheet (with step-by-step photos or layout for classroom/home craft use)?
7. Floral Painted Globe

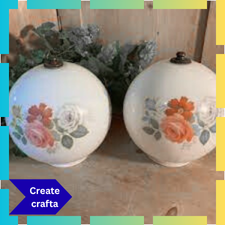
Make a floral beauty out of a globe, no matter how big or small. All you need is flower designs and bright blue paint.
8. Milk Carton Birdhouse
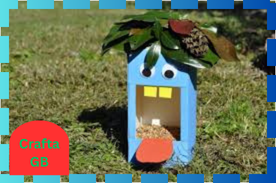
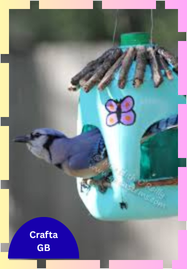
A Milk Carton Birdhouse is a fun, eco-friendly craft that gives used cartons a new life and helps local birds find a cozy spot! 🐦♻️
Here’s how to make one:
🏠 Milk Carton Birdhouse Craft
🧰 Materials:
- Empty milk or juice carton (washed and dried)
- Scissors or craft knife (adult help recommended)
- Acrylic paint or colored paper
- Paintbrushes
- String or twine
- Hole punch
- Stick, pencil, or wooden dowel (for the perch)
- Glue or tape
- Optional: stickers, washi tape, buttons for decoration
🪄 Instructions:
- Clean and Dry the Carton:
Make sure your carton is rinsed and completely dry before starting. - Cut the Door:
Use scissors or a craft knife (adults only!) to cut a bird-sized hole near the upper middle of one side — about 2 inches wide. - Add a Perch:
Below the hole, poke a smaller hole and insert a stick or pencil. Secure it with glue or tape so birds can perch outside. - Paint and Decorate:
Paint the entire carton with bright, non-toxic colors or wrap it with paper. Add fun details like flowers, bricks, or windows! - Attach a Hanger:
Punch a hole through the top of the carton, thread string or twine, and tie a knot for hanging. - Hang It Up:
Place your birdhouse on a tree branch, balcony, or garden hook, somewhere shaded and safe from predators.
🌿 Tips & Variations:
- Use waterproof paint or sealant to protect it from rain.
- Add a few birdseeds inside to invite your feathered friends.
- Make multiple birdhouses in different colors for a “bird village”!
- For a winter version, add a roof of cardboard and cover it with cotton “snow.”
Would you like me to make a printable step-by-step sheet (with photos or cartoon icons for kids/classroom use)?
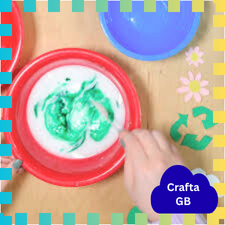
9. Earth Day Slime
What child doesn’t like slime, particularly in vivid shades of green and blue? As you assist your children in creating their own slime to play with, teach them about Earth Day.
10. Mosaic Earth
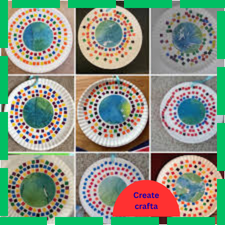
A Mosaic Earth craft is a creative and colorful way to celebrate our planet — perfect for Earth Day, art class, or any nature-themed project! 🌎💚
Here’s how to make it:
🌍 Mosaic Earth Craft
🧰 Materials:
- Blue, green, and white paper (construction or tissue paper)
- Scissors
- Glue stick or liquid glue
- White cardstock or paper plate (as the base)
- Pencil
- Optional: recycled magazines, foil, or colored scraps for texture
🪄 Instructions:
- Draw the Earth:
On your base (paper plate or cardstock), draw a large circle — this will be your Earth outline. - Cut Paper Squares:
Cut or tear blue and green paper into small pieces or squares (about 1 inch or smaller).- Blue = oceans
- Green = continents
- Arrange Your Mosaic:
Before gluing, plan where your continents and oceans will go. You can follow a map or create your own abstract version. - Glue the Pieces:
Apply glue and start placing paper pieces close together, slightly overlapping like a mosaic. Mix in white bits for clouds or ice caps. - Add Details (Optional):
- Write “Love Our Earth” or “Protect Our Planet.”
- Glue on recycled materials like magazine pieces or foil for sparkle.
- Add a black paper border to make your mosaic pop!
- Let It Dry:
Once finished, let your art dry flat before hanging or displaying.
🌱 Tips & Variations:
- Use recycled paper scraps to make it eco-friendly.
- Make a classroom Earth mural by combining everyone’s mini mosaics into one big planet.
- Try tissue paper balls instead of flat pieces for a textured look.
Would you like me to make a printable classroom craft sheet (with a circle template, labeled steps, and supply list)?
11. Recycled Cardboard Sun
Gather several cardboard boxes, including delivery boxes, and turn them into a big sun or little ones to place around the home.