
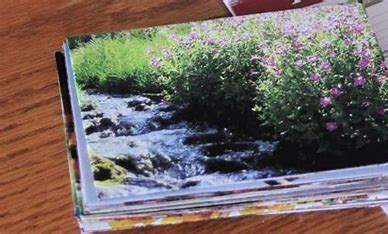
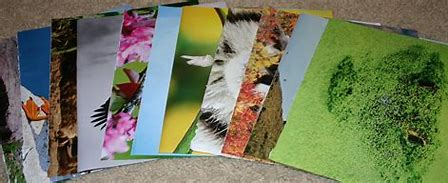
Sure! Here are some clever and creative ways to repurpose old calendars:
- Art Collages: Cut out images from the calendar and create a collage or a new piece of art. The images can be used for scrapbooking or framing.
- Gift Wrap: Use calendar pages as unique and colorful wrapping paper for gifts. It adds a personal touch and is eco-friendly.
- Bookmarks: Cut out small sections of calendar pages to make bookmarks. Laminate them for durability and add a ribbon or tassel.
- DIY Planners: Repurpose calendar pages into custom planners or journals. Use the pages as dividers or add new dates and sections as needed.
- Notepads: Bind calendar pages together to create a notepad or pad of sticky notes. They can be great for jotting down quick reminders.
- Magnets: Cut out small sections of calendar images, laminate them, and add magnets to the back for custom fridge magnets.
- Calendars for Kids: Turn old calendars into educational tools for children, like a DIY learning calendar where they can add their own events or learn about different images.
- Decorative Garlands: Cut calendar pages into shapes (like hearts, stars, or circles) and string them together to make a festive garland for decorations.
- Origami Paper: Use calendar pages for origami projects. The varied designs and patterns can make interesting and colorful creations.
- Puzzle Pieces: Cut out sections of the calendar to create homemade puzzles. You can use different images for varying levels of difficulty.
- Desk Mats: Create a colorful desk mat by covering an old calendar with a clear protective sheet. It’ll brighten up your workspace and keep the calendar’s artwork visible.
- Wall Art: Frame particularly beautiful or inspiring calendar pages as individual pieces of wall art. Mix and match to create a gallery wall.
- Memory Jars: Cut out images and write memories or important dates on them. Place these in a jar as a visual memory collection.
- Recipe Cards: Use the back of calendar pages to write down recipes and create a personalized recipe collection.
- Craft Projects: Incorporate calendar images into various craft projects, such as homemade cards, scrapbook pages, or DIY decorations.
Repurposing old calendars can be a fun way to recycle and add a touch of creativity to your daily life!
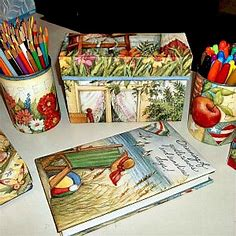
- Decorative Recycled Calendar Boxes
I adore making these adorable tiny ornamental boxes out of vintage calendars. To make them, simply cut and tape the calendar pages together. These would be ideal in small gift boxes for the upcoming holiday season. If you utilise calendar pages with festive themes, you can use tissue paper to contain little gifts like jewellery without even having to bend them.
2. DIY Paper Bow

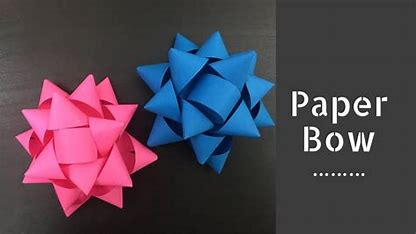
Sure! Here’s a step-by-step guide to making a DIY paper bow:
Materials Needed:
- Decorative or colored paper (or old calendar pages)
- Scissors
- Glue stick or craft glue
- Ruler
- Pencil
- Stapler (optional)
- Ribbon or string (optional)
Instructions:
- Cut the Paper:
- Bow Loops: Cut two strips of paper, each about 1 inch wide and 6-8 inches long. These will be the main loops of the bow.
- Bow Center: Cut another strip of paper, about 1 inch wide and 3-4 inches long. This will be used to wrap around the center of the bow.
- Form the Loops:
- Take one of the longer strips and make a loop by bringing the two ends together. Overlap them slightly in the middle and secure with glue.
- Repeat with the second strip. You should now have two loops.
- Attach the Loops:
- Once the glue has dried, place one loop on top of the other, slightly offset so that they form a layered effect. Secure them together with glue.
- Make the Center Band:
- Wrap the shorter strip of paper around the center of the loops to create the bow’s center band. Overlap the ends at the back and glue them down.
- Add a Tail (Optional):
- Cut a strip of paper (about 1 inch wide and 6-10 inches long) and fold it in half lengthwise. Cut a V shape at one end to create a tail. Glue this tail to the back of the bow.
- Finish Up:
- Let the glue dry completely. If you want to attach the bow to a gift or card, you can use glue or double-sided tape. Alternatively, you can attach a piece of ribbon or string to the back for easy tying.
And there you have it—a charming DIY paper bow that you can use for gifts, decorations, or crafts!
3. DIY Upcycled Calendar Coasters
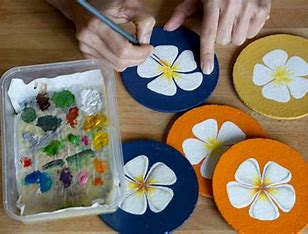
Coasters are my favourite thing. After all, one can never have too many? They also make ideal wedding and holiday gifts. Thus, with just some ceramic tiles and Mod Podge, you may transform an old calendar that you need to reuse into stunning coasters. Simply trim the pages to match the size of your tiles, then use Mod Podge to stick them on. These are really simple to make and look amazing.
4. DIY Jigsaw Puzzle
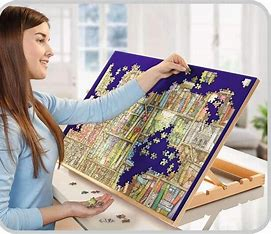
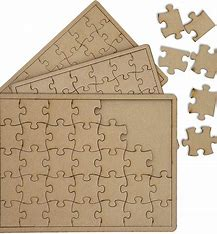
Creating your own DIY jigsaw puzzle can be a fun and rewarding project. Here’s a step-by-step guide to making one from scratch:
Materials Needed:
- A sturdy piece of cardboard or thick paper (like a cereal box or poster board)
- A printed image or drawing (optional, if you want a design)
- Glue stick or craft glue
- Scissors or an X-Acto knife
- A pencil
- Ruler (optional, for precision)
- Puzzle template (optional)
Instructions:
- Choose Your Image:
- Select an image or design you want for your puzzle. It can be a photo, artwork, or any printed image. If you’re using a drawing or a painting, make sure it’s on sturdy paper or mounted on a backing.
- Prepare the Backing:
- Cut a piece of cardboard or thick paper to the size of your chosen image. The backing should be sturdy enough to hold the puzzle pieces together.
- Attach the Image:
- If you’re using a printed image, glue it onto the cardboard or thick paper using a glue stick or craft glue. Make sure it’s evenly spread and there are no wrinkles. Allow it to dry completely.
- Create the Puzzle Template (optional):
- For a more precise puzzle cut, draw or print a puzzle piece template. This template will guide your cutting to create interlocking pieces.
- Draw the Puzzle Pieces:
- Using a pencil, lightly sketch the puzzle piece shapes onto the back of the image (or directly on the cardboard if you didn’t use an image). Puzzle pieces typically have a mix of straight and interlocking edges.
- Cut Out the Puzzle Pieces:
- Carefully cut out the pieces along your pencil lines. You can use scissors for simpler shapes or an X-Acto knife for more intricate cuts. Make sure to cut slowly and carefully to get clean edges.
- Test the Fit:
- Once all the pieces are cut, put them together to ensure they fit correctly. Adjust any pieces as needed.
- Finish Up:
- If desired, you can laminate the puzzle pieces or add a coating of clear adhesive to protect them and make them more durable.
Tips:
- Puzzle Size: The size and number of pieces can be adjusted based on the complexity you want. Larger images can be divided into more pieces.
- Design Variations: Use different types of paper, such as colored or patterned paper, to create a unique puzzle design.
- Personal Touches: Add labels or numbers on the back of each piece to help with assembly or to create a custom challenge.
This DIY jigsaw puzzle can make a wonderful gift, a personalized game, or a fun project to do on your own!
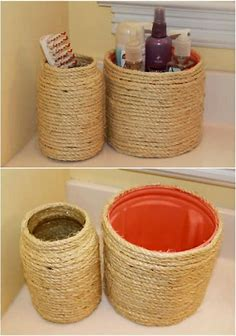
5. Upcycled Tin Can And Calendar Vases
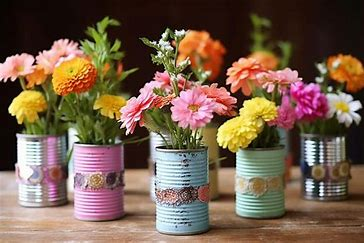
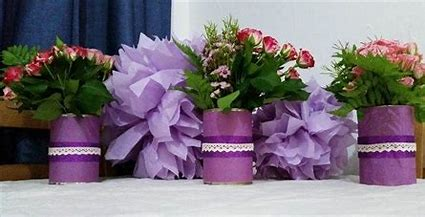
With a little amount of time and effort, you can transform old, obsolete calendars and empty tin cans into stunning vases, pencil holders, or anything else. You won’t have to pay for this project because it’s entirely constructed of recycled materials! Simply cut the calendar pages to the appropriate size, then use Mod Podge to secure them to your empty cans. To ensure that the pictures stay in place, you might need to apply a few coats.
6. DIY Decoupage Furniture
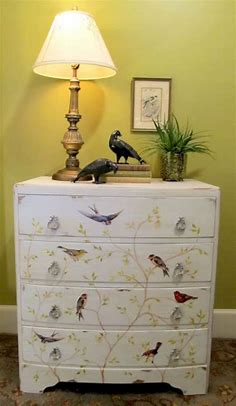
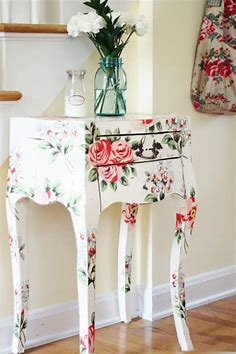
Imagine using an old calendar to transform worn-out furniture into something fresh and elegant. Yes, you can! You can use those calendar pages to decoupage furniture throughout your home, giving it a gorgeous new look. You can put them on tables, chairs, and pretty much anything else. This is a really simple and affordable approach to update the furniture in your home.
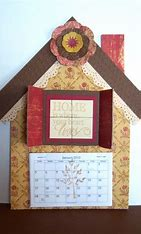
7. DIY Upcycled Calendar Wall Art
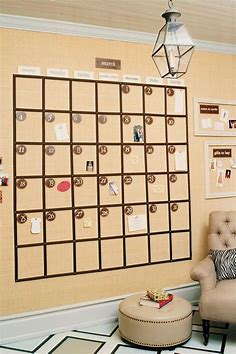
Old calendar covers or pages can easily be transformed into lovely wall art. All you need for this project are some corrugated cardboard and your calendars; it doesn’t even take much time. You’re set if you have that with you. Simply affix the pages of your calendar to the cardboard and hang it up. If you would rather create frames than gallery-style artwork, you can certainly do that.
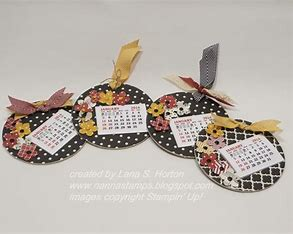
8. Easy DIY Drink Tags
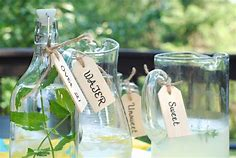
These homemade drink tags are a great idea for parties and outdoor get-togethers, and they can be made using those old calendar pages. To fit around your glass stem, simply cut circles out of your pages, then cut another circle inside the first one. After you add your visitors’ names, nobody will ever again misplace their drink. These can also be themed by using holiday calendar pages for Christmas dinner and summer calendar pages for cookouts.
9. DIY Upcycled Calendar Page Envelopes
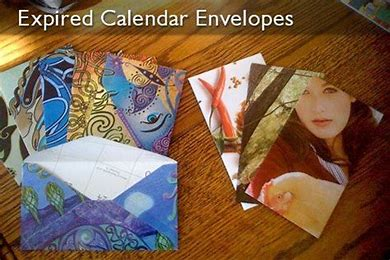
Creating envelopes from upcycled calendar pages is a fantastic way to repurpose old calendars and add a unique touch to your correspondence. Here’s a simple guide to making these creative envelopes:
Materials Needed:
- Old calendar pages
- Envelope template (you can use an existing envelope as a guide)
- Scissors
- Glue stick or craft glue
- Ruler
- Pencil
- Bone folder (optional, for crisp folds)
- Decorative stickers or labels (optional)
Instructions:
- Choose the Calendar Pages:
- Select the pages of your calendar that you want to use. Pick pages with attractive images or patterns that you’d like to feature on your envelopes.
- Prepare the Envelope Template:
- Use an existing envelope as a template, or download and print an envelope template from the internet. The standard envelope size is A2 (4.375 x 5.75 inches) or A7 (5.25 x 7.25 inches), but you can choose any size you prefer.
- Cut Out the Envelope Shape:
- Place your envelope template on the calendar page and trace around it with a pencil. Make sure to align the template so that the most interesting part of the calendar page is visible on the envelope.
- Cut the Envelope:
- Carefully cut out the envelope shape from the calendar page. If your template has flaps or tabs, make sure to include those in your cut.
- Fold the Envelope:
- Fold the envelope along the lines where the flaps will be. Use a bone folder or the edge of a ruler to press down on the folds and create crisp edges.
- Assemble the Envelope:
- Apply glue to the tabs or flaps that will overlap and secure them in place. Make sure to hold them in place until the glue dries or use paper clips to keep them together while drying.
- Add a Closure:
- If desired, you can add decorative stickers or labels to seal the envelope. You can also use a small piece of tape or a sticker to keep the envelope closed.
- Personalize Your Envelopes:
- Add your own personal touch by writing names or addresses directly on the calendar page or by adding additional decorative elements.
Tips:
- Select Images Wisely: Choose calendar pages with images or patterns that will be visible and appealing on the finished envelope.
- Adjust Size: If the calendar page is too small for your envelope template, you can trim it down or use multiple pages to create a larger envelope.
- Create Matching Sets: Make a set of envelopes from the same calendar to create a matching stationery set.
These upcycled calendar page envelopes not only give old calendars a new lease on life but also make your mail stand out with a personal and artistic touch.
10. DIY Upcycled Calendar Gift Bag
Gift bags are another item I frequently forget to purchase. I always seem to run out of those quickly after giving one as a present since I can never have enough of them on hand. You may make incredibly attractive gift bags out of your old calendars, so you won’t have to worry about gifts anymore. Though gift bags aren’t particularly expensive, I feel like they’re not personalised enough, therefore I really like this idea. I can create exquisitely personalised bags out of calendar pages that are ideal for every person on my gift list!
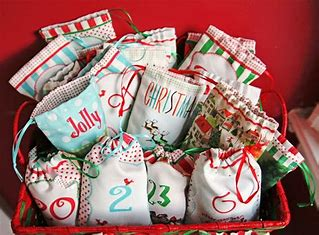
11. DIY Goody Bags

Make these charming DIY goody bags out of old calendars for parties or trick-or-treaters. These involve a little stitching, but it’s not hard at all, and when you’re done, you’ll have these gorgeous goody bags that are ideal for all of your goody bag events. When they’re finished, fill them with candies, raisins, cookies, or whatever else you choose.
12. Easy DIY Japanese Kokeshi Dolls
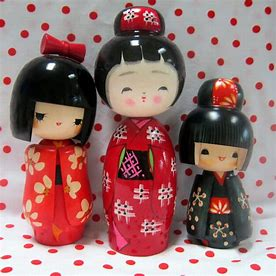

The hefty paper that these Japanese Kokeshi dolls require is what your calendar has. Make these sweet miniature dolls from those pages, which you can give to a special little girl in your life or use as décor. These are an easy project for kids to do on rainy days, and they’re really simple to construct. To make them, you just wrap the pages of your calendar around an empty toilet paper roll and design a foam ball to resemble a face.
13. Japanese Kusudama Flowers
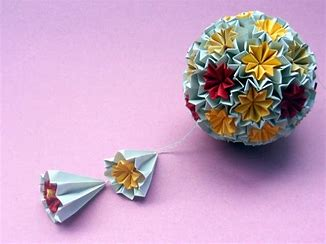
Nowadays, origami is very popular, and these Japanese kusudama flowers have a lot in common with origami. Although actual flowers are typically used to create these blossoms, your calendar pages can have a similar appearance. Simply build the petals by folding the pages in an origami fashion, then glue them together to form flowers. After that, the flowers can be arranged into a lovely kusudama flower ball or used for a variety of decorative purposes.
14. DIY Upcycled Calendar Magnets

Repurposing an old calendar to create a gorgeous new kitchen magnet is the perfect use for it. I adore creating my own refrigerator magnets and am a sucker for them. Using an old calendar, glue, magnets, and transparent accent jewels makes it very simple. The gems are quite affordable and can be found in the Dollar Store. Apart from that, all you have to do is purchase magnets, making this an extremely affordable project. These are fantastic presents for the approaching holidays!
15. Fun DIY Matching Game
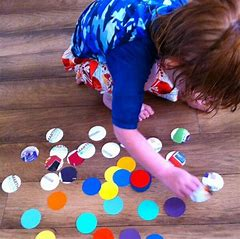
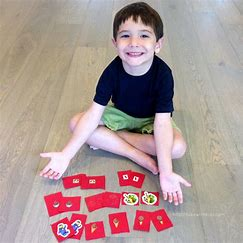
Convert those calendar pages into adorable, instructive matching activities for small children. Just trim out the corresponding pictures from your calendars, then adhere them on cardstock. To maintain their durability, you can either laminate them or apply several layers of Mod Podge to them. Little ones can utilise them to assist develop their memory after they’re dried. Using the phrases and dates from your calendar pages, you could also use this technique to create lesson cards for numbers and letters.
16. DIY Glass Paperweights
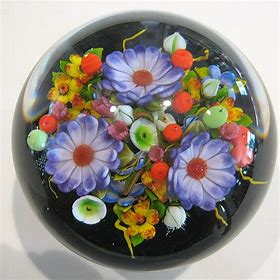
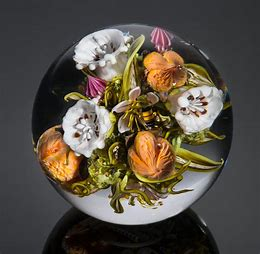
Creating DIY glass paperweights is a fun and creative project that you can customize to match your style or to give as unique gifts. Here’s a simple guide to making your own glass paperweights:
Materials Needed:
- Clear glass marbles, stones, or small glass domes (you can find these at craft stores or online)
- Decorative items (such as small photographs, pressed flowers, glitter, or tiny objects)
- Mod Podge or clear-drying craft glue
- Paintbrush (if using Mod Podge)
- Scissors (if using paper or photos)
- Tweezers (optional, for handling small items)
- Clear resin (optional, for a more durable finish)
Instructions:
- Select Your Base:
- Choose the type of glass item you’ll use as the base for your paperweight. Glass marbles or flat glass stones work well. If you’re using a glass dome, you’ll need to ensure it has a flat base.
- Prepare Your Decorations:
- Decide what you want to include inside the paperweight. Options include small photographs, pressed flowers, tiny beads, glitter, or small decorative objects. Cut or arrange these items to fit your chosen glass base.
- Attach Decorations:
- For Flat Glass Stones: Apply a thin layer of Mod Podge or clear-drying craft glue to the surface of the stone where you want to place your decoration. Carefully position your decorative item on the glue and press it down gently.
- For Glass Marbles: Apply the decorative item to the flat side of the marble. If you’re using a photograph or paper, cut it to fit the marble and use Mod Podge or craft glue to adhere it.
- Seal the Decoration:
- If using Mod Podge, apply a thin layer over the top of the decoration to seal it and add a glossy finish. Let it dry completely.
- For a more durable finish, you can use clear resin. Follow the instructions on the resin package, mixing and pouring it carefully over the decoration. Allow the resin to cure according to the manufacturer’s instructions.
- Let It Dry:
- Allow any glue or Mod Podge to dry thoroughly. If using resin, let it cure fully, which may take several hours or overnight.
- Finish and Display:
- Once everything is dry and set, your paperweight is ready to use. It can be placed on a desk, used to hold papers, or displayed as a decorative piece.
Tips:
- Precision: Use tweezers to handle small items to avoid smudges or fingerprints.
- Experiment: Try different combinations of decorations and bases to create a variety of looks.
- Protective Layer: Ensure the surface where you work is protected from any glue or resin spills.
These DIY glass paperweights make for wonderful personalized gifts or unique home decor items. Enjoy the process of crafting and customizing them to your taste!