Prepare for quick, enjoyable, and instructive dinosaur crafts and activities that will inspire and amuse your young palaeontologists.
These fantastic dinosaur crafts are inexpensive and constructed using common home items like tissue paper, popsicle sticks, paper plates, cupcake liners, and recycled egg cartons.
There are plenty of dinosaur crafts to encourage your child’s imagination, ranging from handmade dinosaur crafts to DIY fossils.
hoto Credit: leapoffaithcrafting.com
1. Creative DIY Dinosaur Bones Craft
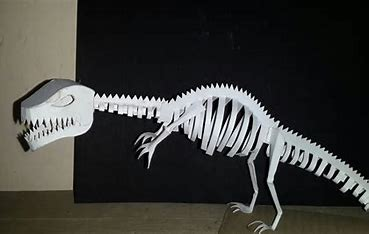
Creating dinosaur bones for a craft project can be both fun and educational! Here’s a creative DIY approach to making your own dinosaur bones, which could be used for a variety of projects, such as a classroom activity, a party decoration, or just a fun weekend craft.
Materials:
- Air-Dry Clay or Salt Dough
- Air-dry clay is easy to use and doesn’t require baking. Salt dough is also a good option and can be made at home.
- Rolling Pin
- For flattening the clay or dough.
- Craft Tools
- Such as a knife, toothpicks, or plastic utensils for shaping the bones.
- Paint
- Brown, gray, or other colors to make the bones look more realistic.
- Paintbrushes
- For painting the bones.
- Varnish (Optional)
- To seal the paint and give a glossy finish.
- Paper Towels
- For drying and cleaning.
- Reference Images
- Pictures of dinosaur bones for accuracy.
Instructions:
- Prepare the Dough:
- If you’re using air-dry clay, knead it until it’s soft and pliable.
- For salt dough: Mix 1 cup of salt, 1 cup of flour, and 1/2 cup of water. Knead until smooth.
- Shape the Bones:
- Roll out the clay or dough with a rolling pin to about 1/2 inch thick.
- Use reference images to shape different dinosaur bones. You can cut out bone shapes with a knife or use plastic tools to create textures and details.
- For a more realistic touch, you can create fossils by pressing items like textured fabrics or leaves into the clay to leave impressions.
- Dry the Bones:
- Let your shaped bones dry completely. This can take several hours to a couple of days depending on the thickness and type of clay or dough.
- Paint and Detail:
- Once dry, paint the bones with shades of brown, gray, or white to give them a fossilized look. You can use darker colors for crevices and lighter colors for raised areas to add depth.
- Let the paint dry fully before adding any additional details.
- Optional: Varnish:
- If you want a glossy finish, apply a coat of varnish once the paint is dry. This will protect the paint and give the bones a polished look.
- Assemble or Display:
- Arrange your bones on a display board to create a dinosaur skeleton, or use them in a diorama or educational project. You could even hide them in a sandbox or garden for a “dino dig” activity.
This project can be a great way to learn about dinosaurs, and it’s also perfect for parties, classrooms, or just a creative day at home. Enjoy your crafting!
oto Credit: raisingwhasians.com
2. DIY Back Scratcher Dinosaur Craft
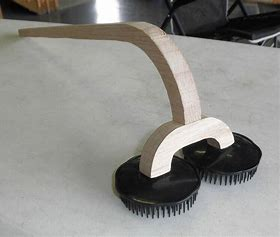
Creating a DIY back scratcher shaped like a dinosaur is a fun and functional craft project. Here’s a step-by-step guide to help you make one:
Materials:
- Wooden Craft Stick or Dowels
- For the handle of the back scratcher.
- Foam Sheets or Felt
- For making the dinosaur’s head and tail.
- Glue
- Hot glue or craft glue.
- Scissors
- For cutting the foam or felt.
- Markers or Paint
- For decorating the dinosaur.
- Googly Eyes (Optional)
- For added fun and detail.
- Pipe Cleaners (Optional)
- For additional details like spikes or claws.
Instructions:
- Prepare the Handle:
- If using a wooden craft stick, you may need to trim it to your desired length. For a dowel, cut it to a comfortable size for holding.
- Create the Dinosaur Head:
- Draw or cut out a dinosaur head shape from the foam or felt. Make sure it’s big enough to be attached to the top of the back scratcher and easily recognizable as a dinosaur.
- Decorate the head with markers or paint. Add googly eyes for a fun touch.
- Add the Dinosaur’s Features:
- Cut out additional pieces from foam or felt to create features like spikes, horns, or a tail. Glue these pieces onto the dinosaur’s head.
- If using pipe cleaners, twist them into spike shapes and glue them onto the head or along the handle for a textured effect.
- Attach the Dinosaur Head:
- Glue the dinosaur head to the top of the wooden stick or dowel. Make sure it’s securely attached and allow the glue to dry completely.
- Create and Attach the Tail:
- Cut a tail shape from foam or felt. Glue it to the opposite end of the handle, or make it extend from the side if it looks better. This adds a nice balance and fun detail to your back scratcher.
- Finish and Decorate:
- Once everything is glued and dry, you can add additional details with markers or paint. You can also glue on extra decorations like glitter for a magical touch.
- Test It Out:
- Make sure the dinosaur back scratcher is sturdy and comfortable to use. Adjust any decorations if needed.
This DIY back scratcher dinosaur craft is not only practical but also a great conversation piece. It’s perfect for kids and adults alike, and it adds a fun, prehistoric twist to a useful tool!
oto Credit: conservamome.com
3. Dinosaur Finger Puppets with Free Printable
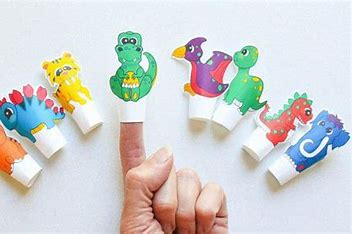
These cute dinosaur finger puppets will enhance kids’ imaginary play. An excellent method for stimulating kids’ creativity. To create the ideal dinosaur project, download the free printable!
hoto Credit: www.delineateyourdwelling.com
4. Dinosaur Mason Jar Play-Dough Containers
Creating dinosaur-themed Mason jar play-dough containers is a fantastic way to combine a fun craft with a practical storage solution for play-dough. Here’s a step-by-step guide to making these playful and functional jars:
Materials:
- Mason Jars
- Choose sizes that suit your needs (e.g., pint or quart jars).
- Acrylic Paints
- Green, brown, and other colors for painting dinosaur designs.
- Paintbrushes
- Various sizes for detail work.
- Dinosaur Stickers or Decals
- For easy decoration.
- Hot Glue Gun and Glue Sticks
- For attaching decorations.
- Plastic Dinosaur Figures or Toys
- Small enough to fit on the lid.
- Mod Podge or Clear Varnish (Optional)
- For sealing the paint and adding a glossy finish.
- Play-Dough
- To fill the jars.
- Paper Towels or Newspaper
- For protecting your work surface.
Instructions:
- Prepare Your Work Area:
- Cover your workspace with paper towels or newspaper to protect it from paint and glue.
- Clean the Mason Jars:
- Make sure your Mason jars are clean and dry before starting your project.
- Paint the Jars:
- Start by painting the exterior of the Mason jars with a base color (e.g., green for a dinosaur theme). Apply one or more coats as needed and allow them to dry completely.
- Once the base color is dry, use smaller brushes to add dinosaur designs, such as scales, patterns, or even full dinosaur scenes.
- Add Details:
- Use acrylic paint to add details to your dinosaur designs. You can paint on dinosaur footprints, scales, or create a whole dinosaur scene.
- If you prefer a quicker option, apply dinosaur stickers or decals to the painted jars.
- Attach Dinosaurs to Lids:
- Paint the Mason jar lids if desired and let them dry.
- Hot glue small plastic dinosaur figures to the top of each lid. This adds a fun 3D element and makes the jars easily recognizable.
- Seal the Paint (Optional):
- For durability, apply a coat of Mod Podge or clear varnish over the painted areas. This will protect the paint from scratches and give a shiny finish. Allow it to dry completely.
- Fill the Jars:
- Once everything is dry and set, fill the jars with play-dough. You can use multiple colors of play-dough for variety.
- Close and Store:
- Screw the lids back onto the jars, and your dinosaur play-dough containers are ready to use!
Tips:
- Safety First: Make sure the paint and glue are fully dry before handling or using the jars.
- Customize: You can adapt this project with other themes or additional decorations, like adding small dinosaur toys inside the play-dough or using different colors and designs.
- Gifting: These jars make great gifts for kids or can be used as party favors.
This project combines creativity with practicality and is perfect for any dinosaur lover. Enjoy your playful and functional Mason jar containers!
5. Cupcake Liner Dinosaur Crafta

Creating a dinosaur craft using cupcake liners is a delightful and simple activity. This project is great for kids and can be a fun addition to any dinosaur-themed party or classroom. Here’s a step-by-step guide to making cute cupcake liner dinosaurs:
Materials:
- Cupcake Liners
- Various colors for different parts of the dinosaur (e.g., green for the body, orange for the spikes).
- Construction Paper or Cardstock
- For the dinosaur’s legs, tail, and other details.
- Glue
- Craft glue or a glue stick.
- Scissors
- For cutting shapes.
- Markers or Crayons
- For adding details like eyes, nostrils, and patterns.
- Googly Eyes (Optional)
- For a fun touch.
Instructions:
- Prepare Your Materials:
- Gather all your cupcake liners, construction paper, glue, and scissors. Lay out your work area with protective covering if needed.
- Create the Dinosaur’s Body:
- Choose a cupcake liner for the dinosaur’s body. If you want a more rounded dinosaur, use a standard cupcake liner. For a more elongated body, you can flatten the cupcake liner slightly.
- Make the dinosaur’s legs:
- Cut out small shapes from construction paper or cardstock to create the dinosaur’s legs. These can be simple rectangles or triangles, depending on the type of dinosaur you want to make. Glue these to the bottom of the cupcake liner.
- Add the dinosaur’s tail:
- Cut a tail shape from construction paper. You can make it long and pointy or short and stubby, depending on your dinosaur design. Glue the tail to the back of the cupcake liner.
- Create the dinosaur’s head:
- Cut out a small circle or oval from construction paper for the dinosaur’s head. Glue this to the top of the cupcake liner.
- Add Details:
- Use markers or crayons to draw features like eyes, nostrils, and a mouth on the dinosaur’s head. You can also draw or glue on small details like spots or stripes on the body.
- If you’re using googly eyes, glue them onto the head for a fun, 3D effect.
- Add spikes or decorations (optional):
- Cut out small triangles from colored construction paper to make spikes or plates. Glue these around the top edge of the cupcake liner to create a spiky dinosaur or plates along the back.
- Final Touches:
- Once all the glue is dry and everything is secure, you can add any additional decorations or details to complete your dinosaur.
Tips:
- Variety: Use different colors and sizes of cupcake liners to make a variety of dinosaurs.
- Creativity: Encourage kids to get creative with their designs. They can make different types of dinosaurs or even add accessories like hats or scarves.
- Safety: Make sure to supervise younger children with scissors and glue to ensure they use them safely.
This cupcake liner dinosaur craft is a fun and easy way to engage kids in a creative project, and the finished dinosaurs can be used as decorations, toys, or party favors. Enjoy your crafting!
hoto Credit: craftwithcartwright.co.uk
6. Dinosaurs Cross Stitch with Free Pattern

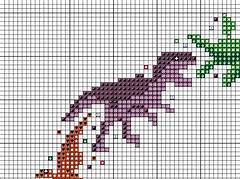
Stitch a dinosaur cross stitch using the free design that is provided. For older children, this dinosaur activity is ideal.
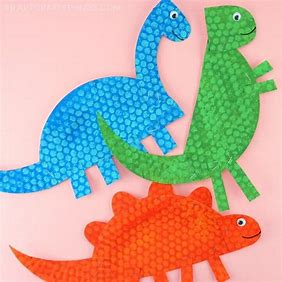
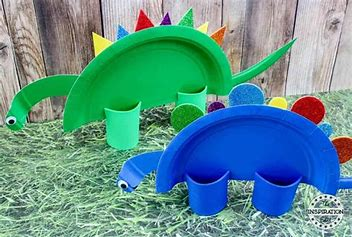
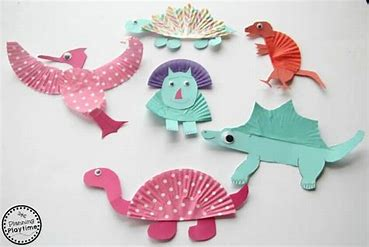
7. Paper Plate Dinosaur Craft
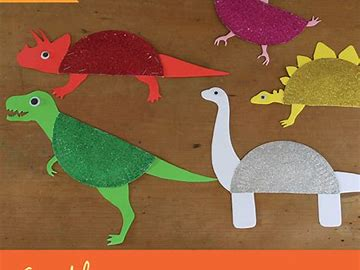
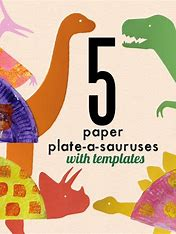
Creating a dinosaur craft with paper plates is a fun and easy activity for kids. This craft is perfect for a dinosaur-themed party, a classroom project, or just a creative afternoon. Here’s a step-by-step guide to making your own paper plate dinosaurs:
Materials:
- Paper Plates
- One plate for each dinosaur.
- Construction Paper or Cardstock
- Various colors for different parts of the dinosaur (e.g., green for the body, red for spikes).
- Glue
- Craft glue or a glue stick.
- Scissors
- For cutting shapes.
- Markers or Crayons
- For drawing details like eyes, nostrils, and patterns.
- Googly Eyes (Optional)
- For a fun touch.
- Paint and Paintbrushes (Optional)
- For adding color and details.
- Paper Straws or Pipe Cleaners (Optional)
- For creating legs or tails.
Instructions:
- Prepare the Paper plate.
- Start by taking a paper plate and deciding which dinosaur you want to create. You can use one plate for the body.
- Paint the Plate (Optional):
- If you want to add a background color to your dinosaur, paint the entire plate. Allow it to dry completely before moving on to the next steps.
- Cut-Out Dinosaur Features:
- From construction paper or cardstock, cut out shapes for the dinosaur’s features:
- Head: Cut out a small circle or oval for the dinosaur’s head.
- Tail: Cut out a long, tapered shape for the tail.
- Legs: Cut out rectangles or ovals for the legs.
- Spikes or Plates: Cut out small triangles or other shapes for the dinosaur’s spikes or plates along the back.
- From construction paper or cardstock, cut out shapes for the dinosaur’s features:
- Assemble the dinosaur:
- Glue the head to one side of the paper plate.
- Attach the tail to the opposite side of the plate.
- Glue the legs to the bottom of the plate.
- Add Details:
- Use markers or crayons to draw eyes, nostrils, and a mouth on the dinosaur’s head.
- Add any additional details, such as spots, stripes, or patterns on the body.
- Glue on googly eyes if you’re using them.
- Create spikes or plates.
- Glue the spikes or plates along the top edge of the paper plate to create a spiky dinosaur, or one with a row of plates.
- Add legs or tail (optional):
- If you want to add movable legs or tails, you can use paper straws or pipe cleaners. Glue or tape these to the plate where the legs or tail should be, and adjust them as needed.
- Final Touches:
- Make sure everything is securely glued, and allow the craft to dry completely.
Tips:
- Creativity: Encourage kids to use their imagination. They can create different types of dinosaurs, add accessories, or use various colors and patterns.
- Durability: For a sturdier dinosaur, you can use heavier cardstock or add a layer of glue for extra strength.
- Safety: Supervise younger children with scissors and glue to ensure they use them safely.
This paper plate dinosaur craft is a simple yet creative way for kids to learn about dinosaurs and enjoy crafting. The finished dinosaurs can be used for decorations, toys, or just as a fun keepsake. Enjoy your crafting session!
hoto Credit: www.twopinkpeonies.com
8. Dinosaur Dot Marker Pages
Enjoy these dinosaur dot marker pages, which are a fun and simple method for young children to do dinosaur crafts and create artwork for bulletin boards.
hoto Credit: www.artsyfartsymama.com
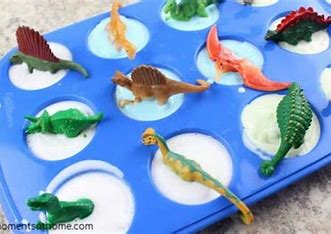
9. DIY Dinosaur Bath Bombs
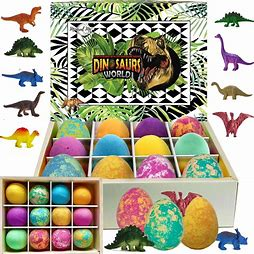
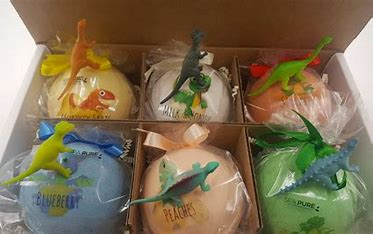
Making DIY dinosaur bath bombs is a fun and creative way to add some excitement to bath time. These bath bombs can also make great gifts or party favors. Here’s a step-by-step guide to creating your own dinosaur-themed bath bombs:
Materials:
- Baking Soda
- 1 cup
- Citric Acid
- 1/2 cup
- Epsom Salt
- 1/2 cup
- Cornstarch
- 1/2 cup
- Oil
- 2 tablespoons (such as coconut oil, almond oil, or olive oil)
- Water
- 2 tablespoons
- Essential Oils
- 10-15 drops (for fragrance, optional)
- Food Coloring
- A few drops (optional for color)
- Dinosaur Molds
- Plastic or silicone molds shaped like dinosaurs. You can also use small plastic dinosaur toys as molds.
- Spray Bottle
- Filled with water for misting.
- Mixing Bowls
- For combining the ingredients.
- Whisk
- For mixing dry ingredients.
Instructions:
- Prepare Dry Ingredients:
- In a large mixing bowl, whisk together the baking soda, citric acid, Epsom salt, and cornstarch until well combined.
- Mix Wet Ingredients:
- In a separate small bowl or measuring cup, combine the oil, water, and essential oils. If you’re using food coloring, add a few drops to this mixture and stir well.
- Combine Mixtures:
- Slowly add the wet mixture to the dry ingredients, a little at a time. Stir continuously while adding to avoid activating the citric acid too quickly. The mixture should resemble slightly damp sand and hold together when squeezed. If it’s too dry, lightly mist it with water from the spray bottle.
- Fill the molds.
- Pack the mixture firmly into your dinosaur molds. If you’re using plastic dinosaur toys as molds, press the mixture around and into the toy to shape it. For silicone molds, simply press the mixture into the mold cavity.
- Set the bath bombs:
- Allow the bath bombs to dry in the molds for at least 24 hours. If using plastic toys, gently remove the bath bombs from the molds after a few hours and let them continue drying on a towel or drying rack.
- Store:
- Once the bath bombs are completely dry, store them in an airtight container to keep them fresh until use.
- Use:
- To use, simply drop one into the bath and watch it fizz and dissolve. Enjoy the colorful and fragrant bath experience!
Tips:
- Customizing: You can customize your bath bombs with different colors and scents. Just remember to mix colors and scents evenly.
- Misting: Be cautious with the amount of water you add. Too much water can cause the mixture to fizz prematurely.
- Decorations: You can also embed small plastic dinosaur figures inside the bath bombs for an extra surprise!
These DIY dinosaur bath bombs are a great way to make bath time more enjoyable and can be a hit with kids and dinosaur enthusiasts alike. Have fun crafting!
hoto Credit: craftsbyamanda.com
10. Dinosaur Terrarium Nightlight Tutorial
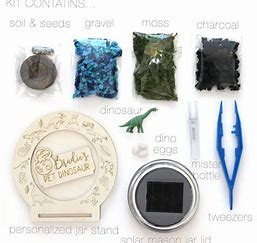
With the help of this easy dinosaur terrarium nightlight project, you can bring dinosaurs to life. These dinosaur activities are sure to delight kids!
hoto Credit: craftsbyamanda.com
11. Clothespin Dinosaur Craft DIY
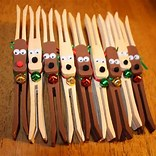
Creating a clothespin dinosaur craft is a delightful and simple project that’s perfect for kids or anyone who enjoys crafting. Here’s a step-by-step guide to making your own clothespin dinosaurs:
Materials:
- Wooden Clothespins
- One for each dinosaur.
- Acrylic Paints
- Various colors are available for decorating your dinosaur.
- Paintbrushes
- For applying paint.
- Googly Eyes
- For added fun and detail.
- Construction Paper or Cardstock
- For making the dinosaur’s features (e.g., spikes, tail).
- Glue
- Craft glue or a hot glue gun (with adult supervision).
- Scissors
- For cutting shapes from paper.
- Markers or Crayons
- For adding details and designs.
Instructions:
- Prepare the Clothespins:
- Start with clean, dry clothespins. If they have any labels or stickers, remove them.
- Paint the clothespins:
- Choose a base color for your dinosaur (e.g., green or brown). Paint the entire clothespin and let it dry completely. This will be the body of your dinosaur.
- For additional details, you can paint patterns or spots on the clothespin once the base coat is dry.
- Create the dinosaur’s features:
- Head: Cut out a small circle or oval from construction paper or cardstock for the dinosaur’s head. Glue it to the top end of the clothespin.
- Tail: Cut out a tail shape from construction paper or cardstock. Glue the tail to the back end of the clothespin.
- Spikes or Plates: Cut out small triangles or other shapes from construction paper to create spikes or plates. Glue these along the top edge of the clothespin to give your dinosaur a spiky appearance.
- Add eyes and details:
- Glue googly eyes onto the head for a fun and expressive look.
- Use markers or crayons to draw additional details such as a mouth, nostrils, or patterns on the dinosaur’s body.
- Final Touches:
- Make sure all the glued parts are secure and allow them to dry completely. You can add more details or touch-ups if needed.
Tips:
- Customization: Encourage creativity by using different colors and shapes for various types of dinosaurs. You can create a whole dinosaur family with unique features.
- Safety: If using a hot glue gun, ensure that an adult is present to supervise its use, especially with younger children.
- Additional Details: For a more 3D effect, you can use small pom-poms or craft foam to add extra textures or features to your dinosaur.
This clothespin dinosaur craft is a fun and easy way to create adorable dinosaur figures, perfect for decorations, toys, or even as part of a dinosaur-themed party. Enjoy your crafting!
Credit: themindfultoddler.com
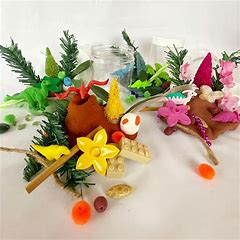
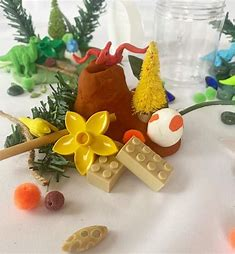
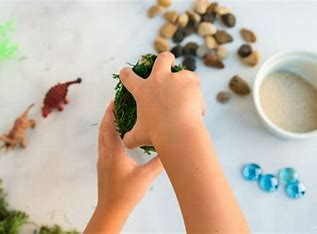
12. Fun DIY Dinosaur Sensory Bin for Toddlers
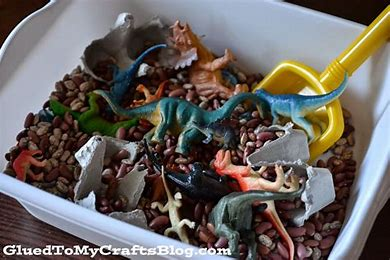
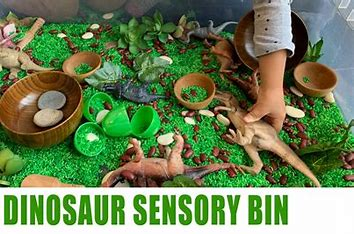
Make an interactive sensory bin at home to introduce your youngster to the world of small dinosaurs. Observe how their imaginative play helps them strengthen their fine motor abilities! All you need to make this is a few basic ingredients!
hoto Credit: intheplayroom.co.uk
13. Hidden Dinosaur Soaps Recipe
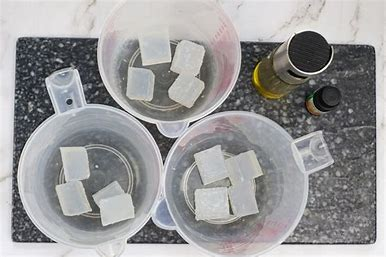
This simple dinosaur craft will be a huge hit with kids of all ages! Make bath time an adventure by learning how to make hidden dinosaur soaps.