11 Valentines Crafts for Tweens and Teens.


Certainly! Valentine’s Day crafts can be a fun and creative way for tweens and teens to express their affection for friends and loved ones. Here are some Valentine’s Day craft ideas suitable for this age group:
1. Friendship Bracelets:
• Provide an assortment of colorful embroidery floss or yarn.
• Teach them different friendship bracelet patterns like the classic chevron or the heart pattern.
• They can make these bracelets for their friends and customize them with beads or charms.
2. DIY Love Coupons:
• Help them create a booklet of personalized “Love Coupons” for family members or friends.
• These coupons can offer services like “One Free Hug,” “Cook Dinner,” or “Movie Night.”
3. Decorated Picture Frames:
• Provide plain wooden or plastic picture frames.
• Let them decorate the frames with paint, markers, stickers, or decoupage.
• Insert a picture of a memorable moment for a personal touch.
4. Handmade Greeting Cards:
• Supply colored cardstock, markers, stickers, and other craft supplies.
• Encourage them to design and write heartfelt messages in handmade cards for friends, family, or their crush.
5. Origami Hearts:
• Teach them to fold origami hearts using red or pink paper.
• These paper hearts can be used to decorate cards, gifts, or simply as standalone decorations.
6. String Art Heart:
• Provide a wooden board, nails, and colorful embroidery thread.
• They can create a heart shape on the board with nails and then weave the thread through to make a beautiful string art design.
7. Beaded Keychains:
• Offer a variety of beads, letter beads, and keychain rings.
• Tweens and teens can create personalized keychains with messages or names for friends or family.
8. Tie-Dye T-Shirts:
• Supply plain white t-shirts and fabric dye in Valentine’s Day colors.
• They can create their own tie-dye patterns or use heart-shaped stencils for a love-themed design.
9. Candy Jars:
• Collect small, clear jars.
• Fill them with Valentine’s Day-themed candies and decorate the lids with paint or fabric.
10. Love Potion Bath Bombs:
• Show them how to make heart-shaped bath bombs.
• These can be placed in a mason jar with a cute label and used as “love potion” bath products.
11. Valentine’s Day Wreath:
• Provide a foam or wire wreath base and an assortment of fake flowers, ribbons, and decorative elements.
• They can create a lovely Valentine’s Day wreath to hang on a bedroom door.
12. Puzzle Art:
• Take an old jigsaw puzzle and have them paint it in Valentine’s Day colors or decorate it with heart shapes.
• Once dried, they can reassemble the puzzle and frame it as unique wall art.
These crafts are not only enjoyable but also allow tweens and teens to express their creativity while showing appreciation to the people they care about on Valentine’s Day.
Also Like :- 10 Everyday Products Made.
1. Tissue Paper Valentines Hearts


Creating tissue paper Valentine’s hearts is a delightful and easy craft that’s perfect for tweens and teens. You can use these hearts to decorate cards, gifts, or even as standalone decorations. Here’s how to make them:
Materials You’ll Need:
• Sheets of red, pink, or white tissue paper
• Scissors
• Pencil
• Ruler
• String or ribbon
• Hole punch (optional)
• Glue stick or double-sided tape
Instructions:
1. Cut Tissue Paper Strips:
• Start by cutting the tissue paper into strips. The strips should be about 1 to 2 inches wide.
• You can use different shades of red, pink, and white for a colorful effect.
2. Layer the Strips:
• Take a few strips of tissue paper and layer them on top of each other.
• You can vary the number of strips to create thicker or thinner hearts.
3. Fold the Strips:
• Accordion-fold the layered tissue paper strips. Fold one end over, then the other, and repeat until you’ve folded the entire strip.
4. Cut a Heart Shape:
• Use a pencil and ruler to draw half of a heart shape on one end of the folded tissue paper.
• The folded side of the strips should be in the center of the heart.
5. Cut Along the Line:
• Carefully cut along the pencil line, ensuring you cut through all the layers.
6. Unfold the Heart:
• Gently unfold the tissue paper heart. You’ll have a lovely, multi-layered heart shape.
7. Add a String or Ribbon:
• To hang the heart, punch a small hole near the top of the heart and thread a piece of string or ribbon through it. Tie a knot at the top.
8. Fluff and Shape:
• Gently separate and fluff the tissue paper layers to create a full, heart-shaped decoration.
9. Attach to Cards or Gifts:
• You can attach these tissue paper hearts to Valentine’s Day cards, gifts, or even create a garland by stringing multiple hearts together.
10. Personalize and Share:
• Add a personal touch by writing a message, drawing, or gluing small decorations onto the tissue paper hearts.
These tissue paper Valentine’s hearts are simple to make, and they’ll add a lovely, homemade touch to your Valentine’s Day celebrations. They can be personalized to suit your style and shared with friends and loved ones to show your affection.
2. Paper Towel Rose Craft


Creating a paper towel rose is a fun and simple craft project that can be used as a decorative element for various occasions. Here’s a step-by-step guide on how to make a paper towel rose:
Materials you’ll need:
• A paper towel or a few sheets of tissue paper
• Green pipe cleaner or floral wire
• Scissors
• Markers (optional, for coloring the paper towel)
Instructions:
1. Prepare your materials: Gather all the materials you need, and make sure your paper towel is clean and dry.
2. Cut the paper towel: If you’re using a standard paper towel, cut it into a square shape. You can do this by folding it in half diagonally to form a triangle and then trimming off the excess along the open edges. If you’re using tissue paper, simply cut a square of the desired size (around 6×6 inches is a good starting point).
3. Color the paper towel (optional): If you’d like to add some color to your rose, use markers to gently color the paper towel. You can make it a single color or create a gradient effect by using different shades.
4. Fold the paper towel: Lay the square flat on a clean surface with one corner pointing towards you. Start rolling the paper towel from the pointed end tightly. This will create the center of your rose. Leave a small triangular portion at the end unrolled (this will be the base of your rose).
5. Shape the rose petals: Gently pull the outer layer of the rolled paper towel upwards to create the first petal. Continue to do this for the remaining layers of the paper towel, each time creating a new petal. Be sure to keep the center of the paper towel as the bud of the rose.
6. Secure the base: Once you’ve shaped all the petals, use a green pipe cleaner or floral wire to secure the base of your rose. Insert it into the unrolled portion of the paper towel and twist it to hold the rose together.
7. Shape the stem and leaves: If you’re using a pipe cleaner, you can shape it to create a stem. To make leaves, cut small leaf shapes from green construction paper or tissue paper and attach them to the stem.
8. Final touches: You can adjust the petals and leaves to your liking and fluff them out a bit to give your paper towel rose a more natural appearance.
That’s it! You’ve created a beautiful paper towel rose. You can make a bunch of these and arrange them in a vase or use them as decorative elements for gift wrapping, cards, or other craft projects. Enjoy your lovely paper towel roses!
3. Folded Paper Hearts Craft


Creating folded paper hearts is a delightful and simple craft that can be used for various occasions such as Valentine’s Day, anniversaries, or as a heartfelt gesture. Here’s a step-by-step guide on how to make folded paper hearts:
Materials you’ll need:
• Square sheets of paper (you can use origami paper, colored paper, or even plain printer paper)
• Scissors
• Glue (optional)
Instructions:
1. Prepare your materials: Gather all the materials you need and choose the color or pattern of paper you want to use.
2. Start with a square: If your paper isn’t already a square, you’ll need to create one. To do this, take one corner of a rectangular sheet and fold it over to the adjacent side to create a triangle. Cut off the excess paper along the bottom of the triangle, leaving you with a square. Unfold the triangle to reveal the square.
3. Fold the square in half: Take your square sheet and fold it in half to create a rectangle.
4. Fold it in half again: Now, fold the rectangle in half to create a smaller square.
5. Create a triangle: Unfold the square so that it’s a rectangle again. Then, take one corner of the rectangle and fold it over to the opposite corner to create a triangle.
6. Fold in the sides: Take the left and right corners of the triangle and fold them towards the center. This will give you a shape that somewhat resembles a kite.
7. Fold the top down: Now, fold the top portion of the kite shape down, aligning it with the bottom edge. You should be left with a shape that somewhat resembles a house with a triangular roof.
8. Fold the sides inward: Take the left and right edges of the “house” shape and fold them inwards to meet at the center line.
9. Unfold the flaps: Gently unfold the two flaps you just created, revealing a smaller triangle at the bottom. These flaps will become the heart’s wings.
10. Shape the heart: To create a heart shape, fold the two flaps down and inward so they meet at the center, forming a heart shape.
11. Adjust and secure (optional): You can adjust the shape of your folded paper heart by gently curving the upper part of the heart to give it a more natural look. If you want, you can use a small amount of glue to secure the flaps in place.
12. Complete your folded paper hearts: Repeat these steps to make as many paper hearts as you like, using different colors or patterns to create a lovely collection.
You can use your folded paper hearts as decorations, attach them to cards, or string them together to make a garland. They are a sweet and simple way to show someone you care.
4. Yarn-Wrapped Pipe Cleaner Hearts


Creating yarn-wrapped pipe cleaner hearts is a fun and creative craft project that’s perfect for Valentine’s Day or as a decoration for various occasions. Here’s a step-by-step guide on how to make yarn-wrapped pipe cleaner hearts:
Materials you’ll need:
• Pipe cleaners (chenille stems) in your choice of color
• Yarn in your preferred color
• Scissors
• Craft glue (optional)
Instructions:
1. Prepare your materials: Gather all the materials you need and choose the colors that you want for your hearts.
2. Form the heart shape: Take one pipe cleaner and shape it into a heart by bending it into a “V” shape. Twist the ends together at the bottom to secure the heart shape. You can also create a loop at the top of the heart if you want to hang it.
3. Start wrapping the yarn: Take the end of your yarn and tie it to one part of the heart, near the top. You can make a knot to secure it, or if you prefer, you can use a dab of craft glue to hold it in place.
4. Wrap the yarn: Begin wrapping the yarn around the pipe cleaner heart. Make sure to wrap it tightly and evenly. You can wrap it in a single color or use multiple colors for a more colorful effect.
5. Continue wrapping: Keep wrapping the yarn until you’ve covered the entire heart shape. You can change the direction of wrapping to create different patterns, such as crisscross or diagonal lines.
6. Secure the end: When you’re satisfied with the coverage, cut the yarn, leaving a tail of a few inches. Use glue to secure the end of the yarn in place, or tuck it under the wrapped yarn to hide it.
7. Trim the excess: Trim any excess yarn from the ends and make sure the heart shape is well-defined.
8. Make more hearts: Repeat these steps to create as many yarn-wrapped pipe cleaner hearts as you desire. You can vary the sizes and colors for a diverse collection.
9. Optional embellishments: You can further decorate your hearts by adding small beads, buttons, or other craft embellishments. Simply attach them with glue to add extra flair.
10. Hang or display: You can hang your yarn-wrapped pipe cleaner hearts as decorations for events or holidays. Attach a string or ribbon to the loop at the top of the heart if you want to hang them. Alternatively, you can place them in a decorative bowl, use them as gift toppers, or incorporate them into other craft projects.
These yarn-wrapped pipe cleaner hearts are a charming and versatile craft project that allows you to express your creativity while adding a touch of handmade charm to your decor or gifts.
5. Cardboard String Art Heart Ornaments


Creating cardboard string art heart ornaments is a creative and engaging craft project that can be used to make lovely decorations or thoughtful gifts. Here’s a step-by-step guide on how to make cardboard string art heart ornaments:
Materials you’ll need:
• Cardboard
• Scissors
• Pencil
• Ruler
• Acrylic paint and paintbrushes (optional)
• Colored embroidery floss or string
• Needle
• Hot glue gun and glue sticks
• Ribbon or twine for hanging
Instructions:
1. Prepare your materials: Gather all the materials you need and decide on the size of your heart ornaments. You can make them as large or as small as you like. For reference, let’s create a 4-inch wide heart.
2. Draw and cut out the heart shape: Draw a heart shape on your cardboard using a pencil. You can freehand it or use a template. Cut out the heart shape carefully with scissors.
3. Paint the cardboard (optional): If you want to add color to your heart ornaments, you can paint them with acrylic paint. Let the paint dry completely before proceeding.
4. Mark the anchor points: Along the edge of the cardboard heart, evenly mark points where you want your string to be anchored. For a 4-inch heart, you might want to space the points about 1/4 inch apart. Use a ruler to keep the spacing consistent.
5. Poke holes for the anchor points: Use a needle to poke holes through the cardboard at each marked point. This will serve as a guide for threading the string.
6. Begin stringing: Cut a length of embroidery floss or string, and thread it through the eye of a needle. Start by inserting the needle through one of the holes you’ve created from the front of the heart to the back.
7. Create the string pattern: Now, thread the string from one hole to another, creating a pattern on the front of the heart. You can go in any direction, making crisscross patterns, zigzags, or concentric circles. Be creative with your design.
8. Secure the ends: When you’re satisfied with your string pattern, tie the ends of the string together on the back of the heart and trim any excess. You can also use a small dot of hot glue on the back to secure the knot and prevent it from coming undone.
9. Add a hanger: Cut a small piece of ribbon or twine and attach it to the back of the heart with hot glue, creating a loop for hanging.
10. Finish your heart ornaments: Trim any excess string, make any necessary adjustments to the string art pattern, and ensure everything is securely in place.
You can create as many cardboard string art heart ornaments as you like, experimenting with different string patterns and colors. These ornaments make wonderful gifts, decorations for holidays or special occasions, and can be hung on a tree, wreath, or garland. Enjoy your handmade string art heart ornaments!
6. Glittered Clay Dough Hearts


Creating glittered clay dough hearts is a fun and artistic craft project that can be used for various occasions, such as Valentine’s Day, weddings, or simply as decorative ornaments. Here’s a step-by-step guide on how to make glittered clay dough hearts:
Materials you’ll need:
• Air-dry clay or salt dough (store-bought or homemade)
• Rolling pin
• Heart-shaped cookie cutter or a template to shape the hearts
• Glitter (fine or chunky, in your desired color)
• Craft glue or mod podge
• Paintbrush
• String or ribbon (for hanging)
• Plastic wrap (optional)
• Baking paper (optional)
Instructions:
1. Prepare your materials: Gather all the materials you need, and make sure you have enough workspace to create and dry your clay hearts.
2. Knead the clay: If you’re using air-dry clay, knead it to soften and make it pliable. If you’re making salt dough, you can follow a simple recipe that typically includes 2 cups of all-purpose flour, 1 cup of salt, and about 1 cup of water. Knead the salt dough until it’s smooth and consistent.
3. Roll out the clay: Use a rolling pin to flatten the clay to your desired thickness, typically about 1/4 inch thick. If the clay is sticky, you can place a sheet of plastic wrap on top of the clay while rolling it out to prevent sticking.
4. Cut out heart shapes: Use a heart-shaped cookie cutter or a template to cut out heart shapes from the rolled-out clay. Place the hearts on a piece of baking paper or a non-stick surface to prevent sticking.
5. Add the glitter: While the clay hearts are still wet, use a paintbrush to apply craft glue or mod podge to the surface of each heart. Then, sprinkle glitter over the glued surface. You can use fine or chunky glitter, depending on your preference.
6. Let the glittered hearts dry: Allow the glittered hearts to air dry completely. This can take anywhere from 24 hours to a few days, depending on the thickness of the clay and your climate. You can flip them over after a few hours to ensure even drying.
7. Seal the glitter: Once the glittered hearts are completely dry, you can seal the glitter in place by applying another coat of craft glue or mod podge over the glittered surface. This will help prevent the glitter from shedding and make the hearts more durable.
8. Add a string or ribbon: When the hearts are fully dry and the glitter is sealed, you can attach a piece of string or ribbon to each heart for hanging. Simply thread the string through a small hole you create in the clay using a toothpick or the tip of a paintbrush.
9. Hang or display: Your glittered clay dough hearts are now ready to be hung as decorations, given as gifts, or displayed in various creative ways.
These glittered clay dough hearts make charming ornaments for holidays, special occasions, or home decor. Customize them with different colors of glitter to match your preferred theme or style.
7. Painted Worry Stones


Painted worry stones are small, smooth stones that have been painted with intricate designs or soothing images. These stones are often used as a form of stress relief and relaxation. Here’s some information on painted worry stones:
1. Purpose: Worry stones, in their natural form, are typically thumb-sized and oval-shaped. People hold them between their thumb and forefinger, rubbing them to relieve stress and anxiety. The painted versions serve the same purpose but with an added visual element.
2. Designs: Painted worry stones can feature a wide range of designs. Some common themes include mandalas, nature scenes, animals, inspirational quotes, and abstract patterns. The designs are often created with acrylic paint or other suitable art supplies.
3. Materials: The base stone can be made of various materials, but they are typically smooth and flat. Common choices include river stones, pebbles, or other naturally occurring materials. For painting, acrylic paint is commonly used due to its durability and wide color range.
4. Creation: To create painted worry stones, you’ll need stones of your choice, acrylic paints, paintbrushes, and varnish (optional). Start by cleaning the stones and ensuring they are free of dust and debris. Paint your chosen design onto the stone and allow it to dry completely. If you like, you can add a layer of varnish to protect the design and add a glossy finish.
5. Uses: Painted worry stones serve as portable stress-relief tools. When you’re feeling anxious or stressed, simply hold the stone and rub your thumb over the painted design. Focusing on the texture and the calming image can help ease your worries and provide a sense of relaxation.
6. Gifts: Painted worry stones can make thoughtful and personal gifts. You can create them with specific designs or colors tailored to the recipient’s preferences or needs.
7. Mindfulness and Meditation: These stones are also used in mindfulness and meditation practices. The act of holding and rubbing the stone can help individuals stay present and grounded during meditation.
8. DIY Projects: Creating painted worry stones is a popular do-it-yourself (DIY) craft project. It’s a creative and therapeutic activity that allows you to personalize your stress-relief tool.
9. Collectibles: Some people collect painted worry stones as a hobby. They may seek out unique and artistically crafted stones to add to their collection.
10. Commercial Availability: Painted worry stones are also available for purchase online or in specialty stores. These stones come in various designs and are often marketed as tools for stress relief and relaxation.
In summary, painted worry stones are a creative and practical way to incorporate art and mindfulness into your daily life. Whether you’re creating your own or purchasing them, these small, painted stones can provide comfort and stress relief when you need it most.
8. Cardboard Cookie Valentines


“Cardboard Cookie Valentines” are a creative and eco-friendly way to celebrate Valentine’s Day. These special Valentines are made from recycled cardboard and designed to resemble cookies. Here’s a simple guide on how to make them:
Materials you’ll need:
1. Recycled cardboard (from old cereal boxes or packaging)
2. Scissors
3. Craft knife (optional)
4. Colored markers
5. Decorative paper or fabric scraps
6. Glue
7. Ribbon or twine
8. Hole punch
9. Love-themed stickers or embellishments (optional)
Instructions:
1. Create the Cookie Shape:
• Cut out circular shapes from the recycled cardboard to resemble cookies. You can make them any size you like, but around 3-4 inches in diameter works well.
2. Decorate the “Cookies”:
• Use colored markers to add a realistic cookie appearance. Draw chocolate chips, frosting, or other cookie decorations. You can also add a cute Valentine’s message on each “cookie.”
3. Personalize Each Valentine:
• On the back of each cardboard “cookie,” write a personal message for the recipient. It could be a heartfelt note, a funny pun, or a special message that is meaningful to you both.
4. Add a “Cookie” Pocket:
• Cut out a small rectangular piece of cardboard and fold it in half to create a pocket. This will be the “cookie” pocket to hold your surprise.
5. Decorate the Pocket:
• Cover the pocket with decorative paper or fabric scraps to make it look like the frosting or wrapping on a real cookie. Glue it in place.
6. Insert the Surprise:
• Place a small surprise inside the pocket, such as a sweet treat, a tiny toy, or a handwritten love note. This adds an extra element of delight to your Valentine.
7. Seal the Pocket:
• Use glue to seal the pocket shut. Make sure the surprise is secure inside.
8. Attach a Ribbon or Twine:
• Punch a hole at the top of the cardboard “cookie” and thread a ribbon or twine through it. Tie it into a bow or a loop for hanging.
9. Embellish as Desired:
• You can further decorate your Cardboard Cookie Valentines with love-themed stickers, glitter, or any other embellishments you like.
10. Distribute with Love:
• Hand out your Cardboard Cookie Valentines to friends, family, or your special someone. They’ll be sure to appreciate the handmade touch and the surprise inside.
These Cardboard Cookie Valentines are a delightful and sustainable way to spread love on Valentine’s Day. They’re not only a sweet gesture but also an eco-friendly alternative to traditional cards.
9. Tissue Paper Roses


Creating tissue paper roses is a delightful and creative craft project. These paper roses can be used for decorations, gifts, or even as a fun DIY activity. Here’s a step-by-step guide on how to make tissue paper roses:
Materials you’ll need:
1. Tissue paper (multiple sheets in your desired color)
2. Green floral wire or pipe cleaners
3. Scissors
4. Pencil
5. Craft glue
Instructions:
1. Prepare your materials: Gather all the materials you need.
2. Cut the tissue paper: Take a sheet of tissue paper and cut it into squares. The size of the squares will determine the size of your rose. Smaller squares make smaller roses, while larger squares make bigger ones. A good starting size is about 6×6 inches.
3. Stack the squares: Take multiple tissue paper squares (usually 6-8) and stack them on top of each other. This will make it easier to cut and fold multiple layers at once.
4. Accordion fold: Starting from one end, make accordion-style folds along the stacked tissue paper squares. Fold it back and forth, keeping the folds even and about 1 inch wide.
5. Trim the ends: Once you’ve folded the entire stack, use scissors to trim both ends into rounded or pointed shapes, depending on the desired look of your rose. Rounded ends create a softer look, while pointed ends give a more realistic appearance.
6. Secure the base: Take a piece of floral wire or a pipe cleaner, and wrap it around the folded tissue paper stack at the center. Twist it tightly to secure the tissue paper in place.
7. Separate the layers: Carefully start separating the layers of tissue paper, pulling them apart one by one towards the center. Gently fluff and shape each layer to create the petals of the rose.
8. Repeat as necessary: Depending on the fullness you want for your rose, you can repeat the process with additional layers of tissue paper. Just stack more squares, fold, trim, and secure them at the base.
9. Shape and arrange: Once you’ve separated and fluffed all the layers, use your fingers to shape and arrange the petals to create a realistic-looking rose.
10. Optional stem and leaves: If you want to add a stem, simply wrap the wire or pipe cleaner with green floral tape. You can also cut out green tissue paper leaves and attach them to the stem using craft glue.
11. Finish: Your tissue paper rose is complete! You can make as many as you like in different colors and sizes to create a beautiful bouquet or use them for various decorative purposes.
Tissue paper roses are a lovely and cost-effective way to add a touch of elegance and color to your home, gifts, or special occasions. Enjoy your crafting!
10. Block Printing Valentines Cards


Creating block-printed Valentine’s cards is a fun and personalized way to show your love and creativity. Block printing involves carving a design into a block, applying ink, and then stamping it onto paper. Here’s a step-by-step guide to help you make your own block-printed Valentine’s cards:
Materials you’ll need:
1. Carving block or linoleum block
2. Carving tools (linoleum cutters or gouges)
3. Ink or acrylic paint
4. Brayer (roller for applying ink)
5. Blank cards or cardstock
6. Pencil
7. Tracing paper (optional)
8. Scrap paper
9. Apron or old clothes to protect from ink
Steps:
1. Design Your Image: Start by sketching your design on a piece of paper or directly onto the carving block. Remember that block printing creates a mirror image, so if your design includes text, write it backward.
2. Transfer the Design: If you prefer a more precise design, draw it on a piece of tracing paper and then transfer it to the carving block by placing the tracing paper face down on the block and rubbing the back of the design with a pencil. This will leave a faint graphite image on the block for you to follow.
3. Carve the Block: Using your carving tools, carefully carve away the areas of the block that you want to be white or uninked. Be cautious and take your time to ensure you’re only removing the parts you want.
4. Ink the Block: Squeeze a small amount of ink onto a flat surface, like a piece of glass or a plastic palette. Roll the brayer in the ink, ensuring it’s evenly coated but not too thick.
5. Print the Cards: Place your blank card or cardstock on a clean, flat surface. Carefully roll the inked brayer over the carved block to coat it with ink. Then, press the block onto the cardstock with even pressure. You can use a wooden spoon or a baren to apply pressure evenly.
6. Repeat the Process: If you’re making multiple cards, re-ink the block and print each one individually. Be mindful to line up the block with the same spot on each card to maintain consistency.
7. Let It Dry: Allow your cards to dry completely before handling or writing any messages.
8. Add Personal Touches: After your block-printed design is dry, you can further embellish your cards with hand-lettering, additional drawings, or heartfelt messages to make them extra special.
9. Finishing Touches: Once you’ve personalized your cards, you can also consider adding envelopes and perhaps some small embellishments like ribbon or stickers to complete the Valentine’s card.
10. Share Your Love: Share your unique and handmade Valentine’s cards with your loved ones, and watch them appreciate the effort and thought you put into making them feel special.
Remember, block printing may take some practice to get the hang of, so don’t be discouraged if your first attempts aren’t perfect. It’s the personal touch and effort that matter most on Valentine’s Day. Have fun creating your one-of-a-kind cards!
11. Paper Fortune Cookie Valentines

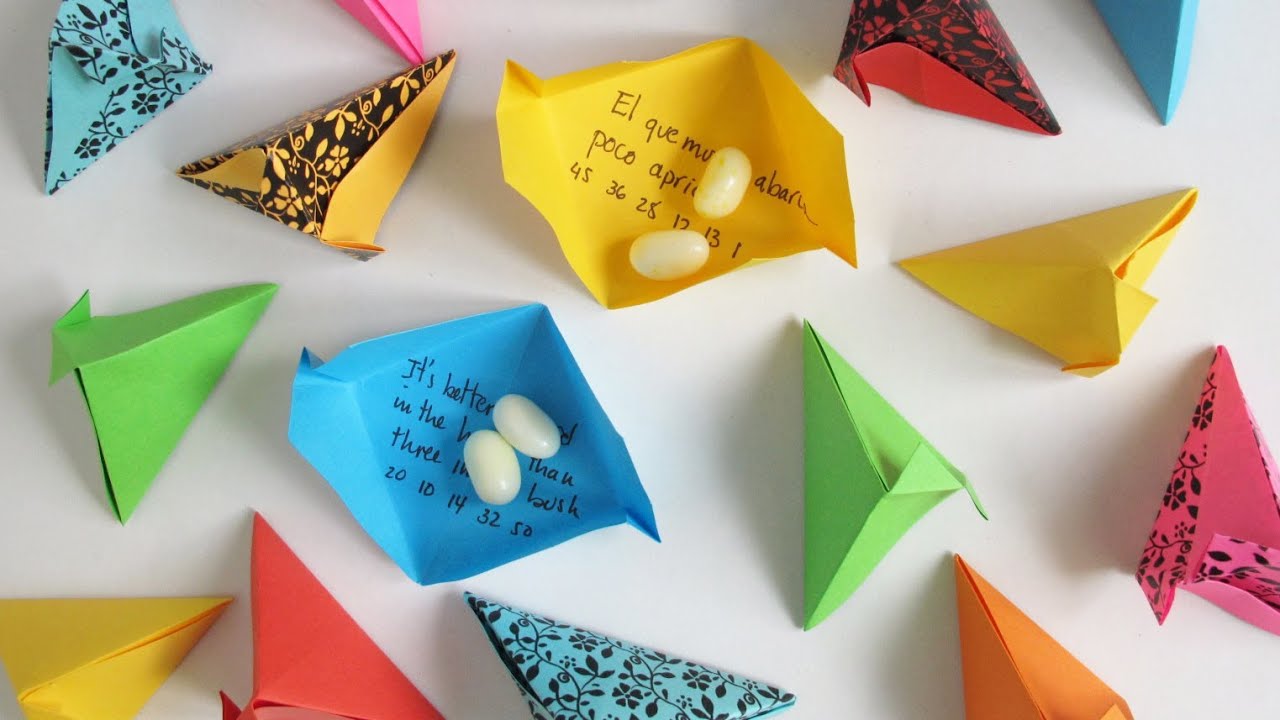
Creating paper fortune cookie Valentines is a creative and fun way to share personalized messages with your loved ones. These paper fortune cookies are a thoughtful and unique gift. Here’s a step-by-step guide on how to make them:
Materials you’ll need:
1. Colored or patterned paper
2. Scissors
3. Circular object (like a glass or lid) for tracing
4. Pen or marker
5. Small strips of paper for writing fortunes
6. Glue or double-sided tape
7. Optional: Stickers, decorative items, or ribbon
Steps:
1. Prepare Your Materials: Gather all your materials and ensure you have enough paper, scissors, and strips of paper for your fortunes.
2. Cut Paper Circles: Using your circular object as a template, trace and cut out several circles from your colored or patterned paper. The size of the circles can vary, but a diameter of around 3-4 inches works well.
3. Write Fortunes: Write your Valentine’s messages or fortunes on the small strips of paper. Get creative and personalize each message for the recipient.
4. Fold the Fortune Cookies: Take a paper circle and fold it in half to create a semi-circle. Don’t crease it completely; just create a slight curve. This will form the basic shape of your fortune cookie.
5. Insert the Fortune: Place one of your written fortunes inside the folded semi-circle, making sure it’s centered.
6. Fold the Cookie: Gently pinch the center of the semi-circle to create the classic fortune cookie shape. The sides should naturally fold in. If they don’t, you can use a little glue or double-sided tape to secure them.
7. Seal the Cookie: Add a small dot of glue or use double-sided tape to seal the ends of the fortune cookie together. Make sure it stays closed and holds its shape.
8. Decorate (Optional): To make your fortune cookies even more special, you can add stickers, small decorations, or tie a ribbon around them. Get creative and make them as festive as you like.
9. Repeat: Continue creating fortune cookies with your messages until you’ve made enough for your Valentine’s recipients.
10. Share the Love: Share your paper fortune cookie Valentines with your loved ones, whether it’s a significant other, family, or friends. They’ll be delighted by the thoughtful and personalized messages inside.
These paper fortune cookies are not only a unique and crafty way to celebrate Valentine’s Day, but they’re also a great way to express your love and appreciation for those you care about. Enjoy making and sharing them with your loved ones!