
Earth Day is almost here! Every year on April 22, it is observed as a way to show support for environmental preservation. Earth Day is a great opportunity to teach kids about environmental conservation and how to take care of the earth. Whenever I can, I try to incorporate recycled materials in the crafts that I love to do with my boys. Are you looking for enjoyable ways to observe this holiday? Here are five simple Earth Day activities that kids may make with recyclable materials.
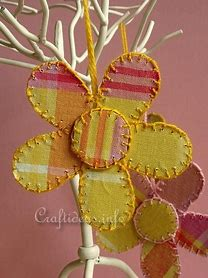
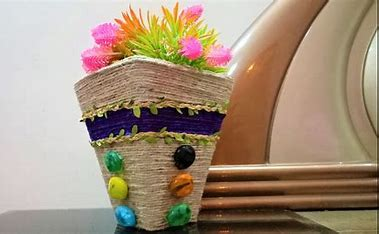
Creating flowers out of cardboard can be a fun and creative craft project! Here’s a simple guide to making cardboard flowers:
Materials Needed:
- Cardboard: You can use old cereal boxes, shoeboxes, or any other cardboard you have on hand.
- Scissors
- Paints or Markers: To add color to your flowers.
- Glue: A glue gun or craft glue will work.
- Green Pipe Cleaners or Floral Wire: For stems (optional).
Steps to Make Cardboard Flowers:
- Prepare the Cardboard:
- Flatten out your cardboard and draw flower shapes on it. You can make various shapes like daisies, roses, tulips, etc. Use a pencil to sketch the shapes lightly.
- Cut Out the Flower Shapes:
- Carefully cut out the shapes using scissors. Younger children may need assistance with this step, especially if the cardboard is thick.
- Shape the Flowers:
- Once you have your flower shapes cut out, you can add more dimension by curling the petals slightly. You can do this by gently bending the cardboard petals outward.
- Paint or Decorate:
- Use paints, markers, or colored pencils to decorate your flowers. You can add patterns, colors, and details to make them look realistic or whimsical, depending on your preference.
- Create the Flower Center (optional):
- To make a flower center, you can use a small piece of cardboard rolled into a tight coil or cut out a small circle and decorate it.
- Assemble the Flowers:
- If you want to make a bouquet, you can glue several flowers together. Arrange them in a pleasing pattern before gluing them together.
- Add Stems (optional):
- To make stems, you can attach green pipe cleaners or floral wire to the back of each flower using glue or tape. Twist the pipe cleaners together if you’re making a bouquet.
- Display Your Flowers:
- Once your cardboard flowers are complete, you can display them in a vase, give them as gifts, or use them as decorations for various crafts.
Tips:
- Experiment with different shapes and sizes of flowers for variety.
- Add leaves by cutting them out of green cardboard or paper and attaching them to the stems.
- Use a hot glue gun for faster drying and stronger adhesion, but be cautious with younger children.
Creating cardboard flowers is a versatile craft that allows for a lot of creativity. Have fun experimenting with different designs and decorations!
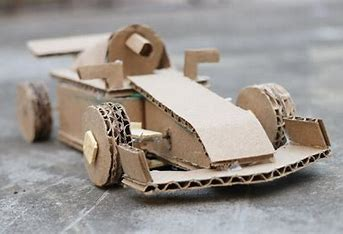
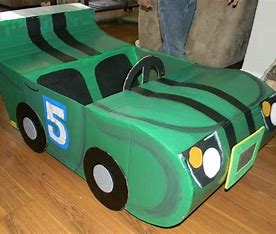
Creating a cardboard tube race car is a fun and engaging craft project, especially for kids. Here’s a step-by-step guide to make one:
Materials Needed:
- Cardboard Tubes: You can use toilet paper rolls, paper towel rolls, or similar.
- Cardboard: For making wheels and other parts.
- Scissors
- Glue: Craft glue or a glue gun (adult supervision required for hot glue).
- Paints or Markers: To decorate your race car.
- Bottle Caps: Optional for making wheels.
Steps to Make a Cardboard Tube Race Car:
- Prepare Your Materials:
- Gather all your materials in one place. Make sure your cardboard tubes are clean and dry.
- Create the Body of the Car:
- Take a cardboard tube and decide which end will be the front and which will be the back of your car.
- Cut out a piece of cardboard that is slightly wider than the tube and long enough to wrap around it. This will form the body of your car.
- Wrap the cardboard around the tube and secure it with glue. This will give your car stability and a surface to decorate.
- Make the Wheels:
- Cut out four circles from cardboard for the wheels. You can use a bottle cap or a small round object to trace circles of equal size.
- Optionally, paint the wheels before attaching them to the car. Let them dry completely.
- Attach the Wheels:
- Glue the wheels onto the bottom of the cardboard tube. Place two wheels towards the front and two towards the back, ensuring they are evenly spaced.
- Decorate Your Race Car:
- Now comes the fun part! Use paints, markers, or stickers to decorate your race car. You can add racing stripes, numbers, sponsor logos—whatever inspires you!
- Add Details (optional):
- Get creative by adding details like a spoiler at the back, headlights at the front (using small circles of paper or googly eyes), or any other features you like.
- Let It Dry:
- Allow your race car to dry completely before playing with it or displaying it.
- Race Your Cars:
- Once everything is dry and secure, have a race with your cardboard tube race cars! Create a track using tape on the floor or a cardboard ramp for added fun.
Tips:
- Use different colored cardboard or paint to customize your race car.
- Experiment with different shapes and sizes of cardboard tubes for unique designs.
- For added durability, reinforce joints and attachments with extra glue.
Making a cardboard tube race car is not only entertaining but also a great way to encourage creativity and hands-on learning. Enjoy crafting and racing your homemade car
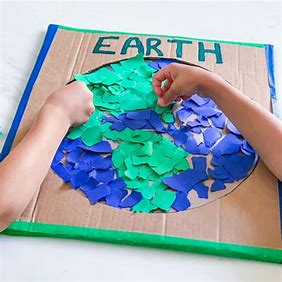
3. MAGAZINE SCRAPS EARTH DAY COLLAGE
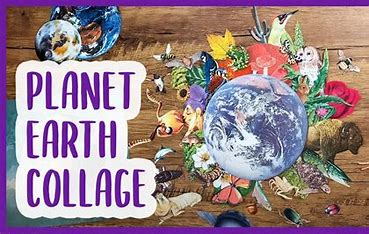
Creating an Earth Day collage using magazine scraps is a fantastic way to celebrate and raise awareness about environmental conservation. Here’s a step-by-step guide to making a magazine scraps Earth Day collage:
Materials Needed:
- Magazines: Old magazines with colorful images related to nature, environment, animals, plants, etc.
- Cardboard or Poster Board: For the base of your collage.
- Scissors
- Glue: Craft glue or glue stick.
- Markers or Paints: Optional for additional decoration.
- Optional: Eco-friendly embellishments like dried leaves, small pebbles, or recycled materials.
Steps to Make a Magazine Scraps Earth Day Collage:
- Gather Materials:
- Collect old magazines and gather all other materials on a workspace.
- Prepare Your Base:
- Cut a piece of cardboard or poster board to the desired size for your collage. This will be the background onto which you’ll glue your magazine scraps.
- Find and Cut Magazine Images:
- Look through the magazines and cut out images that represent Earth Day themes such as trees, oceans, wildlife, recycling symbols, renewable energy, etc.
- Cut out images neatly using scissors. You can also cut out words or phrases related to Earth Day or environmental protection.
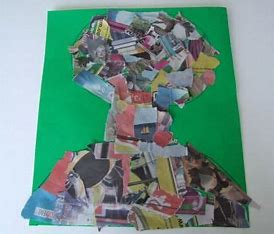
- Arrange and Glue:
- Arrange the cut-out images and words on the cardboard base. Experiment with different layouts until you are satisfied with the composition.
- Once you have your layout, glue each magazine scrap onto the base using craft glue or a glue stick. Press down firmly to ensure they stick well.
- Add Personal Touches:
- If desired, use markers or paints to add borders, outlines, or additional details to your collage.
- Consider adding eco-friendly embellishments like dried leaves or small recycled materials to enhance the collage.
- Let It Dry:
- Allow the glue and any paint or marker additions to dry completely before handling your collage.
- Display Your Collage:
- Once dry, your Earth Day magazine scraps collage is ready to be displayed! You can frame it, hang it on a wall, or place it on a prominent surface to showcase your artistic creation and spread awareness about Earth Day.
Tips:
- Choose a variety of images to create contrast and interest in your collage.
- Use environmentally-themed colors like green, blue, and earth tones to enhance the Earth Day theme.
- Get creative with your layout and use of space on the cardboard base.
Creating a magazine scraps Earth Day collage is not only a fun and creative activity but also a meaningful way to express your support for environmental conservation and awareness. Enjoy making your collage!
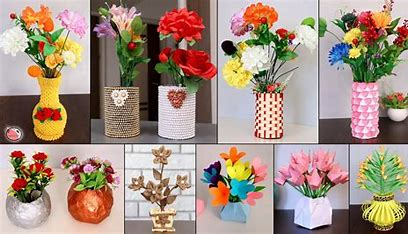
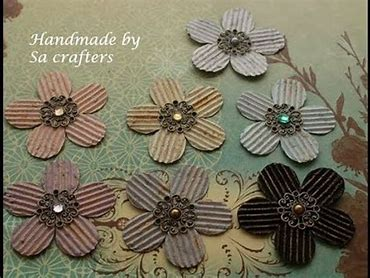
Creating cardboard flowers is a delightful craft that allows for creativity and recycling materials. Here’s a step-by-step guide to making cardboard flowers:
Materials Needed:
- Cardboard: You can use old cereal boxes, shoeboxes, or any other sturdy cardboard.
- Scissors
- Paints or Markers: To decorate your flowers.
- Glue: Craft glue or a glue gun.
- Green Pipe Cleaners or Floral Wire: For stems (optional).
- Buttons, Beads, or other embellishments: Optional for decorating the centers of flowers.
Steps to Make Cardboard Flowers:
- Prepare the Cardboard:
- Flatten out your cardboard and draw flower shapes on it. You can make various shapes like daisies, roses, sunflowers, etc. Use a pencil to sketch the shapes lightly.
- Cut Out the Flower Shapes:
- Carefully cut out the flower shapes using scissors. You may need to help younger children with this step if the cardboard is thick.
- Shape the Flowers:
- After cutting out the shapes, you can give them more dimension by gently curling the petals outward. This adds a realistic touch to your flowers.
- Paint or Decorate:
- Use paints, markers, or colored pencils to decorate your flowers. You can add patterns, textures, or gradients to make them visually appealing.
- Create the Flower Centers:
- For the flower centers, you can use small circles of cardboard painted in a contrasting color, or glue buttons, beads, or small pom-poms in the center of each flower.
- Assemble the Flowers:
- Once the paint and glue are dry, you can assemble your flowers. Arrange them in a bouquet or glue them onto a piece of cardboard or paper as a display.
- Add Stems (optional):
- To make stems, you can attach green pipe cleaners or floral wire to the back of each flower using glue. Twist the pipe cleaners together if you’re making a bouquet.
- Display Your Flowers:
- Once everything is assembled and secure, display your cardboard flowers in a vase, use them as decorations for gifts, or create a centerpiece for a special occasion.
Tips:
- Experiment with different flower shapes and sizes to create variety.
- Use recycled materials like old magazines or fabric scraps for additional decoration.
- Involve children in every step of the process to foster creativity and fine motor skills.
Making cardboard flowers is not only a fun craft activity but also a sustainable way to reuse materials and create beautiful decorations for your home or as thoughtful gifts. Enjoy crafting your cardboard flowers!
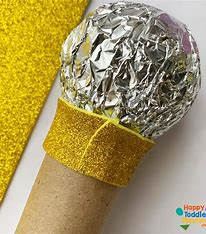
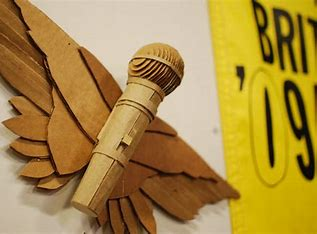
Creating a cardboard tube microphone is a creative and fun craft project, especially suitable for kids who love music and pretend play. Here’s a simple guide to make a cardboard tube microphone:
Materials Needed:
- Cardboard Tube: You can use a toilet paper roll, paper towel roll, or any similar cardboard tube.
- Cardstock or Construction Paper: For decorating the microphone.
- Scissors
- Aluminum Foil: Optional, for a metallic look.
- Markers, Paints, or Washi Tape: For decoration.
- Glue: Craft glue or glue stick.
- Optional: Small bead or button for the microphone head.
Steps to Make a Cardboard Tube Microphone:
- Prepare the Cardboard Tube:
- Choose a cardboard tube and decide on the length you want for your microphone. If needed, cut the tube to your desired size.
- Decorate the Tube:
- Wrap the cardboard tube with cardstock or construction paper. You can also use markers, paints, or washi tape to add designs, stripes, or any other decorative elements.
- Optionally, cover the tube with aluminum foil for a shiny, metallic look.
- Create the Microphone Head:
- To make the microphone head, cut a circle or any desired shape from cardstock or construction paper. You can decorate this piece as well.
- Glue a small bead or button to the center of the circle to represent the microphone’s sound receiver.
- Attach the Microphone Head:
- Glue the decorated circle to one end of the cardboard tube to create the microphone head.
- Finishing Touches:
- Add any final decorations or embellishments to personalize your cardboard tube microphone. You can draw buttons, knobs, or even add a pretend microphone wire using string or ribbon.
- Let It Dry:
- Allow the glue and any paint or markers to dry completely before using your cardboard tube microphone.
- Pretend Play:
- Once dry, your cardboard tube microphone is ready for pretend play! Sing, perform, or use it for fun activities like karaoke with friends and family.
Tips:
- Encourage creativity by letting kids choose their own colors and decorations.
- Use recycled materials like old wrapping paper or stickers to personalize the microphone.
- Consider making multiple microphones for a pretend band or musical performance.
Creating a cardboard tube microphone is not only a creative craft activity but also a great way to foster imagination and role-playing skills in children. Enjoy making and playing with your homemade microphone!