
Certainly! Here are some manly DIY Father’s Day gift ideas using upcycled materials that are sure to impress:
1. Wooden Toolbox
Materials: Old wooden pallets or reclaimed wood.
- Instructions: Disassemble the pallets and sand down the pieces. Assemble them into a simple toolbox design with a handle. You can personalize it with paint or wood burning for a unique touch.
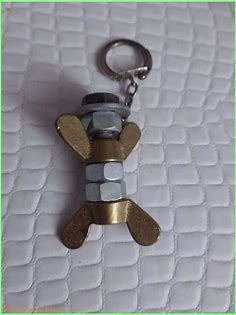
2. Leather Keychain
Materials: Old leather belts or scraps.
- Instructions: Cut the leather into a keychain-sized strip. Use a hole punch to make a hole for the keyring. Optionally, add some initials or a special message using a leather stamp or marker.
3. Metal Can Lanterns
Materials: Empty soup cans or similar metal cans.
- Instructions: Clean the cans and remove the labels. Fill them with water and freeze overnight. Once frozen, remove the ice and use a hammer and nail to punch designs into the can. Paint and add a tealight candle inside for a rustic lantern.
4. Wooden Coasters
Materials: Old tree branches or wooden scraps.
- Instructions: Cut the branches or wood scraps into coaster-sized circles. Sand them smooth and apply a coat of varnish to protect the wood. You can even add a personal design or initial with a wood burner.
5. Upcycled Pallet Whiskey Tasting Flight
Materials: Old pallet wood.
- Instructions: Cut the pallet wood into a rectangular shape and sand it down. Create small slots or sections to hold whiskey-tasting glasses. Personalize it with a custom engraving or paint.
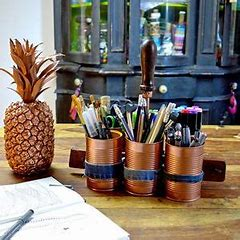
6. Tool Handle Pen Holder
Materials: Old wrenches or screwdrivers.
- Instructions: Clean and polish the tools. Attach them to a sturdy base (like a small wooden block) in an arrangement that holds pens or pencils. This makes a practical and stylish desk accessory.
7. Reclaimed Wood Wall Art
Materials: Reclaimed wood planks.
- Instructions: Arrange the planks into a visually appealing pattern. Attach them to a backing board and add a meaningful quote or design using paint or stencils.
8. Rustic Bottle Opener
Materials: Old barn wood or metal scraps.
- Instructions: Attach a metal bottle opener to a piece of barn wood. You can add a custom engraving or paint to personalize it. Mount it on a wall or a piece of wood for a rustic touch.
9. Vintage Tool Caddy
Materials: Old metal or wooden tools (e.g., hand saw handles, old hammers).
- Instructions: Repurpose old tools into a caddy by attaching them to a wooden base. The handles can serve as compartments or handles for the caddy. Paint or distress the wood for added character.
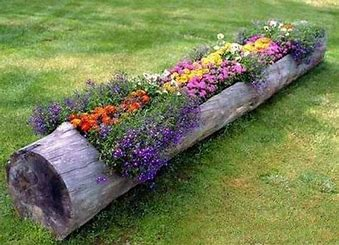
10. Repurposed Tire Planter
Materials: Old car tire.
- Instructions: Clean the tire and cut it to your desired shape. Paint or decorate it, and fill it with soil and plants. This makes a great addition to a garden or patio.
These DIY gifts are not only practical but also imbued with a personal touch and environmental consideration. They’re a great way to show appreciation on Father’s Day while giving a nod to sustainability!
1. Repurposed Ammo Box Speaker
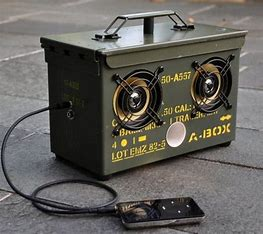

These speakers are quite easy to create from an old ammunition box, and they’re ideal for the music-loving dad. You can get ammunition boxes at any Army surplus store, as well as at a lot of yard sales and flea markets, if you don’t already have one.
2. DIY Camouflage Organizer
Creating a DIY camouflage organizer is a great way to combine functionality with a rugged, outdoor-inspired aesthetic. Here’s a step-by-step guide to making one using upcycled materials:
Materials Needed:
- Wooden Crate or Box: An old wooden crate or box can be repurposed as the base of your organizer.
- Camouflage Fabric: You can use old camouflage clothing or fabric scraps.
- Paint (optional): For additional camouflage patterns or touch-ups.
- Hot Glue Gun and Glue Sticks: For attaching fabric.
- Scissors: for cutting fabric.
- Screws or nails (optional): For extra reinforcement.
- Small Containers: Use old jars, cans, or small boxes to create compartments inside the organizer.
- Paintbrushes: for applying paint if desired.
Instructions:
1. Prepare the base:
- Clean the Crate/Box: Make sure the wooden crate or box is clean and dry. If it’s old or has any rough spots, sand it down.
- Paint (optional): If you want to add a base layer of paint for additional camouflage effects, apply it now. Use green, brown, and black colors for a basic camo pattern. Allow it to dry completely.
2. Cut and attach the camouflage fabric.
- Measure and Cut Fabric: Measure the dimensions of the crate/box sides and cut the camouflage fabric accordingly. If using clothing, cut the fabric into large enough pieces to cover the sides.
- Attach Fabric: Using a hot glue gun, apply glue to the back of the fabric and press it onto the wooden crate/box. Smooth out any wrinkles as you go. If the fabric needs to be cut around edges or corners, do so carefully.
- Trim Excess Fabric: Once the fabric is securely attached and the glue has dried, trim any excess fabric from the edges.
3. Create Compartments:
- Organize Small Containers: Arrange old jars, cans, or small boxes inside the crate/box to create compartments for organizing items.
- Secure Containers: Glue or staple the containers to the bottom of the crate/box to prevent them from moving around. You can also line the bottom with a fabric or cardboard base before placing the containers.
4. Add finishing touches:
- Reinforce (optional): If the crate/box feels unstable, you can reinforce it by adding screws or nails to secure the fabric and any loose parts.
- Personalize: Add any additional decorative elements, like patches or labels, to further customize the organizer.
5. Let it dry:
- Allow any glue or paint to fully dry before using the organizer.
Tips:
- Use Different Fabrics: If you have various camouflage patterns, you can create a patchwork effect by using different pieces of fabric.
- Add Handles: If your crate/box doesn’t have handles, you can attach rope or fabric handles for easy carrying.
- Consider Waterproofing: If you plan to use the organizer outdoors or in a damp environment, consider using a waterproof sealant to protect the wood and fabric.
This DIY camouflage organizer is perfect for storing outdoor gear, tools, or even as a unique storage solution for any room. Plus, it’s a great way to repurpose old materials into something both functional and stylish!
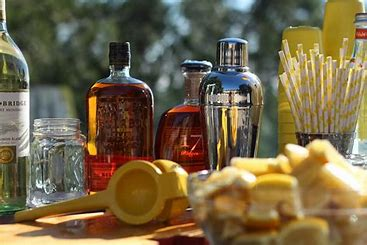
3. Personalized Bar Bottles

If Dad loves his bar, you can transform an ordinary glass bottle into a gorgeous personalised bar bottle that he will cherish. Simply print the name of his preferred alcoholic beverage on a label that can be peeled off and attach it to the bottles. If you wanted them to appear more rustic, you could even use mason jars or something comparable.
4. Upcycled Wood Picture
Creating an upcycled wood picture frame is a great way to repurpose old wood into a unique and stylish piece for displaying photos or artwork. Here’s a step-by-step guide to making your own upcycled wood picture frame:
Materials Needed:
- Upcycled Wood: Old wooden pallets, scrap wood, or reclaimed barn wood.
- Picture Glass or Acrylic Sheet: To cover the photo (you can also use an old picture frame’s glass).
- Backing Board: Sturdy cardboard or thin plywood for the back of the frame.
- Picture Hanger or Stand: For hanging the frame on a wall or standing it on a table.
- Wood Glue: For assembling the frame.
- Screws or Nails: For extra reinforcement (optional).
- Saw: For cutting the wood to size.
- Sandpaper: For smoothing rough edges.
- Paint or Stain: To finish the wood, if desired.
- Clamps: To hold the frame together while the glue dries.
- Staple Gun or Small Nails: For securing the backing board (optional).
- Picture Frame Hardware: Like small clips or metal tabs to hold the glass and photo in place.
Instructions:
1. Prepare the Wood:
- Select and Cut Wood: Choose your upcycled wood pieces and cut them to the size needed for your frame. You will need four pieces for the frame sides and one or more pieces for the back, depending on the thickness of your backing board.
- Sand the Wood: Smooth any rough edges or surfaces with sandpaper. This will help prevent splinters and give the frame a polished look.
2. Assemble the Frame:
- Arrange the Pieces: Lay out the wood pieces in a rectangular or square shape to form the frame. Ensure the corners are aligned properly.
- Glue and Reinforce: Apply wood glue to the ends of the frame pieces where they will join together. Assemble the frame and use clamps to hold it in place while the glue dries. For extra durability, you can also use screws or nails at the corners.
- Allow to Dry: Let the glue dry completely according to the manufacturer’s instructions.
3. Finish the Frame:
- Paint or Stain: If desired, apply paint or stain to the frame to enhance its appearance. Allow it to dry completely. You can also distress the wood for a rustic look or leave it natural for a more organic feel.
4. Prepare the Backing:
- Cut the Backing Board: Cut your backing board to the size of the frame. This will hold the picture and glass in place.
- Attach the Backing: Secure the backing board to the frame using a staple gun or small nails. Make sure it is snug and secure.
5. Insert the Picture:
- Cut Glass/Acrylic: If you’re using glass or acrylic, cut it to fit the frame. You can also have it cut at a hardware store or glass shop.
- Place the Glass: Insert the glass or acrylic into the frame, followed by the picture. Make sure everything is aligned properly.
- Secure the Picture: Use picture frame hardware like small clips or metal tabs to hold the glass and picture in place.
6. Attach the Hanger or Stand:
- Add Hanger: If you want to hang the frame on a wall, attach a picture hanger to the back.
- Add Stand: If you prefer a table stand, you can create a simple stand using additional wood pieces or purchase a pre-made stand.
7. Final Touches:
- Inspect the Frame: Check the frame for any loose parts or uneven areas and make adjustments as needed.
- Clean Glass: Wipe down the glass to remove any fingerprints or dust.
This DIY upcycled wood picture frame is not only eco-friendly but also adds a unique, rustic charm to any photo or artwork. It’s a great way to give new life to old materials and create a personalized piece for your home.
5. Upcycled Brake Disc Clock
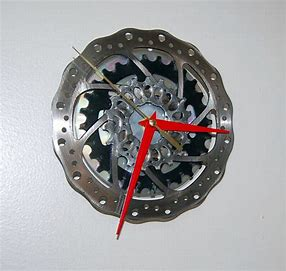
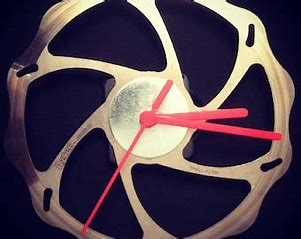
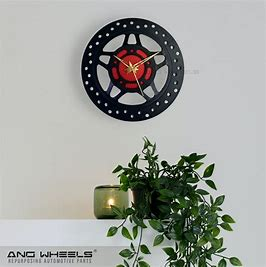
This exquisite clock may be fashioned from an old brake disc. This is a sure hit with any car-loving dad, and it’s not nearly as hard to build as you may think. It looks incredibly manly, and whether Dad works at a body shop or as a mechanic, this is the ideal outfit for him.
6. Repurposed Pallet Bar Cart
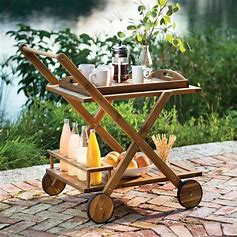
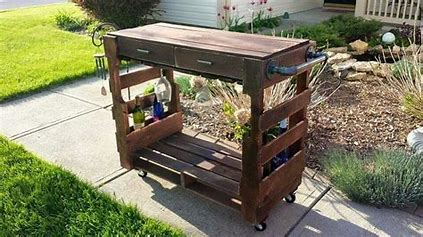
Build Dad an awesome bar cart if he enjoys entertaining outside. This may be constructed from used pallets and has ample space to accommodate almost any type of drink component. You could also use this for non-alcoholic beverages. This summer, use it to serve soda and lemonade beside the swimming pool.
7. Jean And Leather BBQ Belt
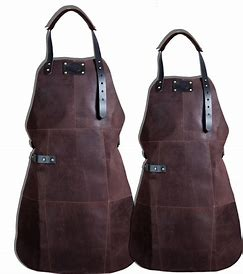
Creating a jean and leather BBQ belt is a practical and stylish DIY project that’s perfect for grilling enthusiasts. This belt combines durable denim with rugged leather to provide a functional accessory for holding BBQ tools or keeping essential items close at hand while you cook. Here’s a step-by-step guide to making your own BBQ belt:
Materials Needed:
- Old Jeans: Denim fabric from old jeans.
- Leather Strip: An old leather belt or leather scraps.
- Belt Buckle: Salvaged from an old belt or purchased separately.
- Rivets or Heavy-Duty Snaps: For attaching pockets and tools.
- Sewing Machine: With heavy-duty thread (or needle and thread for hand sewing).
- Scissors: For cutting the fabric and leather.
- Fabric Glue or Leather Adhesive: For extra bonding strength (optional).
- Measuring Tape: For measuring the belt length and pockets.
- Metal Hooks or Loops: For hanging BBQ tools.
- Snap Fasteners: For easy attachment and removal of pockets or accessories.
Instructions:
1. Prepare the Materials:
- Cut the Denim: Measure and cut a strip of denim from the old jeans. The length should be around your waist size plus a few extra inches for adjustments, and the width should be about 2 to 3 inches.
- Prepare the Leather: Cut a strip of leather slightly shorter than the denim strip (for layering effect) and about the same width. Alternatively, use a pre-made leather belt if it fits your needs.
2. Assemble the Belt:
- Attach the Leather to Denim: Lay the leather strip on top of the denim strip. Use fabric glue or leather adhesive to bond them together. For extra durability, sew along the edges of the leather strip with a sewing machine or by hand.
- Add Belt Buckle: Attach the belt buckle to one end of the denim strip. If using a salvaged buckle, remove any old fittings and securely fasten it to the denim.
3. Create Pockets and Tool Holders:
- Design Pockets: Cut additional pieces of denim to create pockets. The pockets can be used to hold BBQ tools, utensils, or other essentials.
- Attach Pockets: Sew or use rivets/snap fasteners to attach the pockets to the belt. Place the pockets at convenient locations, such as on the front or sides of the belt.
- Add Hooks or Loops: Sew or attach metal hooks or loops onto the pockets or belt. These can be used to hang BBQ tools like tongs or spatulas.
4. Customize and Reinforce:
- Reinforce Stitching: Ensure all pockets and attachments are securely stitched. Reinforce any areas that will bear heavy loads, such as tool holders.
- Customize: Add any personal touches, such as initials or designs, by using leather stamps or fabric paint. You can also distress the leather for a more rugged look.
5. Final Adjustments:
- Fit the Belt: Try on the belt and adjust the length if necessary. If the belt is too long, trim the excess denim and leather, and reattach the buckle if needed.
- Test the Pockets and Holders: Make sure all pockets and tool holders are functional and securely attached. Test the fit of BBQ tools to ensure they’re easily accessible.
Tips:
- Use Heavy-Duty Thread: If sewing, use heavy-duty thread to handle the thickness of denim and leather.
- Pre-Wash Denim: Wash and dry the denim before starting the project to prevent future shrinkage.
- Leather Conditioning: If using old leather, condition it with leather care products to keep it supple and durable.
This DIY jean and leather BBQ belt will not only keep your grilling tools organized but also add a touch of custom style to your BBQ setup. Enjoy the process of creating something functional and personal for your next outdoor cookout!
8. Dad’s Worthy Leather Mouse Pad
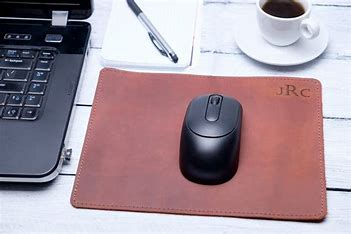
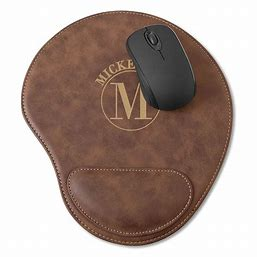
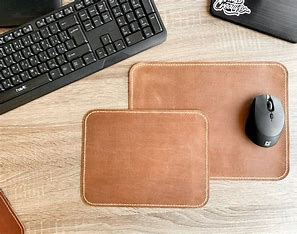
Present Dad with the most manly mouse pad around. It’s very simple to make this leather graphic mouse pad, and it’s one of those personalised items he would never think to buy for himself. All you need to make it is an old shred of leather, acrylic paint, and a mouse pad.
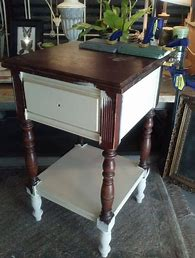
9. Repurposed Oak Nightstand Valet
Creating a jean and leather BBQ belt is a practical and stylish DIY project that’s perfect for grilling enthusiasts. This belt combines durable denim with rugged leather to provide a functional accessory for holding BBQ tools or keeping essential items close at hand while you cook. Here’s a step-by-step guide to making your own BBQ belt:
Materials Needed:
- Old Jeans: Denim fabric from old jeans.
- Leather Strip: An old leather belt or leather scraps.
- Belt Buckle: Salvaged from an old belt or purchased separately.
- Rivets or Heavy-Duty Snaps: For attaching pockets and tools.
- Sewing Machine: With heavy-duty thread (or needle and thread for hand sewing).
- Scissors: For cutting the fabric and leather.
- Fabric Glue or Leather Adhesive: For extra bonding strength (optional).
- Measuring Tape: For measuring the belt length and pockets.
- Metal Hooks or Loops: For hanging BBQ tools.
- Snap Fasteners: For easy attachment and removal of pockets or accessories.
Instructions:
1. Prepare the Materials:
- Cut the Denim: Measure and cut a strip of denim from the old jeans. The length should be around your waist size plus a few extra inches for adjustments, and the width should be about 2 to 3 inches.
- Prepare the Leather: Cut a strip of leather slightly shorter than the denim strip (for layering effect) and about the same width. Alternatively, use a pre-made leather belt if it fits your needs.
2. Assemble the Belt:
- Attach the Leather to Denim: Lay the leather strip on top of the denim strip. Use fabric glue or leather adhesive to bond them together. For extra durability, sew along the edges of the leather strip with a sewing machine or by hand.
- Add Belt Buckle: Attach the belt buckle to one end of the denim strip. If using a salvaged buckle, remove any old fittings and securely fasten it to the denim.
3. Create Pockets and Tool Holders:
- Design Pockets: Cut additional pieces of denim to create pockets. The pockets can be used to hold BBQ tools, utensils, or other essentials.
- Attach Pockets: Sew or use rivets/snap fasteners to attach the pockets to the belt. Place the pockets at convenient locations, such as on the front or sides of the belt.
- Add Hooks or Loops: Sew or attach metal hooks or loops onto the pockets or belt. These can be used to hang BBQ tools like tongs or spatulas.
4. Customize and Reinforce:
- Reinforce Stitching: Ensure all pockets and attachments are securely stitched. Reinforce any areas that will bear heavy loads, such as tool holders.
- Customize: Add any personal touches, such as initials or designs, by using leather stamps or fabric paint. You can also distress the leather for a more rugged look.
5. Final Adjustments:
- Fit the Belt: Try on the belt and adjust the length if necessary. If the belt is too long, trim the excess denim and leather, and reattach the buckle if needed.
- Test the Pockets and Holders: Make sure all pockets and tool holders are functional and securely attached. Test the fit of BBQ tools to ensure they’re easily accessible.
Tips:
- Use Heavy-Duty Thread: If sewing, use heavy-duty thread to handle the thickness of denim and leather.
- Pre-Wash Denim: Wash and dry the denim before starting the project to prevent future shrinkage.
- Leather Conditioning: If using old leather, condition it with leather care products to keep it supple and durable.
This DIY jean and leather BBQ belt will not only keep your grilling tools organized but also add a touch of custom style to your BBQ setup. Enjoy the process of creating something functional and personal for your next outdoor cookout!
Repurposed Oak Nightstand ValetChatGPT
Repurposing an old oak nightstand into a valet is a creative way to give new life to a piece of furniture while adding a stylish and functional accessory to your home. Here’s a step-by-step guide to transform a vintage nightstand into a chic valet:
Materials Needed:
- Old Oak Nightstand: Ensure it is in good structural condition.
- Sandpaper or Power Sander: For smoothing surfaces.
- Wood Primer and Paint/Stain: To update the finish.
- Drawer Pulls and Handles: For added functionality.
- Fabric or Lining Material: For drawer and shelf liners.
- Wood Glue and Screws: For reinforcement and assembly.
- Tools: Screwdriver, saw (if modifications are needed), measuring tape.
- Optional Add-ons: Hooks, a small mirror, or a cushion for added features.
Instructions:
1. Prepare the Nightstand:
- Clean the Nightstand: Remove all hardware and clean the nightstand thoroughly.
- Inspect and Repair: Check for any damage or loose parts and make necessary repairs. Ensure all joints are secure and the nightstand is sturdy.
2. Sand and Refurbish:
- Sand the Surface: Use sandpaper or a power sander to remove any old finish, scratches, or imperfections. Sand the entire surface to create a smooth base for painting or staining.
- Apply Primer: If you are painting, apply a wood primer to help the paint adhere better and provide a more even finish. Let it dry completely.
- Paint or Stain: Apply your chosen paint or stain. For a modern look, consider a sleek black or white paint. For a classic look, a rich stain can enhance the oak’s natural beauty. Apply multiple coats if necessary and let it dry between coats.
3. Customize the Interior:
- Line Drawers and Shelves: Cut and apply fabric or liner material to the inside of the drawers and shelves to add a touch of elegance and protect the wood. You can use adhesive-backed liners or glue the fabric in place.
- Add Organizers: Install small dividers or organizers inside the drawers to keep items like watches, keys, or coins neatly separated.
4. Add Functional Features:
- Install Hooks or Racks: Attach hooks or small racks to the inside of the nightstand doors or sides. These can be used to hang accessories like ties, belts, or hats.
- Add a Mirror: For an extra touch of functionality, mount a small mirror inside one of the drawers or on the back of the door.
- Upgrade Hardware: Replace old drawer pulls with new, stylish handles or knobs. Choose hardware that complements the new finish and adds to the valet’s overall design.
5. Assemble and Finalize:
- Reassemble: Reattach any hardware or fittings you removed earlier. Ensure all screws and joints are tight.
- Final Touches: Check the overall appearance and make any final adjustments. Ensure the nightstand opens and closes smoothly and that all added features are securely in place.
Tips:
- Choose a Theme: If you have a specific décor theme in mind, make sure the finish and hardware match the overall style of your room.
- Test Paint/Finish: Test your paint or stain on a small, inconspicuous area to ensure you’re happy with the color and texture before applying it to the entire piece.
- Protect the Surface: Consider applying a clear protective topcoat to safeguard the finish and make the nightstand more durable.
This repurposed oak nightstand valet will not only offer you a practical and stylish storage solution but also showcase your creativity and DIY skills. Enjoy the satisfaction of transforming a piece of furniture into a unique and functional accessory for your home!
10. Repurposed Beach Towel Hammock

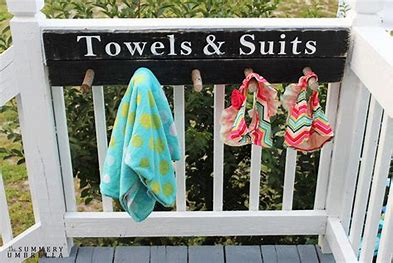
Make Dad’s day by transforming an enormous beach blanket into a beautifully soothing hammock. He will love having his own hammock for a sleep, and let’s be honest—who among us doesn’t actually want their own quiet getaway for a snooze? Using an old blanket or a large cotton towel, this one is incredibly simple to make.
11. Easy DIY Leather Wrapped Flask
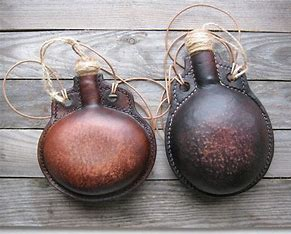
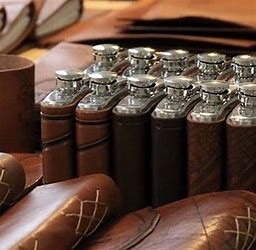
Creating a DIY leather-wrapped flask is a straightforward and rewarding project that adds a personalized touch to a classic accessory. Here’s a step-by-step guide to help you make your own leather-wrapped flask:
Materials Needed:
- Stainless Steel Flask: Available at most craft stores or online.
- Leather Scrap: A piece of leather large enough to wrap around the flask.
- Craft Glue or Contact Cement: For adhering the leather to the flask.
- Scissors or Utility Knife: For cutting the leather.
- Ruler or Measuring Tape: For accurate measurements.
- Leather Hole Punch (optional): For adding decorative holes or patterns.
- Leather Dye or Paint (optional): For coloring or customizing the leather.
- Sponge Brush or Applicator (optional): For applying dye or paint.
- Burnishing Tool or Edge Slicker (optional): For smoothing the edges of the leather.
Instructions:
1. Prepare the Flask:
- Clean the Flask: Make sure the stainless steel flask is clean and dry. Wipe it down with a soft cloth to remove any dust or fingerprints.
2. Measure and Cut the Leather:
- Measure the Flask: Wrap a measuring tape around the flask to determine the length of the leather needed. Measure the height of the flask as well. Add an extra 1/2 inch to 1 inch to each measurement for overlap and adjustments.
- Cut the Leather: Using your measurements, cut a piece of leather that is wide enough to wrap around the flask with a bit of overlap and long enough to cover the height of the flask.
3. Prepare the Leather:
- Dye or Paint (Optional): If you want to add color to your leather, apply leather dye or paint using a sponge brush or applicator. Allow it to dry completely before proceeding.
- Burnish Edges (Optional): For a polished look, use a burnishing tool or edge slicker to smooth the edges of the leather.
4. Attach the Leather to the Flask:
- Apply Adhesive: Spread a thin, even layer of craft glue or contact cement on the back of the leather piece. Be careful not to use too much glue, as it may seep through the leather.
- Wrap the Leather: Carefully wrap the leather around the flask, starting from one end and working your way to the other. Smooth out any wrinkles or air bubbles as you go. Press the leather firmly against the flask to ensure a good bond.
- Trim Excess: If needed, trim any excess leather at the edges to ensure a neat finish.
5. Secure and Finalize:
- Let It Dry: Allow the glue or adhesive to dry completely according to the manufacturer’s instructions. This will ensure that the leather is securely attached to the flask.
- Inspect and Adjust: Check the leather wrap for any loose spots or uneven areas. Make any necessary adjustments or touch-ups.
6. Optional Customization:
- Add Decorative Elements: Use a leather hole punch to create patterns or add rivets for extra decoration. You can also add initials, logos, or designs by stamping or carving into the leather.
Tips:
- Choose Quality Leather: Select a durable leather that will hold up well over time and provide a nice texture.
- Test Adhesive: Test the adhesive on a small piece of leather first to ensure it does not damage or discolor the leather.
- Use Even Pressure: When applying the leather, make sure to apply even pressure to avoid bubbles and ensure a smooth finish.
This DIY leather-wrapped flask makes a fantastic personalized gift or a stylish addition to your own collection. It combines functionality with a touch of craftsmanship, creating a unique accessory that’s both practical and aesthetically pleasing. Enjoy your project!
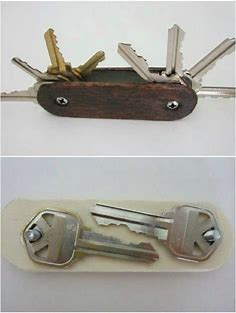
12. Repurposed Denim Roll Up Tool Organizer

Whatever material you choose to make this tool organizer—leather or denim—Dad will adore it. This is the perfect project for those old pants you’ve been holding onto for a while. You can either omit that step and let Dad arrange the tools in any slots he pleases, or you can emblazon labels for each instrument. He is going to love this project, which is fairly simple.
13. Upcycled Tree Branch iPod Dock
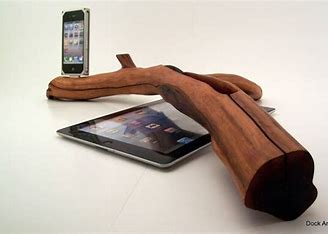

Creating an upcycled tree branch iPod dock is a fantastic way to blend nature with technology, making a unique and eco-friendly accessory. This DIY project repurposes a natural material into a stylish dock for your iPod or similar device. Here’s a step-by-step guide to crafting your own:
Materials Needed:
- Tree Branch: Choose a sturdy branch that is thick enough to hold your iPod securely and long enough for the dock.
- Saw: For cutting the branch to the desired size.
- Drill: To create holes for the iPod.
- Sandpaper: For smoothing the branch.
- Wood Glue: For additional stability (optional).
- Wood Finish: Such as varnish or sealant, to protect the wood.
- Rubber or Foam Padding: To protect the iPod and ensure a secure fit.
- Measuring Tape: For accurate measurements.
- Clamps: To hold pieces in place while the glue dries (if needed).
- Mounting Adhesive or Small Clips: For securing the iPod in place (optional).
Instructions:
1. Select and Prepare the Branch:
- Choose the Branch: Select a branch that is sturdy and has a diameter large enough to support your iPod. It should also have a flat side where the iPod will rest.
- Cut the Branch: Saw the branch to your desired length. The length should be enough to provide stability and accommodate your iPod comfortably.
2. Shape and Smooth the Branch:
- Trim and Shape: If needed, trim the branch to remove any excess twigs or uneven areas. You might want to create a flat base where the branch will rest on a surface.
- Sand the Branch: Use sandpaper to smooth all surfaces of the branch, including the edges and any cut areas. This will help prevent splinters and give a cleaner look.
3. Create the Docking Area:
- Measure and Mark: Measure the dimensions of your iPod to determine where the docking area will go. Mark the locations where you’ll need to drill holes or create grooves.
- Drill Holes: Use a drill to create holes or grooves in the branch where the iPod will be placed. The holes should be slightly larger than your iPod’s connectors and should align with where the device will sit. Make sure the holes are positioned to keep the iPod stable.
4. Add Padding:
- Cut Padding: Cut small pieces of rubber or foam padding to fit inside the drilled holes or along the areas where the iPod will rest.
- Attach Padding: Glue the padding inside the holes or grooves to protect your iPod and provide a secure fit.
5. Finish the Dock:
- Apply Wood Finish: Apply a wood finish, varnish, or sealant to the branch to protect it and enhance its appearance. This will help preserve the wood and give it a polished look.
- Allow to Dry: Let the finish dry completely according to the manufacturer’s instructions.
6. Assemble and Test:
- Assemble the Dock: If you used any additional pieces or glue, make sure everything is securely attached and dried.
- Test the Fit: Place your iPod in the dock to ensure it fits properly and is stable. Make any necessary adjustments to the holes or padding.
7. Optional Customization:
- Add Personal Touches: Consider adding decorative elements such as carvings, paint, or additional padding for customization.
- Secure the iPod: Use mounting adhesive or small clips if you want to add extra security for your iPod in the dock.
Tips:
- Choose a Stable Branch: Make sure the branch is sturdy enough to support the weight of the iPod and any accessories you may add.
- Test Fit Before Drilling: Double-check the size and fit of the holes before drilling to ensure accuracy.
- Protect the Wood: Applying a wood finish not only enhances the look but also protects the branch from damage.
This DIY upcycled tree branch iPod dock is a stylish and functional way to repurpose natural materials while showcasing your creativity. Enjoy the satisfaction of crafting a unique accessory that blends nature with technology!