
Upcycling is all about turning old or discarded items into something new and useful, reducing waste, and being creative. Here’s an ultimate list of upcycling ideas for 2025, across various categories:
1. Furniture Upcycling
- Pallet Furniture: Repurpose wooden pallets to create coffee tables, shelves, or even bed frames. Sand them down, stain or paint them for a fresh look.
- Upcycled Chair Planters: Take old chairs, remove the seat, and turn them into plant stands or garden planters. Add hooks for hanging baskets.
- Drawer Storage Units: Use old drawers as a base for making storage units or stack them to create a unique shelving system.
- Wooden Crate Coffee Table: Stack wooden crates and add a glass top to create a stylish coffee table. You can even leave the crates exposed for extra storage.
2. Fashion & Clothing Upcycling
- Denim Bags: Old jeans can be transformed into trendy tote bags or purses. Cut, stitch, and add some embellishments for flair.
- T-Shirt Quilts: Turn old T-shirts into a cozy quilt that tells the story of your favorite bands, sports teams, or memories.
- Sweater Mittens: Cut up old sweaters to make warm mittens or fingerless gloves, perfect for the colder months.
- Button Jewelry: Old buttons can be transformed into unique necklaces, bracelets, or earrings by stringing them together or attaching them to jewelry frames.
3. Home Décor Upcycling
- Wine Cork Bulletin Board: Collect wine corks and glue them onto a backing board to make a stylish and functional bulletin board.
- Old Teacup Candles: Repurpose vintage teacups into candles. Simply melt wax and add a wick inside.
- Tin Can Lanterns: Use old tin cans to create lanterns by punching holes in them. Paint them with bright colors or leave them rustic for a charming look.
- Mason Jar Light Fixtures: Reuse mason jars to create a rustic light fixture. Attach them to a wooden base with lightbulbs or string fairy lights inside.
4. Kitchen & Garden Upcycling
- Glass Jar Herb Garden: Use glass jars as planters for herbs in your kitchen. Label each jar for easy identification.
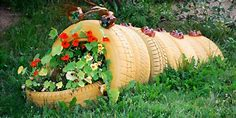
- Upcycled Tire Planters: Old tires can be painted and stacked to create vibrant planters for your garden or porch.
- Plastic Bottle Vertical Garden: Cut plastic bottles and attach them to a wall or fence to create a vertical garden system for herbs or flowers.
- Coffee Grounds Fertilizer: Repurpose used coffee grounds to make a natural fertilizer for your garden plants.
5. Tech Upcycling
- Old Phone Case to Wallet: Transform an old phone case into a small wallet by sewing in cardholders and a small zippered section for coins.
- Keyboard Art: Repurpose old keyboard keys to create a fun and funky piece of wall art. Arrange them into words, shapes, or patterns.
- Old Circuit Board Coasters: Turn circuit boards from old electronics into functional and stylish coasters.
- CD Mosaic Art: Use old CDs to create reflective, shiny art pieces or mirror frames by cutting and arranging them in interesting patterns.
6. Art & Craft Upcycling
- Paper Mâché Bowls: Reuse old newspapers or magazines to make beautiful, colorful paper mâché bowls for storage or décor.
- Magazine Collage Art: Create collage art from pages of old magazines. Cut out pictures or words to create unique designs or messages.
- CD Mobile: Cut old CDs into shapes and create a hanging mobile to add a whimsical touch to any room.
- Fabric Scrap Wall Hangings: Turn fabric scraps into intricate wall hangings by sewing or weaving them together into decorative patterns.
7. Pet Upcycling Ideas
- Sweater Dog Beds: Repurpose an old sweater to make a cozy dog bed. Fill it with soft stuffing or shredded fabric.
- Tennis Ball Dog Toys: Use old tennis balls to create dog toys. Cut a slit to add a squeaker or stuff them with treats for extra fun.
- Old Socks as Cat Toys: Fill old socks with catnip and sew them shut to create simple yet engaging toys for your cat.
- Upcycled Pet Bowls: Use old ceramic mugs, bowls, or tins to create custom pet food or water dishes.
8. Seasonal Upcycling
- Holiday Card Garland: Reuse old holiday cards by cutting them into shapes (like stars or hearts) and stringing them together as a festive garland.
- Christmas Sweater Stockings: Repurpose old, worn-out Christmas sweaters into custom stockings for your mantle.
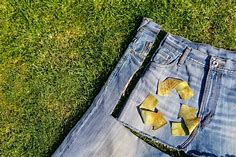
- Pumpkin Decor from Old Jeans: For Halloween, you can create fun fabric pumpkins by using old denim, adding some stuffing, and securing them with a decorative ribbon.
- Upcycled Tree Ornaments: Turn broken jewelry, buttons, or vintage glass into unique Christmas ornaments.
9. DIY Gift Ideas
- Upcycled Candle Jars: Repurpose old candle jars to make new candles with your favorite scents.
- Personalized Jute Bags: Reuse old fabric scraps or t-shirts to make custom jute bags and decorate them with embroidery or fabric paint.
- Bottle Cap Magnets: Use old bottle caps to create fun and quirky magnets for your fridge or locker.
- Recycled Notebooks: Repurpose cardboard and paper scraps to make your own handmade notebooks or journals.
10. Eco-Friendly Upcycling Ideas
- Fabric Scrap Wrapping Paper: Use old fabric scraps or worn-out linens to create unique, eco-friendly wrapping paper.
- Upcycled Tote Bags: Make reusable tote bags from old clothing, such as t-shirts or denim, to reduce plastic use.
- Plastic Bag Rugs: Use plastic bags to crochet or weave colorful rugs, creating a durable and eco-friendly product.
- Repurposed Wooden Spoons for Plant Markers: Old wooden spoons can be transformed into plant markers for your garden by simply writing the plant name on them.
These ideas are just a starting point, and the possibilities are endless. The more you explore your creativity, the more ways you’ll find to breathe new life into old items. Upcycling is not only great for the environment, but it also provides a chance to make something uniquely yours.
Creating storage spaces that are as unique as you and your style are not as hard as you may think
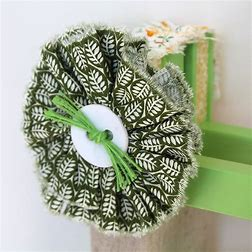
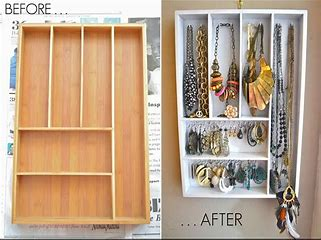
- Upcycled Jewellery Frame

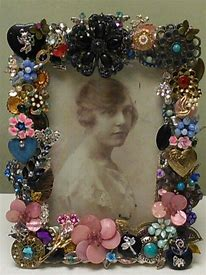
This repurposed jewellery frame is the perfect way to keep your rings, necklaces, and earrings organised. Upcycling can be as easy as providing a way to organise your assets; it’s not only about turning old things into something new.
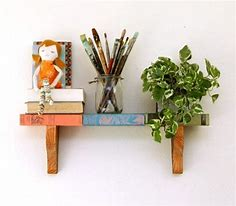
2. Ladder Shelves

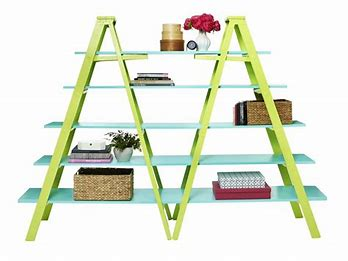
Ladder shelves are a trendy and functional way to display items and add character to any room. They are typically leaning shelving units shaped like a ladder, offering a stylish alternative to traditional bookcases or cabinets. Here’s how you can create your own ladder shelves through upcycling and some design tips for 2025:
DIY Ladder Shelves from Upcycled Materials
- Pallet Wood Ladder Shelves:
- Materials Needed: Wooden pallets, screws, wood stain or paint.
- How-To: Disassemble a pallet and cut the wood into slats for the shelves. Sand down the pieces to remove rough edges, and then stain or paint the wood as desired. Attach the slats to two wooden ladder rungs that you can also make from pallet wood. Lean the structure against the wall, and you’ve got a rustic, upcycled ladder shelf.
- Old Ladder Transformation:
- Materials Needed: A wooden ladder, sandpaper, paint or stain, screws.
- How-To: Find an old wooden ladder (one you no longer use for climbing). Sand it down and then stain or paint the ladder. Attach wooden planks or reclaimed wood pieces across the rungs to create shelves. Secure the ladder against the wall for safety, or leave it freestanding as a charming display piece.
- PVC Pipe Ladder Shelves:
- Materials Needed: PVC pipes, wooden boards, screws, pipe connectors, spray paint.
- How-To: Create a modern, industrial look by using PVC pipes as the ladder structure. Cut the pipes to size and use connectors to assemble the ladder frame. Place wooden planks or upcycled wood as shelves. This is a great lightweight and budget-friendly option.
- Reclaimed Wood Ladder Shelves:
- Materials Needed: Old wood boards or planks, screws, wood glue.
- How-To: Use reclaimed wood from furniture, old fences, or barns. Cut the wood into the desired length for the ladder frame and shelves. Assemble the ladder frame, attaching shelves as you go. The natural imperfections of the reclaimed wood give a rustic and unique look to the piece.
Design Tips for Ladder Shelves
- Style and Aesthetics:
- Rustic/Industrial: Use weathered wood, metal brackets, or exposed pipes for an industrial-chic feel. You can also leave the wood unpainted for a more raw, natural look.
- Modern Minimalist: Opt for sleek, straight lines and light-colored wood or matte metal. A simple, neutral color palette can make the ladder shelves fit seamlessly into modern spaces.
- Bohemian Vibes: Add colorful or patterned fabrics, like woven baskets or macrame hangers, to your ladder shelves for a boho touch. Layer with plants and eclectic decor pieces.
- Placement:
- Living Room: Lean your ladder shelves against a wall and display books, plants, and decorative items. You can use this as a statement piece in a corner or as a room divider.
- Bathroom: Use a ladder shelf for towels and toiletries, making it both functional and stylish in your bathroom.
- Bedroom: Lean the ladder in a corner of the room to store books, a clock, or even plants. You can use the bottom rungs for extra storage baskets.
- Adjustable Ladder Shelves:
- Modular Approach: If you’re looking to get more functional, design the shelves with adjustable brackets so you can move the shelves higher or lower to accommodate different items. This allows for greater customization as your needs change.
- Lighting & Plants:
- Add Light: Incorporate fairy lights or small string lights along the ladder for a cozy, inviting ambiance.
- Green Touch: Ladder shelves are great for plants! Use a variety of plants in hanging planters or small pots to give the shelves a natural touch. This also works well in both living rooms and kitchens.
Benefits of Ladder Shelves
- Space-Saving: Their vertical design makes them perfect for small spaces, especially apartments or compact rooms.
- Versatility: They work well in any room and can be used for storage or purely for decorative purposes.
- Sustainable: By upcycling materials, you’re reducing waste and creating a one-of-a-kind piece.
With these upcycled DIY ideas and design tips, you can create functional and stylish ladder shelves that suit your space and personality.
3. Making Over A Salvaged Library Cart
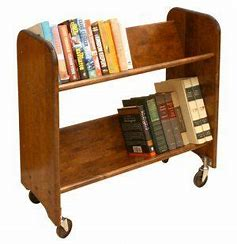

In addition to repurposing something that might otherwise be thrown away, this is the ideal ingenious bookworm storage solution! Moving your “To Be Read” pile between your reading areas is simple. In addition, it’s less expensive than buying a brand-new mobile book trolley.
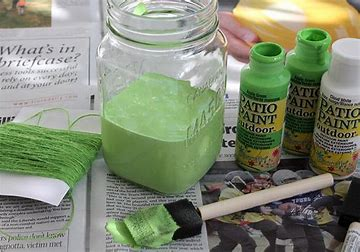
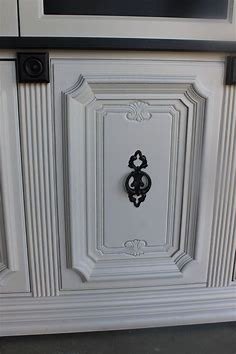
4. Laminate Cabinet Transformed Into Green Boho Style Cabinet
Transforming a laminate cabinet into a green boho-style cabinet is a fun and rewarding project that can completely change the look of your space. Here’s how you can achieve that vibrant and eclectic boho vibe using your existing laminate cabinet:
Materials You’ll Need:
- Laminate Cabinet: A basic laminate cabinet (could be old or inexpensive).
- Sandpaper or Electric Sander: To rough up the laminate surface.
- Primer: A bonding primer to help paint stick to the laminate surface.
- Boho-inspired Paint Colors: Earthy tones such as sage green, mustard yellow, terracotta, or deep blues. For a green boho cabinet, focus on shades of green—sage, olive, mint, or emerald.
- Paint Brushes and Rollers: For applying the paint evenly.
- Wooden or Brass Knobs/Handles: To add a boho flair.
- Stencils or Decals: Optional, for intricate patterns or designs.
- Fabric or Woven Materials: For lining shelves or adding texture to the doors.
- Sealer (Matte Finish): To protect the finish and keep it looking fresh.
- Jute Twine or Macrame Cord: Optional, for a hanging or decorative element.
Step-by-Step Instructions:
1. Prep the Cabinet:
- Clean the Cabinet: Start by cleaning your laminate cabinet with soap and water to remove any dust or grime. Let it dry completely.
- Sand the Laminate Surface: Lightly sand the laminate surface using medium-grit sandpaper or an electric sander. This will help the primer and paint adhere better to the surface. Be sure to focus on the smooth, glossy parts of the laminate.
2. Apply Primer:
- Prime the Surface: Apply a bonding primer specifically designed for laminate surfaces. This step is crucial because it helps the paint stick to the smooth laminate without peeling. Let the primer dry according to the manufacturer’s instructions.
3. Paint the Cabinet:
- Choose Your Green Tone: For a boho-style cabinet, select a shade of green that speaks to you. Sage green, mint green, or olive green work great for a calm, earthy vibe. If you want a more vibrant look, emerald green or forest green can add depth.
- Apply Paint: Using a roller or a brush, apply your first coat of green paint to the cabinet, making sure to cover the entire surface evenly. Allow it to dry completely and apply a second coat for full coverage.
4. Add Boho Accents:
- Stencil or Decal Patterns: If you’re feeling creative, you can use stencils or wall decals to add boho-style patterns (like mandalas, geometric shapes, or floral designs) to the cabinet doors or sides. Opt for a contrasting color like white, gold, or even terracotta to create a stunning contrast against the green.
- Add Texture: Boho style thrives on texture. Consider gluing fabric (such as cotton or linen) to the back panel of the cabinet or along the edges of the doors for a soft, cozy touch. You could also weave in macrame or jute cord around the cabinet handles or edges for extra boho flair.
5. Change the Cabinet Hardware:
- Update the Knobs or Handles: Replace the standard knobs or handles with unique, bohemian-style options. Brass, vintage-inspired knobs, or even wooden handles can add personality and charm to your cabinet. Consider using a mix of mismatched handles for a more eclectic look.
6. Seal the Cabinet:
- Apply a Sealer: After the paint has dried completely, apply a matte sealer to protect your work. A matte finish will maintain the rustic, boho aesthetic while ensuring durability. Allow the sealer to dry before using the cabinet.
7. Optional Boho Touches:
- Macrame Details: If you have the time and inclination, you could create a small macrame hanging for the cabinet’s top or doors. Macrame is a hallmark of boho design and will add texture and depth.
- Add Natural Elements: For a true boho look, place some plants on top of or inside the cabinet. Hanging plants in macrame planters or small potted plants will enhance the green and earthy vibe of the cabinet.
Tips for the Perfect Green Boho Cabinet:
- Mix & Match Patterns: Boho style loves mixing different patterns and textures, so don’t hesitate to play with different fabrics, prints, and design elements to achieve a personalized feel.
- Natural & Earthy Accents: Incorporate natural elements like rattan baskets, woven textiles, and wooden accents to maintain the earthy, bohemian atmosphere.
- Use Warm Tones: While green is the primary color for the cabinet, you can balance it with warm tones like terracotta or mustard yellow through accessories or designs on the cabinet.
Finishing Touches:
Once your cabinet is complete, style it with additional boho-inspired decor—think plants, woven baskets, candles, or colorful woven throws. The final look should be a combination of natural, earthy elements with a pop of vibrant green, reflecting a laid-back and cozy boho vibe.
This upcycled laminate cabinet turned into a green boho-style cabinet will be a unique and beautiful addition to any room, providing both function and flair.
5. Salvaged Wood and Pallet Potting Benches
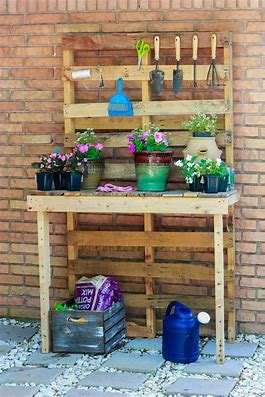
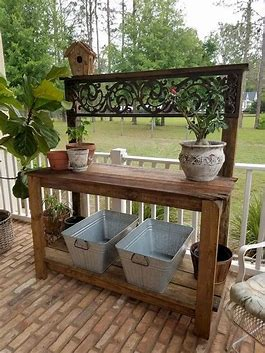
Before you throw away that old piece of furniture, door, or pallet, you need to read this guide! It will inspire you and help you transform your unwanted wood into a unique potting bench and storage unit for all your gardening tools.
6. Upcycled Baby Crib Into Craft Room Storage
Upcycling a baby crib into craft room storage is a brilliant way to repurpose old furniture into something functional and stylish. Since cribs are often made of sturdy wood and feature multiple slats and compartments, they can easily be transformed into shelves, cabinets, or organizers for your craft supplies. Here’s a step-by-step guide to help you transform a baby crib into beautiful craft room storage:
Materials Needed:
- Old Baby Crib: Preferably with a sturdy frame.
- Screws/Drill: For disassembling and assembling parts.
- Wooden Boards or Slats: For additional shelves or compartments.
- Sandpaper or Electric Sander: To smooth out rough edges.
- Paint or Stain: Choose a color that fits your craft room’s aesthetic.
- Drawer Pulls/Knobs: Optional, for adding functionality and style.
- Wood Glue: For reinforcing joints.
- Measuring Tape & Saw: To cut wood or slats to size (if necessary).
- Caster Wheels (optional): To make the storage piece mobile.
Step-by-Step Guide:
1. Disassemble the Crib:
- Remove the Mattress Support and Side Rails: Start by carefully disassembling the crib. You’ll most likely need to remove the mattress support and the side rails. Save the slats, as they can be used for shelving or dividers.
2. Decide on the Design:
- Determine the Storage Needs: Think about what you need for your craft room. Do you need more vertical shelving, horizontal drawer space, or a combination of both? Sketch out a basic design on paper.
- Option 1: Convert the crib’s frame into a vertical shelving unit for organizing paper, fabric, or tools.
- Option 2: Create a cabinet with drawers by attaching the crib’s headboard or footboard to the base and adding boxes or baskets.
- Option 3: Use the side rails to create a wall-mounted organizer with shallow shelves for small craft items like paints, beads, or scissors.
3. Sand and Prep the Wood:
- Smooth Out Edges: After disassembling the crib, use sandpaper or an electric sander to smooth out any rough edges. This step will prevent splinters and make the wood ready for painting or staining.
4. Create Shelves or Drawers:
- Use the Crib Slats for Shelving: The slats from the crib can be repurposed as shelves. Measure and cut them to fit the desired width of the shelf spaces. Secure them with screws or wood glue onto the crib frame to create horizontal storage areas.
- Optional: Use a piece of plywood to create a solid, flat surface for a shelf if you need more stability or larger spaces.
- Make Drawers from the Crib’s Footboard or Side Rails: If you prefer drawer-style storage, use parts of the crib like the footboard or side rails to construct drawer fronts. You can add sliding rails or repurpose wooden crates or baskets to act as pull-out drawers.
5. Paint or Stain the Crib:
- Choose a Color: Pick a paint or stain that complements your craft room decor. If you want a fresh, clean look, consider white, pastels, or bright colors. A natural wood stain can add a rustic or vintage vibe.
- Tip: If you are using the crib slats as shelves, consider painting the shelves a contrasting color to make them stand out.
- Apply the Finish: Sand the entire structure before painting or staining to ensure even coverage. Apply two to three coats of paint or stain, allowing each coat to dry before applying the next.
6. Add Hardware or Decorative Elements:
- Drawer Pulls/Knobs: If you’ve added drawers, attach cute drawer pulls or knobs to complete the look. Opt for colorful knobs for a playful vibe, or choose more minimalistic hardware for a sleek, modern touch.
- Optional Caster Wheels: For mobile storage, attach caster wheels to the bottom of the crib frame. This will allow you to move your storage unit around as needed, perfect for flexible craft spaces.
7. Assemble the Storage Unit:
- Reassemble the Crib: Once the paint or stain has dried completely, begin assembling your new storage piece. Attach the shelves, drawers, or boxes according to your design.
- For Vertical Shelving: Attach the shelves to the sides of the crib frame securely.
- For Drawer Storage: Install the drawers or boxes into the base or use the crib’s footboard as a closed front for a more cohesive look.
8. Organize Your Craft Supplies:
- Fill the Shelves or Drawers: Once the transformation is complete, use the shelves or drawers to store your craft supplies. Organize your materials by type—fabric, paper, beads, markers, or tools. You can also add baskets, bins, or jars inside the drawers for better organization.
- Personalize the Storage: Add decorative touches like labels, small plants, or fabric liners to the drawers for a unique, personalized touch.
Creative Ideas for Your Upcycled Baby Crib:
- Hanging Organizer: If you’re tight on space, mount the headboard or side rails of the crib onto the wall to create a hanging craft organizer with shelves or hooks.
- Rolling Cart: For easy mobility, add casters to the crib’s base and create a rolling craft cart that can move around your room or even to different areas of the house.
- Crafting Station: Turn the crib into a crafting station by adding a tabletop on top of the crib frame. This can serve as an area to work on projects while still having storage underneath.
Benefits of Upcycling a Baby Crib Into Craft Storage:
- Eco-Friendly: Repurposing an old crib helps reduce waste by giving new life to materials that might otherwise be thrown away.
- Customization: You can create a storage solution that is uniquely tailored to your needs and style, saving you money while adding a personal touch to your space.
- Durability: Cribs are often made from solid wood, making them strong and sturdy for holding craft supplies, fabric, or tools.
Conclusion:
Transforming a baby crib into craft room storage is a fun and creative project that not only upcycles old furniture but also provides a practical solution for organizing your craft supplies. With a bit of sanding, painting, and creativity, you can create a one-of-a-kind storage piece that fits your personal style while making your craft room more functional and organized.
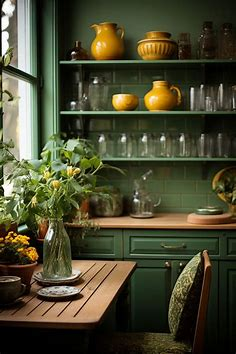
7. Unloved Bread Bins Into Kitchen Storage Space
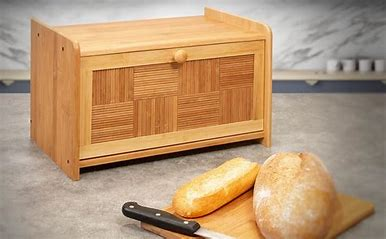
If you’re looking for methods to expand your kitchen’s storage space, you might not think of turning a bread bin into a storage area. However, if you don’t have an unused one at home, you can easily find one at car boot sales and charity shops.
8. Upcycled Guitar Shelf
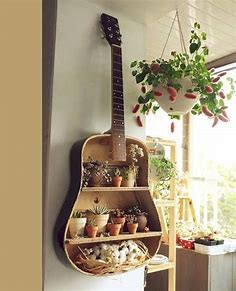

Upcycling an old guitar into a unique shelf is a fantastic way to repurpose a musical instrument that no longer gets used. This DIY project not only saves the guitar from being discarded but also creates a striking piece of wall art that can double as functional storage. Whether you have a vintage guitar, an old acoustic, or even a broken electric guitar, this project is a great way to give it new life.
Here’s how you can transform an old guitar into a stylish and functional shelf:
Materials You’ll Need:
- Old Guitar: An unused or damaged guitar (acoustic or electric works best).
- Saw: For cutting the guitar (if necessary).
- Wooden Planks or Shelving Boards: For the shelf surface.
- Screws and Drill: To attach the shelves securely.
- Wall Mount Brackets or Hooks: For hanging the guitar on the wall.
- Sandpaper or Electric Sander: To smooth rough edges (optional).
- Paint or Stain: For adding color or finishing to the guitar.
- Measuring Tape: For precise measurements.
- Wood Glue (optional): To secure the shelves if needed.
- Small Brackets (optional): For extra shelf support.
Step-by-Step Instructions:
1. Prepare the Guitar:
- Choose the Guitar: Select an old or unused guitar. It doesn’t matter if it’s no longer in working condition; the focus here is on its body, which will serve as the main structure for your shelf.
- Remove Strings and Hardware: Carefully remove the strings, bridge, tuning pegs, and any other hardware from the guitar body. You should be left with the hollow body (for acoustic guitars) or the body and neck (for electric guitars).
2. Decide the Design:
- Determine the Shelf Placement: Decide where you want to place the shelves. The idea is to have the guitar’s body as a visual focal point, with the shelves attached either inside the guitar (for a more subtle design) or outside the body (for an obvious, eye-catching storage solution).
- Option 1: Shelf Inside the Guitar – You can cut a piece of wood to fit inside the guitar body to create a small storage space, ideal for holding small items like keys, jewelry, or trinkets.
- Option 2: Shelves Attached to the Guitar Body – Attach a couple of small wooden planks or floating shelves to the sides of the guitar. This allows for more visible storage and makes the guitar the centerpiece of the shelves.
3. Prepare the Guitar for Shelving:
- Cut the Guitar (Optional): If you prefer a sleeker design, you can remove part of the guitar’s body to create space for the shelves. You can use a saw to cut out sections where the shelf will fit, particularly on the hollow side of the guitar (acoustic guitars).
- Sand the Edges: After cutting, sand the edges of the guitar carefully to avoid any sharp points and ensure smooth, clean lines.
4. Paint or Stain the Guitar:
- Customize the Look: If the guitar looks worn or outdated, consider painting or staining it to give it a fresh, updated look. You can go with a bold color, a vintage vibe, or even a distressed finish for a rustic look. Acrylic paints or wood stains work best for the body of the guitar.
- Protect the Finish: Once you’re happy with the color, apply a clear sealant or varnish to protect the paint and finish. This will help preserve the guitar’s new look and add durability.
5. Attach the Shelves:
- Choose Shelf Boards: Select a wooden plank or board to serve as the shelf surface. The size of the board will depend on how large you want the shelf to be. Cut it to fit inside or next to the guitar body.
- Install the Shelves: Use screws or wood glue to attach the shelves to the guitar. If you are adding shelves inside the guitar, simply place the wood inside and secure it with screws or nails. For shelves mounted on the outside, you may want to drill small holes into the guitar body and attach the shelf with screws.
- Support Brackets (Optional): For added strength, you can use small brackets under the shelf for additional support.
6. Add Wall Mounting Brackets or Hooks:
- Mounting the Guitar: To display the guitar shelf on the wall, use wall mounting brackets or hooks. If the guitar has a neck (for electric guitars), you can mount the neck on the wall for a balanced look. For acoustic guitars, you can mount the guitar body flat against the wall using brackets or picture hangers.
7. Style the Shelf:
- Display Items: Once your guitar shelf is securely mounted, it’s time to style it. You can place small items like books, plants, candles, or musical accessories on the shelves. The guitar itself will be the focal point, but you can create a unique display by mixing and matching items that reflect your personal style.
Design Tips for a Guitar Shelf:
- Vintage Vibe: Keep the guitar’s original design and finish for a rustic, vintage feel. Pair it with old-school décor like retro albums, vinyl records, or old books.
- Modern Style: Opt for a sleek and clean design by painting the guitar with neutral tones and adding minimalist shelves.
- Boho or Artistic Touch: For a boho style, wrap the guitar with colorful fabric, add dreamcatchers or string lights around it, and incorporate plants or woven baskets on the shelves.
Benefits of an Upcycled Guitar Shelf:
- Unique Statement Piece: This shelf is sure to be a conversation starter and adds a personalized, artistic touch to any room.
- Space-Saving: It provides extra storage while maintaining a compact, creative design.
- Eco-Friendly: By upcycling an old guitar, you are reducing waste and giving new life to an item that may have otherwise been discarded.
Conclusion:
An upcycled guitar shelf is an excellent way to combine creativity with functionality. Whether you’re a musician, music lover, or just looking for a unique storage solution, turning an old guitar into a shelf adds charm and personality to your home. With a little work, you can turn your unused guitar into a beautiful piece of functional art that serves as both decor and storage in any room.
9. Old Drawers On Wheels For Under-The-Bed Storage
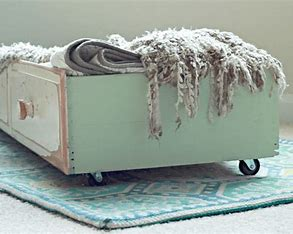
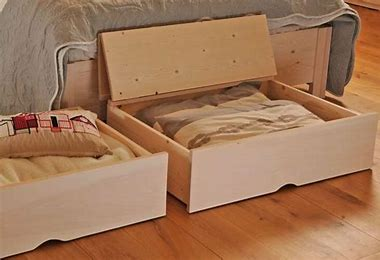
There are twenty fantastic storage solutions in this post. We particularly adore the concept of recycling existing wheels or casters to convert drawers into under-bed storage.
10. Clever and Charming DIY Magazine Storage Ideas
If you’re an avid reader or collector of magazines, you know how quickly they can pile up. Keeping them organized while maintaining a stylish and clutter-free space can be challenging. But with a bit of creativity, you can transform your magazine storage into a charming feature in your home. Here are some clever DIY ideas to help you store your magazines in a functional yet stylish way.
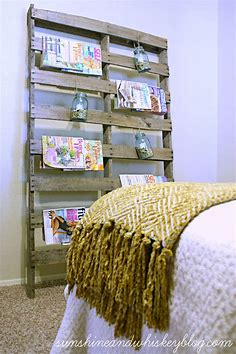
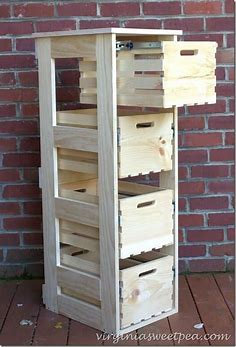
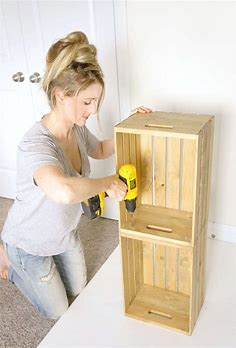
1. Upcycled Wooden Crates
Materials Needed:
- Old wooden crates or pallets
- Sandpaper
- Paint or stain (optional)
- Nails or screws
How-To: Upcycle wooden crates or pallets to create rustic magazine storage. Simply stack a few crates on top of each other or attach them to the wall for a floating shelf look. Sand them down for a smooth finish and add paint or stain if desired. You can even leave them as-is for a more rustic vibe. The open compartments are perfect for magazines, and you can place decorative items on top for added flair.
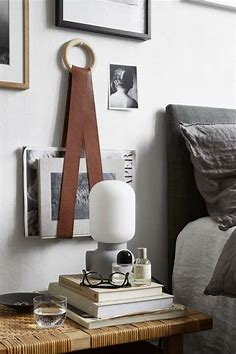
2. DIY Magazine Rack with Leather Straps
Materials Needed:
- Wooden board or plank
- Leather straps
- Screws or nails
- Drill
How-To: For a chic, modern magazine rack, cut a wooden board into a size that fits your magazines. Attach leather straps to each side of the board, creating a simple cradle to hold your magazines in place. Use screws or nails to secure the leather straps to the wooden base. Hang the rack on the wall or place it on the floor for a unique, stylish storage solution.
3. Repurposed Metal Baskets
Materials Needed:
- Metal baskets or wire storage bins
- Spray paint (optional)
How-To: Find some old metal baskets or wire storage bins, which are perfect for storing magazines. Spray paint them in a color that matches your home decor, or leave them as-is for a more industrial look. Stack them vertically, hang them on the wall, or place them on a shelf. This functional and stylish storage solution is simple to create and adds an industrial touch to any room.
4. Magazine Roll Storage
Materials Needed:
- PVC pipes
- Saw
- Spray paint (optional)
- Glue
How-To: For an innovative way to store magazines, cut PVC pipes into short sections (about 6-8 inches each). You can spray-paint the pipes in a fun color to match your decor. Once cut, glue or arrange the sections vertically or horizontally, forming a grid or box shape. Place your magazines inside the individual pipes for a quirky and functional magazine holder. This design works well for small spaces and can be customized to fit any space.
5. Wall-Mounted Magazine Holder
Materials Needed:
- Wooden board or thin plank
- Hooks or small shelves
- Paint or stain (optional)
- Screws or nails
How-To: Create a simple wall-mounted magazine holder by attaching a thin plank of wood to the wall, with hooks or small shelves added to the bottom. Hang magazines from the hooks by their corners, or lay them flat on the shelves for easy access. You can paint or stain the wood for a custom look, and even add decorative touches like framed photos or plants on the shelf for extra charm.
6. Vintage Suitcase Storage
Materials Needed:
- Old suitcase
- Sandpaper
- Paint or fabric (optional)
How-To: Give an old suitcase a new life by turning it into a charming magazine storage piece. Sand down any rough areas and repaint the suitcase or cover it in fabric to match your room’s style. You can place the suitcase on the floor, use it as a side table, or stack several to create additional storage space. Magazines fit perfectly inside, and the vintage aesthetic adds personality to your room.
7. Hanging Magazine Holder from Fabric
Materials Needed:
- Fabric (canvas, linen, or any sturdy fabric)
- Sewing machine (or fabric glue)
- Wooden dowels or rods
- Rope or string
How-To: Make a fabric hanging magazine holder by sewing two pockets onto a sturdy piece of fabric. Hang the fabric with a wooden dowel or rod at the top and bottom for structure. Attach rope or string to each end of the top rod, and hang it on the wall. This DIY project creates a boho or vintage vibe while keeping your magazines neatly stored in an easy-to-access way.
8. Repurposed Bookends as Magazine Holders
Materials Needed:
- Decorative bookends (metal, wood, etc.)
- Strong adhesive or screws
How-To: Repurpose bookends to hold your magazines vertically. You can either use them as they are or attach them to a surface like a shelf or a piece of wood to create a dedicated space for your magazines. Bookends are an excellent way to keep your magazines organized and upright without taking up too much space, and they come in many styles that can fit your home’s theme.
9. Upcycled Ladder Shelf
Materials Needed:
- Old wooden ladder
- Sandpaper or electric sander
- Paint or stain (optional)
- Screws (if mounting to the wall)
How-To: An old wooden ladder can be turned into a charming storage rack for magazines. Sand and paint or stain the ladder to give it a fresh look, then simply lean it against the wall. The steps of the ladder can be used to store magazines, books, and decorative items. You can also mount the ladder on the wall for a more secure and modern floating shelf effect.
10. Magazine Storage in Drawers
Materials Needed:
- Old drawers (from a dresser or cabinet)
- Paint or stain (optional)
- Decorative knobs or handles (optional)
How-To: Upcycle old drawers into stylish magazine holders. You can stack a few drawers on top of each other or mount them on the wall to create floating storage. If you have large drawers, they can hold several magazines inside. Paint the drawers in a fun color or pattern, and add decorative knobs or handles to give them a more polished look. These can be used as a side table or mounted on the wall for an industrial or vintage appeal.
11. Repurposed Wooden Pallet Magazine Rack
Materials Needed:
- Wooden pallet
- Saw (if cutting is necessary)
- Sandpaper
- Paint or stain (optional)
- Nails or screws
How-To: Repurpose an old wooden pallet by turning it into a rustic magazine rack. Simply cut the pallet to the desired size and sand it down. You can leave it in its natural state for a rustic look or paint it to match your room’s aesthetic. Once it’s ready, attach it to the wall for a floating magazine holder or place it on the floor as a stylish magazine display.
Tips for Magazine Storage Success:
- Keep it Accessible: Choose storage solutions that allow you to easily access and browse your magazines, especially if you read them frequently.
- Mix Function with Style: Opt for storage ideas that blend well with your decor, so your magazine storage becomes a design feature in the room.
- Customize the Size: If you’re storing a large number of magazines, make sure the storage space is big enough to accommodate your collection.
- Organize by Category: Consider sorting your magazines by genre, color, or size to make it easier to find what you’re looking for.
With these clever and charming DIY magazine storage ideas, you can transform your cluttered magazines into stylish and functional decor. Whether you choose a vintage suitcase, upcycled wooden crates, or a fabric wall holder, each of these ideas can bring a unique touch to your space while keeping your magazines neatly organized.
In this section we’re going to show you an array of upcycling display ideas to help you show off your books, priceless antiques, and family treasures.
11. Wooden Crate Shelves
Although they may appear to be trash, old crates can be used for a variety of do-it-yourself upcycling applications. You may even make floating shelves to hold your family photos, books, or ornaments!
12. Old Drawer Into Jewellery Organiser
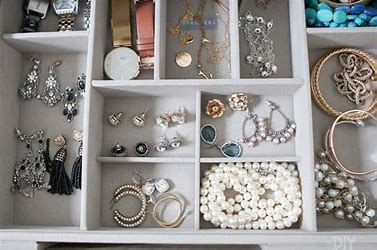
Transforming an old drawer into a jewelry organizer is a fantastic way to repurpose unused furniture while creating a stylish and functional storage solution for your jewelry collection. Here’s a step-by-step guide on how to turn an old drawer into a beautiful and organized jewelry holder:
Materials Needed:
- Old Drawer (from a dresser, cabinet, or discarded piece of furniture)
- Sandpaper or an electric sander
- Paint or Stain (optional, depending on the look you want)
- Drawer Dividers (can use wooden strips, cardboard, or plastic inserts)
- Cushioning Material (felt, velvet, or fabric for lining)
- Hot Glue Gun or wood glue (for attaching dividers and liners)
- Small Hooks (optional, for necklaces)
- Drawer Pull or Handle (optional, for extra style)
Step-by-Step Instructions:
1. Prepare the Drawer:
- Clean and Remove Hardware: If the drawer has any hardware like handles or knobs, remove them. Clean the drawer thoroughly to get rid of any dust, dirt, or old paint.
- Sand the Drawer (Optional): If the drawer has rough edges or you want to smooth out the surface, use sandpaper or an electric sander. This will help the paint or stain adhere better and give the drawer a polished look.
2. Paint or Stain the Drawer:
- Customize the Look: You can leave the drawer as it is if you like the original finish, or you can paint or stain it to match your home decor. Choose a color that complements the rest of your furniture or room’s theme. For a vintage look, consider using a distressed finish, or for a modern touch, go with bold, solid colors.
- Drying Time: Allow the paint or stain to dry completely before moving on to the next steps. If you’re adding a second coat, make sure the first one is dry before applying it.
3. Add a Lining to the Drawer:
- Choose the Lining Material: To give your jewelry a soft surface and prevent scratches, line the bottom of the drawer with a fabric like velvet, felt, or cotton. You can even use decorative paper if you prefer a more colorful or patterned interior.
- Cut and Attach the Lining: Measure and cut the fabric to fit the inside of the drawer. Use hot glue or fabric glue to secure it to the bottom and sides. Make sure the fabric is smooth and tightly adhered to avoid any wrinkles or bubbles.
4. Install Dividers (Optional):
- Organize the Space: To keep your jewelry separated and easily accessible, consider adding dividers. You can use wooden strips, plastic dividers, or even old cardboard cut to size.
- DIY Dividers: Cut small pieces of wood or cardboard and glue them inside the drawer to create compartments for rings, bracelets, earrings, and necklaces. If you use wood, you can paint or stain the dividers to match the drawer’s finish.
- Pre-made Inserts: You can also buy pre-made dividers or jewelry trays to fit inside the drawer if you want something simple.
5. Add Hooks or Pegs for Necklaces:
- Hang Necklaces: If you have a lot of necklaces, consider adding small hooks or pegs to the inside of the drawer’s lid (if it’s a deep drawer) or along the sides of the drawer.
- How to Install Hooks: Use a hot glue gun or small screws to attach hooks to the sides of the drawer. These will be perfect for hanging necklaces, preventing them from tangling.
6. Optional Decorative Touches:
- Handle or Knob: If the drawer doesn’t already have a handle, you can add one for both functionality and style. Choose a decorative knob or pull that complements the look of your jewelry organizer.
- Decorative Inserts: For an extra touch, consider adding small decorative elements, like a small mirror on the inside lid, or a jewelry dish or tray in the drawer’s bottom section to hold loose items like earrings or brooches.
7. Organize Your Jewelry:
- Arrange Your Pieces: Once your drawer is ready, begin organizing your jewelry. Place rings in the smaller compartments, earrings in fabric-lined areas, and necklaces on hooks or in larger sections.
- Use Trays or Dishes: If you prefer, you can add small jewelry dishes or trays inside the drawer for smaller items like bracelets, pins, or hair accessories. These will help keep everything neatly arranged and easy to find.
Design Tips:
- Vintage Style: If you’re aiming for a vintage look, consider using a distressed finish or adding vintage-style knobs and handles to the drawer. You can also use lace or floral fabrics for the lining.
- Minimalist Style: For a modern, minimalist design, keep the drawer simple with neutral colors and sleek dividers. Consider using clear acrylic dividers for a clean, contemporary feel.
- Personal Touch: Add a personal touch by incorporating your favorite colors, patterns, or even a custom label with your initials or name.
Benefits of Using an Old Drawer for Jewelry Storage:
- Space-Saving: A repurposed drawer is an excellent way to store your jewelry without taking up a lot of space. It can easily fit into a dresser, under the bed, or on a closet shelf.
- Organization: The compartments and dividers help keep your jewelry neatly organized, so you can easily find your favorite pieces.
- Stylish and Unique: An upcycled drawer adds a charming and personalized element to your home decor. It’s also a great conversation piece!
- Eco-Friendly: By reusing an old drawer, you’re helping to reduce waste and give new life to an item that might otherwise be discarded.
Conclusion:
Turning an old drawer into a jewelry organizer is a practical, stylish, and eco-friendly way to keep your jewelry collection neatly stored. With just a few materials and a little creativity, you can transform a simple drawer into a functional storage piece that adds charm and organization to your space. Whether you want a vintage, modern, or boho look, this DIY project can be customized to suit your style while making sure your jewelry is safe, accessible, and beautifully displayed.
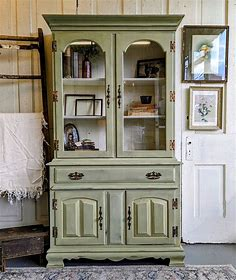
13. Upcycled Vintage China Cabinet
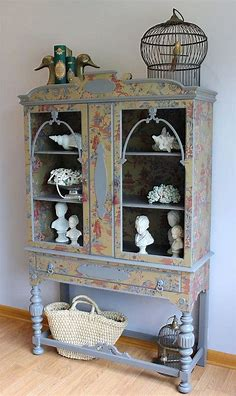
Online marketplaces are a great location to find old China cabinets that need some TLC. Prior to being restored, painted, and repurposed into a functional cabinet, this china cabinet had seen better days due to scratches and broken glass.
14. DIY Gift Wrap Station
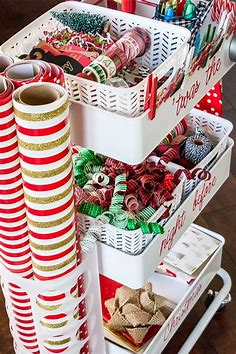
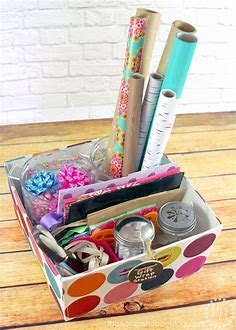
Creating a DIY gift wrap station is a great way to stay organized, save time, and add a touch of fun to your gift-wrapping process. Whether it’s for holidays, birthdays, or any special occasion, having a dedicated space to keep all your wrapping supplies organized can make a big difference. Plus, it’s a charming way to display beautiful rolls of paper, ribbons, and other materials.
Here’s a step-by-step guide to help you create your own gift wrap station:
Materials Needed:
- Gift Wrap Paper Rolls (multiple colors and patterns)
- Tissue Paper or Kraft Paper (optional, for an additional touch)
- Ribbons and Bows
- Scissors
- Tape
- Gift Tags and Labels
- Storage Bins or Baskets (for small supplies like tape and tags)
- Towel Rod or Curtain Rod
- Hooks or Pegboard (for accessories)
- Wooden Shelf or Table (optional, for added workspace)
- Organizing Containers (for small items like ribbon, tape, and tags)
- Wall Space or a Closet (for mounting the station)
Step-by-Step Instructions:
1. Choose a Location for Your Station:
Pick a space in your home that’s easy to access and has enough room to store your gift wrap materials. It could be a corner in a closet, the back of a door, or an unused wall in your office, craft room, or pantry.
You’ll want a spot with good lighting and enough space for rolls of gift wrap and other items. Consider a vertical space like a closet door or wall to save room.
2. Set Up a Rod for Wrapping Paper Rolls:
One of the best ways to organize rolls of wrapping paper is by using a towel rod, curtain rod, or even a dowell rod.
- Install the Rod: Mount the rod horizontally on the wall at a comfortable height, either in a closet or on an empty wall. You can also use a closet rod or even repurpose an old curtain rod.
- Hang the Paper: Slide the rolls of wrapping paper onto the rod, just like you would with a towel or shower curtain. This keeps them from getting crumpled and makes it easy to grab the one you need. You can use large shower curtain hooks or rope to attach the rolls securely if needed.
3. Create a Storage Area for Smaller Items:
Smaller supplies like ribbon, scissors, tape, and gift tags can easily get lost in a drawer or thrown into a box. Instead, create a system that lets you access everything quickly.
- Use Baskets or Bins: Place small items like scissors, tape, gift tags, and tissue paper into clear baskets, boxes, or drawers so they stay organized and easy to find.
- Repurpose Containers: Recycle jars or containers to hold ribbons, bows, and tape. You can use mason jars, tin cans, or small plastic containers for a more organized look.
- Drawer or Shelf Dividers: If you’re using a drawer or shelf, consider adding dividers to keep items separated and easy to find.
4. Install Hooks or Pegboard for Accessories:
A pegboard or wall-mounted hooks is a perfect solution for hanging accessories like bows, ribbons, and small gift tags.
- Pegboard: Install a small pegboard next to your wrapping paper station. Hang small hooks or baskets on the pegboard to store ribbons, bows, and tags. You can also attach small containers or organizers for tape rolls, clips, or other wrapping essentials.
- Hooks: If you don’t have space for a pegboard, simply install hooks or pegs on the wall near your gift wrap station. Use them to hang gift bags, bows, or other accessories.
5. Add a Wrapping Surface or Workspace:
Having a flat surface nearby makes wrapping gifts easier and more comfortable. If you have space, add a small table, a desk, or a wooden shelf where you can roll out wrapping paper and cut it easily.
- Workspace Area: This can be a simple table or countertop where you can measure and cut wrapping paper, arrange ribbons, and add finishing touches to your gifts.
- Protect the Surface: Consider using a craft mat or a tablecloth to protect the surface from scissors, tape, or glue.
6. Organize Gift Bags, Boxes, and Tissue Paper:
- Gift Bags & Boxes: Use a separate space for storing gift bags, boxes, and tissue paper. You can stack the bags and boxes in a dedicated shelf or use large bins to keep them sorted by size or occasion.
- Tissue Paper: Fold tissue paper neatly and store it in a designated bin or container, so it’s ready for use when you need it.
7. Add Labels and Tags:
To give your gift wrap station a finishing touch, add gift tags, labels, and a marker. You can either store these with the other wrapping supplies or hang them up near the station for easy access. If you’re using a pegboard, you can use small baskets or clips to keep tags and labels within reach.
Design Tips for a Stylish Gift Wrap Station:
- Use Matching Storage Containers: Choose storage baskets, bins, and jars in coordinating colors or styles to create a visually appealing look.
- Go for Vertical Storage: If you’re limited on space, install wall-mounted shelves or hooks to make the most of your vertical space.
- Decorative Touches: Add decorative elements like holiday-themed accessories, colorful ribbons, or even framed quotes about gift-giving to make your gift wrap station more fun.
- Make It Mobile: If you have limited space, consider using a rolling cart or storage trolley for your supplies. This allows you to move the station around as needed and store it out of sight when not in use.
Alternative Storage Ideas:
- Over-the-Door Organizers: If wall space is limited, use over-the-door hooks or organizers to hang gift wrap rolls and other supplies.
- Under-the-Bed Storage: For those with very limited space, under-the-bed storage bins or a rolling cart can store wrapping paper and small items when not in use.
- Repurpose Furniture: If you have an old dresser or cabinet, consider turning it into a dedicated wrapping station by using the drawers to store supplies and the top surface for wrapping.
Conclusion:
A DIY gift wrap station can make the often chaotic task of gift wrapping much more enjoyable and efficient. By creating a dedicated space for your supplies and organizing them in a functional way, you’ll always be ready for the next occasion. Whether you opt for a simple, minimalist approach or a more elaborate setup, a well-organized gift wrap station will help you save time, reduce stress, and add a touch of creativity to your gift-giving process.
15. Knit Yourself An Eyewear Display

For anyone who wear sunglasses or glasses, this is the ideal remedy! This simple tutorial offers a practical organiser and display solution for all glasses, whether you are always leaving them in various locations throughout the house or wind up putting them in a random drawer.
16. DIY Macrame Hanging Terrarium Tutorial
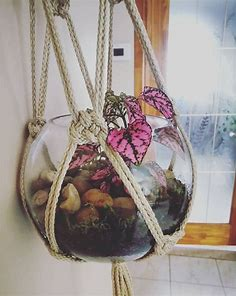
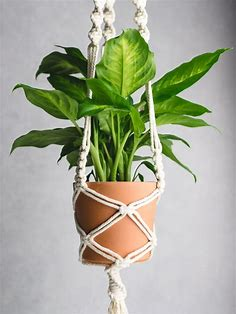
Creating a DIY Macrame Hanging Terrarium is a fun and easy project that combines the beauty of macrame knots with the charm of a small plant terrarium. Here’s a step-by-step guide to help you make your own hanging terrarium:
Materials Needed:
- Macrame Cord (about 2-3mm thick)
- Glass Terrarium (a round or geometric one works well)
- Scissors
- Wooden Ring or Brass Ring (for hanging the macrame)
- Hot Glue Gun (optional)
- Plants, Soil, and Decorative Elements (like moss, pebbles, or small stones)
- Measuring Tape
Steps to Make Your Macrame Hanging Terrarium:
1. Cut the Macrame Cord
- Cut 8 strands of macrame cord, each about 5 feet long. You can adjust this based on how long you want the hanging part to be.
2. Attach the Cord to the Ring
- Fold each strand in half and attach them to your wooden or brass ring using a lark’s head knot.
- To do this, fold a strand of cord in half, place the folded loop under the ring, and pull the loose ends through the loop to secure it.
- You should have 8 cords attached to the ring, evenly spaced.
3. Start Knotting
- Now, it’s time to begin the macrame pattern. The easiest knot to start with is the Square Knot.
- To make a square knot:
- Divide your cords into two groups of 4.
- Take the left-most cord from the left group and cross it over the other cords, making a loop.
- Take the right-most cord from the right group and pull it behind the other cords, bringing it through the loop created by the left-most cord.
- Pull the cords tight, forming a knot.
- Repeat this pattern for the next few rows of your hanging.
- To make a square knot:
4. Create the Macrame Pattern
- Continue knotting the cords in a consistent pattern, making sure that your knots are tight and evenly spaced.
- For a decorative touch, you can alternate between square knots and other macrame knots like half knots or gathered knots.
- Create a pattern of your choice, like a simple spiral or diamond-shaped design. Keep the length of the macrame about 4-5 inches long.
5. Form the Base of the Hanging
- As you approach the end of the cords, stop knotting and begin grouping the cords together.
- Gather all the cords in pairs and tie them in a knot about 1-2 inches below the last knot you’ve made. This will be the base where the terrarium will hang.
6. Attach the Terrarium to the Macrame
- If your glass terrarium has a flat bottom, place it directly in the center of the gathered cords.
- If you like, you can also glue small pieces of felt or fabric to the bottom of the glass terrarium to prevent it from scratching or sliding out of the macrame holder.
- Adjust the cord lengths so the terrarium sits snugly, and ensure it’s centered. You can tie a knot at the end of each cord to secure it and keep the terrarium in place.
7. Add the Plants and Decorations
- Now, it’s time to plant your little terrarium! Place the soil inside your glass terrarium, and plant your chosen small plants.
- Some great options for a terrarium include succulents, air plants, or small ferns.
- You can also add decorative elements like rocks, moss, or small figurines for an extra touch.
8. Hang Your Macrame Terrarium
- Once the terrarium is filled, you can hang your macrame creation.
- Find a suitable place, like a window hook or a ceiling hook, and hang the wooden ring.
Additional Tips:
- Plant Care: Ensure your plants are suitable for a closed terrarium or open terrarium, depending on the type of environment you are creating. Succulents generally need a more open design, while ferns and moss thrive in a more closed space.
- Variation: You can experiment with different knotting patterns or cord colors to match your home decor style.
This macrame hanging terrarium will make a beautiful, boho-chic addition to any space! Enjoy your crafting!
17. Turn Books Into Shelves
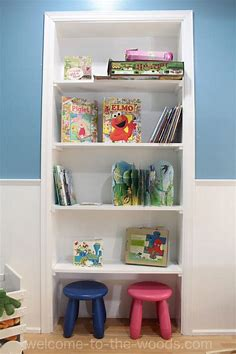
This can be the ideal answer if you have damaged books that you don’t want to read again but also don’t want to discard. You can use your books to make shelves!
18. Make An Aquarium Out Of An Old Television
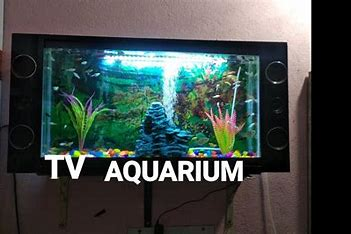
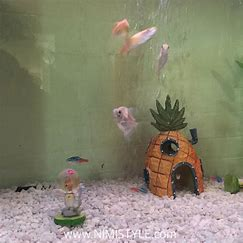
Turning an old television into a unique aquarium is a fun and creative way to recycle and give new life to an outdated piece of technology. Here’s a step-by-step guide to making your own TV aquarium:
Materials Needed:
- Old Television (preferably one with a large screen like a CRT TV)
- Aquarium Tank or Acrylic Sheet (to create the water container)
- Glass Cutter or Acrylic Cutter
- Silicone Sealant (aquarium-safe)
- Submersible Aquarium Pump (for filtration)
- Aquarium Heater (optional, depending on the fish)
- LED Lights (for lighting)
- Decorative Gravel or Sand (for the aquarium base)
- Aquarium Plants and Fish (or decorative aquatic elements)
- Screwdriver (to dismantle the TV)
- Power Drill (for making holes)
- Acrylic Glue (optional, if you need to assemble the tank)
Step-by-Step Guide:
1. Preparing the Old TV
- Unplug and Dismantle the old TV: Remove the back panel and all internal components like the circuit boards, wires, and screen. Be cautious, as older TVs (like CRTs) can contain dangerous components like capacitors that may still hold charge.
- Clean the TV Shell: Once the internal parts are removed, clean the TV shell thoroughly. You may want to wipe it with a damp cloth to remove any dust or debris.
- Keep the Front Frame: You’ll want to keep the front frame of the TV as it will serve as the “frame” for your aquarium. Remove any glass or screen if present.
2. Creating the Aquarium Tank
- Measure the TV Interior: Take measurements of the interior space of the TV where the tank will fit. You will likely need to cut a piece of acrylic or use a pre-made aquarium tank that fits the TV’s size.
- Cut the Acrylic Sheet: If you’re making your own tank, use a glass or acrylic cutter to cut the acrylic sheet to the right size for the TV’s interior. You’ll need four pieces: the base, two side walls, and the back wall.
- Assemble the Tank: Use silicone sealant to adhere the pieces of acrylic together. Make sure the sealant is aquarium-safe to ensure it doesn’t harm the fish later. Allow the silicone to fully cure according to the manufacturer’s instructions.
3. Installing the Tank Inside the TV
- Insert the Aquarium: Carefully place the assembled acrylic aquarium into the TV’s frame. If the fit is too tight, you can adjust the acrylic or trim the edges to ensure it fits well.
- Secure the Tank: Use silicone sealant or small brackets to secure the tank in place. Ensure it’s stable and doesn’t shift around inside the TV.
4. Setting Up the Filtration and Heater
- Install the Filtration System: For the aquarium, you will need a submersible pump or filtration system. Drill a small hole at the bottom of the TV where the pump can be placed to filter the water. You may need to hide the pump in the bottom part of the tank and use tubing to direct the filtered water back into the tank.
- Add the Heater: If you’re keeping tropical fish, you will need to install a submersible aquarium heater to maintain the right water temperature. This can be placed along the bottom of the tank or along the sides.
5. Wiring and Lighting
- Install LED Lights: You can add LED aquarium lights to the TV’s frame for ambiance and to illuminate the tank. Attach LED strips along the edges of the TV or place a small LED light inside the aquarium.
- Wiring the Pump and Lights: If the pump or lights require electrical connections, drill small holes in the back of the TV to run the wires discreetly. Use a power strip or extension cord to plug them in. Make sure all wires are safely connected and are out of reach from the water.
6. Filling the Tank and Decorating
- Fill the Tank: Add clean, dechlorinated water to the tank. Make sure to test the water parameters (like pH, temperature, and hardness) before adding any fish.
- Decorate the Aquarium: Add gravel or sand as the substrate for the bottom of the tank. Then, add some aquatic plants, rocks, or small decorations to create a natural-looking environment for your fish.
7. Adding Fish
- After the tank is set up and the water is conditioned, you can introduce your fish. Start with a few small, hardy fish and allow the tank to cycle before adding more fish.
- Always monitor the water quality regularly and ensure the pump and filter are working efficiently.
8. Final Touches
- Seal and Hide Wiring: Use cable organizers or decorative covers to hide any wires or electrical connections to make the setup look cleaner.
- Adjust the TV’s Position: Place your TV aquarium in a location with appropriate lighting and space for the fish. Avoid direct sunlight, as this can lead to algae growth.
Additional Tips:
- Regular Maintenance: As with any aquarium, you’ll need to do regular water changes, filter maintenance, and cleaning to keep the tank healthy for your fish.
- Safety First: Be sure to check that all electrical components (lights, pump, heater) are waterproof and properly sealed. Always follow the manufacturer’s safety instructions.
- Creative Customization: You can paint or decorate the exterior of the TV frame to match your style or add a vintage or modern look.
This DIY aquarium project is a great way to repurpose old electronics and create a one-of-a-kind fish tank. It’s sure to be a conversation starter in your home!
19. Tennis Rackets Into Trellis
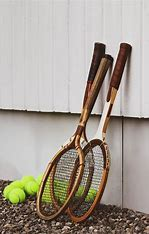
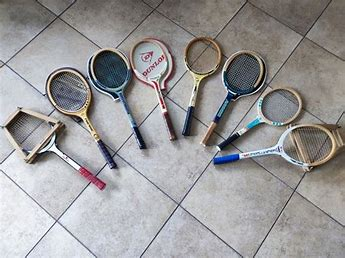
Transforming old tennis rackets into a unique and functional trellis for your garden is a creative and sustainable way to repurpose unused items. Here’s a step-by-step guide on how to turn tennis rackets into beautiful trellises for climbing plants, flowers, or vines.
Materials Needed:
- Old Tennis Rackets (you can use several or just one depending on the size of the area you want to cover)
- Wooden Stakes or Metal Poles (for support)
- Wire or Twine (to secure the rackets)
- Drill with a small drill bit (for making holes in the racket or stakes)
- Screws or Nails (to attach the rackets to the stakes)
- Planting Pots or Garden Soil (for the base if needed)
- Climbing Plants (like peas, beans, or ivy)
- Outdoor Paint or Spray Paint (optional, to add color or weatherproof the rackets)
- Strong Scissors or Wire Cutters (for cutting twine or wire)
Step-by-Step Guide:
1. Prepare the Tennis Rackets
- Clean the Rackets: First, clean your tennis rackets by wiping them down to remove any dirt or dust. If you want, you can give them a fresh coat of paint to enhance their look and add a weatherproofing layer. Choose outdoor paint that can withstand the elements.
- Remove the Strings (Optional): If you prefer a cleaner look or more space for plants to climb, you can remove the strings from the racket. This can be done by cutting them carefully with scissors or using pliers to pull them out. Alternatively, you can leave the strings intact for a unique look.
2. Set Up the Support Structure
- Prepare the Stakes or Poles: Select the poles that will support your tennis rackets. Wooden stakes or metal poles are ideal because they provide sturdy support. The height of the poles will depend on how tall you want your trellis to be. Typically, 5-6 feet is a good height for most plants.
- Secure the Poles: Insert the poles into the ground where you want the trellis to stand. If the soil is soft, you can plant the poles directly into the ground. If the ground is hard or if you’re setting the trellis in a pot, you can use a strong base or container to hold the poles securely.
3. Attach the Tennis Rackets to the Poles
- Position the Rackets: Decide how you want the tennis rackets to be arranged. You can place them vertically, horizontally, or even at an angle depending on the shape and design you want for your trellis. You can use one racket or stack a few together for a larger trellis.
- Drill Holes: If necessary, drill small holes into the sides of the racket frame or near the handle to attach it securely to the stakes. If you’re attaching multiple rackets, you may need to drill holes in the center or sides of the frames.
- Attach the Rackets to the Poles: Using screws, nails, or wire, attach the rackets to the poles. If you’re using wire, wrap it around the racket frame and the pole several times to ensure it’s securely fastened. You can also use twine to tie the rackets to the poles for a more rustic look.
4. Secure the Structure
- Add Stability: If the rackets feel unstable or if you’re using multiple rackets, consider adding additional support to make the structure sturdier. You can tie the rackets together with more wire or twine to hold them in place or add more poles to stabilize the setup.
5. Add Climbing Plants
- Plant Your Climbing Vines: Now that the trellis is set up, plant your climbing plants near the base of the structure. Some popular choices for a tennis racket trellis include:
- Sweet Peas
- Morning Glories
- Clematis
- Climbing Beans
- Ivy
- Train the Plants: As your plants grow, guide their stems to climb up the racket frames. The string pattern of the racket will help the plants grip and grow upward.
6. Final Touches
- Maintain the Structure: As your plants grow, make sure to regularly check the stability of the trellis. You may need to adjust the wires or twine as the plants grow and put additional support for heavier vines.
- Add Decorative Elements: You can further enhance the look of your tennis racket trellis by adding decorative touches like fairy lights, ribbons, or other garden ornaments. This will give it a whimsical, vintage feel.
Additional Tips:
- Sturdiness: If you plan to grow heavy vines like wisteria or cucumbers, make sure the rackets are securely fastened and the poles are firmly planted.
- Weatherproofing: Consider applying a clear coat of outdoor sealant on the rackets to help protect them from the elements and prolong their life outdoors.
- Creative Arrangements: Don’t be afraid to get creative with your design! You could use multiple rackets in different shapes, or even hang them from a tree or fence to create a hanging trellis.
Conclusion:
This DIY tennis racket trellis is a wonderful way to repurpose old equipment and add a quirky, charming element to your garden. Whether you’re creating a focal point for climbing flowers or providing support for vegetables, it’s a functional and creative project that gives new life to something once forgotten!
20. DIY Coat Rack
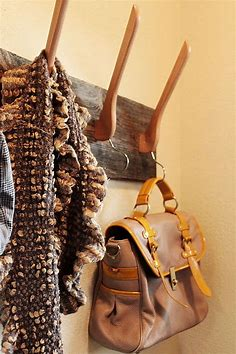
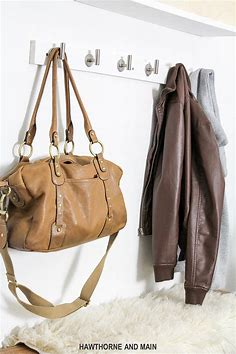
Creating a DIY coat rack is a simple and fun project that can add both functionality and style to your entryway or hallway. You can customize the design to match your home decor and even repurpose old materials to make it unique. Here’s a step-by-step guide on how to build your own coat rack.
Materials Needed:
- Wooden Board or Plank (for the back of the coat rack, about 24-36 inches long depending on your space)
- Hooks or Knobs (you can use coat hooks, old drawer pulls, or even repurpose vintage doorknobs)
- Screws (to attach the hooks or knobs to the board)
- Drill (for making holes in the wood and screwing in the hooks)
- Measuring Tape
- Saw (if you need to cut the wooden board to size)
- Sandpaper (for smoothing rough edges on the wood)
- Wood Stain or Paint (optional, for finishing the wood)
- Wooden Dowel Rods (optional, for a more rustic look)
- Wall Brackets or Picture Hangers (if you want to hang the rack on the wall)
Step-by-Step Guide:
1. Choose Your Wood
- Select a wooden plank or board that is the right size for your space. A typical size for a coat rack could be around 24-36 inches in length and 4-6 inches in width.
- If you’re using reclaimed wood or repurposing old pieces, make sure it’s sturdy enough to hold coats.
2. Sand the Wood
- Use sandpaper to smooth any rough edges and surfaces on your wooden board. This step ensures the wood is safe to handle and ready for painting or staining.
3. Paint or Stain the Wood (Optional)
- If you want to add color or finish to your wood, stain or paint the board. Choose a finish that complements your space—natural wood stain for a rustic look or a bold color to make it pop.
- Allow the paint or stain to dry completely before moving on to the next step.
4. Mark Hook Placement
- Measure and mark where you want to place your hooks or knobs on the board. Space them evenly, typically 4-6 inches apart, depending on how many coats you plan to hang and the size of the hooks.
- You can place them horizontally across the board or in a pattern (e.g., staggered) for a more decorative look.
5. Attach the Hooks or Knobs
- Drill small pilot holes where you marked the spots for your hooks.
- Screw in the hooks or knobs using a screwdriver or drill. Ensure they are securely attached to the wood. If you’re using knobs or other types of handles, you may need to use screws that fit the hardware.
6. Mount the Rack on the Wall
- Install wall brackets or picture hangers on the back of the wooden board, or drill directly into the wall where you want the coat rack to hang. You can also use heavy-duty screws or anchors, depending on the weight of the board and the number of coats you plan to hang.
- Make sure the coat rack is level before securing it to the wall.
7. Final Touches
- Once the rack is mounted, give it one final check to make sure everything is secure and stable. If you want, you can add decorative elements like hooks with different colors or vintage knobs for a personalized touch.
- Consider adding a shelf above the coat rack for extra storage, or a small bench below for a place to sit while putting on shoes.
Optional Additions:
- Wooden Dowel Rods: Add a rustic touch by attaching wooden dowel rods underneath the coat rack to hang scarves, hats, or bags.
- Floating Shelf: Attach a small shelf above the coat rack to store hats, gloves, or other accessories.
- Reclaimed Materials: Get creative by using old items, like a repurposed piece of barn wood or even an old ladder as the base of your rack for a more farmhouse-inspired look.
Conclusion:
Making your own coat rack is a simple yet rewarding DIY project. It’s an easy way to create a functional and stylish piece for your entryway, and you can customize it with different materials or finishes to suit your home. Whether you’re looking for a rustic design or something more modern, this project offers endless possibilities for creativity!