
Here are some genius upcycling tricks to transform old furniture into stylish, useful, and one-of-a-kind pieces:
🔨 Smart Makeovers
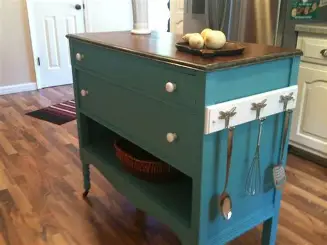
- Turn a Dresser into a Kitchen Island
Remove drawers from one side, add shelves, paint, and top with a butcher block. - Old Door → Headboard or Dining Table
Sand and stain a vintage door, mount it horizontally as a headboard or add legs for a rustic table. - Bookshelf → Bar Cart
Attach wheels, add glass racks, and paint for a rolling mini-bar. - Crib → Desk or Craft Station
Repurpose an outgrown crib into a compact workstation with storage.
🎨 Creative Touch-Ups
- Stencil & Paint Transformation
Fresh paint and bold stencils can turn a boring piece into a statement item. - Fabric-Covered Table or Dresser
Wrap surfaces with patterned fabric and seal with Mod Podge for a designer look. - Wallpaper-Backed Shelves
Add wallpaper or peel-and-stick designs to the back of bookshelves for depth and style.
🪑 Functional Repurposing
- Chair → Side Table
Remove the backrest, refinish, and you’ve got a quirky nightstand or plant stand. - Ladder → Bookshelf or Towel Rack
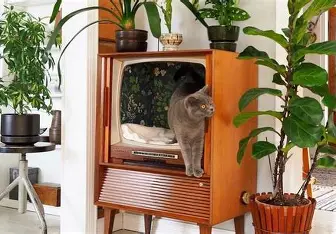
Stand it against the wall for storage or hang it horizontally for a rustic rack. - TV Cabinet → Kids’ Play Kitchen
Paint, add knobs, faux burners, and a curtain to turn it into a play kitchen.
🌱 Eco-Friendly Updates
- Drawers → Planters or Shadow Boxes
Line drawers with plastic, fill with soil, and plant herbs—or mount them on walls for shelves. - Bed Frame → Garden Trellis
An old metal or wooden frame makes the perfect climbing structure for vines. - Suitcase → Side Table or Pet Bed
Add legs to make a retro table or line with a cushion for a cozy cat/dog bed.
✨ Tip: When upcycling, sand and prime surfaces before painting, use eco-friendly sealants, and mix textures (wood, metal, fabric) to create a unique look.
Would you like me to put together a visual idea board (moodboard style) with examples of these transformations for inspiration?
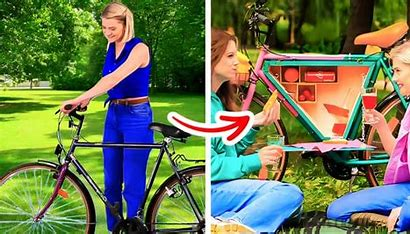
- Pipe Clothing Rack

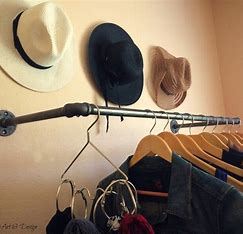
Think of converting industrial pipes into a clothes rack. Put the pipes together in a frame and fasten it to ensure stability.
This rack gives your decor an industrial flair while providing plenty of space for clothes. It’s a sleek and useful solution that showcases your creative approach to interior design.
2. Shutter Headboard
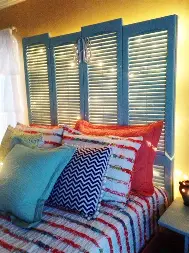
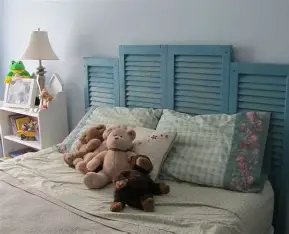
A Shutter Headboard is a creative and budget-friendly way to upcycle old wooden shutters into a charming piece of bedroom décor. Here’s how you can make one:
🛠 Materials Needed:
- Old wooden shutters (2–4, depending on bed size)
- Sandpaper
- Paint or wood stain (optional)
- Paintbrush or roller
- Screws and brackets (or heavy-duty wall anchors)
- Drill and screwdriver
✨ Steps to Create a Shutter Headboard:
- Prepare the Shutters
- Sand the shutters to remove dirt, rough edges, or old paint chips.
- If you like the weathered look, keep some of the distressed texture.
- Paint or Stain (Optional)
- Apply paint for a pop of color (white, pastel, or bold shades).
- Use stain for a rustic farmhouse feel.
- Leave them natural for a shabby-chic or vintage look.
- Arrange the Shutters
- Line them up side by side behind your bed.
- For a taller headboard, you can stack shutters vertically.
- Mix and match different styles for a quirky look.
- Attach Together
- Use brackets or wood screws to join the shutters together on the backside.
- Alternatively, mount each shutter directly to the wall.
- Install Behind the Bed
- Secure the shutters to the wall or the bed frame for stability.
- Make sure everything is level and firmly attached.
🌟 Style Ideas:
- Rustic Farmhouse → Whitewashed shutters with chipped paint.
- Coastal Vibes → Light blue or seafoam green shutters for a beachy look.
- Vintage Charm → Dark stained wood with brass accents.
- Boho Chic → Colorful, mismatched shutters for an eclectic headboard.
Would you like me to also give you ideas for decorating the shutter headboard (like hanging lights, adding shelves, or weaving greenery)?
3. Rug Ottoman
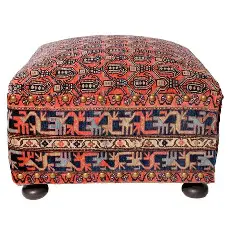
Why not turn an old rug into an ottoman? For comfort, wrap the rug around a wooden frame and add padding.
Use it as additional sitting or as a footrest in your living room. This ottoman highlights your dedication to eco-friendly living and innovative design while adding a warm, textured accent to your interior decor.
4. Trunk Coffee Table
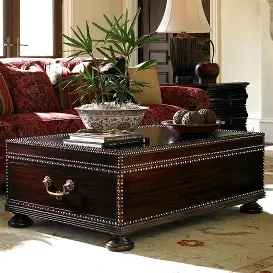

A Trunk Coffee Table is a brilliant upcycling idea that combines style + storage in one piece. An old trunk, chest, or vintage suitcase can be easily transformed into a stunning centerpiece for your living room.
🛠 Materials Needed:
- Old trunk, chest, or sturdy suitcase
- Sandpaper (if wooden)
- Paint, stain, or polish (optional)
- Protective sealant (for wood or leather)
- Table legs, casters, or a low base (optional)
- Screws, brackets, and drill
✨ Steps to Make a Trunk Coffee Table:
- Clean & Prep the Trunk
- Wipe it down inside and out.
- If it’s wood, sand rough spots. For metal, remove rust.
- Refinish (Optional)
- Paint for a modern look.
- Stain for a rustic or vintage feel.
- Polish leather or metal for a sleek, restored style.
- Add a Base
- Attach short legs for a lifted look.
- Use casters if you want it to be mobile.
- Place it directly on the floor for a low-profile table.
- Seal & Protect
- Apply clear varnish or wax to protect surfaces.
- Line the inside with fabric or wallpaper if you plan to use it for storage.
- Style & Use
- Top with a tray to hold drinks, books, or candles.
- Store blankets, board games, or magazines inside.
🌟 Styling Ideas:
- Rustic Farmhouse → Wooden trunk with distressed white paint.
- Industrial Look → Metal trunk with black casters.
- Boho Chic → Colorful painted trunk with patterned fabric lining inside.
- Vintage Charm → Leave it weathered for a nostalgic touch.
Would you like me to also suggest decor styling tips (like what to pair with a trunk coffee table—rugs, décor, and accessories) so it looks magazine-worthy?
5. Cork Bulletin Board

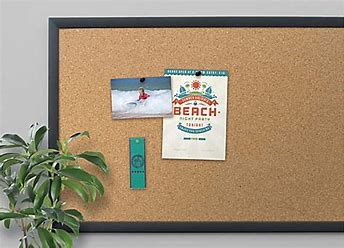
Have you considered using wine corks to make a bulletin board? Place the corks in a frame and fasten them firmly.
You can use it to show notes or pictures at your home office. In addition to being functional, this board showcases your artistic side and gives your workstation a little of vineyard elegance.
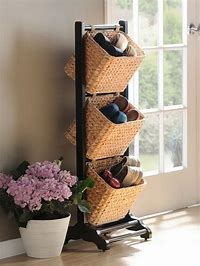
6. Basket Wall Storage

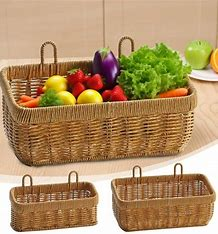
A Basket Wall Storage idea is a simple, stylish, and functional way to organize while adding character to your space. By upcycling old baskets, crates, or woven containers, you can create practical storage that doubles as wall décor.
🛠 Materials Needed:
- Woven baskets (round, square, or mix of styles)
- Wall hooks, screws, or nails
- Drill or hammer
- Anchors (if hanging heavy baskets)
- Optional: paint, stain, or fabric liners
✨ Steps to Create Basket Wall Storage:
- Choose Your Baskets
- Select matching baskets for a neat, uniform look, or mix sizes/shapes for an eclectic design.
- Prep the Baskets
- Clean them thoroughly.
- Paint or stain if you want to match your room’s color scheme.
- Plan the Layout
- Arrange baskets on the floor first to test spacing.
- Decide between vertical, horizontal, or gallery-style arrangements.
- Mount the Baskets
- Drill through the basket base or use sturdy hooks/brackets to secure them.
- Make sure they’re firmly anchored if storing heavier items.
- Fill & Style
- Use them for mail, magazines, books, toys, or craft supplies.
- Add small plants, rolled towels, or decorative accents for a cozy look.
🌟 Styling Ideas:
- Entryway → Baskets for keys, mail, and sunglasses.
- Bathroom → Rolled towels, toiletries, and spa items.
- Living Room → Books, magazines, or throw blankets.
- Kitchen → Produce, utensils, or recipe cards.
- Kids’ Room → Toys, art supplies, or stuffed animals.
Would you like me to put together a set of creative layout ideas (like a cluster design, grid style, or cascading baskets) so you can visualize how to arrange them on the wall?
7. Drawer Side Table
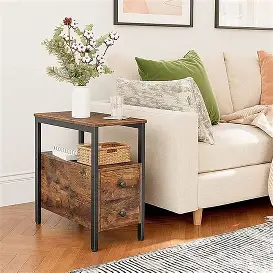
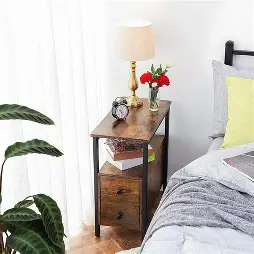
Consider making a side table out of an old drawer. Paint the drawer first, then add legs for stability.
For a useful and fashionable accent to your decor, place it next to your bed or couch. This table displays your creative flair and upcycling skills while providing storage and a distinctive design element.
8. Ladder Towel Rack
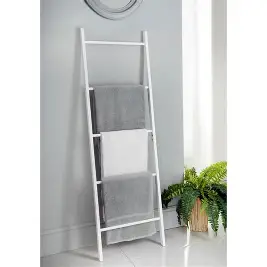
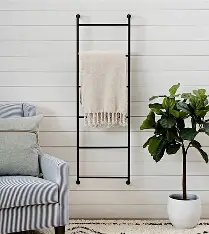
A Ladder Towel Rack is a clever and stylish upcycling project that turns an old ladder into functional bathroom or bedroom storage. It’s easy to make and adds a rustic, farmhouse, or minimalist touch to your décor.
🛠 Materials Needed:
- Old wooden or metal ladder (step ladder or straight ladder)
- Sandpaper
- Paint, stain, or clear sealant (optional)
- Rubber pads or felt (to protect walls/floor)
✨ Steps to Make a Ladder Towel Rack:
- Choose the Ladder
- A narrow ladder works best for smaller bathrooms.
- Step ladders can be split in half to make two racks.
- Prep the Ladder
- Sand rough spots and remove old paint or rust.
- Leave natural for a rustic look or paint for a modern finish.
- Finishing Touches
- Apply wood stain for a farmhouse vibe.
- Spray paint metal ladders in matte black or gold for a chic style.
- Add a clear coat for water resistance if used in a bathroom.
- Positioning
- Lean the ladder securely against the wall.
- Add rubber pads or felt to the bottom to prevent slipping or wall damage.
- Hang Towels
- Drape bath towels, hand towels, or even blankets.
- Use baskets or S-hooks on the rungs for extra storage.
🌟 Styling Ideas:
- Spa-Inspired Bathroom → White ladder with rolled towels and eucalyptus sprigs.
- Rustic Farmhouse → Weathered wood ladder with cozy linens.
- Minimalist Modern → Matte black ladder with neatly folded towels.
- Bedroom Use → Ladder as a throw blanket display.
Would you like me to also suggest creative variations (like turning the ladder towel rack into a multi-use storage for magazines, plants, or accessories)?
9. Wine Crate Shoe Rack
Think about making a shoe rack out of wine crates. Crates should be stacked and secured in the appropriate arrangement first. For a rustic style, leave them unpainted; for a splash of colour, paint them.
In addition to providing plenty of shoe storage, this rack gives your foyer a hint of vineyard charm. It’s a simple and efficient method to display your upcycling abilities while organising your shoes.
10. Suitcase Pet Bed
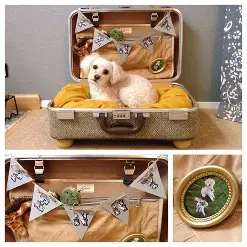
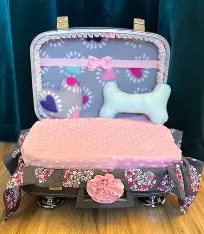
A Suitcase Pet Bed is a charming and practical way to upcycle an old suitcase into a cozy resting spot for your cat or dog. It’s budget-friendly, unique, and adds a vintage touch to your home décor.
🛠 Materials Needed:
- Old hard-shell suitcase (sturdy and clean)
- Cushion, pillow, or pet bed insert
- Fabric or blanket (optional, for lining)
- Short furniture legs (optional, for height)
- Drill, screws, and brackets (if adding legs)
✨ Steps to Make a Suitcase Pet Bed:
- Choose the Suitcase
- Pick a size that fits your pet comfortably.
- Ensure hinges and latches are safe (remove sharp edges).
- Prep the Suitcase
- Clean thoroughly inside and out.
- If needed, line the interior with soft fabric or a blanket for extra comfort.
- Stabilize the Base
- Remove the top lid or leave it propped open (depending on style).
- If you want it elevated, screw on short furniture legs or wooden blocks.
- Add the Cushion
- Place a plush pillow, pet bed insert, or foam cut to size inside the suitcase.
- Cover with a washable fabric or pet-friendly cover.
- Style & Personalize
- Paint or decorate the outside for a custom look.
- Add your pet’s name with stencils or stickers.
🌟 Styling Ideas:
- Vintage Charm → Keep the suitcase weathered with a cozy plaid blanket inside.
- Modern Chic → Paint the suitcase in neutral colors and add gold or wooden legs.
- Travel Theme → Attach travel stickers and line with map-print fabric.
- Luxury Look → Use faux fur lining and elegant fabric for a pampered pet bed.
Would you like me to also suggest mini add-ons (like built-in toy storage or a matching suitcase feeder station) to make it even more functional?
11. Shutter Wall Organizer

A Shutter Wall Organizer is a brilliant upcycling project that transforms old window shutters into stylish and functional storage. It works perfectly in entryways, kitchens, offices, or craft rooms to keep things tidy while adding rustic charm.
🛠 Materials Needed:
- Old wooden or metal shutter
- Sandpaper
- Paint, stain, or sealant (optional)
- Small hooks, knobs, or clips
- Screws, nails, or wall anchors
- Drill or hammer
✨ Steps to Make a Shutter Wall Organizer:
- Prepare the Shutter
- Sand to remove rough edges, dirt, or peeling paint.
- Leave distressed for a shabby-chic look, or paint/stain to match your décor.
- Add Storage Features
- Attach small hooks for keys, bags, or hats.
- Screw in knobs for hanging scarves, jewelry, or accessories.
- Clip or tuck mail, notes, or photos between the shutter slats.
- Mount a small basket at the bottom for mail or magazines.
- Mount on the Wall
- Use strong screws or anchors for stability.
- Position vertically for a narrow space or horizontally for a wide organizer.
- Organize & Decorate
- Use it as a mail station in the entryway.
- As a kitchen organizer for recipes, shopping lists, or utensils.
- As a craft room tool holder for scissors, ribbons, and brushes.
- Or as a photo display for snapshots, postcards, or artwork.
🌟 Styling Ideas:
- Farmhouse Style → Whitewashed shutter with bronze hooks.
- Vintage Charm → Keep the weathered paint for a rustic look.
- Color Pop → Brightly painted shutter as a statement piece in an office or kids’ room.
- Minimalist Modern → Matte black shutter with sleek metal hooks.
Would you like me to also give you themed organizer ideas (like one for an entryway, one for a home office, and one for a kitchen) so you can see different ways to customize it?
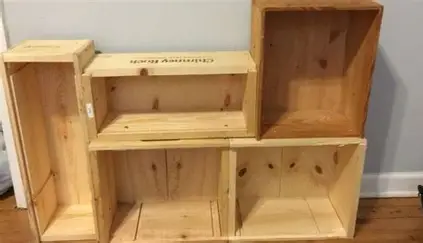
12. Crate Bookshelf
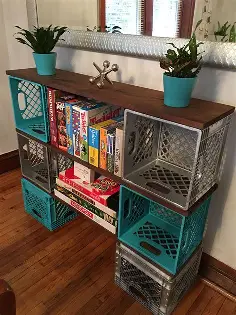

Consider assembling wooden boxes into a bookcase. Crates can be easily stacked and secured in the configuration of your choice. For a rustic appearance, paint them or leave them unpainted.
There is plenty of room for books and décor on this bookshelf. It’s a simple approach to give any space personality and usefulness while showcasing your creative side and passion for repurposed design.
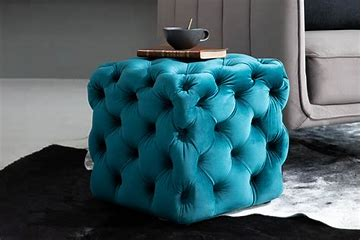
13. Tire Ottoman

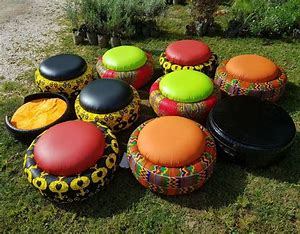
A tire ottoman is a clever upcycling project where you turn an old car tire into a stylish and functional piece of furniture. It’s eco-friendly, budget-friendly, and adds a rustic or modern touch depending on how you finish it.
Here are some creative DIY tire ottoman ideas:
1. Rope-Wrapped Ottoman
- Clean an old tire thoroughly.
- Cut a circular wooden board to cover the top and bottom.
- Screw them in place for stability.
- Wrap the tire with jute rope, sisal rope, or cotton rope, gluing as you go.
- Add a cushion on top for extra comfort.
👉 Perfect for boho or rustic interiors.
2. Upholstered Tire Ottoman
- Cover the top with foam and fabric to create a soft, padded seat.
- Upholster the sides with fabric or faux leather.
- Attach small furniture legs or casters for height and mobility.
👉 Great as a coffee table or footrest in living rooms.
3. Storage Tire Ottoman
- Use two wooden circles, one fixed at the bottom and one hinged at the top.
- Leave the inside hollow for hidden storage (blankets, toys, magazines).
- Decorate with rope, fabric, or paint.
👉 Functional and stylish for small spaces.
4. Outdoor Patio Ottoman
- Waterproof the tire with outdoor paint or varnish.
- Add a weather-resistant cushion on top.
- Wrap with outdoor rope or paint in bright colors.
👉 Works well for gardens, balconies, or poolside areas.
✨ Tip: If you’re using it indoors, clean and disinfect the tire well before starting.
Would you like me to make a step-by-step tutorial with materials and instructions for one style (like the rope-wrapped version)?
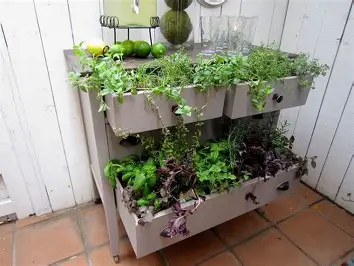
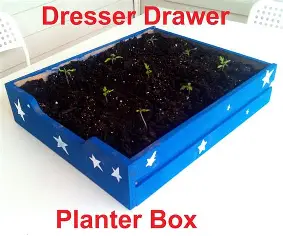
14. Drawer Planter
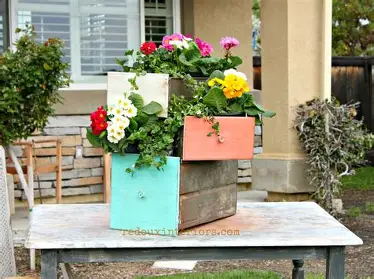
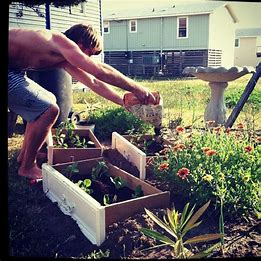
Ever consider turning old drawers into planters? Start by filling each drawer with dirt and drilling drainage holes. For a splash of colour, plant herbs or flowers.
For a striking visual effect, arrange them in your garden in a tiered display. In addition to repurposing abandoned furniture, this idea gives your outside area a quirky touch, making gardening enjoyable and imaginative.
15. Barrel Chair

A barrel chair is a stylish and sustainable DIY project where you repurpose an old wooden or metal barrel into a comfortable and unique piece of furniture. It’s perfect for rustic, industrial, or farmhouse-style interiors and patios.
Here are some creative DIY barrel chair ideas:
1. Classic Cut-Out Barrel Chair
- Take a large wooden or metal barrel.
- Cut out a seating space (about one-third of the barrel’s side).
- Sand down sharp edges and apply wood stain or paint.
- Add a padded cushion or upholstered seat inside the cut-out.
👉 Great for rustic living rooms, patios, or wine-themed décor.
2. Upholstered Barrel Chair
- Cut the barrel to form the chair base.
- Line the inside with foam and upholstery fabric for comfort.
- Add armrests by shaping the sides of the barrel.
- Finish with decorative tacks, leather, or patterned fabric.
👉 A cozy, elegant version for indoor use.
3. Swivel Barrel Chair
- Mount the cut barrel base onto a swivel chair mechanism.
- Add cushions and upholstery for a modern twist.
- Paint or stain the outside for a polished look.
👉 Perfect for home offices or stylish lounges.
4. Outdoor Barrel Chair
- Use a durable, waterproof sealant on the barrel.
- Add weather-resistant cushions.
- Pair with a matching barrel side table for a complete set.
👉 Great for gardens, decks, or poolside seating.
✨ Tips:
- Always sand and seal wooden barrels to prevent splinters.
- For metal barrels, ensure edges are smoothed and rust-proofed.
- Add small legs or casters if you want height and mobility.
Would you like me to create a step-by-step guide with tools and materials for making a simple cut-out barrel chair?
16. Basket Pendant Light
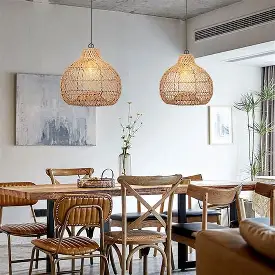
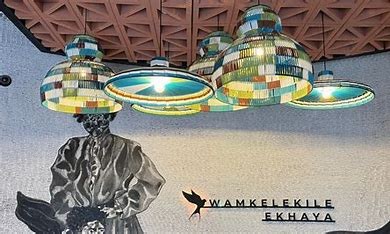
Consider turning a wicker basket into a one-of-a-kind pendant light. Installing the light fixture over your kitchen island or dining table only requires cutting a hole for it.
An pleasant ambiance is produced by the warm, textured patterns projected by this light. It displays your inventive personality and is the ideal fusion of modern design and rustic charm. Because of its warm, handcrafted glow, every meal shared under this lamp becomes a memorable moment.
17. Ladder Bookshelf
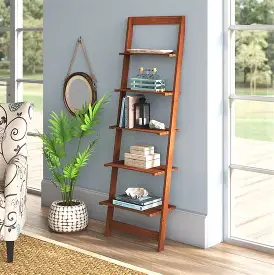
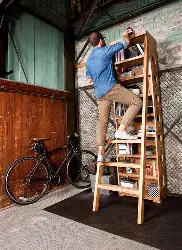
A ladder bookshelf is a creative and space-saving way to repurpose an old ladder into a stylish piece of furniture. It adds a rustic, farmhouse, or modern vibe depending on how you finish it.
Here are some DIY ladder bookshelf ideas:
1. Leaning Ladder Bookshelf
- Take a wooden ladder and lean it against the wall.
- Add wooden planks across the rungs to form shelves.
- Secure the planks with screws or brackets for stability.
- Paint or stain the ladder to match your décor.
👉 Perfect for small spaces and minimalist interiors.
2. A-Frame Ladder Bookshelf
- Use two ladders (or one foldable ladder).
- Place them open in an “A” shape.
- Add wide wooden boards across the rungs, starting with the widest at the bottom and narrowest at the top.
- This creates a tiered bookshelf.
👉 Great for living rooms or offices.
3. Hanging Ladder Shelf
- Hang a sturdy wooden ladder horizontally on the wall using brackets or chains.
- Place planks or baskets on the rungs to hold books and décor.
👉 Works well as a statement piece above a desk or sofa.
4. Freestanding Ladder Bookshelf with Drawers
- Attach shelves directly between the two sides of a ladder.
- Add small storage boxes or drawers at the bottom for extra functionality.
👉 A mix of open shelving and hidden storage.
✨ Tips:
- Always sand and seal old ladders before use.
- Use wall anchors if leaning to ensure stability.
- Mix books with plants, picture frames, or baskets for a stylish display.
Would you like me to put together a step-by-step tutorial for the leaning ladder bookshelf (the easiest version)?
18. Drawer Planter
Ever consider turning old drawers into planters? Start by filling each drawer with dirt and drilling drainage holes. For a splash of colour, plant herbs or flowers.
For a striking visual effect, arrange them in your garden in a tiered display. In addition to repurposing abandoned furniture, this idea gives your outside area a quirky touch, making gardening enjoyable and imaginative.
19. Dresser Kitchen Island
A ladder bookshelf is a creative and space-saving way to repurpose an old ladder into a stylish piece of furniture. It adds a rustic, farmhouse, or modern vibe depending on how you finish it.
Here are some DIY ladder bookshelf ideas:
1. Leaning Ladder Bookshelf
- Take a wooden ladder and lean it against the wall.
- Add wooden planks across the rungs to form shelves.
- Secure the planks with screws or brackets for stability.
- Paint or stain the ladder to match your décor.
👉 Perfect for small spaces and minimalist interiors.
2. A-Frame Ladder Bookshelf
- Use two ladders (or one foldable ladder).
- Place them open in an “A” shape.
- Add wide wooden boards across the rungs, starting with the widest at the bottom and narrowest at the top.
- This creates a tiered bookshelf.
👉 Great for living rooms or offices.
3. Hanging Ladder Shelf
- Hang a sturdy wooden ladder horizontally on the wall using brackets or chains.
- Place planks or baskets on the rungs to hold books and décor.
👉 Works well as a statement piece above a desk or sofa.
4. Freestanding Ladder Bookshelf with Drawers
- Attach shelves directly between the two sides of a ladder.
- Add small storage boxes or drawers at the bottom for extra functionality.
👉 A mix of open shelving and hidden storage.
✨ Tips:
- Always sand and seal old ladders before use.
- Use wall anchors if leaning to ensure stability.
- Mix books with plants, picture frames, or baskets for a stylish display.
Would you like me to put together a step-by-step tutorial for the leaning ladder bookshelf (the easiest version)?
20. Teacup Garden Lights
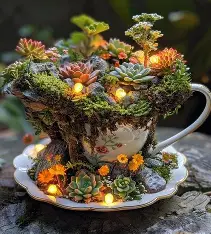
Teacup garden lights are a charming upcycling project where you turn old teacups into whimsical outdoor (or indoor) lighting. They’re perfect for adding a cozy, vintage touch to your garden, patio, or balcony. 🌿✨
Here are some creative ways to make them:
1. Teacup Candle Lights
- Place a candle (tea light or small pillar) inside a vintage teacup.
- Add sand, gravel, or wax beads at the bottom to keep it steady.
- Arrange them on garden tables, steps, or walls for a romantic glow.
👉 Simple and budget-friendly.
2. Hanging Teacup Fairy Lights
- Drill a small hole in the bottom of each teacup.
- Thread string lights or fairy lights through the holes.
- Hang the cups upside down on a tree branch, pergola, or along a fence.
👉 Creates a magical floating lantern effect.
3. Solar-Powered Teacup Lights
- Remove the top part of small solar garden lights.
- Fix the solar bulb inside a teacup.
- Place the teacup on a saucer or mount it on stakes in the garden.
👉 Eco-friendly and perfect for outdoor use.
4. Teacup Chandelier
- Attach several teacups (with drilled holes) to a metal frame or old chandelier base.
- Run small bulbs, LED candles, or fairy lights through them.
- Hang above a patio dining space for a vintage statement piece.
✨ Tips:
- Always use LED candles or solar lights for safety if indoors.
- Mix and match different teacup designs for a quirky look.
- For outdoor setups, waterproof wiring is essential.
Would you like me to write a step-by-step guide for the hanging teacup fairy lights (the most magical version)?