Here’s a fun roundup you can use for Best Earth Day Crafts for Kids: Celebrate Earth 🌎✨
Best Earth Day Crafts for Kids: Celebrate Earth
Earth Day is the perfect time to teach kids about caring for our planet while having fun with creative, hands-on activities. From upcycled art to nature-inspired projects, these crafts let kids celebrate Earth while learning the importance of reusing, recycling, and protecting our environment.
🌿 Easy and Fun Earth Day Crafts for Kids
- Coffee Filter Earth Craft
Kids can color coffee filters with blue and green markers, then spray lightly with water to create a watercolor-style planet Earth. - Handprint Earth Craft
Trace and cut out handprints to form the shape of Earth, symbolizing helping hands that care for our planet. - Recycled Tin Can Planters
Paint and decorate old cans, then fill them with soil and seeds for a perfect upcycled plant pot. - Salt Dough Earth Necklaces
Shape and paint little earth charms from salt dough for kids to wear proudly on Earth Day. - Bottle Cap Flowers
Use old bottle caps to make bright flowers—showing how “trash” can be turned into art. - Earth Day Cookies on a Stick
Bake cookies decorated with green and blue icing to look like Earth, then share them as eco-friendly treats. - Seed Bombs
Mix clay, compost, and wildflower seeds into balls. Kids can toss them in gardens or empty lots to help flowers grow. - Mosaic Earth Craft
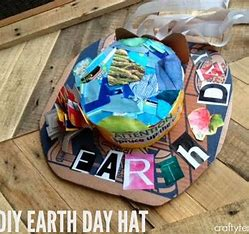
Cut old magazines into small pieces and arrange them into a big Earth collage—teaching reuse and creativity. - DIY Earth Day Hat (Printable Template)
A fun crown-style hat kids can decorate with pictures of trees, recycling bins, and animals. - Tin Foil Earth Art
Wrap cardboard circles in foil and paint blue and green designs for a shiny Earth-themed decoration.
✨ These crafts are not only fun but also meaningful—they encourage kids to think about protecting the Earth while making something special with their own hands.
Would you like me to make this into a kid-friendly step-by-step guide with pictures/printable templates so it’s ready to use in a classroom or at home?
- Hotel for Insects Craft
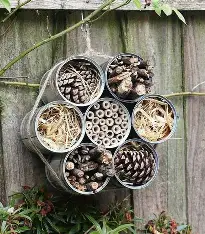
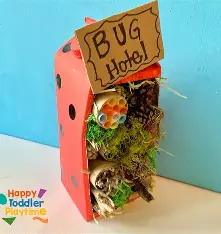
Tree bark, pine cones, small sticks, twigs, and a plastic bottle are required.
The process involves cutting a plastic bottle in half and punching two holes in the top to allow for the hanging of the bottle with a thread. An insect hostel will result from this. Discard the sides of the bottle after cutting it into two cylinders. Fill the bottle with natural materials like pinecones, branches, twigs, and bark. Anywhere insects and bugs might use it is the ideal location to hang it.
2. Pebble Art Craft
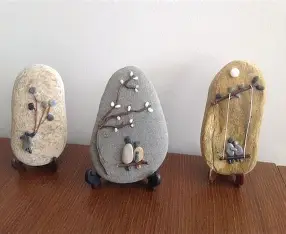
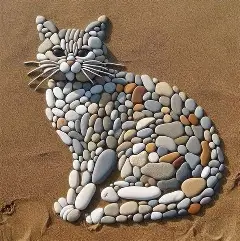
Here’s a simple and creative idea for a Pebble Art Craft that kids and adults can enjoy:
🪨 Pebble Art Craft
Pebble art is all about turning small stones into beautiful works of art. With just pebbles, glue, and a bit of imagination, you can make wall art, photo frames, or even story scenes!
Materials Needed:
- Smooth, clean pebbles (different sizes and shapes)
- Strong craft glue or hot glue (for older kids with supervision)
- A piece of cardboard, canvas, or wood as the base
- Acrylic paints and brushes (optional)
- Markers or pens for details
- Extras: twigs, dried leaves, shells, or fabric scraps for decoration
Steps:
- Collect Pebbles
Gather smooth pebbles from your garden, park, or beach. Wash and dry them. - Plan Your Design
Arrange pebbles on your base before gluing. Ideas:- A family of pebble people
- A tree with pebble leaves
- Birds on a branch
- A heart shape made of small pebbles
- Glue the Pebbles
Once you’re happy with your layout, carefully glue each pebble in place. - Add Details
- Paint eyes, clothes, or patterns on the pebbles.
- Use twigs for tree branches or leaves for natural accents.
- Draw background details with markers.
- Display Your Artwork
Let it dry completely, then hang it up or give it as a handmade gift.
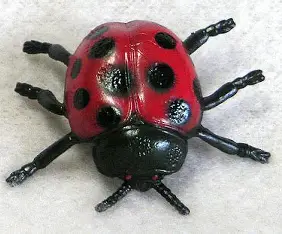
🌟 Fun Ideas for Kids
- Pebble Pets: Paint pebbles to look like ladybugs, turtles, or bees.
- Pebble Puzzle: Create a simple animal or flower design and leave it like a puzzle to reassemble.
- Pebble Frame: Decorate a picture frame with glued pebbles for a rustic look.
Would you like me to create a step-by-step Pebble Art project with printable design templates (like pebble people, trees, or animals) so kids can easily follow along?
3. Seed Jar Making

You will need water, paper towels, seeds, and transparent jars.
How to Do It: Prepare the jars and give one to every child. Give them instructions to line their jars with folded paper towels, then top them off with water. Next, ask them to gently lay the seeds on top of the paper towels, close to the jar’s edges. This allows them to watch the seeds as they slowly sprout. The seeds can be moved into the garden when they have sprouted.
4. Plastic Lid Ladybugs
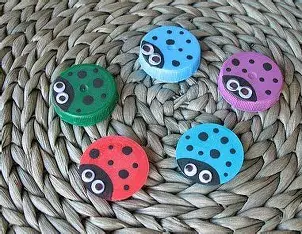
Here’s a super fun and eco-friendly craft idea for Plastic Lid Ladybugs 🐞 —perfect for Earth Day, bug-themed lessons, or just a creative afternoon!
🐞 Plastic Lid Ladybugs Craft
Instead of throwing away old plastic lids, turn them into adorable ladybugs. This upcycling craft teaches kids about reusing materials while making something cute and cheerful.
Materials Needed:
- Plastic lids (from jars, bottles, or containers)
- Red acrylic paint (or red permanent markers)
- Black acrylic paint or a black marker
- Googly eyes (or white paper + marker)
- Paintbrushes
- Craft glue
- Optional: magnets or safety pins to turn them into fridge magnets or wearable pins
Steps:
- Prepare the Lid
Wash and dry the plastic lid thoroughly. - Paint the Ladybug Body
Paint the lid red and let it dry completely. (If using markers, just color it in.) - Add Ladybug Details
- Paint or draw a black line down the middle for the wings.
- Add black dots on each side.
- Paint the top portion black for the head.
- Attach Eyes
Glue on googly eyes, or cut small white paper circles and draw black dots for DIY eyes. - Optional Finishing Touches
- Glue a small magnet on the back to make a fridge magnet.
- Attach a pin backing to wear it as a cute bug badge.
- Use several ladybugs to decorate flower pots or garden sticks.
🌟 Fun Variations
- Make a ladybug family with different-sized lids.
- Create other bugs too (bees with yellow lids, turtles with green lids, etc.).
- Add glitter paint for a sparkly look.
Would you like me to also put together a printable ladybug wing template (kids can glue on top of the lids) so it looks even more realistic?
5. Earth Day Ornaments Crafta
You’ll need paint, paintbrushes, oven, salt dough, and hanging thread or ribbon.
How to Do: This is among the most enjoyable ideas for an Earth Day project. Let the kids play with the dough and shape it into different shapes according on their tastes. Create a hole at the top of each ornament once they have finished shaping it so that string can be inserted to hang it. After drying the ornaments in the oven, give the children blue and green paint so they can adorn their masterpieces. The painted ornaments should then be hung from the ceiling.
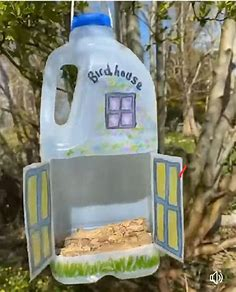
6. Milk Carton Bird House
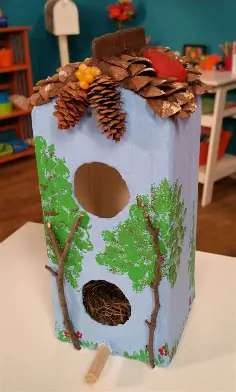
Here’s a fun, eco-friendly project for kids and families — a Milk Carton Bird House 🐦🌿. It’s a perfect way to reuse cartons while helping the birds in your garden!
🐦 Milk Carton Bird House Crafta
Materials Needed:
- Empty milk carton (washed and dried)
- Acrylic paint or spray paint (non-toxic, outdoor safe)
- Paintbrushes
- Craft knife or scissors (grown-up use only)
- String or twine (for hanging)
- Wooden stick, dowel, or twig (for the perch)
- Hot glue or strong craft glue
- Decorations: stickers, buttons, foam shapes, or markers
Steps:
- Prepare the Carton
Rinse the milk carton thoroughly and let it dry. Remove the top plastic spout if there is one. - Cut the Bird Entrance
With an adult’s help, cut a round hole about 2–3 inches from the bottom of the carton. The hole should be large enough for a bird to fit through. - Add a Perch
Make a small hole just under the entrance. Insert a twig, straw, or wooden stick and secure it with glue. This will be the bird’s perch. - Paint the Carton
Paint the entire outside with bright colors, patterns, or even camouflage shades to blend with the garden. Let it dry completely. - Decorate
Add fun extras like flowers, polka dots, or even turn it into a “bird café” with a painted sign! - Attach Hanging String
Poke two small holes at the top, thread the twine through, and knot it securely. - Hang It Up
Place your birdhouse in a shady, safe spot outdoors—preferably in a tree or on a porch where birds feel secure.
🌟 Fun Ideas & Variations
- Roof Shingles: Glue on bottle caps, popsicle sticks, or small pieces of cardboard.
- Feeding Station: Cut extra holes on the sides and fill with birdseed.
- Themed Houses: Turn it into a fairy house, mushroom house, or even a mini castle for the birds!
Would you like me to create a printable design template (with windows, doors, and decorations kids can color, cut, and glue onto the birdhouse) to make it even easier for classrooms or groups?
7. Marble Paint Crafta
You’ll need paper plates, tissue paper, shaving cream, and blue and green paint.
How to Do It: Your kids will appreciate this simple Earth Day craft. Give the kids some shaving cream and some blue and green paint, and let them mix and play with it to make it a messy but enjoyable experience. When the mixture is ready, ask them to spread the cream on a plate and let it dry in the sun.
8. Earth Day Crayons Crafta
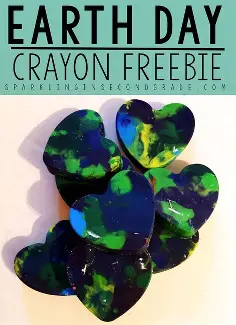

Here’s a simple and fun idea for Earth Day Crayons Craft 🌎🖍️
Earth Day Crayons Crafta
Instead of tossing out old, broken crayons, kids can recycle them into brand-new Earth-shaped crayons! This eco-friendly activity teaches the importance of reusing materials while creating something fun to color with.
✨ What You’ll Need:
- Old, broken crayons (blue, green, and optional white)
- Silicone mold (circle or Earth-shaped works best)
- Baking sheet
- Oven (with adult supervision)
🪴 How to Make It:
- Peel the Wrappers
Remove paper wrappers from old crayons. - Break and Sort
Snap crayons into small pieces. Group blue, green, and white together to mimic the colors of Earth. - Fill the Mold
Place crayon pieces into each mold cavity, mixing the colors randomly so they melt into an Earth-like swirl. - Bake
Preheat oven to 250°F (120°C). Put the silicone mold on a baking sheet and bake for 10–15 minutes until the crayons are fully melted. - Cool and Pop Out
Let them cool completely, then pop out your brand-new Earth Day crayons!
🌍 Why This Craft is Great
- Eco-friendly – teaches kids to recycle and reuse.
- Hands-on learning – fun way to celebrate Earth Day.
- Useful outcome – kids get cool swirl crayons to draw with after!
👉 Would you like me to also give you Earth Day printable coloring pages that pair perfectly with these recycled crayons?
9. Birdseed Ornament Crafta
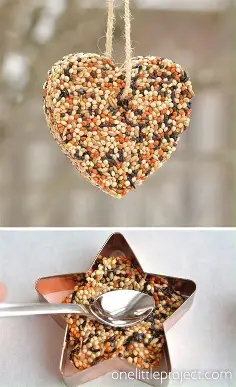
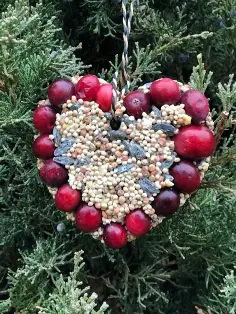
Items You’ll Need: string, cookie cutters, birdseed, gelatin (2 packets), corn syrup, straw, cold and boiling water and parchment paper
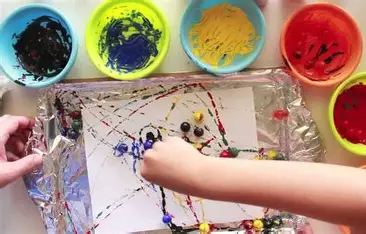
10. No Mess Painting Crafta
Here’s a fun “No Mess Painting Craft” idea that kids will love—and parents/teachers will appreciate since cleanup is super easy! 🎨✨
🖌 No-Mess Ziplock Bag Painting
Supplies:
- Large ziplock bag (gallon size works best)
- Washable paint (2–4 colors)
- Thick cardstock or white paper (cut to fit inside the bag)
- Tape (optional)
Steps:
- Place the sheet of paper inside the ziplock bag.
- Add a few drops/blobs of paint on top of the paper (don’t need too much).
- Seal the bag tightly. You can even tape the top shut for extra security.
- Kids can spread and mix the paint by pressing, squishing, or dragging their fingers across the bag.
- Once finished, carefully remove the paper and let it dry—or keep it inside for a reusable sensory art activity!
🎨 Variations:
- Shape Painting: Before placing the paper inside, cut it into fun shapes (hearts, stars, circles).
- Letter/Number Tracing: Place a printed worksheet under the bag and let kids trace letters or numbers with their finger while moving paint around.
- Glitter Sparkle: Add a pinch of glitter or sequins inside the bag for extra sparkle without the mess.
👉 This is perfect for toddlers, preschoolers, or classrooms where you want the fun of painting but none of the spills.
Would you like me to give you a list of different no-mess painting crafts (like cotton ball painting in a box, bubble wrap painting, etc.) or just keep it to this ziplock bag version?
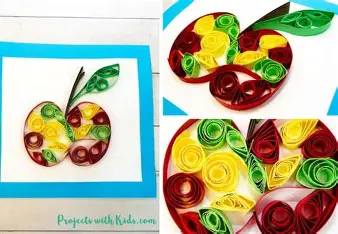
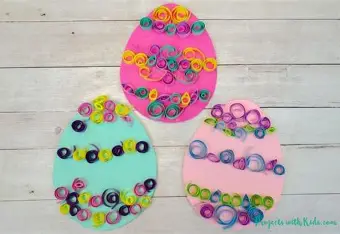
11. Paper Quilled Earth Day Craft
Coloured paper, scissors, acrylic paint, an old toothbrush, a chopstick, a pencil, glue, and a paintbrush are required.
How to Do It: To make your night sky background, combine white acrylic paint with a little water until it becomes runny. Make dots and splatters on your paper with an old toothbrush. Before continuing, let it dry completely. Using a plastic lid as a pattern, draw and cut out an earth form on black paper. Apply glue around the circle with a paintbrush, then use dark blue paper strips to make theshape of the earth. Next, wrap paper strips around a pencil or chopstick, dip them in white glue, and adhere them to your paper to form paper coils. To create original designs, encourage kids to try out various quilled shapes. To finish your Earth Day creation, add a heart made from red paper and tiny stars cut from white paper.
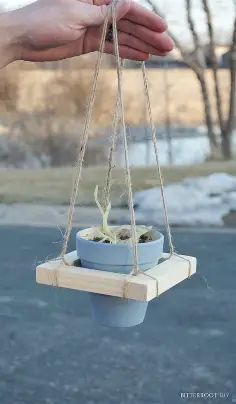
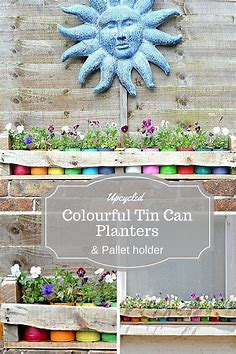
12. Hanging Planter Crafta
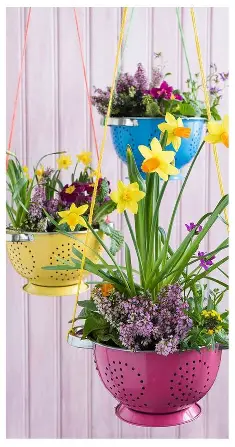
Here’s a simple Hanging Planter Craft idea that’s fun, budget-friendly, and works great for both kids and adults:
🌿 DIY Hanging Planter Crafta
Materials:
- Empty tin can / mason jar / plastic bottle (upcycled)
- Acrylic paint or spray paint (optional, for decorating)
- Paintbrushes
- Twine, yarn, rope, or macrame cord
- Scissors
- Soil + small plant or succulent
Steps:
- Prepare the Container:
- Clean your can, jar, or bottle.
- If using a plastic bottle, cut off the top half and smooth edges with tape.
- Decorate:
- Paint or decorate the outside however you like (stripes, polka dots, or even chalk paint for a rustic look).
- Let it dry completely.
- Add Hanging Strings:
- Cut 3–4 equal lengths of twine or rope.
- Tie each piece around the top rim of the planter, evenly spaced.
- Bring all the ends together at the top and tie into a knot to create a hanger.
- Planting:
- Add a few small drainage holes at the bottom (if possible).
- Fill with soil and plant your succulent, herb, or small flower.
- Hang & Display:
- Hang near a sunny window, balcony, or patio!
🌸 Variations:
- Macrame Style: Use macrame knots for a trendy boho look.
- Recycled Bottle Version: Cut a 2L soda bottle horizontally, decorate, and hang with string.
- Kid-Friendly: Let kids paint silly faces on cans or jars to make “plant people.”
Would you like me to make a list of 5–10 different hanging planter craft ideas (like coconut shell, teacup, old colander, etc.) for variety, or keep it focused on this tin can/jar style?
13. Cardboard Sun Crafta
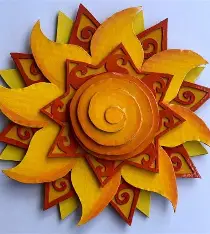
Paint, cardboard, a sun pattern, a cutting mat, tape or adhesive, a craft knife, and scissors are necessary.
How To Do: This is a fantastic Earth Day art project for kids if you’re looking for something enjoyable and simple. Print the template first, then cut out the pieces. Cut out the patterns after tracing them onto the desired area. Lastly, use glue or strong tape to put the parts together.
14. Earth Day Stained Glass Craft
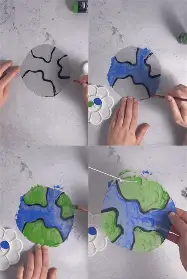

Here’s a beautiful and kid-friendly Earth Day Stained Glass Craft idea 🌍✨
🌎 Earth Day Stained Glass Craft
Materials:
- Black construction paper or cardstock
- Tissue paper in blue and green (for water + land)
- Pencil & scissors
- Glue stick or clear contact paper
- Optional: string or tape for hanging
Steps:
- Create the Earth Frame
- Fold a piece of black construction paper in half.
- Draw a large circle (Earth shape) and cut it out.
- Cut another smaller circle inside, leaving a ring (like a frame).
- Add “Land & Water”
- Tear or cut green and blue tissue paper into small pieces.
- Glue them onto a separate piece of wax paper or contact paper, overlapping slightly to look like continents and oceans.
- Assemble the Stained Glass Earth
- Place your tissue-covered wax/contact paper behind the Earth frame.
- Trim off the extra tissue edges.
- Glue or press the frame down so the “Earth” is complete.
- Hang & Shine
- Tape your stained glass Earth to a window.
- Watch the sunlight shine through the blue and green “glass”!
🌟 Variations:
- Heart-Shaped Earth: Cut a heart frame instead of a circle to symbolize love for the planet.
- Add Animals or Trees: Decorate the black frame with small cutouts of animals, recycling symbols, or trees.
- Group Project: Kids can each make a small Earth and combine them into a big stained-glass mural.
Would you like me to also give you a list of other Earth Day “stained glass” style crafts (like butterflies, recycling symbols, or flowers in stained glass form), or just keep it to the Earth version?
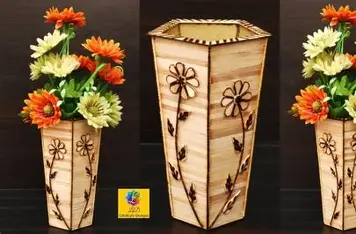
15. Tin Can Planters
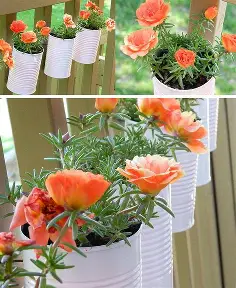
You’ll need a punch, old tin cans, a drill, a hammer, nail polish, cactus soil, and other craft supplies.
How to Do It: Make holes in the bottom of the tin can using a large nail and hammer to get it ready for planting. Then punch a little less than halfway down, making two little arm holes on each side. Bend the ends of a pipe cleaner to form hands after inserting it through the holes. Plant the plant of your choice after filling the can with dirt; if necessary, use succulent soil. Adding unique embellishments to the can, like pom-poms and googly eyes, will improve its appeal.
16. Grass Crown Crafta
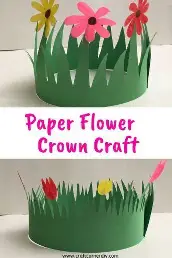
Here’s a fun Grass Crown Craft 🌱👑 —perfect for Earth Day, spring celebrations, or garden-themed activities.
🌿 Grass Crown Crafta
Materials:
- Green construction paper or cardstock (or recycle cereal boxes and paint them green)
- Scissors
- Glue or tape
- Stapler (optional for extra hold)
- Crayons, markers, or stickers (optional for decorating)
Steps:
- Make the Crown Base
- Cut two long strips of paper about 2–3 inches wide.
- Tape or staple them together to make one long strip that fits around the child’s head.
- Cut the Grass Blades
- From another sheet of green paper, cut long thin triangles or strips to look like tall blades of grass.
- Vary the heights to make it look natural.
- Attach the Grass
- Glue or tape the grass blades along one side of the crown strip (the top edge).
- Let the glue dry before shaping.
- Form the Crown
- Wrap the strip around the child’s head, size it, then tape or staple it closed into a circle.
- Decorate (Optional)
- Add paper flowers, bugs, or butterflies for a nature-themed crown.
- Use stickers or draw designs to personalize.
🌸 Variations:
- Wildflower Crown: Add colorful tissue paper flowers to the grass.
- Recycled Crown: Use old newspaper painted green instead of construction paper.
- Real Nature Crown: Tape on small leaves, petals, or grass clippings collected from outside.
Would you like me to also suggest a set of nature-inspired crowns (like flower crown, leaf crown, twig crown) for kids’ crafts, or keep it just to the grass crown?
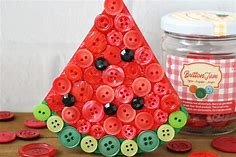
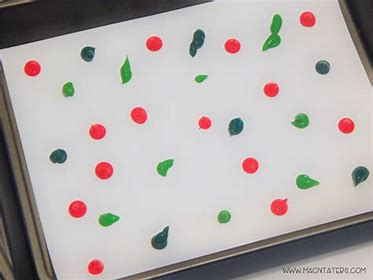
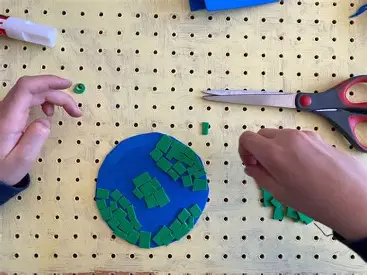
17. Mosaic Earth Craft

A pen or pencil, cardboard, old magazines and newspapers, scissors, glue, yarn, and beads are among the supplies you’ll need.
The first step is to print the pattern and place it over the cereal box’s back. To make an indentation, trace the pattern onto the cardboard. Outline the indentation lightly with a pen or pencil. Cut magazines or construction paper into tiny squares. Add the pieces to the circular shape using a glue stick and the pattern as a guide. When you’re done, turn it over and cut off any extra. Using yarn and beads, create a hanger and fasten it to the shape’s back.
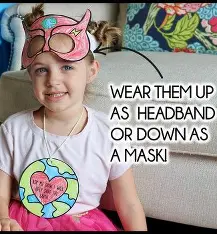
18. Earth Day Mask Craft
Here’s a creative Earth Day Mask Craft 🌍🎭 —a fun way for kids to “be the Earth” and celebrate protecting the planet!
🌎 Earth Day Mask Craft
Materials:
- Paper plate (or thick cardstock)
- Blue & green paint or markers (for oceans and land)
- Scissors
- Craft stick, string, or elastic band
- Glue or tape
- Optional: stickers (trees, animals, recycling symbols)
Steps:
- Make the Mask Base
- Cut out two eye holes from a paper plate.
- Trim the edges if you want a neater circle.
- Paint the Earth
- Paint the plate blue for the oceans.
- Add green “continent” shapes for land.
- Let it dry completely.
- Add Details (Optional)
- Decorate with small Earth Day stickers or drawings (trees, flowers, recycling signs, animals).
- Kids can even write messages like “Love the Earth” or “Go Green.”
- Attach Handle or Strap
- For a handheld mask: Glue a craft stick to one side.
- For a wearable mask: Punch small holes on each side and tie on string or elastic.
🌟 Variations:
- Happy & Sad Earth Mask: Make one side of the Earth smiling (healthy planet) and another side frowning (polluted Earth).
- Animal Masks for Earth Day: Instead of Earth, make masks of endangered animals to raise awareness.
- Group Project: Each child makes a mask of either the Earth, sun, tree, or animal for an Earth Day play.
Do you want me to also create a printable Earth Day mask template (with outlines for kids to color and cut), or just stick with the DIY painted plate version?
19. Watercolor Art Pillow
You will need a 14 by 14 piece of white fabric, two yards of trim, half a yard of fabric, watercolour and a brush. Water cup, Terrarium Pattern, paint pallet, and wax paper
How to Do It: To protect your surface and the terrarium pattern, print it out and cover it with wax paper. Cover with fabric. Get a cup of water ready to thin the paint and a paper plate ready for mixing the paint. Apply water to the paint and surface to create a watercolour look when painting the succulent leaves with the smallest brush. To create a shaded effect, paint one side and then pull the paint to the other side. Keep painting the succulent leaves, as well as the stem. Keep some sections dark and some light. Utilise the pattern as a guide. Use darker hues for details, shading, and dots. This time, thin the paint less. To prevent paint from getting on the pillow back fabric, let the design dry for a few hours. Lastly, add trim to the pillow and sew an envelope back.
20. Bird Feeder Craft

Here’s a simple and eco-friendly Bird Feeder Craft 🐦🌿 —a great project for kids to connect with nature and help local birds.
🐦 Easy Bird Feeder Craft
Materials:
- Empty toilet paper roll or pinecone
- Peanut butter (or honey/sunflower butter for nut-free option)
- Birdseed
- String or yarn (if hanging)
- Butter knife or spoon
Steps (Toilet Paper Roll Feeder):
- Spread Peanut Butter
- Use a spoon/knife to coat the outside of the toilet paper roll with peanut butter.
- Roll in Seeds
- Pour birdseed into a shallow dish.
- Roll the peanut butter-covered tube in seeds until fully coated.
- Hang It Up
- Thread string through the tube and tie it to a tree branch, OR simply slide the roll onto a branch.
Steps (Pinecone Feeder):
- Choose a Pinecone
- Pick a large, open pinecone.
- Spread Peanut Butter
- Smear peanut butter into the cracks and edges.
- Add Birdseed
- Sprinkle or press birdseed onto the pinecone.
- Hang It
- Tie a piece of string at the top and hang from a tree.
🌟 Variations:
- Orange Peel Feeder: Scoop out half an orange, fill with birdseed, and hang with string.
- Milk Carton Feeder: Cut a window in a small carton, decorate, and fill with seed.
- Cookie Cutter Feeder: Mix birdseed with gelatin, press into cookie cutters, let dry, and hang with ribbon.
Would you like me to put together a list of 8–10 creative bird feeder craft ideas (using things like plastic bottles, teacups, mason jars, etc.) so you have multiple options?
21. Collage Art
Items You’ll Need: Paper, gum, scissors, cardboard, bits of paper, and pieces of cloth and leaves
How to Do It: Kindergarteners will love this Earth Day craft. Collect little, useless objects, such as those mentioned above, and encourage the kids to create art with them. They can make a collage of anything they choose, including a park landscape, a cityscape, a picture, or anything else they want.
22. Craft Stick Flower Pots
Here’s a cheerful Craft Stick Flower Pot idea 🌸🌿 —a colorful way to plant flowers or herbs using popsicle sticks!
🌼 Craft Stick Flower Pots
Materials:
- Empty tin can, yogurt cup, or plastic container (washed and dried)
- Craft sticks / popsicle sticks
- Hot glue gun or strong craft glue
- Paints or markers (to decorate sticks)
- Soil + small plant or flowers
Steps:
- Prepare the Container
- Clean your can or cup.
- If it has sharp edges (like a tin can), cover them with tape for safety.
- Decorate the Craft Sticks
- Paint, color, or leave natural depending on the style you want.
- You can make rainbow colors, patterns, or even write words on them.
- Attach the Sticks
- Glue the craft sticks vertically all the way around the outside of the container until it’s covered.
- Line them up evenly so it looks like a wooden fence.
- Planting
- Fill the container with soil.
- Plant flowers, herbs, or succulents inside.
- Finishing Touch
- Tie a ribbon or piece of twine around the pot for decoration.
- Add stickers, gems, or painted details for a fun look.
🌟 Variations:
- Mini Planters: Use smaller containers like yogurt cups for little succulents.
- Classroom Project: Each child decorates a stick, then combine to make a class flower pot.
- Seasonal Themes: Paint sticks in Earth Day colors (blue & green), spring pastels, or holiday colors.
Would you like me to also share 5–6 creative variations of flower pots made from recycled materials (like bottle planters, tin can planters, CD mosaic pots, etc.) along with the craft stick version?
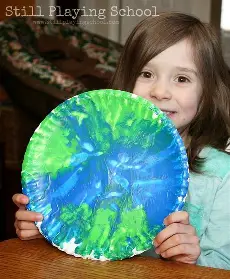
23. Hand Print Earth Day Craft
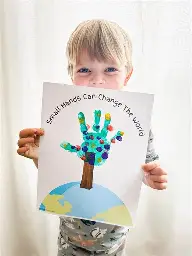
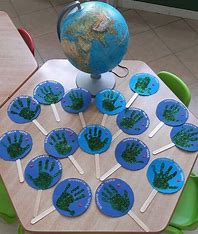
You’ll need a paintbrush, paper, water, a paper plate, and blue and green paint.
How to Do It: To start, pour green and blue paint into different paper plates and mix each with a little water. After that, give the kids instructions to either dip their hands into the paint and create handprints on a large piece of chart paper, or paint their hands with both colours. The chart paper can be used as an Earth Day decoration by hanging it in the room and writing each child’s name next to their handprint.