1. Cardboard Sculptures
Use old cardboard boxes to create sculptures of animals, abstract art, or even miniature cities.
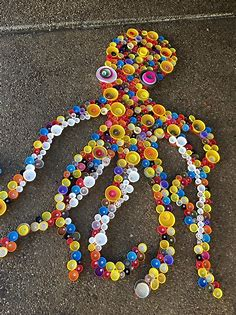
2. Bottle Cap Mosaics
Collect metal or plastic bottle caps and arrange them in a mosaic pattern to create colorful wall art.
3. Plastic Bottle Flowers
Turn empty plastic bottles into beautiful flowers by cutting and painting the bottle parts.
4. CD Mosaics
Break or cut old CDs into small pieces and create a reflective, shimmering mosaic art piece.
5. Tin Can Lanterns
Repurpose empty tin cans into lanterns by punching holes in them and adding a candle inside.
6. Newspaper Collages
Use old newspapers to create intricate collages of animals, landscapes, or abstract designs.
7. Magazine Fashion Design
Cut out images from magazines to design fashion looks or entire outfits on paper.
8. Glass Bottle Planters
Recycle glass bottles into stylish planters for herbs, flowers, or succulents by cutting and painting them.
9. Shoe Box Dioramas
Create small, detailed dioramas in old shoe boxes, such as historical scenes or miniature natural landscapes.
10. Plastic Fork Flowers
Transform disposable plastic forks into colorful flowers by bending and painting the prongs.
11. Wooden Pallet Furniture
Use reclaimed wooden pallets to create unique furniture like tables, benches, and shelves.
12. Denim Jeans Art
Old denim jeans can be cut and sewn into colorful quilts or used to create unique wall art pieces.
13. Toilet Paper Roll Crafts
Transform toilet paper rolls into fun crafts like animals, jewelry holders, or even wall art.
14. Cereal Box Notebooks
Use empty cereal boxes as covers for DIY notebooks, journals, or sketchbooks.
15. Plastic Spoon Sculptures
Use plastic spoons to create sculptures of birds, flowers, or abstract designs by gluing them together.
16. Button Art
Collect old buttons and glue them onto a canvas or piece of wood to create textured artwork.
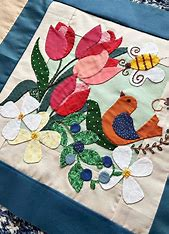
17. Fabric Scrap Wall Art
Use scraps of fabric to create wall hangings, abstract art, or even a decorative quilt.
18. Rubber Band Bracelets
Recycle old rubber bands into colorful and creative wearable art like bracelets and rings.
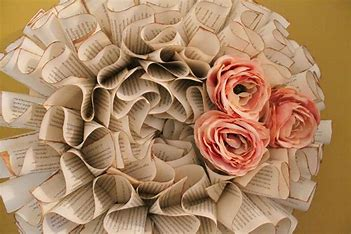
19. Old Book Art
Repurpose old books into art by folding, cutting, or painting them to create 3D sculptures or wall art.
20. Pallet Wood Wall Art
Collect old wooden pallets and turn them into rustic, personalized wall art by painting or distressing the wood.
21. Recycled Tin Can Wind Chimes
Combine old tin cans, beads, and string to create a set of musical wind chimes.
22. Wine Cork Stamps
Cut wine corks into different shapes and patterns to use them as stamps for printmaking projects.
23. Junk Mail Scrapbook
Create a scrapbook using pieces of junk mail, postcards, and other paper waste.
24. Plastic Bag Weaving
Cut old plastic bags into strips and weave them into placemats, coasters, or tote bags.
25. Soda Can Art
Flatten soda cans and use the metal to create abstract designs or even figures by cutting and shaping the material.
These art projects not only reduce waste but also give new life to everyday objects!
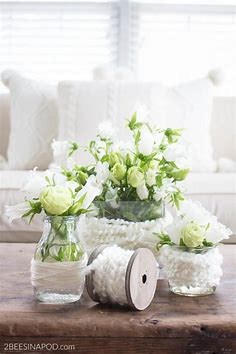
- Upcycled Bead Curtain DIY
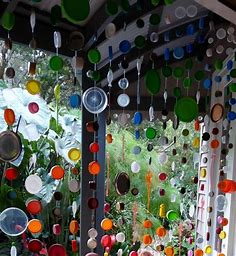
Making colourful bead curtains out of used plastic bottles has two advantages: it gives your living areas a pop of colour and revitalises what would otherwise be trash. In addition to helping you live a more sustainable lifestyle, these curtains may mimic the look of stained glass by catching the light and creating a spectrum across your space. The bottles are cut into rings or other shapes for these beaded drapes, and then they are painted or slightly melted to provide distinctive textures. These curtains serve as conversation starters and environmentally conscious statements as they sway in the wind, encouraging others to recycle in novel ways. It’s a lovely reminder that, one bottle at a time, art and environmental care can work together to alter our homes and the earth.
2. Denim Patchwork Quilts
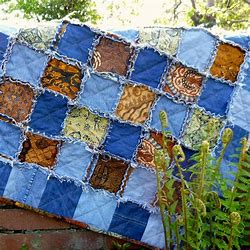
Denim Patchwork Quilts: A Creative and Sustainable Craft
Denim patchwork quilts are a beautiful way to reuse old jeans and denim clothing while creating something practical, cozy, and full of character. This eco-friendly project is perfect for artists, crafters, or anyone looking to reduce textile waste in a stylish way.
Why Choose Denim for Patchwork Quilts?
- Durable: Denim is a strong, long-lasting fabric, making it ideal for quilts that will be used frequently.
- Textured Look: Different washes and shades of blue give the quilt a naturally rich and varied texture.
- Eco-Friendly: Repurposing old jeans helps keep textiles out of landfills.
- Customizable: Each piece of denim tells a story – pockets, seams, and worn patches add personality.
What You’ll Need
- Old denim jeans or jackets
- Sharp fabric scissors or rotary cutter
- Quilting ruler or measuring tape
- Sewing machine (or needle and thread for hand-stitching)
- Cotton or fleece backing fabric
- Batting (optional, for extra warmth)
- Pins or fabric clips
- Iron and ironing board
Steps to Create a Denim Patchwork Quilt
- Collect and Prepare Denim
- Gather various shades of denim.
- Cut along seams and remove bulky parts like waistbands and zippers.
- Wash and dry all denim to ensure it’s clean and preshrunk.
- Cut Denim Squares or Shapes
- Standard square sizes are 5”x5” or 6”x6”, but you can get creative with triangles, hexagons, or strips.
- Use a rotary cutter for clean, even cuts.
- Design Your Layout
- Lay out your denim pieces on a flat surface.
- Play with color arrangement, mixing light, medium, and dark denim for contrast.
- Add details like pockets or logos for added flair.
- Sew the Pieces Together
- Use a ¼” seam allowance and sew pieces row by row.
- Press seams open or to one side with an iron.
- Assemble the Quilt Layers
- Lay the backing fabric face down, then batting (if using), and finally the denim top layer.
- Pin or clip all layers together.
- Quilt the Layers
- Stitch in the ditch (along the seams) or use decorative stitches to secure the layers.
- Keep stitches fairly simple – denim can be thick and tough to quilt through.
- Bind the Edges
- Use denim strips or another sturdy fabric to bind the edges and finish the quilt.
- Fold, press, and stitch the binding securely.
Creative Tips
- Add embroidery or hand-stitched designs to personalize your quilt.
- Use contrasting thread colors for decorative stitching.
- Combine denim with other recycled fabrics for a more eclectic look.
Final Thoughts
Denim patchwork quilts are more than just warm blankets – they’re artistic statements of sustainability, resourcefulness, and creativity. Each quilt is unique, reflecting the wear and life of the denim it’s made from. Whether you’re a beginner or seasoned quilter, this project is a fun way to upcycle and express your personal style.
Want help planning a layout or choosing a pattern style? I’d be happy to sketch one out or offer ideas!
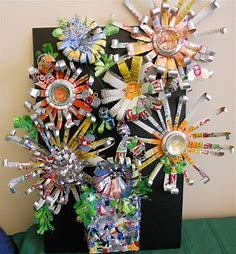
3. Candy Wrapper Origami Art
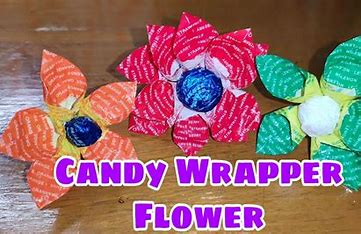
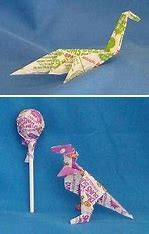
Candy wrappers, which are frequently thrown away carelessly, have enormous potential in the hands of a creative artist. What would have otherwise ended up in the trash is transformed into beautiful, vibrant creations by the delicate folds of origami. This unusual kind of art not only stimulates our creativity but also highlights a serious message about sustainability.
Each origami piece is a unique treasure due to the variety and brilliance of candy wrappers. These underutilised materials are being transformed by artists worldwide into everything from intricate animals to delicate flowers, demonstrating that beauty can truly emerge from the most unlikely sources. The endless potential of turning commonplace objects into something spectacular is highlighted by this fusion of creativity and environmental awareness.
4. Tin Can Pencil Holders
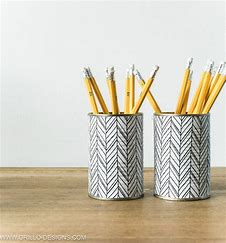
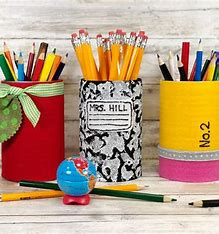
Tin Can Pencil Holders: Simple, Stylish, and Sustainable
Tin can pencil holders are a fun, eco-friendly craft that’s perfect for organizing your workspace while giving new life to used cans. With a bit of creativity, you can transform everyday food cans into personalized desk accessories that are both functional and decorative.
Why Make Tin Can Pencil Holders?
- ♻️ Eco-friendly: Reuses materials that would otherwise go to waste.
- 💰 Budget-friendly: Uses items you already have at home.
- 🎨 Creative freedom: Can be customized to suit any style or theme.
- 🧒 Great for all ages: Simple enough for kids, fun enough for adults.
What You’ll Need
- Empty tin cans (soup, beans, coffee, etc.)
- Paint (acrylic or spray paint)
- Paintbrushes or sponges
- Decorative materials (stickers, ribbon, twine, fabric, washi tape, scrapbook paper)
- Hot glue gun or craft glue
- Sandpaper (optional, to smooth edges)
- Scissors
How to Make a Tin Can Pencil Holder
1. Clean and Prepare the Can
- Rinse the can thoroughly and remove the label.
- If needed, sand any sharp edges around the rim.
- Dry completely before decorating.
2. Paint or Cover the Can
- Apply a base coat of paint and let it dry. You can use multiple colors, patterns, or stencils for designs.
- Or, wrap the can with fabric, decorative paper, or scrapbook paper using glue.
- Let everything dry before moving to the next step.
3. Add Decorations
- Wrap twine, yarn, or ribbon around the can for a rustic or cozy look.
- Use stickers, buttons, or washi tape to add color and personality.
- Add labels or name tags if making multiple holders (e.g., “Pens,” “Markers,” “Brushes”).
4. Finishing Touches
- Optionally seal your design with a clear varnish spray to protect it.
- Add felt or cork to the bottom of the can to prevent scratching your desk.
Creative Variations
- Chalkboard paint: Create a writable surface to label your holder with chalk.
- Nature-inspired: Use bark, twigs, or dried flowers for a natural look.
- Themed holders: Make matching sets for office supplies, craft tools, or kids’ coloring materials.
Bonus Ideas
- Group several cans together and glue them to a base to create a multi-section organizer.
- Use different can sizes for storing various tools (paintbrushes, scissors, rulers, etc.).
Final Thoughts
Tin can pencil holders are a small project with big creative potential. Whether you’re sprucing up your own desk or crafting with kids, they’re a great way to blend sustainability with everyday utility. Plus, they make great handmade gifts!
Want inspiration for a specific style or theme—like boho, modern, or vintage? I can help design one with you!
5. Computer Disk Door Wreaths
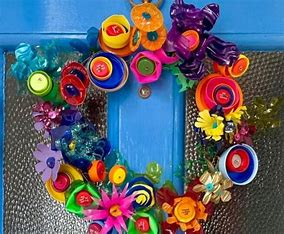
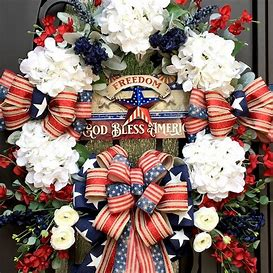
In a time when technology is developing at a dizzying rate, old computer discs are given a new lease on life as decorative door wreaths. This eco-friendly art piece combines modern design ideas with nostalgia to transform outdated technology into a welcoming emblem. In addition to sparking discussions about sustainability, these wreaths provide home décor a touch of nostalgic style.
Making these wreaths is an imaginative repurposing experience that transforms the formerly state-of-the-art storage devices with a dash of do-it-yourself creativity. Visitors are dazzled by the striking sculpture created by the discs’ reflective surfaces, which catch the light magnificently. It’s a great way to honour the technology of the past while encouraging more ecologically friendly decorating and art.
6. Spoon Garden Markers
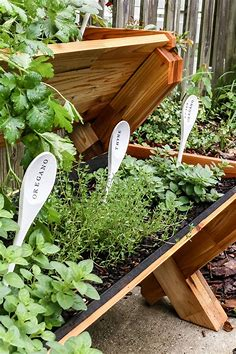
Spoon Garden Markers: Charming DIY Labels for Your Plants
Spoon garden markers are a fun and functional way to label herbs, vegetables, or flowers in your garden using old or mismatched cutlery. Whether you’re going for rustic charm or playful creativity, this eco-friendly project is perfect for gardeners of all ages.
Why Use Spoons as Garden Markers?
- ♻️ Upcycles old utensils into something beautiful and useful.
- ☀️ Weather-resistant: Metal spoons can withstand outdoor elements.
- 🎨 Customizable: Paint, stamp, or engrave to suit your garden’s style.
- 🌱 Easy to make: No special tools required for most designs.
Materials You’ll Need
- Old metal or plastic spoons (thrift stores are a great source!)
- Permanent markers or paint pens
- Acrylic paint (optional)
- Letter stamps and hammer (for engraving metal, optional)
- Clear sealant spray (for weatherproofing)
- Sandpaper (optional, for prep)
How to Make Spoon Garden Markers
1. Clean and Prep the Spoons
- Wash and dry your spoons thoroughly.
- Lightly sand the surface if you plan to paint, to help the paint adhere.
2. Choose a Decorating Method
- Painted: Apply acrylic paint to the spoon bowl and let it dry. Then, write the plant name with a paint pen or permanent marker.
- Stamped (for metal spoons): Use metal letter stamps and a hammer to imprint the plant name into the spoon’s surface.
- Handwritten: Simply write the name directly onto the spoon with a permanent marker for a quick and easy option.
3. Seal Your Marker (Optional but Recommended)
- Use a clear sealant spray to protect the writing or paint from fading in the sun and rain.
4. Place in the Garden
- Push the handle into the soil in front of each plant or pot.
Creative Ideas & Variations
- Color-code your garden: Use different colors for herbs, veggies, or flowers.
- Decorate with doodles: Add leaves, sunflowers, or veggie illustrations.
- Use teaspoon/tablespoon sizes: Smaller for pots, larger for garden beds.
- Twist the handle: Use pliers to curl or spiral the handle for a decorative touch.
Bonus Tip
Make a full set as a thoughtful handmade gift for a gardening friend!
Final Thoughts
Spoon garden markers are a whimsical, eco-conscious addition to any garden. They’re not only helpful for identifying plants but also add a personal, artistic touch to your outdoor space. Whether you go bold and colorful or rustic and minimalist, your garden will thank you!
Need a few design sketches or label ideas for popular herbs and veggies? I’ve got you! 🌿
7. Ladder Bookshelf Upcycling Ideas
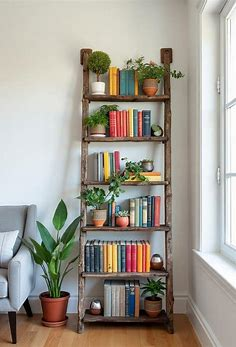
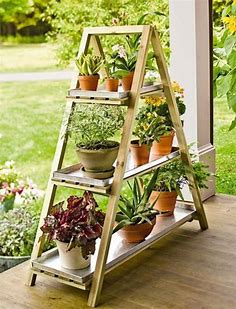
Ladder Bookshelf Upcycling Ideas: Turn Old Ladders into Stylish Shelving
Repurposing an old ladder into a bookshelf is one of the most creative and functional ways to upcycle. It’s a perfect mix of rustic charm and practical storage, making it a favorite for DIYers and eco-conscious decorators alike. Whether your style is farmhouse, industrial, or boho, a ladder bookshelf can fit right in.
Why Upcycle a Ladder Into a Bookshelf?
- ♻️ Eco-friendly: Reuse materials and reduce waste.
- 💰 Budget-friendly: Save money by avoiding store-bought shelving.
- 🎨 Customizable: Paint, stain, or decorate to match your space.
- 🛠️ Easy DIY: No advanced tools or carpentry skills required.
Types of Ladder Bookshelf Projects
1. Leaning Ladder Shelf
- How it works: Simply lean a wooden ladder against the wall and add planks across the rungs to act as shelves.
- Best for: Books, plants, or lightweight decor items.
- Pro tip: Secure the ladder to the wall for safety, especially in homes with kids or pets.
2. Hanging Ladder Shelf
- How it works: Hang a ladder horizontally on the wall and attach shelves across the rungs.
- Best for: Displaying small books, succulents, or kitchenware.
- Pro tip: Use sturdy brackets or rope for a rustic, floating look.
3. Step Ladder Shelf
- How it works: Open an A-frame ladder and place wooden boards across the steps from side to side.
- Best for: Corner shelving or a freestanding unit in any room.
- Pro tip: Great for a tiered plant stand or kitchen storage.
4. Wall-Mounted Half-Ladder Shelf
- How it works: Cut a ladder in half lengthwise and mount it vertically on the wall with small boards attached for shelves.
- Best for: Narrow spaces, entryways, or bedside shelving.
- Pro tip: Use for keys, frames, or decorative items.
5. Ladder Bookshelf with Drawers or Baskets
- How it works: Combine an old ladder with small drawers, crates, or baskets for extra storage.
- Best for: Organizing magazines, office supplies, or toys.
- Pro tip: Paint baskets to match your room’s color scheme.
Styling Ideas
- Rustic: Keep the ladder’s natural wood look or distress it with sandpaper and whitewash.
- Modern: Paint the ladder a solid color (like matte black or white) for a sleek finish.
- Boho: Add macrame, fairy lights, or woven baskets for a cozy, eclectic vibe.
- Industrial: Pair with metal brackets or pipes for a rugged look.
Where to Use a Ladder Bookshelf
- 📚 Living Room: For books, photos, and decorative objects.
- 🌿 Garden or Balcony: As a vertical planter or herb shelf.
- 🧼 Bathroom: Store towels, toiletries, and baskets.
- 🍴 Kitchen: Display cookbooks, mugs, or jars.
- 🛏️ Bedroom: Use as a nightstand alternative or blanket ladder.
Final Thoughts
Ladder bookshelves are a creative, cost-effective way to breathe new life into an old object while adding character to your space. With just a few simple materials and a splash of creativity, you can create a piece that’s both functional and fabulous.
Need help choosing a design or planning the layout? I can sketch out a few ideas or walk you through a step-by-step build. Just say the word! 🪜📚Output in
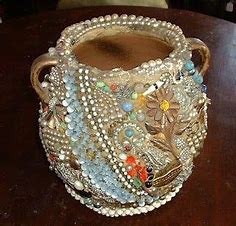
8. Yarn-Wrapped Recycled Vases
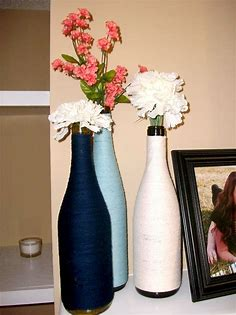
Not only is it creative to turn old, unwanted sweaters into beautiful, one-of-a-kind vases, but it also makes a fantastic statement about sustainability. You can breathe new life into these clothing by carefully unravelling the yarn. In addition to cutting waste, this method creates a really unique touch in interior design.
Picture your next focal point: a vase filled with entwined recollections of balmy winter days, now encased in the vivid, cosy colours of woollen yarn. These installations stand out because they not only add colour and texture to rooms, but they also convey thoughts and tales. This material repurposing demonstrates the limitless potential of upcycling and the elegance of giving vintage items a new purpose.
9. Bottle Cap Wall Murals
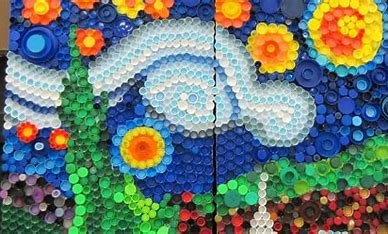

Bottle Cap Wall Murals: Colorful, Eco-Friendly Art for Any Space
Bottle cap wall murals are an eye-catching and sustainable way to turn everyday waste into vibrant works of art. Whether you’re decorating a community wall, a backyard fence, or a kid’s room, using plastic or metal bottle caps can bring your design to life with texture, color, and creativity.
Why Make a Bottle Cap Wall Mural?
- ♻️ Reuses waste: Keeps bottle caps out of landfills.
- 🎨 Unique art form: Adds texture, dimension, and bold colors.
- 👪 Great group project: Ideal for classrooms, community centers, or family fun.
- 💸 Low-cost: Materials are often free or recycled.
What You’ll Need
- Hundreds (or thousands!) of plastic or metal bottle caps in various colors and sizes
- Plywood board, outdoor wall, or sturdy surface
- Strong adhesive (hot glue, silicone, or construction adhesive)
- Paint (optional, for background or guidelines)
- Pencil or chalk (for sketching your design)
- Screws and drill (if mounting a board)
Steps to Create a Bottle Cap Wall Mural
1. Collect and Sort Bottle Caps
- Ask friends, neighbors, restaurants, or cafes to save caps.
- Sort by color and size to make design planning easier.
2. Plan Your Design
- Sketch your mural on paper or use grid software.
- Choose a subject: flowers, animals, nature scenes, abstract patterns, or a meaningful quote.
- Use a pencil or chalk to lightly draw your design onto the wall or board.
3. Prepare the Surface
- If using wood, sand and prime the surface.
- For walls, make sure the area is clean and dry.
- Optionally, paint the background for added depth or color.
4. Attach the Bottle Caps
- Begin placing caps according to your design, starting from the bottom or center.
- Use strong adhesive to secure each cap firmly.
- For larger murals, work in sections.
5. Finish and Seal
- Let the mural dry completely.
- For outdoor murals, seal with a weatherproof coating to protect against the elements.
Creative Variations
- Use gradients: Arrange caps by shade to create a fading or 3D effect.
- Add mixed media: Incorporate buttons, small lids, or beads for detail.
- Backlight the mural: If installed indoors, LED lights behind the mural can create a glowing effect.
Where to Display
- 🌆 Community Centers or Schools: Great for collaborative projects.
- 🏡 Home Decor: Add a pop of color to fences, patios, or playrooms.
- 🌍 Eco Exhibitions or Gardens: Showcase sustainability through art.
Tips for Success
- Make a mockup: Lay caps on a table to test color patterns before gluing.
- Clean caps: Wash all caps before use to prevent odor or mold.
- Get others involved: Bottle cap murals are perfect for group participation.
Final Thoughts
Bottle cap wall murals are more than just upcycled art—they’re a creative celebration of color, collaboration, and sustainability. Every cap tells a story, and together, they can create something truly memorable.
Need help designing a pattern or planning your layout? I’d be happy to help you brainstorm or even map out your mural idea! 🎨♻️
Get smarter respons
10. Bike Part Clock Art


Transforming discarded bike parts into practical art pieces mixes environmental responsibility with creative expression. In addition to telling the time, clocks made of sprockets, gears, and chains can also narrate tales of past exploits and the unrelenting passing of time. These designs demonstrate how things that are deemed waste may be given a second chance at becoming eye-catching home décor, which is a testament to the beauty of upcycling.
Despite the wear and tear from its prior life on the road, every clock is a one-of-a-kind work of art. Each component must be chosen and put together with a combination of mechanical skill and artistic vision to create a work that is a celebration of craftsmanship and an ode to sustainable living. This method pushes the functional into the realm of the remarkable while also cutting waste.
11. Denim Coin Purse
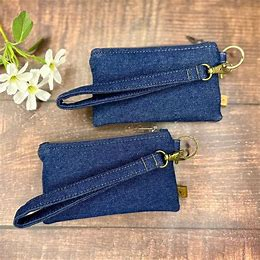

Denim Coin Purse: A Stylish Way to Upcycle Old Jeans
A denim coin purse is a fun and practical DIY project that gives new life to worn-out jeans. These mini pouches are perfect for carrying coins, small items, or even earbuds—and they make great handmade gifts, too! With just a few basic materials, you can turn denim scraps into something cute, durable, and totally unique.
Why Make a Denim Coin Purse?
- ♻️ Eco-friendly: Uses leftover denim from old jeans.
- 💸 Cost-effective: Requires minimal materials—most of which you already have.
- 🎁 Giftable: Perfect as a personalized, handmade gift.
- ✂️ Beginner-friendly: Great sewing project for all skill levels.
What You’ll Need
- Scrap denim (from old jeans or jackets)
- Fabric lining (optional but recommended)
- Zipper (4–6 inches)
- Sewing machine or hand-sewing needle
- Thread
- Scissors or rotary cutter
- Pins or fabric clips
- Iron (for pressing)
Steps to Make a Denim Coin Purse
1. Cut the Fabric
- Cut two identical denim rectangles (e.g., 5” x 4”).
- Cut two lining pieces the same size, if using.
2. Attach the Zipper
- Place one denim piece face up.
- Lay the zipper face down on the top edge.
- Place the lining fabric face down on top of the zipper (you’ll have a sandwich).
- Pin and sew along the edge.
- Repeat with the other side of the zipper and remaining fabric pieces.
3. Topstitch (Optional)
- Open up the fabric and topstitch along the zipper to keep everything in place and give a clean, finished look.
4. Sew Around the Edges
- Open the zipper halfway (important for turning it right side out later!).
- Pin the layers right sides together: lining with lining, denim with denim.
- Sew all the way around, leaving a small opening in the lining for turning.
5. Trim and Turn
- Trim the corners to reduce bulk.
- Turn the pouch right side out through the opening in the lining and pull the denim through the zipper.
- Stitch the lining closed.
6. Final Touch
- Press the pouch with an iron to flatten and shape it.
- Add embellishments like a denim pocket piece, patch, embroidery, or a keyring loop.
Creative Variations
- Add a patch or embroidery for a personalized touch.
- Use a colorful zipper or contrast lining for a pop of fun.
- Shape it differently: Try circular or triangle shapes for unique styles.
- Repurpose a jeans pocket as the front or back of your coin purse.
Final Thoughts
A denim coin purse is a small project with big style potential. Whether you’re crafting for fun, for gifts, or to reduce waste, it’s a great way to transform something old into something beautiful and functional.
Want a pattern template or step-by-step image guide? Just let me know—I’d be happy to help you design your perfect coin purse! 👖💙🪡
12. Upcycled Paper Crafting Ideas
In addition to giving workplace paper waste a new lease of life, handmade paper lends a bit of rustic appeal to any project. By involving the artist in an environmentally conscious endeavour, this sustainable craft turns the ordinary into something exquisitely detailed and distinctively individual. Making handmade paper is a peaceful experience that promotes awareness of waste and consumption.
Moreover, projects utilising handmade paper, such as notebooks, greeting cards, or even wall art, offer a story of metamorphosis. This story gives each piece more depth and significance, transforming it from a beautiful object into a topic of discussion about creativity and sustainability. Waste is now the start of something exciting rather than the conclusion of a tale thanks to this creative endeavour.
13. Repurposed Can Lamps
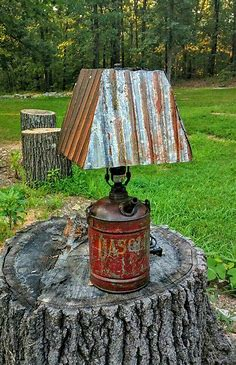
“Repurposed can lamps” are a super creative and eco-friendly way to turn everyday tin cans—like soup or coffee cans—into functional and artistic light fixtures. People use them as pendant lights, table lamps, or even lanterns. Want a few ideas to get inspired?
Here are some common approaches:
1. Punched Tin Lanterns
- Clean out a can and remove the label.
- Fill with water and freeze it (so it won’t dent while punching).
- Use a hammer and nail to punch decorative patterns (stars, moons, flowers).
- Add a tea light or LED inside for a glowing effect.
2. Hanging Pendant Lights
- Drill a hole in the bottom for a light socket.
- Paint or decorate the outside.
- Hang with a cord kit to make an industrial-style pendant lamp.
3. Table or Desk Lamps
- Stack multiple cans or mount one on a wooden base.
- Insert a bulb and use fabric, paint, or metal finishes for a unique look.
4. Wall Sconces
- Cut the can in half vertically or use it whole, mounted to the wall.
- Add a bulb and direct the light upward or downward.
Would you like a quick guide or some photos for inspiration?