
DIY Projects by Big DIY Ideas” sounds like a collection of creative and fun home improvement or craft projects. If you’re looking for ideas or inspiration from this source, you can expect various types of DIY projects, from simple home decor to more advanced woodworking or renovation tasks. Big DIY Ideas often share step-by-step tutorials, material lists, and tips to help you successfully complete a project on your own.
Here are a few types of DIY projects that you might find in a similar collection:
- Home Decor: Transforming your living space with handmade art, upcycled furniture, or custom decorations.
- Example: Creating a unique wall art piece using reclaimed wood or designing your own throw pillows.
- Gardening Projects: Crafting planters, raised garden beds, or even creating an indoor herb garden.
- Example: Building a vertical garden for small spaces or decorating plant pots.
- Furniture Building: Simple woodworking projects to create shelves, tables, or chairs.
- Example: A DIY coffee table made from pallets or a minimalist bookcase.
- Organization Solutions: Creating storage solutions to tidy up your space.
- Example: Crafting a custom pegboard for organizing tools or making a decorative jewelry organizer.
- Upcycling and Recycling: Turning old materials or furniture into something new and useful.
- Example: Upcycling old denim jeans into a tote bag or converting an old ladder into a bookshelf.
Would you like suggestions on any specific types of DIY projects? Let me know your interests!
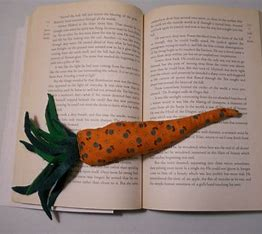
- Flower Bookmarks
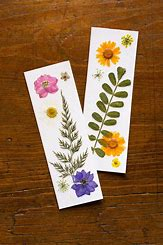
DIY Flower Bookmarks
Making flower bookmarks is a fun and simple DIY project that can add a touch of nature and personalization to your reading experience. Here’s a step-by-step guide to help you create beautiful flower bookmarks.
Materials You’ll Need:
- Pressed flowers (you can either press your own flowers or buy pre-pressed ones)
- Bookmark template (you can use cardstock, sturdy paper, or even craft foam)
- Scissors
- Clear adhesive (such as Mod Podge or clear tape)
- Glue (optional for extra holding power)
- Ribbons, twine, or string (optional for decoration)
- Parchment paper or wax paper (for pressing flowers)
Steps to Make Flower Bookmarks:
Step 1: Prepare the Flowers
If you’re using fresh flowers, you’ll need to press them first. Here’s how:
- Place your flowers between two sheets of parchment or wax paper.
- Put the paper between the pages of a heavy book and leave it for a few days to press and dry the flowers. You can also use a flower press if you have one.
- Once pressed and dry, carefully remove the flowers from the paper.
Step 2: Cut the Bookmark Template
- Use scissors to cut out your bookmark shape. A typical bookmark is around 2 inches wide and 6 inches long, but you can adjust the size to fit your preferences.
- You can use thick paper, cardstock, or even laminate it later for durability.
Step 3: Arrange the Flowers
- Lay the pressed flowers on the bookmark template. Arrange them in a pattern or randomly, depending on your style.
- Make sure to leave a little space at the top and bottom for any ribbons or decorations.
Step 4: Glue the Flowers
- Once you’re happy with the arrangement, use a small amount of clear adhesive (like Mod Podge) to carefully glue the flowers onto the bookmark.
- If you want a more glossy finish, you can add a thin layer of Mod Podge over the flowers after gluing them down, which will also seal them in place.
Step 5: Add Finishing Touches
- After the flowers are secured, you can decorate the top of the bookmark with a piece of ribbon, twine, or string for an extra touch.
- Optionally, you can laminate the bookmark for more durability, especially if you use thin paper.
Step 6: Let Dry
- Let the bookmark dry for a few hours or overnight before using it to mark your pages.
Additional Tips:
- Experiment with different types of flowers, colors, and arrangements to make each bookmark unique.
- You could even add a little quote or text to personalize the bookmark further using markers or stickers.
- For a more rustic look, use natural twine and dried flowers for a charming handmade feel.
These flower bookmarks make great gifts for book lovers, and they’re perfect for adding a handmade touch to your reading collection. Enjoy crafting!
2. Origami Butterfly
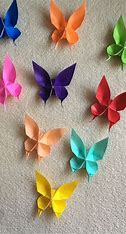
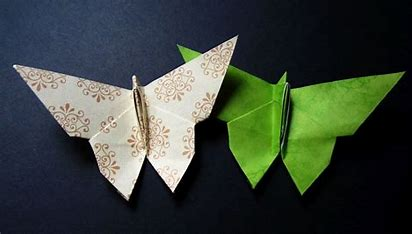
DIY Origami Butterfly – Step-by-Step Guide
Making an origami butterfly is a simple and fun paper craft that’s perfect for all ages. You only need one square piece of paper and a few folds to create a beautiful butterfly. Here’s how to do it!
🦋 Materials Needed:
- 1 square piece of paper (any size, but 6×6 inches is a good starting size)
- You can use origami paper, printer paper, or even recycled paper
- Optional: Markers, glitter, or stickers to decorate
📝 Instructions:
Step 1: Fold Diagonally
- Fold the paper in half diagonally (corner to corner) to form a triangle. Crease well and unfold.
- Now fold diagonally the other way and unfold again. You should now have an X crease.
Step 2: Fold in Half Horizontally and Vertically
- Fold the paper in half like a book (side to side). Crease and unfold.
- Fold in half from top to bottom. Crease and unfold.
Now you should see an asterisk-like set of creases (✱) on your paper.
Step 3: Collapse Into a Triangle
- Holding the sides of the paper, push them inward along the vertical and horizontal folds. The paper should collapse into a triangle (also known as a waterbomb base).
Step 4: Create Wings
- Take the two top flaps of the triangle and fold them up so that the corners meet at the top point. The shape should now look like a diamond with a horizontal line in the middle.
Step 5: Fold the Bottom Point Up
- Flip the paper over.
- Take the bottom point of the triangle and fold it up so that the tip sticks out just slightly over the top edge. This will form the butterfly’s body.
Step 6: Fold in Half
- Fold the whole shape in half vertically (along the body line), so the small point you just folded sticks out on top.
- Press gently along the crease so the paper holds its shape.
🎉 Your Origami Butterfly is Complete!
You can make several in different sizes and colors for decorations, greeting cards, or hanging mobiles. You can also decorate your butterfly with pens, paint, or stickers to make it even more unique.
Would you like a printable diagram or video tutorial to go along with these instructions?
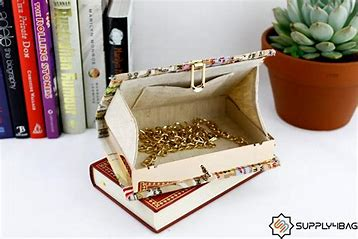
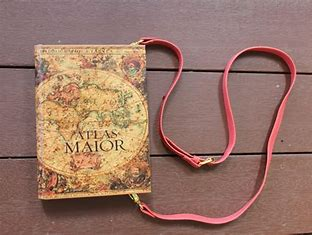
3. Zipper Book Clutch Tutorial
DIY Zipper Book Clutch Tutorial
A zipper book clutch is a stylish and creative accessory that looks like a vintage book on the outside but functions as a purse or clutch on the inside. It’s perfect for book lovers and makes a unique gift or fashion statement. Below is a step-by-step guide to making your own!
📚 Materials Needed:
- 1 old hardcover book (make sure it’s big enough to hold your essentials)
- 1 zipper (around the same length as the book’s opening, usually 9–12 inches)
- Fabric for lining (cotton or canvas works well)
- Hot glue gun or fabric glue
- Scissors or craft knife
- Ruler and pencil
- Optional: interfacing for sturdier lining, decorative elements
📝 Instructions:
Step 1: Hollow Out the Book
- Open the book and use a ruler to mark a rectangle inside the pages, leaving about 1 inch (2.5 cm) margin around the edges.
- Using a craft knife, carefully cut through the pages along the marked lines. Remove the inner pages until you reach the bottom of the book.
- Apply a thin layer of glue along the inside edges to keep the remaining pages in place and let it dry.
Step 2: Prepare the Lining
- Cut your fabric lining into 5 pieces:
- 1 piece for the bottom of the clutch (same size as the hollowed-out rectangle),
- 2 pieces for the long sides,
- 2 pieces for the short sides.
- If you want extra structure, attach interfacing to the back of the fabric.
- Glue or sew the pieces together into a box shape that fits inside the book cavity.
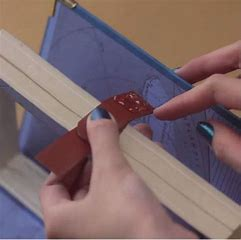
Step 3: Attach the Zipper
- Open the zipper and pin it around the top edge of your fabric box (lining).
- Sew or glue the zipper in place.
- Once secure, test the zipper to ensure it opens and closes smoothly.
Step 4: Insert the Lining into the Book
- With the zipper open, apply glue to the outside edges of the fabric box.
- Press the box into the hollowed-out book cavity so that the zipper sits right at the top.
- Hold in place until dry, or use clips to secure while drying.
Step 5: Add Finishing Touches
- Clean up any glue strings or excess fabric.
- Optionally, decorate the book cover with paint, gold foil, or a custom title for extra flair.
👜 Tips:
- Choose a book with a sturdy spine that opens flat.
- Use a fabric with a fun print to add a surprise pop of color inside.
- You can add a wrist strap or small handle for easier carrying.
Now you have a beautiful zipper book clutch—perfect for storing makeup, money, or small accessories in literary style!
Would you like a printable version of this tutorial or a link to a video demonstration?
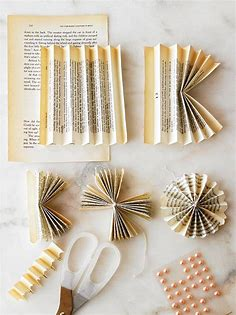
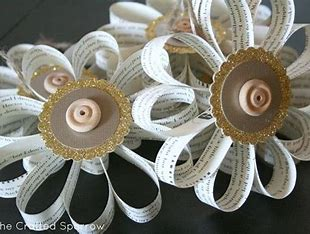
4. Book Page Wreath Tutorial
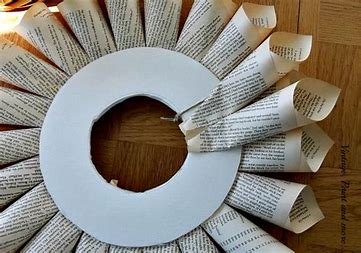

DIY Book Page Wreath Tutorial
A book page wreath is a charming, vintage-inspired decoration made from the pages of an old book. It’s perfect for book lovers and makes a beautiful statement piece for your door, wall, or mantel. This project is easy, budget-friendly, and customizable!
📘 Materials Needed:
- 1 old book (preferably with yellowed or vintage-style pages)
- Cardboard or foam wreath form (about 10–14 inches)
- Hot glue gun and glue sticks
- Scissors or paper cutter
- Optional: ink pad for distressing, ribbon for hanging, embellishments (buttons, flowers, etc.)
📝 Instructions:
Step 1: Prepare the Wreath Base
- If using cardboard, cut a ring shape (like a donut) to your desired size. A 2-inch width works well.
- If using a foam form, you’re ready to go as-is.
Step 2: Tear Out and Cut Pages
- Carefully remove pages from the book.
- You’ll need 40–100 pages depending on the size of your wreath and how full you want it.
- Cut the pages in half or thirds if they’re large—each piece will be one “leaf” of the wreath.
Step 3: Roll or Fold the Pages
You have a few style options for shaping the pages:
- Cone shape: Roll each page piece into a cone and glue the point to hold it.
- Accordion fold: Fold each piece back and forth like a fan and pinch the middle.
- Looped petals: Roll each end toward the center to make a figure-eight or bow shape.
Step 4: Attach to the Wreath Form
- Start by hot-gluing the paper rolls/petals/cones to the outer edge of the wreath form.
- Work your way around in layers, slightly overlapping each new piece with the previous one.
- Continue inward, adding layers until the wreath looks full and even.
Step 5: Add a Center (Optional)
- For a finished look, you can glue a rosette, a decorative button, or a flower in the middle of the wreath.
- Or leave it open for a more airy design.
Step 6: Add Hanging Ribbon
- Cut a piece of ribbon and glue or tie it to the back of the wreath for hanging.
- You can also embellish the ribbon for a seasonal or festive look.
🎨 Customization Ideas:
- Lightly brush the edges of the pages with brown ink or tea stain for an aged look.
- Add glitter, paint, or mini ornaments for a seasonal version (Christmas, fall, etc.).
- Use colored book pages (like from an old children’s book) for a playful effect.
✅ Tips:
- Make sure to keep the paper evenly spaced as you glue to maintain a round shape.
- You can spray the finished wreath with a clear sealer to make it more durable.
Would you like a printable template or photo inspiration for different book page wreath styles?
5. Greeting Cards Made From Old Books
DIY Greeting Cards Made from Old Books
Reusing pages from old books is a creative and eco-friendly way to make one-of-a-kind greeting cards. These handmade cards are perfect for birthdays, thank-yous, holidays, or just because—and they add a lovely vintage or literary charm.
📚 Materials Needed:
- Pages from an old book (novels, dictionaries, or music sheets work well)
- Blank cards or cardstock paper (white, kraft, or colored)
- Scissors or craft knife
- Glue stick or double-sided tape
- Ruler and pencil
- Decorative extras: stamps, stickers, washi tape, ribbons, pressed flowers, buttons, markers, etc.
📝 Instructions:
Step 1: Prepare Your Base
- Cut your cardstock to your desired card size (e.g., 5×7 inches or A6).
- Fold in half to form the greeting card base.
Step 2: Cut Book Page Elements
You can use book pages in a variety of ways:
- Background layer: Cut a rectangle slightly smaller than the front of your card to act as a backdrop.
- Shapes: Cut hearts, stars, butterflies, or other shapes from the pages.
- Strips or borders: Tear or cut book pages into strips to use as borders or accents.
- Word cutouts: Choose meaningful or themed words from the book text and cut them out to use like labels.
Step 3: Assemble Your Card
- Glue the book page elements onto the card in your desired layout.
- You can layer shapes over a book-page background, add borders, or create a collage.
- For a clean look, use a glue stick; for a more textured look, use double-sided tape or foam adhesive to lift elements off the page.
Step 4: Add Decorative Touches
- Embellish with:
- Ribbon or lace for a romantic look
- Stamps or inked edges for a vintage feel
- Buttons, washi tape, or stickers for pops of color
- Doodles or hand-lettered messages to personalize the card
Step 5: Let It Dry and Write Your Message
- Once everything is secure and dry, write a heartfelt note inside the card.
🎨 Design Ideas:
- Literary Love Card: Use a romantic quote from a novel with heart-shaped cutouts.
- Birthday Card: Add a “Happy Birthday” message over a background of book text and decorate with balloons or candles.
- Thank You Card: Use a strip of book page text with a stamped or handwritten “Thank You” on top.
- Holiday Card: Pair a snowflake or tree cutout from a book page with red or green cardstock.
✅ Tips:
- Avoid using glossy book pages—they don’t glue well.
- Choose book pages with clean or meaningful text (no offensive or inappropriate content).
- Use recycled or secondhand books that are damaged or no longer readable to give them new life.
Would you like a printable template or images for card layout ideas?
6. DIY Book Page Fabric
DIY Book Page Fabric – How to Print or Transfer Book Text onto Fabric
Creating fabric with book page text is a beautiful way to blend literature with crafting. You can use this custom fabric for pillows, tote bags, bookmarks, or framed art. There are several methods, depending on how permanent or decorative you want the result to be.
📚 Option 1: Print Directly Onto Fabric Using an Inkjet Printer
🧵 Materials Needed:
- Lightweight cotton fabric (white or light-colored)
- Freezer paper (found in the grocery or craft store)
- Iron and ironing board
- Scissors
- Inkjet printer (not laser!)
- Book text or a scanned book page on your computer
📝 Instructions:
- Prepare the Fabric:
- Cut your fabric to standard printer paper size (8.5×11 inches).
- Cut a matching piece of freezer paper and iron the shiny side to the back of the fabric. This stiffens it so it can feed through the printer.
- Print the Text:
- Choose a text excerpt from a book or format it in a document (Word, Canva, etc.).
- Load the fabric-paper sheet into your printer so the fabric side will be printed on.
- Print as usual using black ink.
- Set the Ink:
- Let the ink dry completely.
- Gently heat set it by ironing the printed fabric (ink side up) for a few minutes with a dry iron.
- Peel and Use:
- Peel off the freezer paper and use the fabric in your sewing or craft project.
🖼️ Option 2: Transfer Text Using Mod Podge or Gel Medium
This method works well for decorative items like canvas, wood, or thicker fabric pieces.
🧵 Materials:
- Book page photocopy (laser print works best)
- Light-colored fabric
- Matte Mod Podge or gel medium
- Foam brush or paintbrush
- Water and sponge or cloth
📝 Instructions:
- Apply a thick layer of Mod Podge or gel medium to the fabric where the text will go.
- Press the printed book page face-down onto the glue.
- Let it dry completely (overnight is best).
- Dampen the paper with a sponge and gently rub away the paper. The text will remain on the fabric.
✂️ Project Ideas Using Book Page Fabric:
- Throw pillows with a favorite quote or passage
- Tote bags with classic book text
- Bookmarks backed with book page fabric
- Canvas wall art or banners
- Patches for clothing or denim
✅ Tips:
- Always test a small sample first to check how your fabric and ink behave.
- Use high-contrast black-and-white text for the clearest results.
- If the fabric is going to be washed, consider using fabric fixatives or printable fabric sheets designed for sewing.
Would you like a printable version of the text layout to try this project, or links to free book page templates?
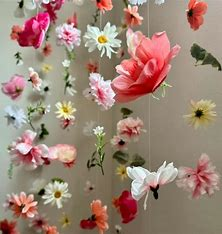
7, Paper Flower Décor

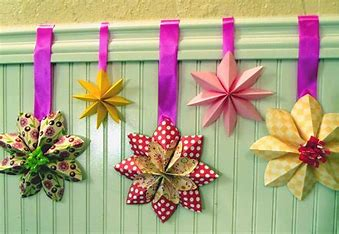
DIY Paper Flower Décor – Easy & Beautiful Craft Ideas
Paper flower décor is a lovely, affordable way to brighten up any room, event, or celebration. Whether you’re decorating for a party, wedding, or just want to add a handmade touch to your home, these flowers are fun to make and completely customizable.
🌸 Materials Needed:
- Colored craft paper or cardstock (or recycled book pages for a vintage look)
- Scissors
- Glue stick or hot glue gun
- Pencil
- Templates or stencils (optional)
- Floral wire or pipe cleaners (optional, for stems)
- Tape or string (for hanging)
📝 Basic Paper Flower Instructions:
Option 1: Simple Rolled Paper Rose
- Cut a Circle – Start with a circle about 4–6 inches wide.
- Spiral Cut – Cut the circle into a spiral, working from the outside in.
- Roll It Up – Start from the outside end and roll it tightly inward.
- Glue the Base – Once you reach the center, let the spiral loosen slightly and glue the rolled rose to the center base.
Option 2: Layered Petal Flower
- Draw & Cut Petals – Cut 5–7 identical petal shapes. You can make them round, pointed, or heart-shaped depending on the flower style you want (like daisies, peonies, etc.).
- Curl the Petals – Use a pencil to curl the edges of the petals for a more realistic look.
- Layer & Glue – Glue the petals in a circular pattern, overlapping slightly. Add more layers for a fuller flower.
- Add a Center – Roll a small strip of paper into a tight coil or fringe-cut a strip and roll it for a stamen.
🌼 Decoration Ideas:
- Wall Décor: Arrange large paper flowers on a wall to create a statement backdrop.
- Garlands: String small flowers along twine or ribbon for a festive garland.
- Bouquets: Attach flowers to floral wire or sticks to make paper flower bouquets.
- Wreaths: Glue flowers around a foam or cardboard ring to create a floral wreath.
- Gift Toppers: Use mini paper flowers to decorate gift packages.
✅ Tips:
- Mix colors, patterns, or even pages from old books or sheet music for different looks.
- Use cardstock for sturdier flowers or tissue paper for soft, delicate petals.
- Keep a few sizes and petal shapes on hand to create variety in your arrangements.
Would you like printable flower templates or a step-by-step video tutorial link?
8. Make a Book Garland
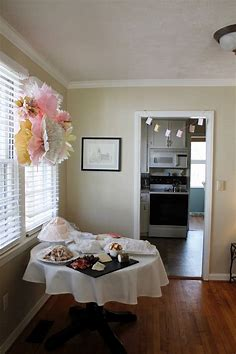
DIY Book Garland – A Charming Literary Decoration
A book garland is a beautiful and easy project that turns old or damaged books into cozy, vintage-style decor. You can hang it across a mantle, doorway, bookshelf, or wall. It’s perfect for book lovers, parties, weddings, or just adding a creative touch to your space.
📚 Materials Needed:
- Old book pages (or printed literary quotes)
- String, twine, ribbon, or yarn
- Scissors or paper cutter
- Hole punch or mini clothespins
- Glue stick or tape
- Optional: cardstock backing, decorative extras (buttons, lace, glitter, etc.)
📝 Instructions:
Step 1: Choose and Prepare Book Pages
- Carefully tear or cut out pages from an old book.
- You can leave them full-size, or cut them into shapes like:
- Rectangles
- Triangles (for bunting style)
- Hearts
- Circles
- Pennants (flag shapes)
Tip: If the pages are too thin, glue them to cardstock for durability.
Step 2: Decorate (Optional)
- Add extras like:
- Stamped or handwritten quotes
- Decorative paper backing
- Edging with scissors or ink
- Layered shapes (e.g., a heart cut from a book page on top of a larger colored heart)
- You can also distress the edges with brown ink for a vintage look.
Step 3: Punch Holes or Attach to String
- Use a hole punch to make two holes at the top of each page piece and thread them onto your string.
- OR use mini clothespins to clip the pages onto the string (easier and reusable).
- OR fold the top of each page piece over the string and secure with glue or tape.
Step 4: Hang It Up
- Tie or tape each end of the garland to your desired spot—mantel, bookshelf, window, or wall.
- Adjust the spacing of the pages so they hang evenly.
🎨 Creative Variations:
- Themed Garland: Use pages from a specific book (romantic, spooky, classic) to match a theme.
- Holiday Garland: Add seasonal shapes—leaves for fall, snowflakes for winter, hearts for Valentine’s Day.
- Name or Quote Garland: Cut out large letters to spell a word or phrase using book pages as the background.
- Color Accents: Add colored paper or fabric strips between each page for contrast.
✅ Tips:
- Use books that are already damaged or headed for recycling.
- Mix in photos, postcards, or illustrations for a personalized touch.
- If you want to reuse it, avoid gluing directly to the string—use clips or folded flaps instead.
Would you like a printable template or examples of shapes for the garland pieces?
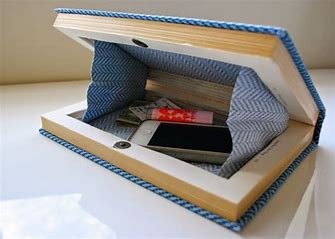
9. Better Book Safe
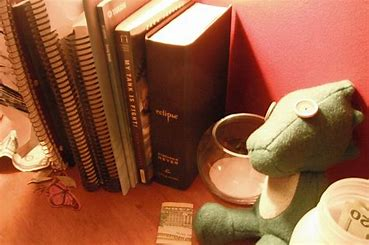
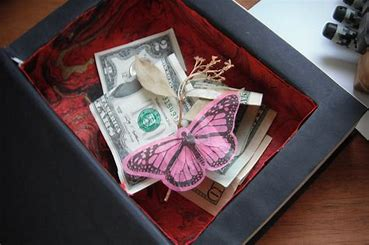
DIY Better Book Safe – Hidden Storage in a Book
A book safe is a clever way to hide valuables, keepsakes, or small items inside what looks like an ordinary book. Unlike the basic version, a better book safe is cleanly made, durable, and secure—perfect for gifting or personal use.
Here’s a step-by-step guide to making a better-quality book safe.
📚 Materials Needed:
- 1 thick hardcover book (at least 1.5 inches thick)
- Craft knife/X-Acto knife
- Ruler and pencil
- Mod Podge or white glue (mixed 1:1 with water)
- Paintbrush
- Plastic wrap or wax paper
- Heavy objects (like other books)
- Optional: felt or fabric for lining, magnetic clasp or elastic band
🛠️ Instructions:
Step 1: Choose the Right Book
- Use a hardcover book that’s thick and sturdy.
- Make sure it’s not valuable or sentimental—you’ll be cutting into it.
Step 2: Protect the First Few Pages
- Open the book and leave the first 2–3 pages uncut (you can glue these down later for a clean look).
- Wrap the back cover and last few pages with plastic wrap or wax paper to protect them from glue.
Step 3: Glue the Pages Together
- Mix glue and water (1:1 ratio).
- Use a brush to apply the mixture to the outside edges of the book pages.
- Clamp the book shut (or stack heavy books on top) and let it dry for a few hours.
Step 4: Cut Out the Safe Compartment
- Open the book to the glued section.
- Use a ruler to draw a rectangle about 1 inch from each edge.
- Carefully cut along the lines using a craft knife, a few pages at a time.
- Take your time—clean cuts make a better finish.
- Cut down until you’re about 0.5–1 inch from the bottom of the book.
Step 5: Seal the Inner Edges
- Once the compartment is fully cut, apply glue to the inner walls to keep them firm.
- Let it dry completely.
Step 6: Add Finishing Touches
- Glue the first few uncut pages down to hide the cutout.
- Line the inside of the compartment with felt or fabric for a polished look.
- Optional: Add a magnetic clasp or elastic band to keep the book securely closed.
🔒 Bonus Ideas for a Better Book Safe:
- Add a hinge or hidden box inside for more security.
- Use a book with a dust jacket to disguise the safe even further.
- Store small electronics, keys, jewelry, or emergency cash.
✅ Tips:
- Use a sharp blade and replace it often for clean cuts.
- Be patient—rushing leads to messy or uneven edges.
- Let each glue layer dry fully for a sturdy and long-lasting result.
Would you like a printable guide or video tutorial link to go with this project?
10. Candleholders with Book Pages
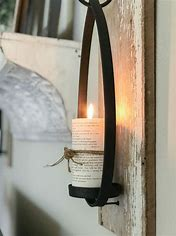

DIY Candleholders with Book Pages – Elegant & Literary Decor
Transform ordinary candleholders or jars into beautiful, vintage-style decor using book pages! This is an easy and inexpensive way to upcycle old books into something both charming and functional. These candleholders are perfect for centerpieces, cozy home decor, or literary-themed events.
🕯️ Materials Needed:
- Old book pages (preferably aged or yellowed for a vintage look)
- Glass candleholders, jars, or votives
- Mod Podge or diluted white glue (1:1 with water)
- Foam brush or paintbrush
- Scissors or craft knife
- LED tealights or real candles (use caution – see safety note)
- Optional: twine, lace, ribbon, or buttons for decoration
📝 Instructions:
Step 1: Prepare the Book Pages
- Tear or cut the book pages into strips or shapes.
- You can use full strips of text, cut out meaningful words, or create decorative shapes like hearts, leaves, or stars.
Step 2: Apply the Book Pages
- Use a foam brush to apply a thin layer of Mod Podge/glue to the outside of the glass candleholder.
- Carefully place the book page pieces on the glass and smooth them down to avoid air bubbles.
- Once covered, apply another thin layer of Mod Podge over the top to seal.
Step 3: Let It Dry
- Allow the candleholder to dry completely (about 1–2 hours).
- If needed, add a second layer of glue to ensure everything is sealed and secure.
Step 4: Add Decorative Touches (Optional)
- Wrap the top of the candleholder with twine, lace, or ribbon.
- Add small embellishments like buttons, paper flowers, or tags with quotes.
⚠️ Safety Tip:
Only use LED candles if your book pages are not fully sealed or are close to the flame. If you’re using real candles, make sure:
- The book pages don’t extend above the rim of the glass.
- The paper is sealed well with Mod Podge.
- You never leave a real flame unattended.
🎨 Creative Variations:
- Use music sheets, poetry pages, or maps instead of book pages.
- Layer vellum or tissue paper under the book text for a soft, glowing effect.
- Try using colored book pages or pages with illustrations for a unique twist.
Would you like a printable version of this tutorial or links to design inspiration?
11. DIY Nerdy Book Clutch
A DIY Nerdy Book Clutch sounds like a fun and creative project! Here’s a simple step-by-step guide on how to make one:
Materials Needed:
- Old hardcover book (choose a book that you don’t mind cutting up; ideally something that fits the size you want for your clutch)
- Craft knife or utility knife
- Hot glue gun and glue sticks
- Felt or fabric for lining (you can choose a pattern or solid color)
- Clutch hardware or a clasp (magnetic clasp, snap, or a button)
- E6000 or strong adhesive (for securing the clasp)
- Ruler and pencil
- Optional: decorative embellishments (such as book quotes, gems, buttons, or paint)
Step-by-Step Instructions:
1. Prepare the Book
- Choose an old hardcover book with a sturdy spine that you won’t mind cutting. The size of the book will determine how large your clutch is, so pick one that’s just right for your needs.
- Use a craft knife to cut out the inside pages. You can choose to leave the back cover and spine intact to create the “book” look, or you can cut those out as well for a completely open clutch. Be careful when cutting, and go slow to avoid tearing the pages unevenly.
2. Create the Hollow Space
- Measure and mark the inner area that you want to carve out for the clutch. You may want to leave a small border around the edges to keep the structure of the book intact.
- Slowly start cutting out the pages one at a time, using your utility knife. After each page is cut, remove the paper and continue cutting the next one. Keep cutting until you have a nice hollow space that fits your essentials.
3. Add Lining to the Inside
- Once the pages are cut out, measure the inside of your book to determine how much fabric or felt you’ll need for lining.
- Cut your fabric to fit inside the book’s hollow space, leaving a bit of extra fabric to fold over the edges.
- Use your hot glue gun or fabric glue to secure the fabric inside the book. Make sure it’s smooth and well-attached.
4. Attach the Clasp
- For the closure, you can use a magnetic clasp, snap button, or a decorative button.
- If you’re using a magnetic clasp, glue one half to the inside of the front cover and the other half to the back cover of the book, ensuring they line up properly when the book is closed.
- Allow the glue to dry completely before testing the closure.
5. Decorate the Cover
- Now, you can get creative! You can leave the cover as-is for a simple and minimalistic look, or you can decorate it with paint, fabric, or even add a book quote to make it feel more personal.
- If you want to go all-out nerdy, you can add embellishments like small book-themed pins, charms, or stickers that reflect your favorite literary characters or genres.
6. Enjoy Your Nerdy Book Clutch!
- Once everything is dry and secure, you have your very own DIY book clutch! Use it to store your essentials like your phone, cards, and lipstick.
This DIY project is not only a great way to repurpose an old book, but it also creates a functional, stylish, and totally unique accessory. Plus, it’s a fantastic conversation starter!
Let me know if you need further help with any part of the process!
12. Ornaments
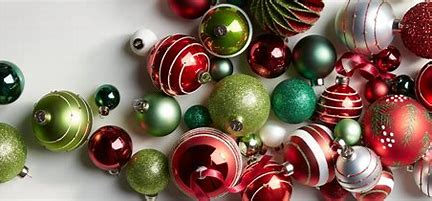
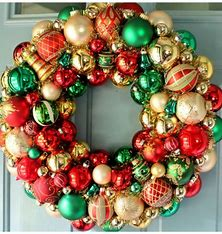
Could you clarify what you’re looking for related to “ornaments”? Are you interested in:
- Christmas or holiday ornaments?
- Decorative objects for home or garden?
- Ornaments in art, architecture, or design?
- Something else entirely?
Let me know how you’d like to explore the topic!
13. Homemade Bookmarks
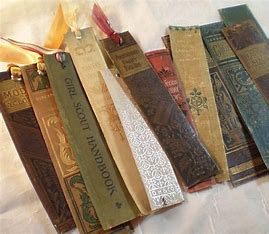

Homemade bookmarks are a fun and creative way to personalize your reading experience, and they make great gifts! You can create bookmarks using various materials, and you can easily customize them to suit your style or the person you’re gifting them to. Here are some ideas and methods for making your own:
Materials You Can Use:
- Cardstock or heavy paper – A sturdy base to start with.
- Ribbon or string – Adds a decorative touch.
- Stickers, stamps, or washi tape – For quick decoration.
- Pressed flowers or leaves – For a natural, rustic look.
- Markers, paints, or colored pencils – To add artistic designs.
- Scrapbook paper – To add texture or patterns.
- Mod Podge or glue – To seal designs or attach embellishments.
Steps to Make a Simple Bookmark:
- Cut Your Base:
- Start by cutting your cardstock or paper into the shape you want. A common size is around 2 inches by 6 inches, but you can adjust based on your preferences.
- Decorate:
- Use markers, stamps, or colored pencils to create patterns, designs, or doodles.
- Add embellishments like washi tape, pressed flowers, or decorative stickers.
- Add Personal Touches:
- Write a meaningful quote, your favorite book title, or a personal message on the bookmark.
- Lamination (Optional):
- To make your bookmark more durable, you can laminate it. If you don’t have a laminator, you can use clear contact paper to cover the front and back.
- Add a Tassel (Optional):
- Punch a hole at the top of the bookmark, then thread a piece of ribbon or yarn through it to create a tassel or simply tie a decorative knot.
- Let it Dry (If Needed):
- Allow any ink, glue, or Mod Podge to dry completely before using your bookmark.
Fun Variations:
- Watercolor bookmarks: Use watercolors to create a soft and colorful design.
- Vintage style: Use old book pages or scrapbook paper with a retro design for a nostalgic look.
- Themed bookmarks: Make bookmarks based on your favorite books, seasons, or even quotes.
- Photo bookmarks: Print out a favorite photo and use that as your bookmark base.
Homemade bookmarks are a perfect DIY project and are easy to personalize for any occasion! Would you like a specific design idea, or are you planning to make some yourself?
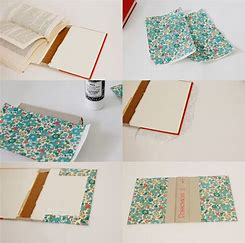
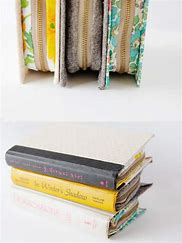
14. Turn a Vintage Book into a Clutch
Turning a vintage book into a clutch is a creative and stylish DIY project that repurposes an old or damaged book into a unique accessory. Here’s a step-by-step guide to help you do it:
🧰 Materials Needed:
- A vintage hardcover book (preferably with an interesting or beautiful cover)
- Craft knife or X-Acto knife
- Ruler
- Pencil
- Fabric (for the lining)
- Glue (fabric glue or hot glue gun)
- Zipper, magnetic snap, or clasp for closure
- Optional: Decorative handle, chain, or embellishments
✂️ Instructions:
1. Choose Your Book
Pick a hardcover book that’s large enough to serve as a clutch and not a rare collectible (unless it’s already damaged). Thickness is important – about 1.5″ thick works well.
2. Remove the Pages
Open the cover and use a craft knife to carefully cut out the inside block of pages. Try to leave the inner edges neat so the book maintains its shape.
3. Reinforce the Spine (Optional)
If the spine feels weak, glue a piece of cardboard inside the spine area to reinforce it. You can also use fabric tape.
4. Prepare the Lining
Cut fabric to fit the interior dimensions of the book cover (both front and back, and the spine area if desired). Cut side panels if you want to create depth (accordion-style folds work well).
5. Create the Inner Pouch
Use your fabric to create a pouch that will be glued inside the book. Sew the side panels to the base and back of the fabric to form a bag shape. Make sure it fits well when inserted.
6. Attach the Zipper or Closure
Sew or glue a zipper along the top edge of your fabric pouch, or use a magnetic snap for a simpler close. If using a zipper, make sure it can open fully for easy access.
7. Glue Fabric Pouch into the Book
Once the pouch is constructed and the zipper is in place, glue the back of the pouch to the inside back cover of the book. Allow it to dry fully.
8. Embellish the Outside (Optional)
You can paint the cover, add a handle, or attach a chain strap with small screw-in hardware.
💡 Tips:
- Use Mod Podge or decoupage glue if you want to preserve the outer surface.
- If the book cover is plain, consider adding vintage decals or fabric overlays.
- For a polished finish, line the interior cover with patterned scrapbook paper or faux leather.
Would you like a visual guide or printable template for the pouch pattern?
15. Butterfly Book Page Craft Ornaments
Creating butterfly ornaments from book pages is a beautiful and eco-friendly way to repurpose old books while adding a charming, vintage touch to your decor. These delicate butterflies can be used as ornaments, gift tags, or wall decor. Here’s how you can make them:
🧰 Materials Needed:
- Old book pages (preferably with some text or illustrations)
- Scissors
- Pencil or pen
- Glue (mod podge or hot glue gun)
- Decorative ribbon or string (for hanging)
- Butterfly template (optional)
- Paint or ink (optional for added color)
- Small embellishments like glitter or rhinestones (optional)
✂️ Instructions:
1. Prepare the Book Pages
Pick out some pages from an old book. If you want, you can choose pages with illustrations or interesting typography to give the butterflies a unique look. You can also choose to lightly tea stain or ink the edges of the pages for an aged effect.
2. Draw or Use a Template for Butterfly Shape
Use a pencil to lightly sketch a butterfly shape onto the book page. Alternatively, you can print a butterfly template and trace it onto the pages. You’ll need two identical butterfly shapes for each ornament.
- Tip: If you want to add dimension, you can make the top wings slightly larger than the bottom wings to create depth.
3. Cut Out the Butterflies
Carefully cut out the butterfly shapes using scissors. You should have two butterflies for each ornament (front and back).
4. Add Color (Optional)
You can leave the butterflies in their natural book-page form, or you can add a bit of color. Use watercolor paints, ink, or even colored pencils to lightly color the edges or the center of the butterfly. This adds a personal touch and a bit of contrast.
5. Create a 3D Effect (Optional)
To make the butterflies appear more lifelike, gently fold the wings along the center so they stick up slightly. You can crease the wings to add a little more texture and dimension.
- Tip: Curl the edges of the wings slightly with your fingers or a pencil to create a more realistic, fluttering effect.
6. Glue the Two Butterflies Together
Once you have two butterfly cutouts, place them back to back, slightly offsetting them so the wings look more layered. Add a small amount of glue along the spine of the butterfly to hold them together.
7. Add a Hanging Ribbon or String
Before the glue dries, glue a small piece of ribbon or string to the top of the butterfly for hanging. You can glue it to the top of the butterfly’s spine or through a hole punched at the top.
- Tip: You can reinforce the ribbon by adding a little glue to the knot.
8. Embellish (Optional)
If you want to add some sparkle, you can embellish the butterfly with a light dusting of glitter, tiny rhinestones, or buttons for the body. You can also outline the wings with a fine marker or pen to highlight the details.
💡 Extra Tips for Butterfly Ornaments:
- Create a Butterfly Mobile: If you make several of these butterflies, you can create a mobile by hanging them at different lengths with a wooden dowel or branch.
- Gift Tags: Attach these butterflies to gifts as unique, vintage-inspired gift tags.
- Personalized Touch: Write a sweet note or quote from the book on the back of each butterfly to give it a sentimental meaning.
🦋 Butterfly Ornament Variations:
- Nature-Inspired Butterflies: Use pressed flowers on the wings for a more botanical look.
- Metallic Butterflies: Coat the edges with gold or silver leaf to create a more luxurious appearance.
- Watercolor Butterflies: Paint soft watercolor wings for a dreamy effect.
Would you like more tips on making variations or perhaps a video tutorial suggestion?
16. Craft Stick Farm Animal Bookmarks
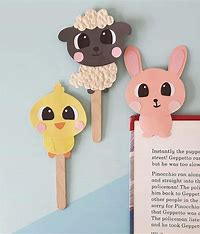
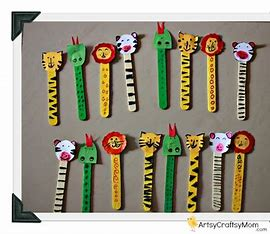
Making craft stick farm animal bookmarks is a fun and creative activity that’s perfect for kids, classrooms, or themed events. Here’s a simple guide to help you make them:
🐮 Materials You’ll Need:
- Craft sticks (popsicle sticks) – plain wooden ones work best
- Colored cardstock or foam sheets – for animal faces and features
- Googly eyes – or draw your own
- Markers or pens – for details like noses, mouths, or patterns
- Glue or glue dots
- Scissors
- Optional: pom-poms, felt, cotton balls, or yarn (for texture)
🐷 Instructions by Animal:
1. Cow Bookmark
- Paint or color the craft stick white.
- Cut a cow head shape from white cardstock or foam.
- Add black spots, ears, googly eyes, and a pink nose.
- Glue the head to the top of the stick.
2. Pig Bookmark
- Paint the stick pink.
- Cut out a round pig face.
- Add a pink snout with two dots for nostrils, ears, and googly eyes.
- Glue the pig face on top.
3. Sheep Bookmark
- Leave the stick plain or paint it white.
- Cut a sheep face from black or gray cardstock.
- Glue cotton balls or white pom-poms around the face for wool.
- Add googly eyes and ears.
4. Chicken Bookmark
- Paint the stick yellow.
- Cut a small round or oval shape for the head.
- Add a red comb and yellow beak.
- Use googly eyes or draw them on.
5. Horse Bookmark
- Paint the stick brown or tan.
- Cut a horse face and ears from matching paper.
- Add a yarn mane glued to the back of the head.
- Draw or glue on eyes and nostrils.
📚 Tips:
- For extra durability, laminate the faces before attaching them.
- These make great classroom gifts, party favors, or storytime crafts.
- You can write the animal’s name or a fun fact on the stick, too!
Would you like printable templates for the animal faces.