Absolutely! Here’s an article titled “Recycled Christmas Decorations: Eco-Friendly and Fun DIY”:
Recycled Christmas Decorations: Eco-Friendly and Fun DIY
The holiday season is a time of joy, celebration, and—unfortunately—waste. From wrapping paper to disposable decorations, it’s easy to accumulate trash during Christmas. But there’s a way to enjoy the festivities while being kind to the planet: recycled Christmas decorations! With a little creativity, you can transform everyday household items into beautiful, eco-friendly decor.
Why Choose Recycled Decorations?
- Reduce waste: Reusing materials keeps them out of landfills.
- Save money: DIY decorations are budget-friendly.
- Personal touch: Handmade items bring charm and uniqueness to your holiday setup.
- Fun for all ages: Great for family bonding and teaching kids about sustainability.
Fun and Easy DIY Ideas
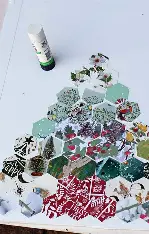
1. Paper Snowflakes from Old Magazines
Instead of using new paper, cut snowflakes from colorful magazine pages. They make vibrant, unique decorations for windows, walls, or garlands.
2. Tin Can Lanterns
Clean out empty soup or vegetable cans, punch holes in them using a hammer and nail to create festive patterns, and place LED tea lights inside. These make magical porch or tabletop lanterns.
3. Bottle Cap Ornaments
Paint and decorate used bottle caps to create mini ornaments or characters like snowmen or Santa faces. Add string to hang them on your tree.
4. Cardboard Star Garland
Cut stars out of cereal boxes or shipping boxes, paint or decorate with wrapping paper scraps, and string them together for a rustic garland.
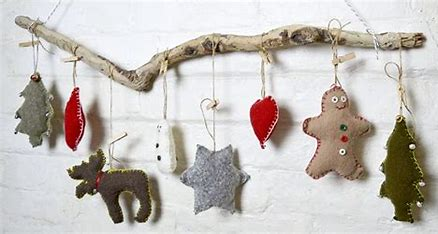
5. Old Sweater Stockings
Upcycle old, worn-out sweaters into cozy Christmas stockings. Add buttons, patches, or embroidery for extra flair.
6. CD Ornament Sparkle
Have old CDs lying around? Cut them into small pieces and glue them onto cardboard shapes to create shimmering ornaments that reflect Christmas lights beautifully.
7. Wine Cork Reindeer
Glue together wine corks to create mini reindeer. Add twigs for antlers, a red bead for the nose, and googly eyes to complete the look.
Tips for Eco-Friendly Decorating
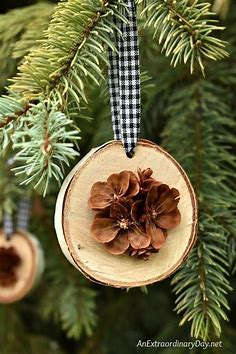
- Use natural elements like pinecones, branches, and dried oranges.
- Avoid plastic and glitter, which are harmful to the environment.
- Reuse last year’s decorations in new ways.
- Choose LED lights for energy efficiency.
Final Thoughts
Decorating for the holidays doesn’t have to be expensive or wasteful. With a little imagination and a commitment to sustainability, recycled Christmas decorations can become a cherished part of your holiday tradition. They add a homemade charm, reduce your environmental impact, and make the season feel even more meaningful.
Would you like this turned into a printable guide or a blog post format with images and headings?
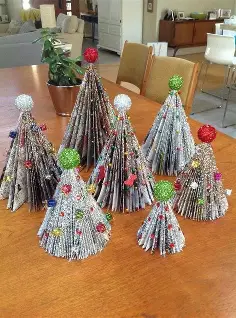
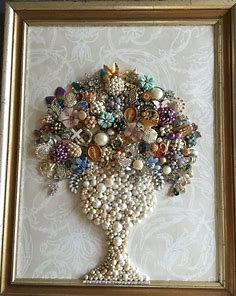
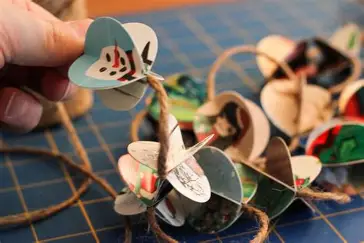
Old magazines and junk mail can be creatively converted into ornamental tabletop Christmas trees with a little easy folding.
2. How To Upcycle China Plates
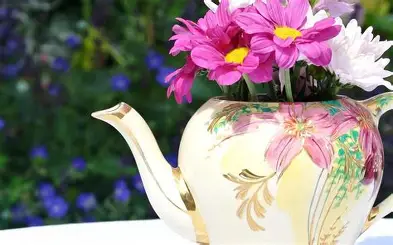
Upcycling china plates can be a fun, creative way to give new life to old or mismatched pieces. Whether you have heirloom china with chips, thrift store finds, or a full set you no longer use, here are some great ideas to upcycle china plates:
🎨 Creative & Decorative Upcycles
- Wall Art / Plate Gallery
- Arrange plates in a visually pleasing pattern on a wall.
- Use plate hangers, adhesive plate discs, or wall hooks.
- Mix colors, patterns, and sizes for an eclectic look.
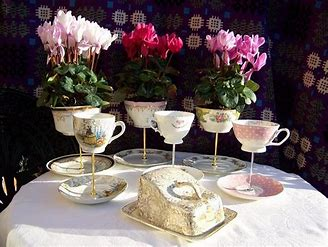
- Cake Stands or Tiered Trays
- Use epoxy or strong adhesive to attach glass candlesticks, teacups, or vases as a base.
- Stack different-sized plates to create a tiered serving stand.
- Clock
- Drill a hole in the center of the plate.
- Add a clock kit (available at craft stores) for a unique wall or countertop clock.
- Mosaic Art
- Break plates into small pieces (wear safety gear).
- Use them to create mosaic tabletops, stepping stones, or frames with grout.
🌱 Garden & Outdoor Uses
- Garden Markers
- Write plant names on the plate with ceramic markers or paint.
- Mount on stakes or sticks for labeling garden rows.
- Bird Feeder or Bird Bath
- Attach a bowl or shallow plate to a pole or hang it with chains.
- Great for attracting birds to your garden.
- Garden Totems
- Stack plates, bowls, and cups on a rod or rebar to create whimsical sculptures.
🕯️ Home & Utility Projects
- Jewelry or Trinket Dish
- Small china saucers make perfect holders for rings, earrings, or keys.
- Paint or gild edges for a custom touch.
- Candle Holder
- Glue a candlestick to a plate or use a teacup to hold a votive candle.
- Serving Tray
- Add drawer pulls to the sides of a large plate or platter for handles.
- Secure to a wood backing if extra support is needed.
🧵 Crafts with Kids or for Gifts
- Picture Frame
- Cut out the center of a plate and insert a photo.
- Use for family pictures or as a unique gift.
- Wind Chimes
- Drill small holes in broken plate pieces.
- Use fishing line or chains to suspend them from a base (like an old teapot or colander).
🧰 Tools & Safety Tips:
- Adhesives: Use E6000, epoxy resin, or other heavy-duty glues.
- Drilling: Use a diamond drill bit and keep the surface wet to reduce cracking.
- Cutting China: Use tile nippers or a hammer (wrapped in a towel) for breaking.
- Safety: Always wear eye protection and gloves when cutting or drilling.
Would you like step-by-step instructions for one of these projects (like making a tiered stand or mosaic art)?
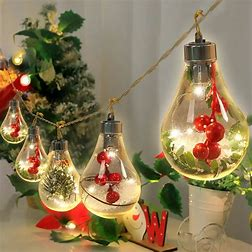
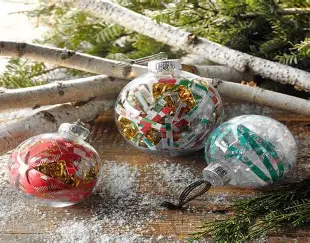
3. Easy Christmas Bottle Lights
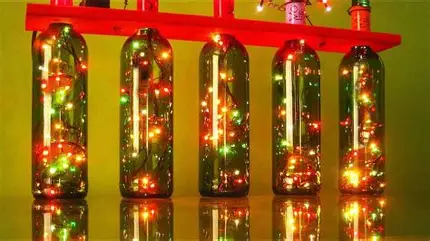
To add brightness to your house on chilly winter evenings, turn used glass bottles into illuminated Christmas ornaments.
4. DIY Plaid Fabric Reindeer
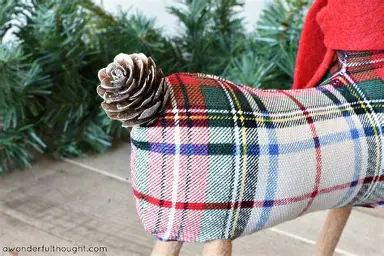
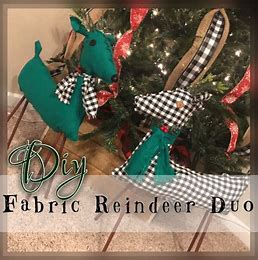
Sure! Here’s a DIY Plaid Fabric Reindeer project — a charming and cozy holiday craft you can sew or glue together depending on your skill level. Perfect for rustic, farmhouse, or traditional Christmas decor.
🎄 DIY Plaid Fabric Reindeer
🧵 Supplies You’ll Need:
- Plaid fabric (flannel or cotton works great)
- Reindeer template (can be printed from online or hand-drawn)
- Scissors or rotary cutter
- Needle & thread or sewing machine
- Polyfill stuffing
- Felt or faux leather (for antlers)
- Buttons or black beads (for eyes)
- Ribbon or twine (for a neck bow)
- Hot glue gun (optional if you’re not sewing)
- Embroidery floss (for facial details, optional)
📝 Instructions:
1. Choose Your Pattern
- Find or draw a simple reindeer shape (side profile is easiest).
- You can find printable reindeer templates online. Size it to your liking.
2. Cut the Fabric
- Fold your plaid fabric in half (right sides facing each other).
- Pin the paper pattern to the fabric and cut 2 identical pieces (front and back).
3. Add Antlers
- Cut antlers from felt or faux leather.
- Insert them between the two fabric layers at the top of the head so they stick out when sewn.
- Pin them in place securely.
4. Sew It Together
- With right sides together, sew around the edge, leaving a small opening at the bottom for turning and stuffing.
- Use a 1/4″ seam allowance.
- Carefully turn the reindeer right-side out.
5. Stuff the Reindeer
- Use polyfill stuffing to fill the body.
- Use a pencil or chopstick to push stuffing into the legs and nose.
- Stitch the opening closed by hand.
6. Add the Face
- Sew or glue on button eyes or black beads.
- Optional: use embroidery floss to stitch a little nose or smile.
7. Decorate
- Tie a little ribbon or twine around the neck like a scarf or collar.
- Add small jingle bells or a mini wreath for extra festive charm.
🎁 Bonus Ideas:
- Use as ornaments, mantel decor, or stocking toppers.
- Make a family of reindeer in different sizes!
- Add lavender or cinnamon to the stuffing for a scented holiday accent.
Would you like a printable template or pattern suggestion for the reindeer shape? I can help you find one or guide you on how to draw it.
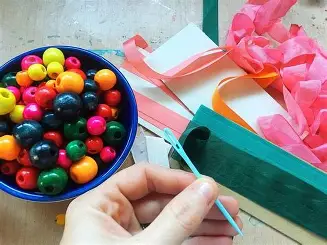
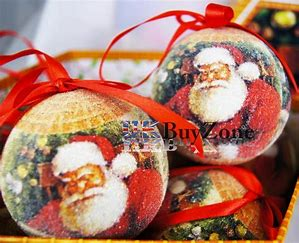
5. Easy DIY Picture Jar Lid Ornaments For Christmas
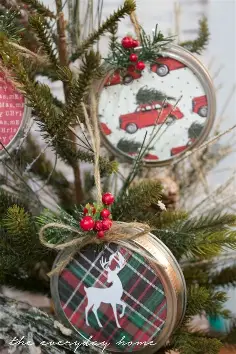
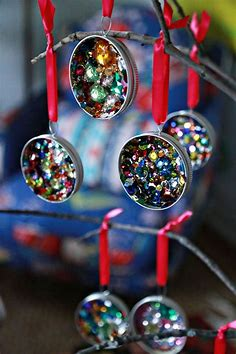
These adorable ornaments for jam jar lids were created using old photos of tropical birds, but they may be readily altered with your own photos to make one-of-a-kind, sentimental tree decorations. These recycled decorations give your Christmas tree a lovely and unique touch, whether you use old prints or family photos.
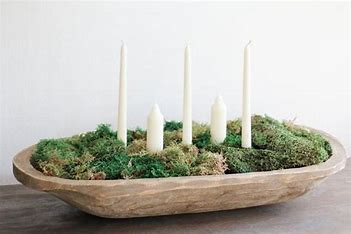
6. Recycled Christmas Candle Holders
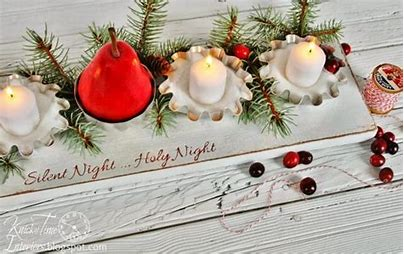

Absolutely! Here’s how to make beautiful Recycled Christmas Candle Holders using everyday items — a festive, eco-friendly craft perfect for the holidays!
🕯️ DIY Recycled Christmas Candle Holders
These charming candle holders can be made from jars, cans, bottles, or even old teacups. Below are a few creative and easy ideas to try.
1. Mason Jar Candle Holders
Materials:
- Empty glass jars (mason, jam, or baby food jars)
- Epsom salt or fake snow
- Tea lights or LED candles
- Twine, ribbon, or lace
- Evergreen sprigs, pinecones, cinnamon sticks, or berries
- Glue or Mod Podge (optional)
Instructions:
- Clean the jars and remove any labels.
- Add 1–2 inches of Epsom salt or fake snow inside the jar.
- Place a tea light or LED candle on top.
- Decorate the outside with twine, ribbon, or hot glue small pinecones or berries around the rim.
- Optional: Brush the outside with Mod Podge and sprinkle with glitter or Epsom salt for a frosted look.
2. Tin Can Candle Holders
Materials:
- Clean, empty tin cans
- Hammer and nail (or drill)
- Spray paint (white, gold, or red)
- Tea lights or votive candles
- Optional: ribbon, washi tape, or stencils
Instructions:
- Fill cans with water and freeze (this makes it easier to punch holes).
- Once frozen, use a nail and hammer to punch holes in a pattern (stars, trees, snowflakes, etc.).
- Let the ice melt and dry the cans.
- Spray paint them in festive colors.
- Place tea lights inside and enjoy the glowing patterns!
3. Wine Glass Candle Holders
Materials:
- Old wine glasses
- Mini Christmas ornaments or faux snow
- Tea lights or small pillar candles
- Ribbon, garland, or decorative paper
Instructions:
- Turn the wine glass upside down and place mini ornaments or faux snow inside the bowl.
- On top of the base (now the top), place a tea light or candle.
- Tie ribbon or garland around the stem for decoration.
4. Teacup Candle Holders
Materials:
- Old china teacups or espresso cups
- Wax (from old candles or wax flakes)
- Candle wicks
- Cinnamon sticks or dried orange peels (optional, for scent)
Instructions:
- Melt wax and pour into the cup.
- Hold wick in place with a skewer or clothespin until wax hardens.
- Optional: add dried citrus, cloves, or essential oils for a holiday scent.
♻️ Tips for Success:
- Always use fire-safe containers (especially with real flames).
- Reuse old materials like lace, fabric scraps, jars, and tins.
- Add a handmade touch with custom tags or labels.
- Use LED candles if you’re worried about fire hazards.
Would you like printable tags or labels to go with your recycled candle holders for gifts? I can help design those too!
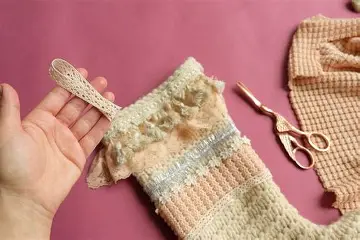
Use repurposed sweaters to make lovely stockings to add a homey, cosy touch to your Christmas mantel. With a unique, eco-friendly touch, these upcycled knitwear give your Christmas décor a cosy, rustic vibe while also adding warmth and charm.
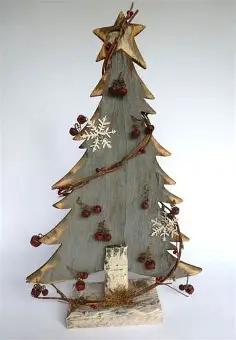
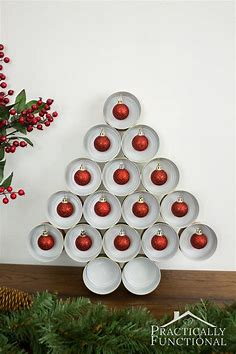
8. Unique DIY Wooden Christmas Tree With Knobs On
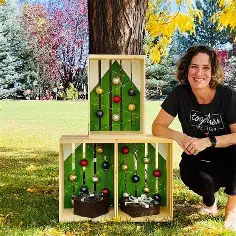
Absolutely! Here’s a step-by-step guide to creating a unique DIY wooden Christmas tree with knobs — a rustic, stylish, and functional decoration that can hang ornaments, stockings, or small gifts!
🎄 DIY Wooden Christmas Tree with Knobs
This tree is made from wood slats or planks, arranged in a triangle or layered style, with decorative knobs or hooks added as “branches” or hangers. It’s great for farmhouse, minimalist, or Scandi-style décor.
🪵 Materials Needed:
- Wooden boards or planks (pallet wood, 1x2s, or scrap wood)
- Wood screws or nails
- Wood glue (optional)
- Saw (hand saw, circular, or miter)
- Sandpaper or sander
- Paint or wood stain (optional)
- Decorative knobs or hooks (vintage, ceramic, brass, etc.)
- Hanging hardware or stand
🛠️ Tools:
- Drill and bits
- Screwdriver
- Ruler or tape measure
- Pencil
- Level
📝 Instructions:
1. Design the Tree Shape
Choose one of these styles:
- Triangle frame – three long planks form a triangle (tree outline), with cross boards inside for structure.
- Layered slats – horizontal planks stacked from longest (base) to shortest (top) in a tree shape.
- Modern post tree – a single vertical post with short “branches” sticking out at angles.
2. Cut and Sand Wood
- Cut your wood to desired lengths.
- For slat-style: Cut each horizontal piece shorter than the one below it (e.g., 24″, 20″, 16″, etc.).
- Sand all edges smooth.
3. Assemble the Tree
- Attach the horizontal planks to a vertical back board using screws or nails.
- For a freestanding version, add a sturdy base (like a cross-shaped stand).
- For a wall-mounted version, attach D-rings or sawtooth hangers to the back.
4. Paint or Stain (Optional)
- Paint it white, green, black, or stain for a rustic look.
- Let dry completely.
5. Add Decorative Knobs
- Mark where you want the knobs (evenly spaced or randomly).
- Drill pilot holes, then screw in the knobs or hooks.
- Mix and match vintage knobs, ceramic pulls, or even small drawer handles for charm.
6. Decorate Your Tree
- Hang:
- Mini ornaments
- Stockings
- Garland or fairy lights
- Tiny gift bags or tags with names
🌟 Bonus Ideas:
- Add a star or wooden topper at the top.
- Use chalkboard paint and write festive messages.
- Attach small baskets or crates to hold greenery or candles.
✅ Why It’s Unique:
- Doubles as a decor + functional hanger
- Great for small spaces (wall-mounted or tabletop versions)
- Customizable with colors, knobs, and accessories
- Perfect for advent calendar or photo display
Would you like a visual sketch or design template for one of these tree styles? I can help with that next!
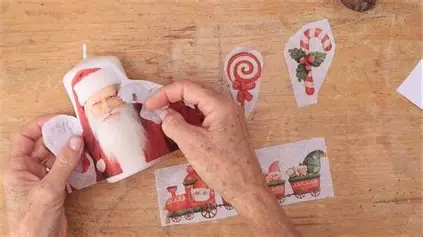
8. DIY Cardboard Christmas Decorations with Old Postage Stamps

To make a rainbow of 3D decorations to adorn the Christmas tree, all you need are some cardboard boxes and old postage stamps.
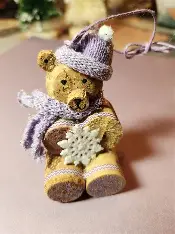

Here’s a fun and easy craft project: a Cork Polar Bear Ornament — perfect for kids, adults, and anyone who loves cozy handmade holiday decor!
🐻❄️ DIY Cork Polar Bear Ornament
This cute ornament uses wine corks and a few basic craft supplies to create a polar bear you can hang on your Christmas tree or use as a tabletop decoration.
🧰 Materials Needed:
- 1 wine cork (for the body)
- 1 mini cork or large wooden bead (for the head)
- 4 small white pom-poms (for feet)
- 2 tiny black beads or small dots of black felt (for eyes)
- 1 small black pom-pom or felt circle (for nose)
- White acrylic paint (if corks aren’t already light-colored)
- Hot glue gun and glue sticks
- White felt or craft foam (for ears and tail)
- Ribbon or twine (for hanging loop)
- Optional: mini scarf (fabric scrap or ribbon), small hat or hat made from felt
📝 Instructions:
1. Paint the Corks (Optional)
- If desired, paint the corks white to better resemble a polar bear’s fur.
- Let dry completely before gluing.
2. Build the Body
- Lay the wine cork horizontally — this is the body.
- Glue a mini cork or large bead to one end of the body to form the head.
3. Attach the Feet
- Glue four small white pom-poms underneath the body as legs/paws.
4. Make the Face
- Glue tiny black beads or felt dots on the head for eyes.
- Add a black pom-pom or felt circle for the nose.
- Cut small circles from white felt and glue to the top sides of the head for ears.
5. Add the Tail
- Cut or roll a small piece of white felt or use a tiny pom-pom for a tail on the back.
6. Decorate
- Tie a small ribbon or felt strip around the neck like a scarf.
- Add a tiny Santa hat or beanie (optional).
- For extra sparkle, brush on a little white glue and sprinkle with glitter.
7. Attach Hanging Loop
- Glue a loop of ribbon or twine to the back or top of the head so you can hang it as an ornament.
🧒 Kid-Friendly Tips:
- Use craft glue instead of hot glue if kids are making them.
- Skip the hanging loop and make it a cute mini polar bear figure for play or display.
❄️ Bonus Idea:
Make a family of cork polar bears in different sizes, with custom scarves or names on tags, for a super cute mantel or centerpiece!
Would you like a printable template for the ears or hat shapes? I can help with that too!
10. Repurposed Tin Can Ornament For Christmas
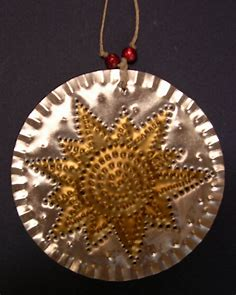
Make unique Christmas tree ornaments out of old sardine cans by utilising vintage Christmas cards! Convert these used cans into lovely, eye-catching ornaments that give your holiday décor personality and nostalgia by creating a miniature diorama within each can to tell a festive tale.
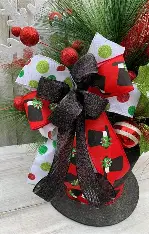
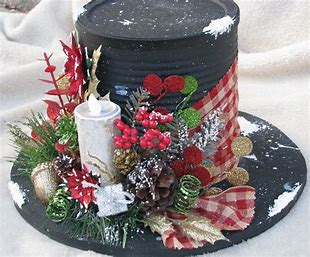
Sure! Here’s a festive and easy project for the holidays: a DIY Snowman Hat Centerpiece. It’s charming, affordable, and perfect as a table centerpiece, mantel decoration, or front porch accent.
🎩 DIY Snowman Hat Centerpiece
This cute centerpiece resembles a snowman’s top hat and can be filled with greenery, pinecones, flowers, or even candy canes. Made from simple materials like cardboard, plastic containers, or flower pots.
🧰 Materials Needed:
Option 1: Using a flower pot (easiest method)
- 1 black plastic or terra cotta flower pot (inverted)
- 1 round tray, plate, or foam board (for brim)
- Black spray paint or acrylic paint (if needed)
- Hot glue gun & glue sticks
- Ribbon (red plaid, burlap, etc.)
- Faux greenery, holly berries, pinecones, or floral picks
- Optional: snowflake ornaments, glitter, faux snow, small sign or name tag
📝 Instructions:
1. Paint the Hat
- If your flower pot and brim aren’t already black, spray paint or paint them.
- Let dry completely.
2. Assemble the Hat
- Turn the flower pot upside down.
- Glue it to the center of your brim base (tray or foam circle) — this forms the snowman’s hat.
3. Decorate the Brim
- Wrap a ribbon or fabric strip around the base of the pot (where it meets the brim) like a hat band.
- Add a bow or jingle bells for detail.
- Glue on pinecones, berries, evergreen sprigs, mini ornaments, or other wintery accents on one side of the brim.
4. Add a Centerpiece (Optional)
- You can leave it closed or use the top (flower pot base) as a container:
- Fill with floral foam and insert faux flowers or greenery.
- Add candy canes, ornaments, or mini LED lights for sparkle.
🧊 Optional Snowy Touch:
- Brush edges with glue and dust with Epsom salt or glitter for a snowy, frosted look.
- Add a few snowflake cutouts or white buttons for a classic snowman vibe.
🎁 Bonus Idea:
Use smaller pots to create mini snowman hats as place settings or gift toppers!
Would you like a printable sign that says something like “Let it Snow!” or “Welcome Winter” to add to your hat centerpiece? I can help design one!
12. Super Easy to Make Cute Norwegian Christmas Gnomes
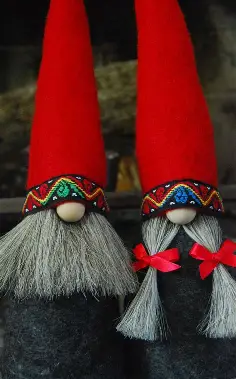
Made from wooden logs and used sweaters, these cute Norwegian gnome Christmas decorations are incredibly simple to make—no stitching is needed! You can create these adorable, rustic gnomes with a few basic supplies to give your Christmas décor a warm, Scandinavian feel.
13. Giant Cardboard Christmas Ornaments
Absolutely! Here’s how to make Giant Cardboard Christmas Ornaments — an eye-catching, budget-friendly way to decorate for the holidays. These oversized ornaments are perfect for porches, windows, photo backdrops, classrooms, or even large trees.
🎄 DIY Giant Cardboard Christmas Ornaments
These lightweight, customizable ornaments are made from cardboard and decorated with paint, glitter, wrapping paper, or fabric.
🧰 Materials Needed:
- Large cardboard pieces (from shipping boxes or appliance boxes)
- Pencil & ruler
- Scissors or box cutter (use safely!)
- Paint (acrylic or spray paint)
- Hot glue gun or craft glue
- Ribbon, string, or yarn (for hanging or decoration)
- Aluminum foil or plastic bottle caps (for ornament tops)
- Wrapping paper, glitter, markers, or stickers (optional)
- Bowl, compass, or plate (to trace circles)
📝 Instructions:
1. Draw and Cut the Ornament Shape
- Use a large bowl, plate, or lid to trace a circle on the cardboard (or draw freehand).
- Cut out the circle using scissors or a box cutter.
- Cut out two identical circles for a front and back if you want the ornament 3D or double-sided.
2. Make the Ornament “Top”
- Cut out a small rectangle or use a plastic bottle cap, foil-covered cardboard, or a paper cup.
- Attach it to the top of the circle as the ornament cap.
- For a hanger loop, glue on a small ring of cardboard, a piece of string, or a loop of wire.
3. Paint or Cover the Ornament
- Paint your cardboard with bright holiday colors like red, green, gold, silver, blue, or white.
- Optional: cover the front with wrapping paper or fabric for texture.
- Add stripes, polka dots, snowflakes, stars, or other fun patterns.
4. Decorate!
- Use glitter, stickers, buttons, felt shapes, or cut-out letters to personalize.
- Add a name or holiday message like “JOY,” “MERRY,” or “HO HO HO.”
5. Assemble (for 3D Look)
- If making a 3D version, glue the front and back together with spacers between (like rolled-up cardboard or foam).
- You can also fold two circles and slot them together to create a standing 3D shape.
6. Add a Hanging Loop
- Glue or tape ribbon, twine, or yarn to the top to hang it on a wall, door, or large tree.
🎁 Bonus Ideas:
- Make different shapes: bell, teardrop, star, or bulb shapes!
- Create a giant ornament garland by stringing several together.
- Use as holiday photo booth props or window displays.
Would you like a printable pattern for the ornament shape or ideas for stencil designs? I can create one for you!

Paint toilet paper tubes a variety of bright hues, then cut them into pieces to create cheery decorations to add some colour to your Christmas décor. A fun and environmentally friendly addition to your Christmas setting, these repurposed paper ornaments are ideal for stringing into festive garlands or hanging on the tree.
15. DIY Christmas Village Using Toilet Paper Rolls
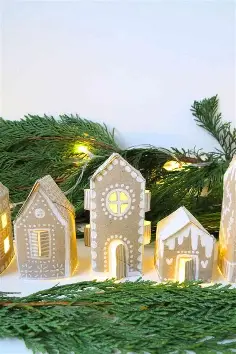
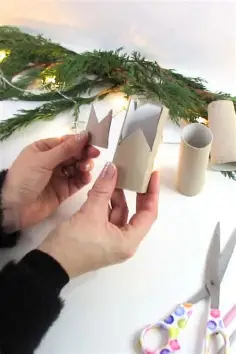
Creating a DIY Christmas Village using toilet paper rolls is a fun, eco-friendly craft that’s perfect for all ages! Here’s a simple step-by-step guide to make your own charming holiday village.
🎄 Materials Needed:
- Empty toilet paper rolls (or paper towel rolls cut in half)
- Craft paper, scrapbook paper, or paint
- Glue or a hot glue gun
- Scissors
- Cotton balls or batting (for snow)
- Markers or pens
- Decorative bits: stickers, mini wreaths, glitter, washi tape, buttons, etc.
- Small LED tea lights (optional, for a glowing effect)
- Cardboard base or tray (optional)
🏘️ How to Make Your Christmas Village:
1. Create the Base (Optional)
- Use a piece of cardboard or a tray as your village base.
- Cover it with white felt, cotton, or batting to simulate snow.
2. Decorate the “Houses”
Each toilet paper roll will be one house.
- Option 1: Paint the rolls. Use acrylic paint in festive colors (red, green, white, gold, silver).
- Option 2: Wrap in paper. Cover each roll in patterned or colored paper and glue it down.
3. Cut Out Windows and Doors
- Cut small square or rectangular windows using scissors or a craft knife.
- Add a door using paper or by cutting a flap directly into the roll.
- Use markers or pens to draw details like shutters, bricks, or garlands.
4. Make the Roof
- Cut circles from cardstock (around 4–5 inches in diameter).
- Cut a slit halfway into the circle and overlap the edges to form a cone shape. Glue it to secure.
- Glue the cone onto the top of the toilet paper roll to form a roof.
- Decorate the roof with snow (cotton), glitter, or “shingles” made from paper strips.
5. Add Snow and Details
- Glue cotton to the roof and base for snow.
- Add tiny wreaths (you can twist green pipe cleaners into circles).
- Use glitter glue to simulate icicles or frost.
- Draw or glue on Christmas lights using string and tiny colored paper dots.
6. Optional: Add Lights
- Place a battery-powered LED tea light inside a roll for a cozy glow through the windows.
🎁 Bonus Ideas:
- Make different buildings: A bakery, church, toy shop, post office — just label each roll and add themed decorations.
- Create a winter scene: Add bottle brush trees, mini figurines, or a paper sled.
- Add levels: Use boxes underneath to create height variations in your village layout.
Would you like a printable template for roofs, windows, or signs to go with this?
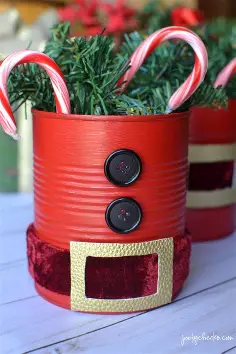
16. DIY Christmas Craft: Tin Can Snowman
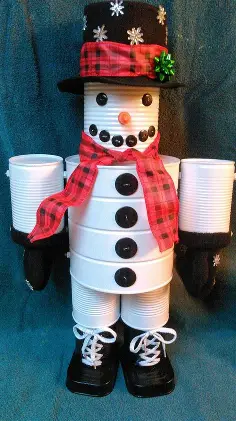
This cute tin can snowman is the perfect Christmas craft if you’re looking for something quick and simple! The best part is that it’s quick, easy, and a lot of fun to put together, making it a great method to upcycle those old tin cans. Ideal for giving a little holiday flair without the trouble!
17. Night Light Bulb Christmas Ornaments
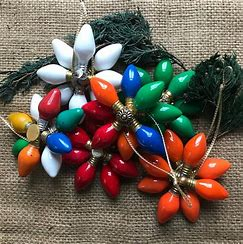
Sure! Here’s a fun and festive project: Night Light Bulb Christmas Ornaments – a great way to upcycle old light bulbs into charming decorations for your tree!
💡 Night Light Bulb Christmas Ornaments – DIY Guide
🧰 Materials Needed:
- Burnt-out or old night light bulbs (or small incandescent bulbs)
- Acrylic paints (red, green, white, gold, etc.)
- Paintbrushes (fine tips for detail)
- Glitter, glue, or mod podge
- Ribbon or string (for hanging)
- Hot glue gun or strong craft glue
- Small embellishments: mini hats, buttons, googly eyes, felt scraps, etc.
- Optional: clear sealer spray or mod podge to protect the finish
🎨 Step-by-Step Instructions:
1. Clean the Bulbs
- Wipe the bulbs with a damp cloth to remove any dust or residue.
- Make sure they are completely dry before painting.
2. Paint the Bulbs
Choose your theme and paint the entire bulb. Some popular ideas:
- Snowman – White bulb, draw on eyes, carrot nose, scarf, and buttons.
- Santa – Red bulb with a white beard, black belt, and gold buckle.
- Reindeer – Brown bulb, add antlers (from pipe cleaners), eyes, and red nose.
- Penguin – Black and white paint with an orange beak and tiny feet.
Let the paint dry completely between coats.
3. Add Details
Use fine-tip brushes or markers to draw faces, outlines, or decorations. You can also:
- Use glitter glue to highlight features.
- Add felt scarves, hats, or ears.
- Glue on small accessories like pom-poms or buttons.
4. Seal (Optional)
Once the paint and glue are dry, you can spray or brush on a clear sealer (like Mod Podge or acrylic sealant) to protect your ornament for future holidays.
5. Attach a Hanger
- Loop a ribbon or string and glue it to the metal base of the bulb.
- You can also tie it around the metal threads if you prefer a no-glue option.
- Let dry fully before hanging.
✨ Display Ideas:
- Hang on your Christmas tree.
- Group several in a bowl for a holiday centerpiece.
- Give them as handmade gifts or party favors.
Would you like printable tags or labels to go with these ornaments for gifting?
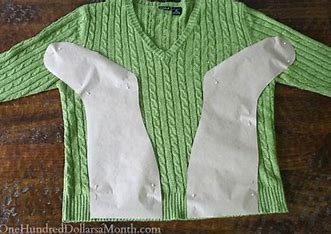
18. Easy Cookie Cutter Sweater Upcycled Christmas Ornaments
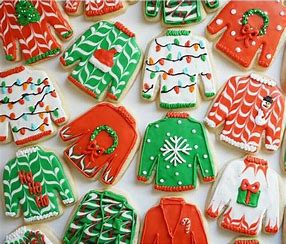
Use Christmas-shaped cookie cutters as templates to upcycle your old sweaters into adorable Christmas ornaments.
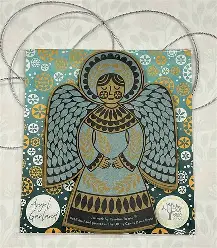

Absolutely! Here’s a lovely and creative holiday craft: Wallpaper Angel Garland — a charming way to reuse old wallpaper or decorative paper to make festive angels for a garland.
👼 Wallpaper Angel Garland – DIY Guide
🧰 Materials Needed:
- Old wallpaper scraps or decorative paper (can mix and match patterns)
- Scissors
- Glue stick or double-sided tape
- String, twine, or ribbon (for the garland)
- Hole punch
- Small beads, buttons, or glitter (optional)
- Pencil and ruler
✂️ How to Make the Angel Garland:
1. Cut Out the Angel Pieces
You’ll need:
- Body: Cut a triangle (about 4–6 inches tall) from patterned wallpaper.
- Wings: Cut a small oval or bow-tie shape.
- Head: Use a 1–1.5 inch circle (you can trace a coin).
- Halo (optional): Cut a small ring or use metallic thread or a gold sticker.
2. Assemble Each Angel
- Glue the wings to the back of the triangle (body).
- Glue the circle (head) to the top point of the triangle.
- Add the halo above the head (either glue it or hang it on a thread).
- Decorate with glitter, buttons, or draw on facial features with a pen.
3. Make Multiple Angels
- Repeat with different wallpaper patterns to create a unique, colorful set of angels.
4. Attach to Garland String
- Punch a small hole at the top of each angel’s head and thread your string or ribbon through.
- Space angels about 4–6 inches apart.
- Alternatively, use mini clothespins or paper clips to attach them to the string.
5. Hang and Enjoy!
- Drape across a mantel, staircase, wall, or above a window for a festive touch.
🎁 Bonus Tips:
- Use metallic or embossed wallpaper for an elegant effect.
- Add names or messages to each angel for a personalized garland.
- Make mini versions to use as gift tags or tree ornaments.
Would you like a printable template for the angel shape or ideas for variations (like angel choir or holding stars)?
20. Dictionary Christmas Decoupage Baubles
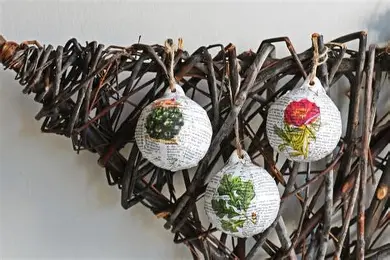
Make these intriguing Christmas ornaments out of the book pages of an old dictionary to give your tree decorations a touch of vintage charm.
21. DIY Recycled Christmas Card Blocks
Sure! Here’s a fun and meaningful holiday project: DIY Recycled Christmas Card Blocks — a creative way to reuse old Christmas cards and make decorative blocks that can be used for display, gifts, or even play.
🎄 DIY Recycled Christmas Card Blocks – Craft Guide
🧰 Materials Needed:
- Old Christmas cards (fronts with pretty images or messages)
- Wooden blocks (can use kids’ toy blocks, scrap wood, or cut your own)
- Scissors or craft knife
- Glue (Mod Podge, white glue, or a glue stick)
- Sandpaper (optional, for smoothing edges)
- Acrylic paint (optional, to paint the blocks)
- Clear sealer or Mod Podge (optional, to protect the finish)
🧱 How to Make the Blocks:
1. Prepare the Wooden Blocks
- Use wooden blocks in any size (1.5″ to 3″ cubes work well).
- Sand the edges to remove rough spots if needed.
- Paint them in festive colors (red, white, gold, green) and let dry — or leave natural for a rustic look.
2. Cut the Christmas Cards
- Cut out images, phrases, or scenes from the cards to fit each block face.
- You can cover just one side, or multiple sides for variety.
- Try using letters from different cards to spell out words like JOY, NOEL, PEACE, etc.
3. Glue the Card Pieces
- Apply a thin layer of glue to the block surface.
- Press the card cut-out onto the block and smooth out any bubbles.
- Let it dry completely.
4. Seal the Surface (Optional)
- Apply a layer of Mod Podge or clear sealer over the card to protect and give it a finished look.
- Allow to dry fully before handling.
5. Display or Gift!
- Arrange your blocks on a mantel, shelf, or tabletop.
- Stack them to form words or display festive scenes.
- They also make thoughtful handmade gifts or stocking stuffers!
🎁 Bonus Ideas:
- Add ribbon around the edges like little presents.
- Use alphabet stickers or stamps to personalize.
- Add glitter or embellishments for extra sparkle.
- Create a nativity scene using card cut-outs on multiple blocks.
Would you like printable letters or templates to help plan block designs?
22. How to Make Giant Christmas Candles
Why not give these enormous candles constructed from recycled cardboard packaging tubes a go if you’re searching for bigger Christmas decorations? They are a stunning, cost-effective, and environmentally responsible way to add height and festive flair to your Christmas décor!

Of course! Here’s a cozy and creative holiday craft: Paper Pine Cone Ornaments — a beautiful and budget-friendly way to decorate your Christmas tree using paper.
🌲 DIY Paper Pine Cone Ornaments
These pine cones are made from layers of paper and can look incredibly elegant or rustic, depending on your choice of paper.
🧰 Materials Needed:
- Cardstock or patterned scrapbook paper (brown, gold, green, metallics work well)
- Scissors or paper punch (oval or teardrop shape is ideal)
- Glue (hot glue gun or tacky glue)
- Foam egg or paper cone base (or make your own cone from cardstock)
- Ribbon or string (for hanging)
- Optional: glitter, ink, or paint for accents
✂️ How to Make Paper Pine Cones:
1. Choose Your Paper
- Use solid colors for a classic look or metallics and patterns for a festive style.
- Brown, kraft, white, or even gold/rose gold all look great for pine cones.
2. Cut the Scales
- Cut 30–50 small teardrop, oval, or rounded triangle shapes (about 1–1.5 inches long).
- A paper punch in a teardrop or petal shape can speed this up.
- For added dimension, curl the tip of each piece slightly with a pencil.
3. Create the Pine Cone Base
- Use a foam egg, paper cone, or a homemade cone made by rolling and taping a piece of cardstock.
- This will serve as the shape onto which you’ll glue the paper scales.
4. Glue the Scales
- Start from the bottom (wider end) of the cone and work your way up.
- Overlap each row slightly, gluing each paper piece in a ring around the base.
- Continue layering upward until the entire cone is covered.
5. Add a Topper
- When you reach the top, you can:
- Glue a small circle or flower-shaped piece to cover the final tip.
- Add a small bead, button, or tiny pine cone.
- Glue on a looped ribbon to hang the ornament.
6. Add Ribbon and Finishing Touches
- Attach a ribbon loop with glue or a pin to hang your ornament.
- Optionally, dust edges with glitter, metallic ink, or faux snow for sparkle.
🎁 Bonus Ideas:
- Use old book pages or sheet music for a vintage look.
- Create a full set in different sizes for a themed tree.
- Hang them from garlands, wreaths, or even use as gift toppers.
Would you like a printable template for the petal shapes or a pattern for the cone base?
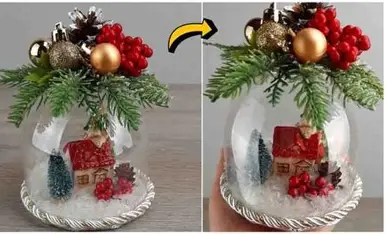
24. DIY Snow Globe Using A Plastic Bottle Tutorial
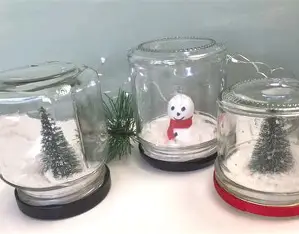
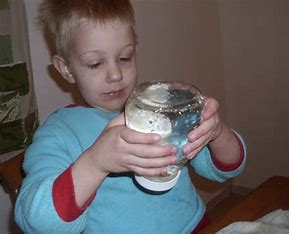
Absolutely! Here’s a fun and festive project: DIY Snow Globe Using a Plastic Bottle — a great upcycling craft that’s easy to make and perfect for the holidays!
❄️ DIY Snow Globe Using a Plastic Bottle – Step-by-Step Tutorial
This craft is kid-friendly, budget-conscious, and full of holiday magic!
🧰 Materials Needed:
- Clear plastic bottle (small water or soda bottles work well)
- Distilled water
- Glycerin (available at pharmacies or craft stores; optional but helps the “snow” fall slowly)
- Glitter or fake snow
- Mini holiday figurine (plastic or waterproof)
- Strong glue (hot glue or waterproof craft glue)
- Scissors or craft knife
- Decorative ribbon or washi tape (optional)
- Optional: small pebbles or beads for weight at the base
🧪 Instructions:
1. Prepare the Bottle
- Rinse and dry the bottle thoroughly.
- Remove the label and any adhesive (use rubbing alcohol or oil if needed).
- Decide if you’re using the top or bottom part of the bottle as the globe:
- Bottom half gives you a bowl shape, open on top (good for diorama style).
- Top half with the cap becomes a traditional upside-down globe.
2. Secure the Figurine
- Choose a waterproof figurine (mini Santa, tree, snowman, etc.).
- Glue the figurine to the inside of the bottle cap or a small waterproof base that can fit inside.
- Let it dry completely.
3. Fill the Bottle
- Fill with distilled water (tap water may cloud over time).
- Add a few drops of glycerin (to slow down the glitter).
- Add glitter or fake snow — not too much or it will clump.
4. Seal It Up
- Carefully screw on the cap with the glued figurine (it will be upside-down inside the water).
- Apply glue around the rim of the cap before tightening to prevent leaks.
- Let dry completely before shaking.
5. Decorate (Optional)
- Wrap ribbon or washi tape around the cap or base.
- Add stickers or paint the outside with snowflake designs.
- You can also glue the bottle onto a base (like a mason jar lid or small dish) for a finished look.
🌟 Tips:
- If using a larger bottle, place small rocks or beads inside the cap base for stability.
- For a dry version, skip the water and just add fake snow and glitter inside — it becomes a shakeable snow scene!
- Hot glue works well for a secure seal but allow it to cool slightly before attaching to avoid warping thin plastic.
Would you like a printable version of this tutorial or a kid-friendly version for classroom use?