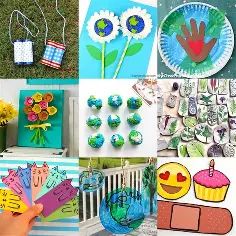
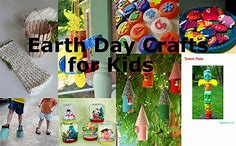
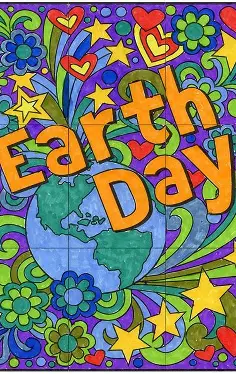
Crafts for Earth Day are a fantastic way to get children interested in and enthusiastic about protecting the planet. There are 30 fantastic Earth Day projects and crafts for kids, so you’re sure to find something your child will like. We have something for every child, from entertaining activities that emphasise the value of recycling to easy, eco-friendly craft projects for beginners. With simple directions that make it easier for young children to grasp the significance of Earth Day, these Earth Day activities for kids serve to develop eco-friendly behaviours early on. You’ll be shocked at how much fun your kids have making their own Earth Day projects, so embrace this eco-friendly celebration!
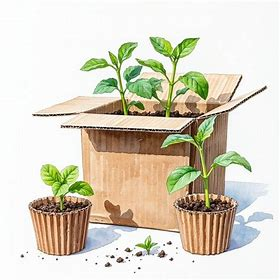
- Cool DIY Earth Day Plant Pot
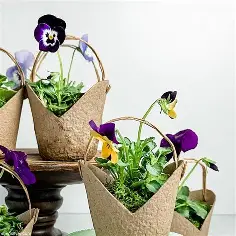
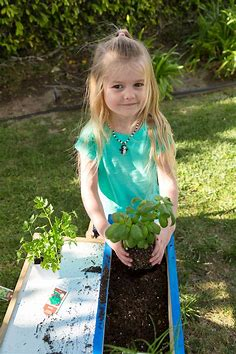
Earth Day is a wonderful opportunity to honour our planet and all that it provides for us, but it’s also a moment to consider what we can do to help preserve it. Making your own DIY Earth Day plant pot is one of the finest ways to get involved. With just a few supplies and a little bit of know-how, you can create a chic and useful pot that will demonstrate your dedication to protecting the environment.
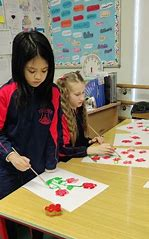
2. Easy Earth Day Art Activity for School
DIY earth crafts are a fantastic way to teach children about the environment and how to care for our globe, regardless of the project you decide on. Children of all ages will love this craft. It supports the growth of both fine motor and critical thinking abilities.
Children can also practise cutting skills through earth craft. You can undertake this enjoyable hobby with your family or friends. The best thing about do-it-yourself projects is that they are made to be simple and enjoyable for children. Therefore, you should start now by gathering your materials.
3. DIY The Lorax Truffula Trees
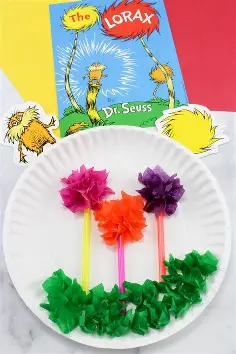
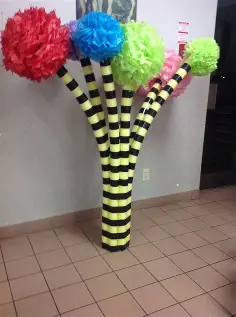
Were you trying to find a simple Earth Day project? Children of all ages will love this do-it-yourself project: making lorax truffula trees. It’s enjoyable, simple, and needs little materials. Additionally, it’s an excellent method to teach children critical skills like adhering to instructions, cutting with scissors, and applying glue. The best part is that it’s a do-it-yourself project that takes only fifteen minutes to complete at home. What’re you waiting for, then? Start making things! craftplaylearn
4. Bottle Cap Flowers Crafts for 3rd Grader
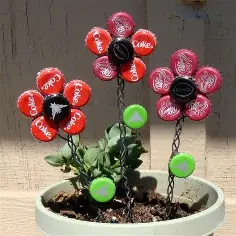

Here’s a fun and simple Bottle Cap Flowers Craft idea that’s perfect for a 3rd grader:
🌸 Bottle Cap Flowers Craft
Materials Needed:
- Colorful plastic bottle caps (different sizes if possible)
- Cardboard or thick paper (as the base)
- Green craft sticks / straws / pipe cleaners (for stems)
- Construction paper (for leaves)
- Glue (hot glue with adult help OR strong craft glue)
- Scissors
- Markers or paint (optional, for decorating caps)
Steps:
- Prepare the Base:
Cut a circle or square from cardboard to hold your flower design. - Make the Flower Petals:
Arrange several bottle caps around in a circle shape to look like petals. Glue them down. - Add the Center:
Place a different colored bottle cap in the middle as the “flower center.” - Create the Stem:
Glue a green craft stick, straw, or pipe cleaner under the flower as the stem. - Make Leaves:
Cut leaf shapes from green construction paper and glue them to the stem. - Decorate:
- Draw little patterns inside the caps with markers or paint.
- Add glitter, stickers, or even small beads inside the caps for extra fun.
- Display:
Once dry, your child can hang it on the wall, make a bouquet by attaching flowers to sticks, or even decorate plant pots with them.
✨ Extra Idea for 3rd Graders: Turn this into a Mother’s Day card or Earth Day art project by gluing the flower onto folded cardstock and writing a message inside.
Would you like me to also make a step-by-step printable instruction sheet with pictures for this craft so a 3rd grader can follow along easily?
5. Pine Cone Bird Feeders
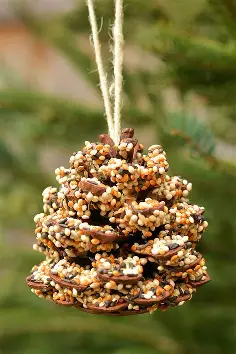
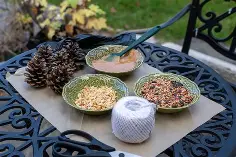
All the birds will flock to your yard with these pine cone feeders! Start the fluttering!
To make: Tie a piece of string around the pine cone’s upper stem. Roll the entire pine cone in bird seed after stuffing peanut butter into the opening. dangle from a tree branch outside. Take out and re-fill as necessary.
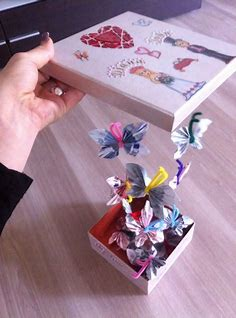
6. Hanging Bouquet
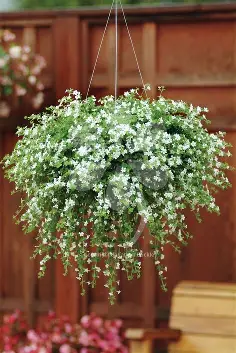
Got it 😊 Here’s a simple Hanging Bouquet Craft idea in English that a 3rd grader can make:
🌸 DIY Hanging Bouquet Craft
Materials Needed:
- Colorful paper or felt flowers (or handmade bottle cap flowers!)
- String, ribbon, or yarn
- Small paper cups / plastic cups / mason jar (lightweight)
- Tape or glue
- Scissors
- Green construction paper (for leaves)
- Hole punch (optional)
Steps:
- Make the Flowers:
- You can use paper, felt, or recycled bottle caps to create flowers.
- Add stems using straws, pipe cleaners, or craft sticks.
- Prepare the Holder:
- If using a cup, punch two small holes near the rim on opposite sides.
- Tie a ribbon or string through the holes to create a hanger.
- Arrange the Bouquet:
- Place the flowers inside the cup/jar to make a bouquet.
- Cut green paper into leaf shapes and glue them to the stems.
- Add Hanging String:
- Tie a longer ribbon or yarn to hang the bouquet from a wall hook, doorknob, or ceiling.
- Decorate:
- Wrap the cup with colorful paper, paint, or stickers.
- Add bows or glitter for extra charm.
✨ Extra Idea: Instead of a cup, you can roll a piece of colorful paper into a cone shape, tape it, and use that as a bouquet holder.
Would you like me to make this Hanging Bouquet craft using bottle cap flowers (to connect with your earlier idea), or just a paper flower version for simplicity?
7. DIY Canvas Drop Cloth Picnic Blanket


Experiencing the beauty of nature outdoors is the ideal way to commemorate Earth Day. A homemade picnic blanket will be the ideal place to sit while admiring gorgeous puffy clouds, passing birds, and wind-blown leaves.
To make: A canvas drop cloth from the hardware shop should be cleaned and ironed to the appropriate size. Apply fabric paint (or, as directed on the container, combine fabric paint fixative with acrylic paint). Use painter’s tape and a drop cloth to tape off the desired design. After letting it dry, go outside.
8. Coffee Filter Poppies
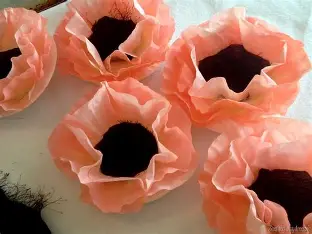
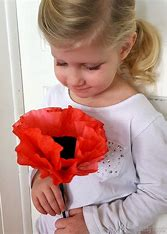
Here’s a super easy Coffee Filter Poppies Craft that’s perfect for kids, including 3rd graders:
🌺 Coffee Filter Poppies
Materials Needed:
- White coffee filters
- Red watercolor or food coloring (diluted with water)
- Black marker or black paint
- Green pipe cleaners or straws (for stems)
- Small cup of water
- Paintbrush (if using paint)
Steps:
- Color the Filters:
- Lay the coffee filter flat.
- Use red watercolor or food coloring to paint the whole filter.
- Let it dry completely.
- Shape the Petals:
- Once dry, pinch the middle of the coffee filter.
- Scrunch it gently so it looks like ruffled flower petals.
- Make the Center:
- Use a black marker or dab black paint in the middle of the filter to create the poppy’s center.
- Attach the Stem:
- Poke a small hole in the center of the filter.
- Push a green pipe cleaner or straw through and twist/tape it in place.
- Finish the Flower:
- Fluff the petals so they look full and natural.
- Add a green paper leaf if you’d like.
✨ Extra Idea:
- Bundle a few together to make a bouquet.
- Hang them on the wall for a classroom display (great for Remembrance Day or Memorial Day).
Would you like me to also create a step-by-step printable template with illustrations for this Coffee Filter Poppy craft?
9. Celery Print Cards
Kids may be crafty and develop a connection with earthly products by creating interesting prints on cloth or paper (which can be used as note cards) using natural materials.
To make: Trim a celery head 2 to 3 inches from the bottom. Use a paper towel to pat dry the cut end. Tap the root side to assist create an even print, then press the sliced end into a blank note card after pressing it on a stamp pad. After drying, add a kind salutation.
10. Kitchen Pan Hanging Planters
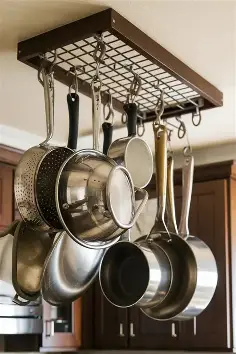
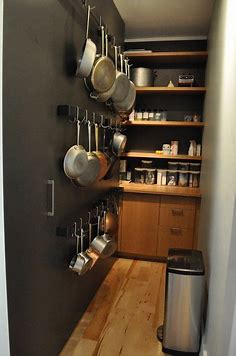
That’s a super creative upcycling idea! 🌱✨ Turning old kitchen pans into hanging planters adds a rustic, quirky, and eco-friendly touch to your home or garden. Here are some ideas and steps to inspire you:
🔨 How to Make Kitchen Pan Hanging Planters
Materials You’ll Need:
- Old pans (frying pans, saucepans, or even lids)
- Drill (for drainage holes and hanging holes)
- Strong rope, chain, or macramé cord
- Potting soil
- Plants (succulents, herbs, or trailing plants work great)
- Optional: paint, spray paint, or mosaic tiles for decoration
🪴 Steps:
- Prepare the Pan
- Clean the pan thoroughly.
- Drill a few drainage holes at the bottom so water doesn’t sit inside.
- Add Hanging Points
- Drill 2–3 small holes near the edge of the pan (evenly spaced) to attach rope or chain.
- If using a saucepan with a handle, you can hang it by the handle too.
- Decorate (Optional)
- Paint the pan with outdoor spray paint for a fresh, colorful look.
- Add patterns, stencils, or even a chalkboard label to mark herbs.
- Planting
- Place a thin layer of small rocks or pebbles for drainage.
- Fill with potting soil.
- Plant herbs, flowers, or succulents.
- Hang It Up
- Thread rope or chain through the holes and knot securely.
- Hang in your kitchen, balcony, or garden for a fun rustic vibe.
🌿 Creative Variations
- Frying Pan Herb Garden → Mount frying pans on a wooden wall panel, plant different herbs in each, and label them.
- Saucepan Hanging Planter → Hang by the handle on a garden hook, perfect for cascading plants.
- Painted Pan Planters → Brightly painted pans hung at different heights for a colorful garden display.
- Pan Lid Hanging Garden → Repurpose lids as shallow planters for succulents or moss.
👉 Would you like me to sketch out a visual design/DIY guide (step-by-step illustration) for these hanging planters so it’s easier to picture?
11. Garden Markers
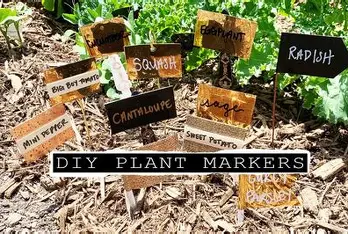
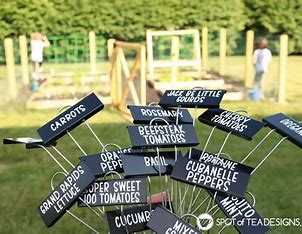
Make your own garden markers with old gardening tools to teach children about gardening and food production.
To make: Ask adults to drill a tiny hole in the wood handles, then use thread to tie kid-made wooden tags through the holes. To make the markers stand erect, stick the sharp points into the ground. on shield the handwriting from the weather, apply a transparent varnish on the wood.
12. Grass Crown
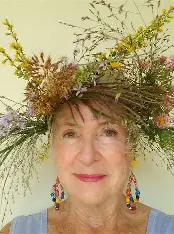
A Grass Crown is a fun and nature-inspired craft, perfect for kids’ activities, outdoor play, or themed events like Earth Day, spring festivals, or pretend play. 🌿👑
Here’s how you can make one:
🌱 How to Make a Grass Crown
Materials You’ll Need:
- Fresh long grass, reeds, or wheat stalks (the longer, the better)
- Scissors (optional)
- String, twine, or floral wire (if needed for extra support)
🪴 Steps:
- Gather Grass
- Collect long blades of grass or natural stems from outside.
- Try to pick flexible ones that won’t snap easily.
- Start Braiding
- Take 3 long grass blades and start braiding them like hair.
- As you braid, add more grass strands to keep it long enough to wrap around your head.
- Create the Crown
- Once the braid is long enough, wrap it around your head to measure.
- Overlap the ends and tuck them into the braid, or tie with string/twine to secure.
- Decorate (Optional)
- Add small flowers, leaves, or even herbs into the braid for a colorful, fairy-like crown.
🌿 Fun Variations
- Wildflower Crown → Weave in daisies, dandelions, or clovers.
- Herb Crown → Use rosemary, mint, or lavender for a fragrant version.
- Festival Crown → Spray paint some grass gold or silver for a shiny, party-style crown.
Would you like me to make a simple kids’ activity version of the Grass Crown (with paper strips and green craft supplies) in case fresh grass isn’t available?
13. Papier-Mâché Fish
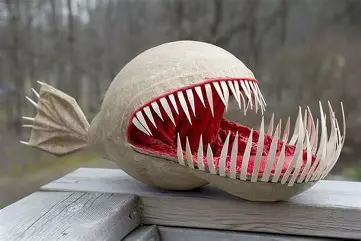
As you assist the little ones in creating Nemo (or any other fish they like) out of papier-mâché, you can teach them about the ocean. Using flour, water, and repurposed materials like cereal boxes and newspapers, it’s surprisingly simple.
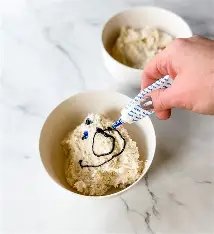
14. Salt Dough Necklaces
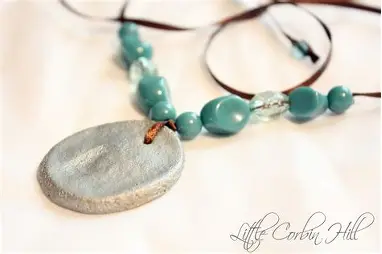
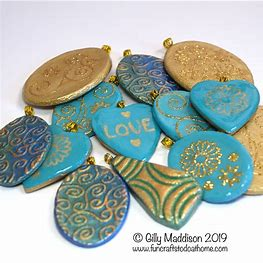
Great choice! 🎨 Salt dough necklaces are a fun, kid-friendly craft that doubles as a keepsake or handmade gift. They’re easy to make with simple ingredients you likely already have at home.
🌟 How to Make Salt Dough Necklaces
Ingredients & Materials:
- 2 cups flour
- 1 cup salt
- 1 cup water (add slowly as needed)
- Rolling pin
- Cookie cutters (hearts, stars, circles, etc.)
- Straw or toothpick (to poke holes)
- String, yarn, or ribbon
- Paints & brushes (optional for decorating)
- Clear sealant (optional, for longer-lasting necklaces)
🪴 Steps:
- Make the Dough
- Mix flour, salt, and water in a bowl until it forms a smooth dough.
- Knead for a few minutes to get rid of stickiness.
- Shape the Pendants
- Roll the dough flat with a rolling pin (about ¼ inch thick).
- Use cookie cutters or shape by hand into fun designs.
- Make the Necklace Hole
- Use a straw or toothpick to poke a hole near the top of each pendant (big enough for string).
- Bake or Air Dry
- Place shapes on a baking tray.
- Bake at 200°F (90°C) for 2–3 hours until hard, or leave to air dry for 1–2 days.
- Decorate
- Once cool, paint with bright colors or patterns.
- Add glitter or write names/initials for personalization.
- String & Wear
- Thread ribbon, yarn, or string through the hole.
- Tie and wear your handmade necklace!
🎨 Fun Ideas
- Friendship Necklaces → Make matching pendants for friends.
- Nature Prints → Press leaves, flowers, or shells into the dough before baking for texture.
- Holiday Themes → Stars for Christmas, hearts for Valentine’s Day, pumpkins for Halloween.
👉 Do you want me to also give you a classroom activity version of this craft (super simple, no oven needed, just air dry)?
15. Recycled Crayons
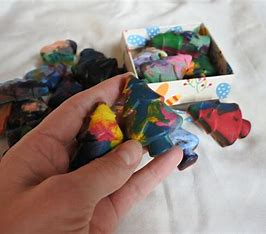
You and the kids can use up those old broken pieces of blue and green crayon in this cheerful fashion. They also make wonderful small presents.
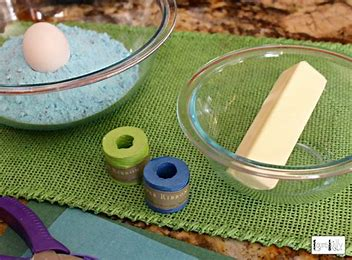
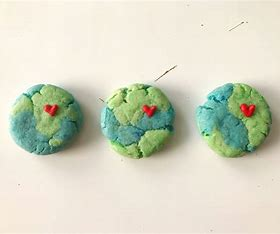
16. Earth Day Cookies with Gift Tag
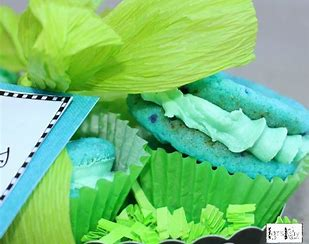
That’s such a sweet Earth Day idea! 🌍🍪 Making Earth Day cookies with gift tags is a fun way to celebrate while spreading awareness about caring for our planet. Here’s a simple guide:
🌎 How to Make Earth Day Cookies with Gift Tags
Ingredients (for sugar cookies):
- 2 ¾ cups flour
- 1 tsp baking soda
- ½ tsp baking powder
- 1 cup butter (softened)
- 1 ½ cups sugar
- 1 egg
- 1 tsp vanilla extract
- ½ tsp salt
(You can also use store-bought sugar cookie dough to save time.)
For Decorating:
- White icing or frosting (as a base)
- Blue and green food coloring (for oceans & land)
- Small piping bags or spoons
🪴 Steps to Make the Cookies:
- Prepare the Dough
- Mix butter and sugar until creamy.
- Add egg and vanilla, then slowly mix in flour, baking soda, baking powder, and salt.
- Chill dough for 30 minutes.
- Cut & Bake
- Roll out dough to about ¼ inch thickness.
- Use a round cookie cutter (to look like Earth).
- Bake at 350°F (175°C) for 8–10 minutes until lightly golden.
- Decorate
- Spread a thin layer of white icing.
- Drop small blobs of blue and green icing on top, then swirl gently with a toothpick to make an “Earth pattern.”
- Let Set
- Allow cookies to dry before packaging.
🎁 Gift Tag Idea
Attach cookies in small clear bags or boxes with a cute Earth Day gift tag.
Sample Wording for Gift Tags:
- 🌍 “Love the Earth, It’s Our Home!”
- 🌱 “A Sweet Treat for a Greener Planet”
- 💚 “Happy Earth Day – Be Kind to Our Earth”
- 🌸 “Small Acts = Big Impact”
Kids can also decorate gift tags with drawings of trees, flowers, or recycling symbols.
👉 Would you like me to design a printable Earth Day gift tag template for these cookies (something kids or teachers can cut out and use)?
17. Recycled Cardboard Sun
Making this cheerful project out of recycled cardboard boxes will require your leadership, but what better way to teach the kids about the value of recycling (and the sun)? A useful template is included with this instruction.
18. Mosaic Earth
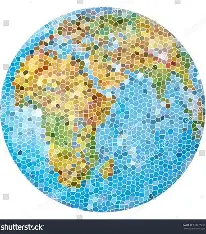
A Mosaic Earth is a beautiful and creative Earth Day craft that lets kids (or adults!) design their own planet using colorful pieces. 🌍✨ It’s a fun way to combine art with learning about caring for the Earth.
🌎 How to Make a Mosaic Earth
Materials You’ll Need:
- Cardstock or cardboard (circle cut-out for the Earth)
- Blue and green construction paper (or magazines, tissue paper, paint chips)
- Scissors (or let kids tear paper for a textured look)
- Glue stick or liquid glue
- Optional: glitter, sequins, or recycled materials for extra sparkle
- Black or dark blue paper for the background (to look like space)
🪴 Steps:
- Prepare the Earth Base
- Cut out a large circle from cardstock or cardboard.
- This will be your Earth template.
- Cut or Tear Mosaic Pieces
- Cut or tear green paper for the land and blue paper for the oceans.
- Smaller pieces give a true mosaic look.
- Arrange & Glue
- Glue blue pieces around most of the circle for water.
- Add green pieces in irregular shapes to look like continents.
- Fill in all gaps until the Earth is covered.
- Add Background (Optional)
- Glue your Earth onto a black sheet of paper.
- Add stars, the moon, or even a rocket for extra decoration.
🌟 Variations
- Recycled Mosaic → Use scraps of old magazines, wrappers, or recycled packaging instead of new paper.
- Tissue Paper Mosaic → Crumple tissue paper into tiny balls for a 3D Earth.
- Classroom Mural → Have each student make a small Earth mosaic, then display them together on a big bulletin board.
👉 Do you want me to create a step-by-step printable template (circle Earth base + continents outline) so kids can easily fill in their mosaic pieces?
19. Flowering Branches
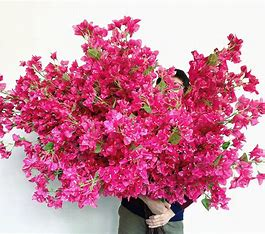
Start a conversation on the value of bees, trees, or even the seasons of our natural world by using this lovely craft that is perfect for teenagers.
20. Earth Day Cookie on a Stick
Yum! 🍪🌍 An Earth Day Cookie on a Stick is a fun, festive treat that kids can help decorate and then enjoy like a cookie lollipop. Perfect for parties, classroom activities, or Earth Day celebrations.
🌎 How to Make Earth Day Cookies on a Stick
Ingredients & Supplies:
- Sugar cookie dough (homemade or store-bought)
- Round cookie cutter (to look like Earth)
- Popsicle sticks or lollipop sticks (oven-safe)
- Frosting or royal icing
- Blue and green food coloring
- Toothpicks or piping bags for decorating
- Clear bags and ribbons (optional, for gifting)
🪴 Steps:
- Prepare the Dough
- Roll out sugar cookie dough to about ¼ inch thickness.
- Cut out circles with a round cookie cutter.
- Insert Sticks
- Place a stick halfway into each cookie before baking.
- Press gently to secure, then place on a baking tray.
- Bake
- Bake according to dough instructions (usually 350°F / 175°C for 8–10 minutes).
- Allow cookies to cool completely.
- Decorate as Earth
- Spread a base layer of blue icing for the oceans.
- Add green icing blobs for the continents.
- Use a toothpick to swirl slightly for a realistic Earth look.
- Let Set & Display
- Allow icing to dry.
- Wrap in clear bags and tie with green/blue ribbons for gifting.
🌟 Fun Variations
- Marbled Earth → Drop blue and green food coloring into white icing and swirl for a natural Earth effect.
- Sprinkle Earth → Use green and blue sprinkles to decorate instead of icing.
- Edible Glitter Earth → Add a touch of sparkle for a magical planet look.
👉 Would you like me to also include a printable Earth Day tag design that you can tie onto the cookie sticks for gifting?
21. Milk Carton Birdhouse

This traditional craft aids in teaching the value of taking care of all living things, which is one of the most important lessons learnt on Earth Day.
22. Tin Can Planters
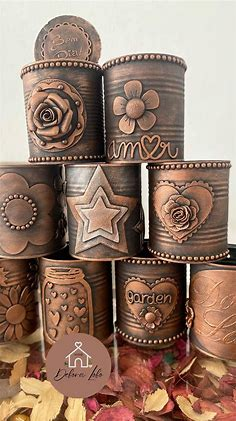
Perfect idea! 🌱✨ Tin can planters are one of the easiest and most creative upcycling projects. They’re budget-friendly, eco-friendly, and add charm to any garden, balcony, or even a windowsill.
🌿 How to Make Tin Can Planters
Materials You’ll Need:
- Empty tin cans (soup, coffee, or vegetable cans)
- Hammer and nail (for drainage holes)
- Paint, spray paint, or decorative paper (optional)
- Potting soil
- Plants or herbs (succulents, flowers, basil, mint, etc.)
🪴 Steps:
- Prepare the Can
- Wash and dry the tin can thoroughly.
- Remove any sharp edges around the rim.
- Add Drainage
- Using a hammer and nail, carefully poke 3–4 holes in the bottom of the can for drainage.
- Decorate (Optional)
- Paint cans in bright colors, add patterns, or wrap them in burlap or twine.
- For a rustic look, leave them plain and let the metal shine.
- Planting
- Place a thin layer of small rocks or pebbles at the bottom.
- Fill with potting soil.
- Add your chosen plant and press soil gently around it.
- Display
- Place on a windowsill, shelf, or patio.
- You can also hang them using wire, macramé, or hooks.
🌟 Creative Variations
- Hanging Tin Can Garden → Attach wire or rope to hang cans on a fence or balcony railing.
- Chalkboard Cans → Paint with chalkboard paint and label with plant names.
- Rustic Kitchen Herb Garden → Line up several cans filled with different herbs.
- Kids’ Art Planters → Let children paint or decorate cans with stickers before planting.
👉 Do you want me to also give you ideas for arranging tin can planters (like a vertical garden, wall display, or tiered stand) to make them look extra creative?
23. Holding Earth Art Project
We all carry the Earth and its destiny in our hands, which is one of our favourite metaphors in this art project that is ideal for young hands.
24. Seed Bombs
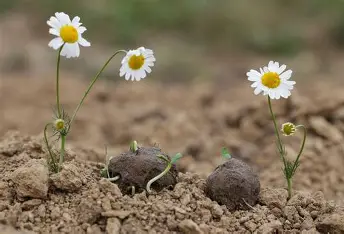
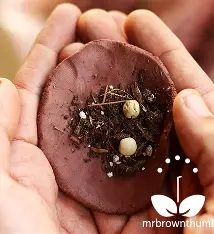
Great pick! 🌱💚 Seed bombs are small balls made from soil, clay, and seeds that you can toss onto bare soil to grow flowers, herbs, or plants. They’re fun, eco-friendly, and perfect for Earth Day, gardening with kids, or gifting.
🌍 How to Make Seed Bombs
Materials You’ll Need:
- 1 part seeds (wildflowers, herbs, or pollinator-friendly plants)
- 3 parts compost or potting soil
- 5 parts clay powder (or natural air-dry clay)
- Water (a little at a time)
- Mixing bowl
🪴 Steps:
- Mix Dry Ingredients
- In a bowl, combine compost, clay, and seeds.
- Add Water Slowly
- Sprinkle in a little water at a time until the mixture is damp and sticky (not too wet).
- Shape into Balls
- Roll small pieces into balls about the size of a marble or gumball.
- Dry
- Place seed bombs on a tray or newspaper.
- Let them dry for 24–48 hours until firm.
- Use or Gift
- Toss seed bombs into soil, empty lots, or garden beds.
- Rain will break them down, and seeds will sprout naturally!
🌟 Fun Variations
- Colorful Seed Bombs → Mix powdered natural food coloring into the clay for bright, gift-worthy bombs.
- Shaped Seed Bombs → Press mixture into silicone molds (hearts, stars, flowers).
- Kids’ Craft Version → Use shredded recycled paper blended with water as the base instead of clay.
🎁 Gift Idea
Package seed bombs in small recycled paper bags or boxes. Add a tag that says:
🌸 “Throw me, grow me – Happy Earth Day!”
👉 Do you want me to write a classroom-friendly version (no clay, just paper and seeds) that kids can make easily at school?