Recycling Craft Projects – Recycling: – All Free Crafts


Certainly! Here’s a description of a recycling craft project:
Recycled Magazine Coasters
Materials:
• Old magazines or catalogs
• Scissors
• White glue or Mod Podge
• Paintbrush
• Clear varnish (optional)
• Cork sheet or cardboard (for backing)
• Pencil
Instructions:
1. Gather Your Materials: Collect old magazines or catalogs. The more colorful and visually interesting, the better. You’ll also need scissors, white glue or Mod Podge, a paintbrush, clear varnish (optional), cork sheet or cardboard, and a pencil.
2. Select Magazine Pages: Choose magazine pages with vibrant colors, interesting patterns, or appealing images. These will make your coasters visually appealing.
3. Cut Strips: Use your scissors to cut the magazine pages into long, thin strips. The width of the strips will determine the size of your coasters, so you can make them as large or small as you like. Strips that are about 1/2 to 1 inch wide work well.
4. Create Coaster Designs: Arrange the magazine strips into your desired coaster design. You can make simple patterns or more intricate designs. Be creative!
5. Glue the Strips: Use white glue or Mod Podge to attach the strips to each other. Apply a thin layer of glue to the back of each strip and press them together. Continue until you’ve created a square or round shape for your coaster. Allow it to dry.
6. Seal the Coasters (Optional): To protect your coasters and give them a glossy finish, you can apply a layer of clear varnish. This step is optional but will make your coasters more durable.
7. Attach Cork Backing: To make your coasters functional, cut pieces of cork sheet or cardboard to the same size as your coasters. Use white glue to attach the cork or cardboard to the bottom of your coasters. This will protect your tabletops from scratches and provide a non-slip surface.
8. Trim Excess: If there’s any excess magazine paper or cork hanging over the edges, use your scissors to trim it to create a neat and uniform shape.
9. Enjoy Your Coasters: Once your coasters are dry and the backing is attached, they’re ready to use. Place your homemade recycled magazine coasters under your drinks to protect your furniture in style.
This project is not only eco-friendly, but it also allows you to add a personal touch to your home decor. Have fun crafting and recycling at the same time!
Also Like:- Creative Watermelon Carving Ideas.
1.Paint Cans Turned Organizer


Paint Cans Turned Organizer
Materials:
• Empty paint cans with lids
• Sandpaper
• Paint or spray paint
• Paintbrushes (if using paint)
• Decorative paper or fabric
• Mod Podge or glue
• Scissors
• Old newspapers or a drop cloth
• Labels (optional)
• Marker or labels for labeling (optional)
Instructions:
1. Gather Your Supplies:
• Start by collecting empty paint cans with their lids. Make sure they are clean and dry.
2. Prepare the Cans:
• If the cans have any residual paint or rough spots on the exterior, use sandpaper to smooth them out. Clean the cans to remove any dust or debris.
3. Paint or Decorate:
• Decide on the color or design you want for your organizer. You can either paint the cans or use decorative paper or fabric. If you choose to paint, place the cans on old newspapers or a drop cloth to protect your work surface. Apply one or more coats of paint, allowing each coat to dry before adding the next. If you prefer to use decorative paper or fabric, cut it to size and apply it to the cans using Mod Podge or glue.
4. Create Labels (Optional):
• If you want to label the cans, you can create labels using paper or buy pre-made labels. Write or print the names of the items you plan to store in each can on the labels.
5. Attach the Labels (Optional):
• Once your cans are completely dry and the paint or glue has set, attach the labels to each can. This step is especially useful if you’re using the organizer for items like craft supplies, small tools, or office supplies.
6. Organize Your Space:
• Fill the paint cans with the items you want to organize. These cans make great containers for small items like pencils, markers, paintbrushes, sewing supplies, and more.
7. Stack or Arrange:
• You can stack the paint cans on top of each other to save space or arrange them in a row on a shelf. The choice is yours, depending on your space and organizational needs.
By repurposing empty paint cans, you not only create a useful organizer but also reduce waste. This project is a creative and eco-friendly way to declutter and organize your space.
2. Fabric Storage Bins


Fabric Storage Bins
Materials:
• Sturdy fabric (such as canvas, denim, or upholstery fabric)
• Sewing machine and thread
• Measuring tape
• Fabric scissors
• Iron and ironing board
• Cardboard or heavy interfacing (optional)
• Fabric markers or labels (optional)
Instructions:
1. Measure and Cut Fabric:
• Decide on the size of the storage bin you want to make. Measure and mark the dimensions on your fabric. A common size is about 12 inches by 12 inches, but you can adjust the measurements to fit your needs. Be sure to account for seam allowances (usually 1/2 inch on each side) when cutting your fabric.
2. Cut Out Fabric Pieces:
• Cut two identical square or rectangular pieces of fabric for the front and back of your storage bin. Cut two identical pieces for the sides and a single piece for the bottom. If you want a sturdy bin, you can also cut cardboard or heavy interfacing to match the dimensions of the fabric pieces. This will give your bin extra support.
3. Fold and Press the Edges:
• Fold over and press a 1/2-inch seam allowance along the top edge of all fabric pieces. If you’re using interfacing or cardboard for added stability, fold the fabric over them and press to secure.
4. Sew the Sides:
• Take one of the side pieces and sew it to the front piece, right sides together. Repeat this step to attach the other side piece to the front. You should now have a ring shape.
5. Attach the Bottom:
• Sew the bottom piece to the ring shape you’ve created in the previous step. Make sure to align the edges and corners as you sew.
6. Complete the Bin:
• To complete the fabric storage bin, sew the back piece to the remaining open edge of the ring. Leave a small opening (about 4-6 inches) along one edge to turn the bin right side out.
7. Turn the Bin Right Side Out:
• Reach inside the opening and carefully turn the entire bin right side out. Use a pencil or a pointed object to gently push out the corners and edges for a neat finish.
8. Close the Opening:
• After turning the bin right side out, fold the raw edges of the opening inward and sew it closed. You can use a slip stitch or topstitch close to the edge to secure it.
9. Optional: Add Labels
• If you want to label your fabric storage bin, you can attach fabric labels or use fabric markers to write directly on the bin.
10. Organize and Enjoy:
• Your fabric storage bin is now complete. Use it to organize clothing, toys, craft supplies, or any other items in your home.
These DIY fabric storage bins are customizable and can be made in various sizes and colors to match your decor and organizational needs. Plus, they are an excellent way to repurpose fabric scraps or old curtains.
3. DIY Evelope Pillow


DIY Envelope Pillow Cover
Creating a DIY envelope pillow cover is a straightforward sewing project that allows you to easily change the look of your throw pillows. Here’s how to make one:
Materials:
• Fabric of your choice (enough to cover your pillow insert)
• Pillow insert (the same size as the finished cover)
• Sewing machine and thread
• Measuring tape
• Fabric scissors
• Iron and ironing board
• Pins
Instructions:
1. Measure and Cut Your Fabric:
• Measure your pillow insert to determine the size of your fabric. You’ll need two identical fabric pieces for the front and back of the pillow. The width of these pieces should be the same as the width of your pillow insert, and the length should be the width of your pillow insert plus 1-2 inches to allow for overlapping at the back.
2. Hem One Edge:
• On one of the long edges of each fabric piece, fold over the edge by about 1/2 inch and press it with an iron. Then, fold it over again by 1/2 inch and press it. This creates a double-fold hem. Stitch along the folded edge using your sewing machine.
3. Overlap the Back Panels:
• Lay the two fabric pieces right sides together, with the hemmed edges overlapping in the center. The overlap should be about 3-4 inches, depending on your pillow size. Pin the sides and top and bottom edges to keep the fabric in place.
4. Sew the Seams:
• Using your sewing machine, stitch around the three remaining edges of the fabric. Use a 1/2 inch seam allowance and backstitch at the beginning and end to secure your seams.
5. Trim the Corners:
• Trim the excess fabric from the corners, making sure not to cut into the stitches. This will reduce bulk in the corners when you turn the cover right side out.
6. Turn the Pillow Cover Right Side Out:
• Reach inside the envelope-style opening and turn the cover right side out. Push out the corners with your fingers or a pencil for a neat finish.
7. Insert the Pillow:
• Insert your pillow into the cover through the envelope opening.
8. Close the Envelope:
• Finally, use your sewing machine to stitch close to the edge along the open edge of the envelope flap. This will secure the pillow inside and close the cover.
Your DIY envelope pillow cover is now complete! You can make more of these covers in various fabrics to switch up your home decor whenever you like. It’s a simple and cost-effective way to give your space a fresh look.
4. Recycled Jewlery Holder
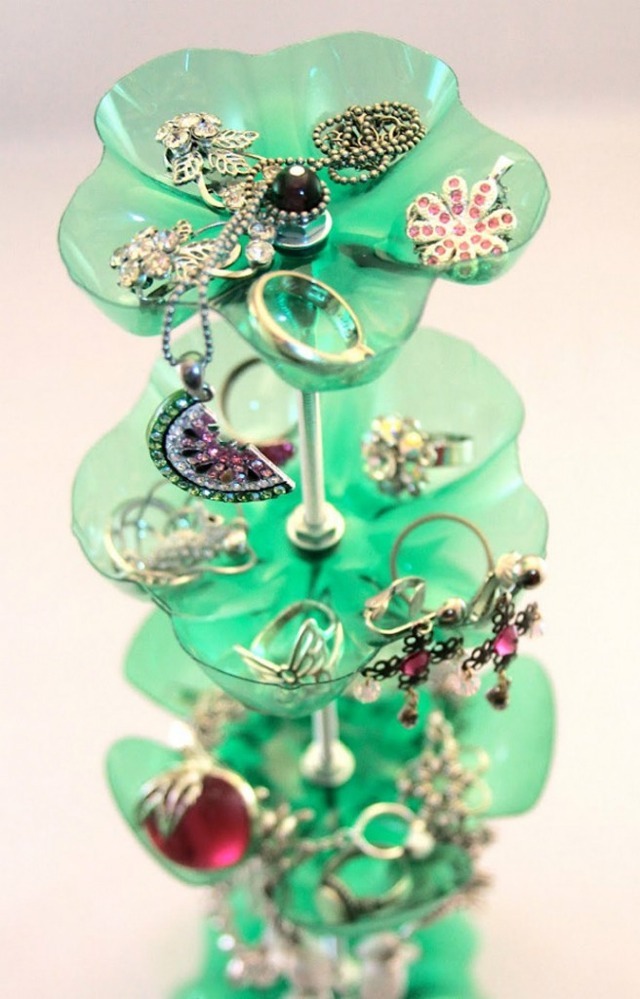

Creating a recycled jewelry holder is a fun and eco-friendly DIY project. Here’s a step-by-step guide on how to make one using common household items:
Materials you’ll need:
1. Empty toilet paper rolls or paper towel rolls
2. Acrylic paint or decorative paper
3. Glue or adhesive
4. Scissors
5. Decorative items (e.g., ribbon, buttons, beads)
6. Paintbrush (if using paint)
7. Old cardboard or a wooden base (optional)
Steps:
1. Gather your materials: Collect as many toilet paper rolls or paper towel rolls as you need, depending on the size of your jewelry holder.
2. Decorate the rolls:
• Option 1: If you’re using acrylic paint, paint the rolls in your preferred colors. Allow them to dry completely.
• Option 2: If you have decorative paper, cut it into pieces that will cover the rolls. Glue the paper onto the rolls and let it dry.
3. Cut the rolls:
• Measure and mark the desired height for each roll. It’s best to have varying heights for a more interesting design.
• Use scissors to carefully cut the rolls to the desired heights.
4. Assemble the jewelry holder:
• If you have a base (cardboard or wood), attach the rolls to it using glue.
• Arrange the rolls in a way that creates a visually appealing design. You can stack them in rows or create a tree-like shape with varying heights.
5. Decorate further: Add additional decorative elements like ribbons, buttons, beads, or any other items you like. Glue these items to the rolls or the base for added charm.
6. Let it dry: Make sure everything is securely attached, and allow your jewelry holder to dry thoroughly.
7. Organize your jewelry: Once the holder is completely dry, you can start using it to organize and display your jewelry. Slide rings onto the rolls, hang necklaces on them, and place earrings or other accessories in the open ends of the rolls.
This recycled jewelry holder is not only a practical storage solution but also a creative way to upcycle old materials and add a unique touch to your space. Enjoy making and using your eco-friendly jewelry holder!
5. Newspaper Holder


A newspaper holder is a simple, often decorative, and functional accessory designed to hold newspapers and other periodicals for easy access and organization. These holders are typically placed outside or near the entrance of a home, business, or other location where newspapers are delivered or picked up regularly.
Newspaper holders serve several purposes:
1. Protection: They shield newspapers from the elements, such as rain and wind, ensuring that the content remains readable.
2. Organization: Newspaper holders help keep newspapers neat and orderly, preventing them from scattering or becoming disheveled.
3. Convenience: They make it easy for individuals to find their newspapers and keep them in a designated place, eliminating the need to search for a misplaced paper.
4. Aesthetic Appeal: Many newspaper holders come in various designs and materials, adding a decorative touch to the entrance of a home or business.
Newspaper holders are available in different styles and materials, including metal, plastic, wood, and even fabric. Some are wall-mounted, while others are freestanding on a post or stand. Their design can range from modern and sleek to classic and ornate, allowing homeowners and businesses to choose one that complements their property’s aesthetic.
In addition to holding newspapers, some holders may also have space for other items, such as magazines or letters. This versatility makes them a valuable addition to homes and offices.
Overall, a newspaper holder is a practical and visually pleasing accessory that helps keep newspapers organized, protected, and easily accessible.
6. Metallic Vase


A metallic vase is a decorative container made primarily of metal, typically designed to hold and display flowers or other ornamental items. These vases come in various shapes, sizes, and finishes, and they serve both functional and aesthetic purposes in interior decor.
Here are some key features and considerations regarding metallic vases:
1. Material Variety: Metallic vases can be crafted from various metals, including but not limited to stainless steel, brass, copper, aluminum, and pewter. Each type of metal lends its unique appearance and characteristics to the vase.
2. Design and Style: Metallic vases are available in a wide range of styles, from contemporary and minimalist to ornate and traditional. The design may include intricate patterns, embossing, engraving, or textured surfaces, depending on the desired aesthetic.
3. Shapes and Sizes: Metallic vases can be found in numerous shapes, such as cylindrical, spherical, square, or abstract designs. The size can vary from small bud vases to larger statement pieces suitable for grand floral arrangements.
4. Finishes: Metal vases often come in various finishes, including polished, brushed, antiqued, or patinaed. The choice of finish can significantly impact the vase’s appearance and how it complements the surrounding decor.
5. Versatility: These vases are versatile and can be used for various purposes. While they are primarily associated with holding fresh or artificial flowers, they can also serve as standalone decorative pieces or containers for dried branches, decorative stones, or other creative displays.
6. Durability: Metal vases are known for their sturdiness and longevity. They can withstand wear and tear better than fragile glass or ceramic vases and are less likely to break if accidentally knocked over.
7. Maintenance: Maintenance requirements may vary depending on the metal and finish. Generally, metal vases are easy to clean and maintain by wiping with a soft cloth and occasionally applying a metal polish to restore their shine.
8. Interior Decor: Metallic vases are popular choices in interior design for adding a touch of elegance, contrast, or a modern edge to a room. They can complement a wide range of decor styles, from industrial and contemporary to vintage and eclectic.
Whether used as a centerpiece on a dining table, a focal point on a mantel, or simply as an accent piece in a living space, a metallic vase can enhance the aesthetics of a room and bring a sense of refinement and artistry to your decor.
7. Patterned-Paper Book Covers


Patterned-paper book covers are protective coverings made from decorative or patterned paper that are used to wrap around and protect books. These covers serve both practical and aesthetic purposes, and they are popular among students, book enthusiasts, and individuals looking to add a personal touch to their book collections.
Here are some key features and considerations regarding patterned-paper book covers:
1. Protection: Patterned-paper book covers are primarily designed to protect books from wear and tear, including scratches, scuffs, and spills. They help extend the life of the book and maintain its overall condition.
2. Customization: One of the primary advantages of patterned-paper book covers is their ability to add a personal touch to your books. They are available in a wide variety of colors, designs, and patterns, allowing you to choose a cover that suits your individual style or matches your school’s or organization’s branding.
3. Easy Application: These book covers are typically easy to apply. They often come in pre-cut, foldable sheets with guidelines for proper folding and placement. Most require no adhesive, as they can be secured by tucking flaps or tabs.
4. Reusability: Many patterned-paper book covers are reusable, so you can remove them and reapply them to different books. This makes them a cost-effective and sustainable option for protecting your book collection.
5. Durability: The durability of patterned-paper book covers can vary depending on the quality of the paper and the thickness of the cover. While they offer protection, they may not be as durable as some other types of book covers, such as plastic or leather.
6. Versatility: Patterned-paper book covers are suitable for covering textbooks, notebooks, novels, and other types of books. They are commonly used in educational settings to protect and identify school materials.
7. Labeling: Some patterned-paper book covers may have a label or space for you to write the book’s title, your name, or other identifying information. This can help keep your books organized and easily distinguish one from another.
8. Creative Expression: Using patterned-paper book covers can be a creative and enjoyable activity. You can mix and match designs, create your own patterns, or even decorate them further with stickers, drawings, or personal notes.
Patterned-paper book covers are a versatile and affordable way to protect and personalize your books. Whether you’re a student looking to keep your textbooks in good condition, a book lover aiming to showcase your collection, or someone who simply enjoys the creative process, these covers offer both functionality and an opportunity for self-expression.
8. Mod Mosaic Table


Of course! A mosaic table is a beautiful and creative way to add a unique touch to your home or outdoor space. Here are some steps to help you create a mod mosaic table:
Materials and Tools:
1. Table: Choose a table that you want to mosaic. It could be an old one that needs a makeover or a new one that you’d like to customize.
2. Mosaic Tiles: You can use ceramic, glass, or even recycled materials like broken dishes. Pick a variety of colors and shapes to create a visually appealing design.
3. Adhesive: You’ll need adhesive specifically designed for mosaics, like thin-set mortar or mosaic adhesive.
4. Grout: Select grout that complements your tile colors and the overall look you want to achieve.
5. Tile Nippers: These are essential for cutting tiles to fit your design.
6. Safety Gear: Wear safety glasses and gloves when handling tiles and adhesives.
7. Sponge and Buckets: For cleaning and grout application.
Steps:
1. Design: Plan your mosaic design. You can create a pattern, picture, or abstract design. Use paper or software to sketch out your design.
2. Prepare the Table: Clean the table thoroughly to remove any dirt or grease. If it’s wooden, you may want to sand and paint it to create a smooth and even base.
3. Cut Tiles: Use tile nippers to cut tiles into the shapes you need to fit your design. Ensure they are the right size and shape to match your pattern.
4. Adhere Tiles: Apply the mosaic adhesive to a small section of the table, and start placing your tiles according to your design. Press each tile firmly into the adhesive, leaving a small gap between them for the grout.
5. Work in Sections: Continue working in small sections, applying adhesive and placing tiles until the entire table is covered.
6. Allow to Dry: Let the adhesive dry for the recommended time (usually 24 hours or as per the manufacturer’s instructions).
7. Grouting: Once the adhesive is dry, mix your grout according to the instructions on the packaging. Apply the grout to the gaps between the tiles, making sure to press it in well. Use a damp sponge to wipe away excess grout from the tile surfaces.
8. Cure: Allow the grout to dry for a specified period (usually 24-48 hours). As it dries, you may need to wipe away any remaining grout haze with a clean, damp sponge.
9. Sealing (Optional): Depending on the type of grout and tiles you used, you may want to apply a sealer to protect your mosaic from stains and moisture.
10. Enjoy: Once everything is dry and the table is sealed (if needed), your mod mosaic table is ready to use and display. It will add a touch of creativity and artistry to your space.
Creating a mosaic table can be a fun and satisfying DIY project, and it allows you to add a personalized touch to your home or garden decor. Be creative and enjoy the process!
9. Business Card Holder
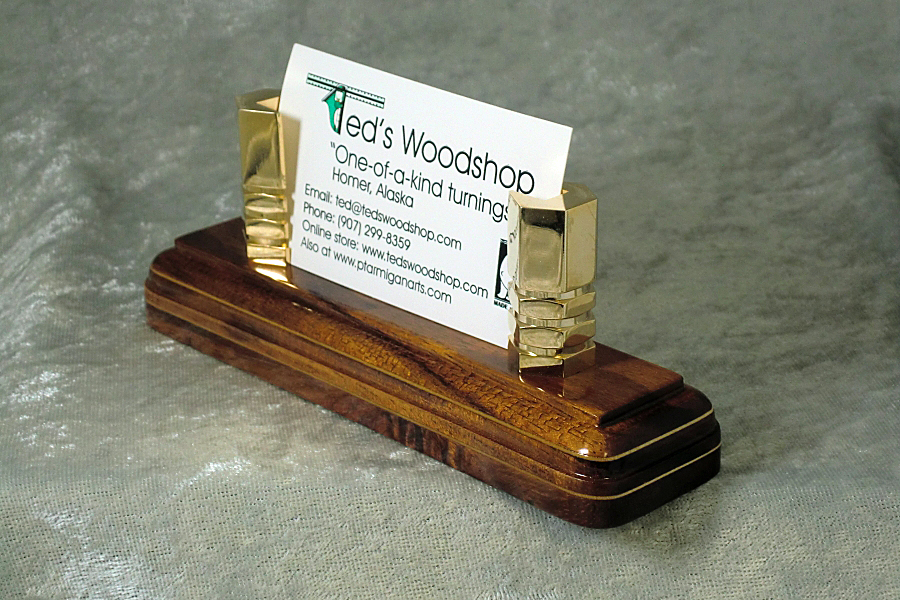

Certainly! Creating a business card holder can be a simple yet stylish DIY project. Here’s how to make a basic business card holder:
Materials and Tools:
1. A Small Piece of Wood: You can choose any type of wood you prefer. It should be around 4-5 inches in length, 2-3 inches in width, and about 1/4 to 1/2 inch thick.
2. Saw: To cut the wood to the desired size.
3. Sandpaper: For smoothing and rounding the edges.
4. Wood Stain or Paint: If you want to add color or finish to your card holder.
5. Paintbrush or Rag: For applying the stain or paint.
6. Business Cards: To measure and adjust the card slot.
Steps:
1. Cut the Wood:
• Measure and mark the dimensions for your business card holder on the piece of wood.
• Use a saw to cut the wood along your marked lines. Make sure the edges are straight and even.
2. Sand the Edges:
• Use sandpaper to smooth and round the edges of the wooden piece. This will give it a polished look and prevent any splinters.
3. Design and Measurements:
• Decide where you want the slot for your business cards to be. It’s typically in the center and should be wide enough to hold several cards.
• Measure the width and depth of your business cards and mark these measurements on the wood.
4. Cut the Card Slot:
• Use a saw or a rotary tool with a cutting attachment to carefully cut a slot into the wood. Make sure it’s deep and wide enough to comfortably hold your business cards.
5. Stain or Paint:
• If you want to add color or finish to your business card holder, apply wood stain or paint. Follow the manufacturer’s instructions for the specific product you’re using. Let it dry thoroughly.
6. Final Touches:
• Once the stain or paint is dry, you can apply a clear sealant to protect and enhance the finish.
• Add any personal touches or decorations, like your name or logo, if desired.
7. Allow to Dry:
• Ensure that all the applied finishes are completely dry before using the business card holder.
Your DIY business card holder is now ready to use. It’s a simple yet elegant way to display and organize your business cards on your desk, at meetings, or in your office. You can customize it to match your personal style or branding.
10. Bottle Cap Magnets


Creating bottle cap magnets is a fun and eco-friendly DIY project. Here’s how you can make your own bottle cap magnets:
Materials and Tools:
1. Bottle Caps: Gather clean and empty bottle caps. You can use beer bottle caps, soda caps, or any other type you like.
2. Images or Decorative Paper: Choose images, photos, or decorative paper to fit inside the bottle caps. These can be pictures, logos, patterns, or anything you prefer. Consider using a craft punch to cut out small circles that fit the size of your bottle caps.
3. Clear Epoxy Resin: You’ll need a clear epoxy resin, like a two-part resin that you mix before use. You can find this at most craft stores.
4. Small Neodymium Magnets: These should be small enough to fit inside the bottle caps.
5. Mod Podge or Craft Glue: To adhere your images or paper to the bottle caps.
6. Mixing Cups and Stirring Sticks: For mixing and applying the epoxy resin.
7. Disposable Gloves: To protect your hands when working with epoxy.
Steps:
1. Prepare the Bottle Caps:
• Clean and dry the bottle caps thoroughly to remove any residue.
• Choose the images or decorative paper you want to use and cut them to fit inside the bottle caps.
2. Glue Images or Paper:
• Use Mod Podge or craft glue to adhere your images or paper to the inside of the bottle caps. Make sure they are centered and secure. Let them dry completely.
3. Mix Epoxy Resin:
• Follow the instructions on the epoxy resin packaging to mix the resin and hardener. Be sure to wear disposable gloves.
4. Fill the Bottle Caps:
• Carefully pour the mixed epoxy resin into each bottle cap, covering the image or paper completely. Try to avoid overfilling, as you want a smooth, level surface.
5. Place Magnets:
• While the epoxy is still wet, press a small neodymium magnet into the back of each bottle cap. Make sure it’s centered and flush with the epoxy.
6. Allow to Cure:
• Let the bottle caps sit undisturbed in a level and dust-free area to cure. This can take several hours to overnight, depending on the epoxy you used. Follow the manufacturer’s recommendations.
7. Trim Excess Epoxy:
• After the epoxy has fully cured, you may notice a raised edge around the bottle cap. Carefully trim this excess with scissors or a craft knife to make the surface even.
Your bottle cap magnets are now ready to use! Place them on your fridge or any other magnetic surface to hold notes, photos, and more. This project allows you to personalize your space with unique and creative designs, making it a great DIY gift idea as well.
11. Desk Accessories Holder


Creating a desk accessories holder is a practical and stylish DIY project to help you keep your workspace organized. Here’s how you can make your own desk accessories holder:
Materials and Tools:
1. A Container: Choose a container to serve as the base for your desk accessories holder. You can use a small wooden box, a glass jar, a metal tin, or any other container that fits your style.
2. Paint or Stain (optional): If you want to change the appearance of your container, you can use paint or wood stain to give it a fresh look.
3. Brushes or Sponges: For applying paint or stain if needed.
4. Decorative Paper or Fabric: Choose decorative paper or fabric that matches your style. This will be used to cover the inside of your container.
5. Mod Podge or Craft Glue: To adhere the decorative paper or fabric to the inside of your container.
6. Scissors: For cutting the paper or fabric to the right size.
7. Additional Decorations (optional): You can add ribbon, buttons, stickers, or other embellishments to further personalize your holder.
Steps:
1. Prepare the Container:
• If you want to paint or stain the container, do this first and allow it to dry completely before proceeding to the next steps.
2. Cut and Glue the Decorative Paper/Fabric:
• Measure the inside of your container and cut the decorative paper or fabric to fit. Make sure to leave some overlap to ensure full coverage.
• Apply a layer of Mod Podge or craft glue to the inside of the container.
• Carefully press the cut paper or fabric into the container, smoothing out any bubbles or wrinkles. Allow it to dry.
3. Add Decorations (optional):
• If you’d like to embellish your holder, you can now add ribbons, buttons, stickers, or any other decorative elements. Use glue to attach them securely.
4. Allow to Dry:
• Let your holder dry thoroughly before using it to hold your desk accessories.
Your desk accessories holder is now complete! You can use it to keep pens, pencils, paper clips, notepads, and other small items organized on your desk. It’s both functional and aesthetically pleasing, and you can customize it to match your personal style or office decor.
12. Fabric Scrap Balls


Creating fabric scrap balls is a creative and eco-friendly DIY project that can turn fabric scraps into decorative items or playthings. Here’s how to make fabric scrap balls:
Materials and Tools:
1. Fabric Scraps: Collect fabric scraps in various colors and patterns. These can be leftover pieces from other sewing projects.
2. Fabric Glue or Mod Podge: You’ll need a strong adhesive to bond the fabric pieces.
3. Balloons: Small balloons are typically used as a base for creating fabric scrap balls.
4. String or Twine: To hang the fabric scrap balls while they dry.
5. Scissors: For cutting fabric scraps.
6. Plastic Container or Bowl: To hold the adhesive and help with the dipping process.
Steps:
1. Cut Fabric Scraps:
• Begin by cutting your fabric scraps into small pieces. They can be squares, rectangles, or any other shapes you like. The size of the fabric pieces can vary, but smaller pieces are easier to work with.
2. Inflate Balloons:
• Inflate the small balloons to the size you want for your fabric scrap balls. Make sure they are all roughly the same size.
3. Prepare Adhesive:
• Pour fabric glue or Mod Podge into a plastic container or bowl. You can dilute it slightly with water if it’s too thick. You’ll be dipping the fabric scraps into this adhesive.
4. Dip and Apply Fabric Scraps:
• Dip a fabric scrap into the adhesive, ensuring it’s fully coated.
• Place the wet fabric scrap onto a balloon and smooth it down, making sure there are no air bubbles or wrinkles. Repeat this process with more fabric scraps, overlapping them slightly to create a patchwork effect.
• Continue adding fabric scraps until the entire balloon is covered, leaving a small uncovered area near the balloon’s knot for hanging.
5. Hanging and Drying:
• Before the adhesive dries, tie a piece of string or twine around the balloon’s knot.
• Hang the balloon upside down to dry, making sure it doesn’t touch anything that could stick to the adhesive.
• Allow the fabric scrap-covered balloons to dry completely. This may take 24 hours or more, depending on the adhesive and humidity.
6. Pop and Remove Balloon:
• Once the fabric scrap balls are completely dry, carefully pop the balloons with a pin. The fabric will hold its shape.
7. Trim and Finish:
• Trim any excess fabric that may be hanging from the top where the balloon was tied.
• Your fabric scrap balls are now ready to be displayed or used as decorations. You can hang them from a string, place them in a bowl, or use them for various decorative purposes.
These fabric scrap balls are a great way to repurpose fabric scraps and create unique, colorful decorations for your home or special events. They can be made in various sizes and colors, making them versatile for different occasions and styles.
13. Visible Mending


Visible mending is a creative and sustainable way to repair damaged clothing or fabric items, turning them into unique and stylish pieces. This technique embraces the idea of making the mending process intentionally visible as a form of art and self-expression. Here’s how you can get started with visible mending:
Materials and Tools:
1. Damaged Clothing or Fabric Item: Choose an item with a visible tear, hole, or worn area.
2. Needle and Thread: Use a strong, matching or contrasting thread. You can also use embroidery floss for added color and texture.
3. Embroidery Hoop (optional): This can help keep the fabric taut while you work.
4. Scissors: For cutting excess threads and yarn.
5. Fabric Patches or Embroidery Thread (optional): These can be used to add decorative elements to your mend.
Steps:
1. Assess the Damage:
• Examine the damaged area on your clothing or fabric item to understand the extent of the damage and decide how you want to repair it.
2. Choose Your Mending Technique:
• There are various visible mending techniques, including simple running stitches, cross stitches, darning, or even embroidery. Choose the one that best suits your style and the type of damage you’re repairing.
3. Prepare Your Thread:
• Thread your needle with a length of thread that’s manageable and won’t tangle easily.
4. Secure the Thread:
• Start your mending process by tying a knot at the end of your thread.
5. Begin Mending:
• Work your chosen mending technique to cover the damaged area. If it’s a hole, you may want to place a fabric patch beneath the hole before stitching.
6. Get Creative:
• Don’t be afraid to get creative with your mending. You can add decorative elements like flowers, shapes, or patterns using embroidery floss. Use different colors and textures to make your mending stand out.
7. Secure and Finish:
• Once you’re satisfied with your visible mend, tie a knot in the thread on the inside of the fabric to secure it.
8. Trim Excess Threads:
• Carefully trim any excess threads or yarn on both sides of your mend to give it a neat appearance.
9. Press if Needed:
• If your fabric allows, you can lightly press your mend with an iron to flatten and set the stitches.
Visible mending not only extends the life of your clothing and reduces waste but also adds a unique and personalized touch to your wardrobe. It’s a great way to embrace the concept of sustainability and self-expression in fashion. Plus, it’s a fun and creative way to make your clothes one-of-a-kind.