10 Creative Recycled Magazine Crafts You Can Easily DIY
Certainly! Here are some creative recycled magazine crafts that you can easily DIY:
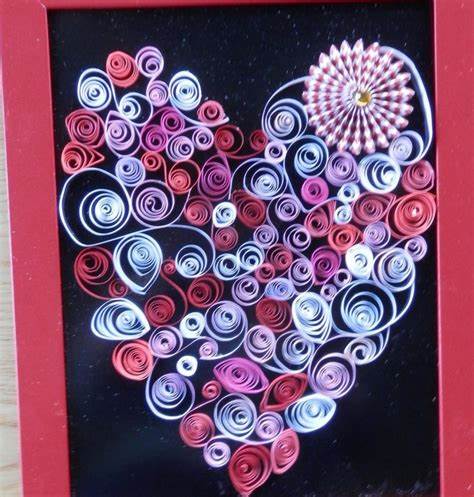
Paper Bead Jewelry:
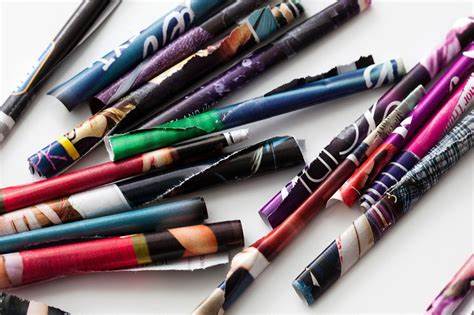
Roll up thin strips of colorful magazine pages to create paper beads. Once you have a collection of beads, string them together to make unique and eco-friendly jewelry.
Magazine Coasters:
Cut out colorful magazine pages into squares or circles and laminate them to make durable and eye-catching coasters for your coffee table.
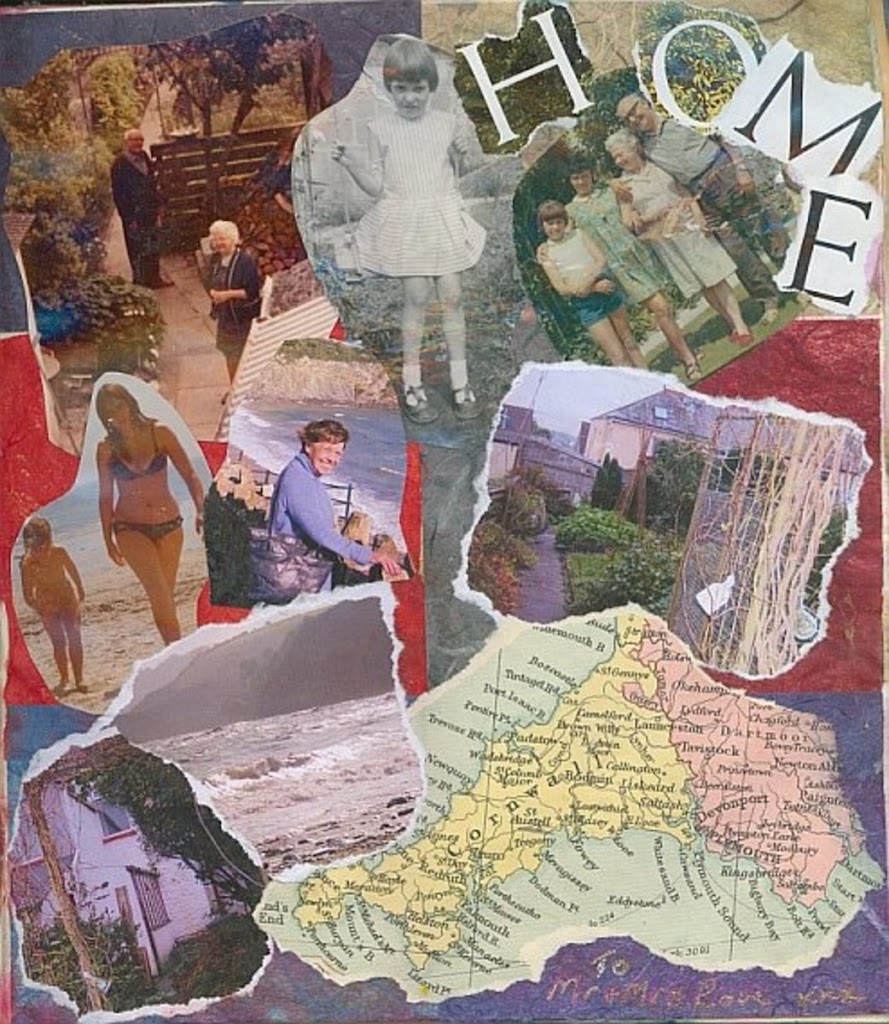
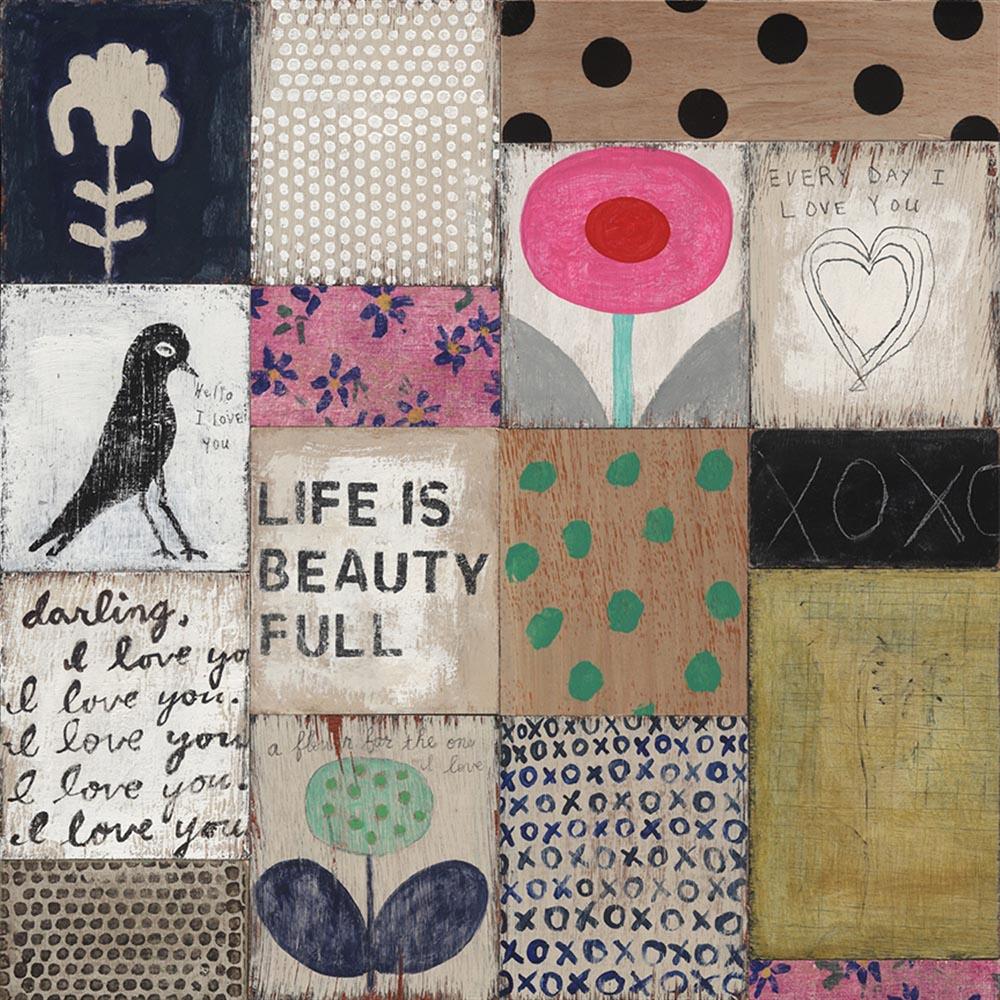
Magazine Collage Art:
Create beautiful collage art by cutting out images and words from magazines and arranging them on a canvas or a piece of sturdy cardboard. Use your creativity to design unique artwork.
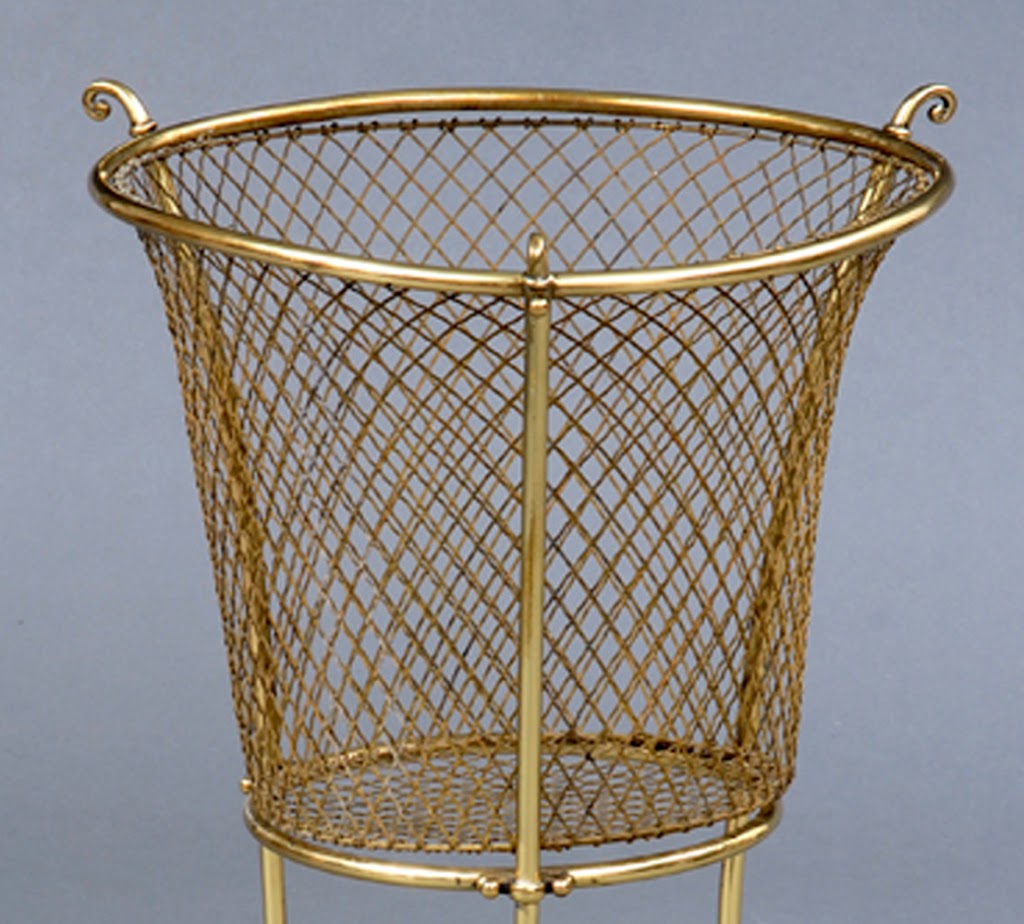
Magazine Baskets:
Weave strips of magazine pages into small baskets. These can be used for organizing small items or even as decorative pieces.
Magazine Silhouettes:
Choose a silhouette of your choice (e.g., an animal, a tree, or a person), and fill it in with torn magazine pages. This creates a visually interesting and colorful piece of art.
Magazine Envelopes:
Turn magazine pages into envelopes by folding and sealing them. You can use these for sending letters or as gift envelopes.
Magazine Flowers:
Cut magazine pages into petal shapes and create beautiful paper flowers. You can use these to decorate your home or give them as gifts.
Magazine Picture Frames:
Create picture frames by cutting out strips of magazine pages and gluing them around a plain frame. This adds a pop of color to your photos.
Magazine Confetti:
Punch out colorful shapes from magazine pages to make your own confetti. Use it for parties, weddings, or other celebrations.
Magazine Mosaic Art:
Tear magazine pages into small pieces and use them to create mosaic designs on various surfaces, like mirrors, trays, or even furniture.
Magazine Bookmarks:
Create unique bookmarks by cutting out interesting images and laminating them. These make for great gifts or personal use.
Magazine Lampshade:
Decorate a plain lampshade with magazine cutouts to add a burst of color and personality to your room’s lighting.
Magazine Desk Organizer:
Roll up magazine pages into cylinders and glue them together to make a stylish and functional desk organizer for pens, pencils, and other small items.
Magazine Wall Art:
Arrange cutouts from magazines to create a large piece of wall art. This can be a stunning focal point for any room.
Magazine Origami:
Use magazine pages for origami projects, such as paper cranes, flowers, or geometric shapes.
These creative recycled magazine crafts are not only environmentally friendly but also a fun way to repurpose old magazines and let your creativity shine. Enjoy your DIY projects!
Also Like : Crafty Tips for Upcycling Materials
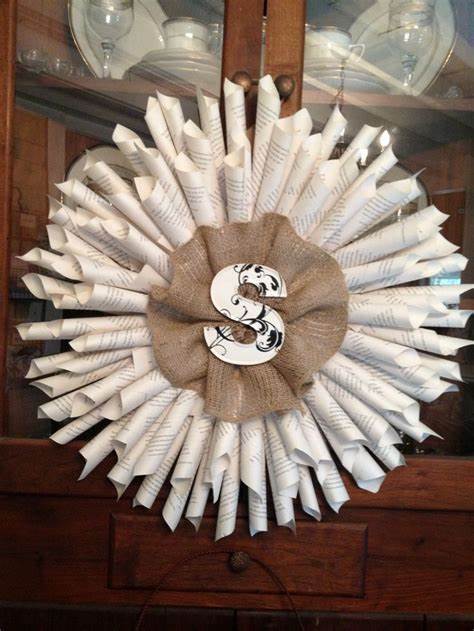
1. DIY Rolled Paper Wreath
Certainly! Here are step-by-step instructions for making a DIY Rolled Paper Wreath:
Materials you’ll need:
Old magazines or colorful scrap paper
Cardboard or a foam wreath base
Glue (craft glue or a glue gun)
Scissors
Pencil
Ribbon or twine for hanging (optional)
Decorations (optional, like faux flowers, beads, or leaves)
Instructions:
Gather your materials:
Collect all the materials you’ll need for this project. Choose magazines or paper with colors and patterns you like.
Prepare the base:
If you’re using cardboard, cut it into a circular shape to form the base of your wreath. Alternatively, you can use a foam wreath base that’s readily available at craft stores. If using cardboard, you might want to wrap it in colored paper or fabric for a more attractive finish.
Cut paper strips:
Start by cutting magazine pages or colorful scrap paper into long strips, about 1 inch wide. The length of the strips can vary, but around 8–10 inches is a good size to start with.
Roll the paper strips.
Take a paper strip and place a small dab of glue at one end. Roll the strip tightly from the glued end. As you roll, make sure to keep it tight and aligned. When you reach the end, add a bit more glue to secure the end in place. Repeat this step for all your paper strips.
Create Rolled Paper Tubes:
These rolled paper strips will resemble little paper tubes. You’ll need a good number of these to cover your wreath base.
Arrange and glue the paper tubes:
Start attaching the rolled paper tubes to the wreath base. Apply a small amount of glue to the base, and then press one end of a paper tube onto the glued area. Continue this process, overlapping the paper tubes slightly, until you’ve covered the entire wreath base.
Create a layered effect:
If you want to add depth and texture to your wreath, you can create multiple layers of rolled paper tubes. You can glue some tubes deeper into the base and some closer to the surface.
Add Decorations (Optional):
To enhance the wreath’s appearance, you can glue on decorative elements such as faux flowers, beads, leaves, or any other embellishments you like.
Add a hanging loop.
If you intend to hang your wreath, attach a loop of ribbon or twine to the back of the wreath. Glue it securely and allow it to dry.
Let It Dry:
Allow the wreath to dry completely. This might take a few hours, depending on the type of glue you use.
Hang and enjoy:
Once the wreath is dry, it’s ready to be displayed. Find a suitable place to hang your beautiful rolled paper wreath, whether it’s on your front door, a wall, or as a festive decoration for any occasion.
This DIY rolled paper wreath is a great way to upcycle old magazines and create a unique and colorful decoration for your home. Have fun crafting!
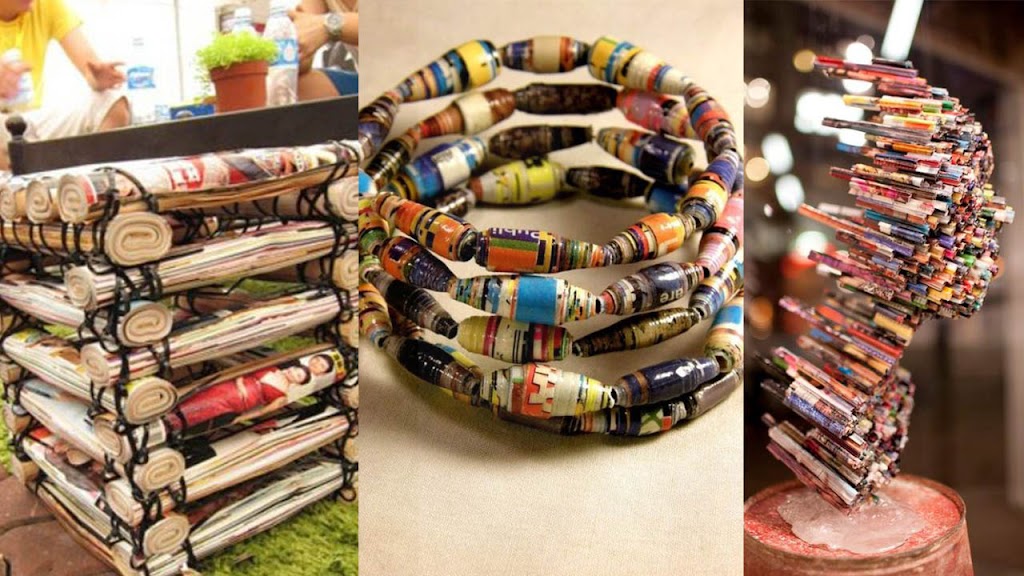
2. DIY Recycled Magazine Bracelets


Creating DIY recycled magazine bracelets is a fun and eco-friendly craft project. These bracelets are not only stylish, but also a great way to repurpose old magazines. Here’s how you can make your own recycled magazine bracelets:
Materials you’ll need:
Old magazines or colorful paper
Glue (craft or white school glue)
Scissors
Ruler
Pencil or pen
Clear adhesive tape or Mod Podge (optional)
Elastic cord or stretchy string
Beads (optional)
Step-by-Step Instructions:
1. Select Your Magazines:
Choose old magazines with colorful pages. You can select different pages for a variety of colors and patterns.
2. Prepare strips:
Carefully tear out the pages from the magazine.
Using a ruler and a pencil, measure and mark strips on the pages. A typical strip can be around 1 inch wide and 6–8 inches long, but you can adjust the size to your preference.
Cut out the strips along the marked lines. You will need several strips to create a bracelet.
3. Create paper beads (optional):
To add extra flair to your bracelet, you can turn some of the paper strips into beads.
Start at one end of the strip and roll it tightly around a pencil or thin dowel.
Apply a small amount of glue to the end of the strip to secure it in place.
Slide the bead off the pencil once the glue dries. Make as many beads as you’d like for your bracelet.
4. Begin weaving:
Take one paper strip and apply a thin layer of glue along its entire length.
Place a second strip on top, aligning the edges, and press them together. Repeat this process to create a chain of strips. You can make the chain as long as you need it to fit your wrist.
5. Form a bracelet:
Once your paper strip chain is long enough to fit around your wrist, overlap the ends slightly.
Apply glue to the overlapping portion to secure the bracelet in a circular shape. You can use clear adhesive tape or Mod Podge for added durability.
6. Add beads (optional):
If you made paper beads, you can thread them onto the elastic cord or stretchy string and intersperse them along the bracelet for added decoration.
7. Secure and Finish:
Allow the bracelet to dry completely, which may take a few hours.
Cut a piece of elastic cord or stretchy string long enough to string through your bracelet and tie securely around your wrist.
Once you’ve tied a secure knot, trim any excess cord.
Now you have your very own recycled magazine bracelet! These unique and colorful accessories are not only a great way to recycle old magazines but also make fantastic gifts or craft projects for kids. Get creative with your choice of colors and patterns to personalize your bracelets even more. Enjoy your eco-friendly and stylish accessory!
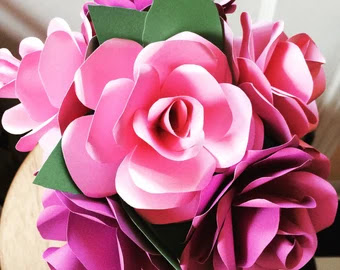
3. DIY Paper Flowers
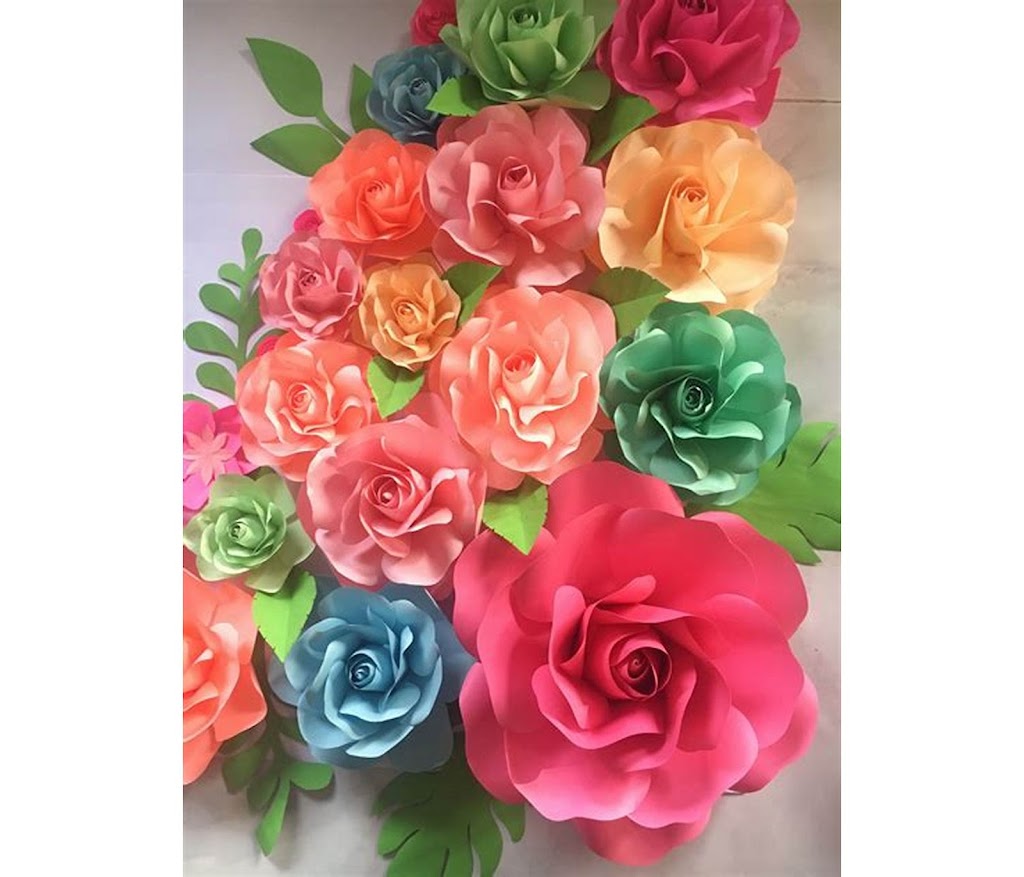

Creating DIY paper flowers is a fun and creative craft that can be used for various decorative purposes, from home decor to event decorations. Here’s a step-by-step guide to making your own beautiful paper flowers:
Materials you’ll need:
Colored paper (you can use various colors and sizes for different flower types)
Scissors
Pencil
Glue or glue gun
Floral wire or green pipe cleaners (optional for stems)
Floral tape (optional for securing stems)
Buttons, beads, or other embellishments (optional for the flower centers)
Instructions:
Choose your flower style:
Decide on the type of flower you want to create. Common choices include roses, daisies, and tulips. The shape and size of your petals will depend on the type of flower.
Cut out petal shapes:
Use your colored paper to cut out petal shapes. The number and size of petals will vary depending on your chosen flower style. For a simple five-petal flower, you can cut out five teardrop- or oval-shaped petals.
Create Petal Texture:
To give your paper petals a more natural look, gently curl the edges of each petal using a pencil. This will add dimension to your flower.
Assemble the flower:
Start with one petal as the base, and apply a small amount of glue to the bottom part of the petal. Place the second petal slightly over the first one. Continue this process until all your petals are attached. You can adjust the spacing and overlap to achieve the desired shape.
Add a Center (optional):
You can attach a button, bead, or other small embellishment to the center of your flower using glue.
Create the stem (optional):
To make a stem for your paper flower, take a piece of floral wire or a green pipe cleaner and attach it to the base of the flower using glue or floral tape. If using a pipe cleaner, you can bend it to create a realistic stem shape.
Repeat and experiment:
Experiment with different colors, shapes, and sizes to create a variety of paper flowers. You can also try different techniques for petal shaping and center embellishments.
Arrange and display:
Once your paper flowers are complete, arrange them in a vase or use them for your desired decoration. You can create bouquets, floral wreaths, or use them as table centerpieces.
Paper flowers are a versatile and cost-effective way to add a touch of nature to your space, and they make great gifts or party decorations. Get creative and enjoy the process of crafting your own unique paper blooms!
4. Upcycle Old Magazines Into Wall Art
Upcycling old magazines into wall art is a creative and eco-friendly way to breathe new life into something that might otherwise end up in the recycling bin. Here’s a step-by-step guide to help you turn those old magazines into a stunning piece of wall art:
Materials you’ll need:
Old magazines
Scissors
Glue or Mod Podge
Paintbrush
Canvas or sturdy cardboard
Optional: Acrylic paint, stencils, or other decorative elements
Step 1: Gather your magazines
Collect a stack of old magazines in a variety of colors and patterns. The more diverse the magazines, the more interesting and visually appealing your wall art will be.
Step 2: Cut out magazine pages
Carefully flip through the magazines and cut out interesting images, patterns, or text that you’d like to use for your wall art. You can create a theme or go for a more eclectic mix, depending on your preferences.
Step 3: Prepare your canvas
Select a canvas or a piece of sturdy cardboard as your base. If you’re using cardboard, you can paint it with acrylic paint to create a solid background color that complements your magazine cutouts. Let it dry completely before proceeding.
Step 4: Arrange and glue
Lay out your cutouts on the canvas to plan your design. Once you’re satisfied with the arrangement, begin gluing them down using either regular glue or Mod Podge. Apply a thin layer of adhesive to the back of each magazine piece and press it onto the canvas.
Step 5: Overlap and layer
Don’t be afraid to overlap and layer the magazine pieces to create depth and texture in your wall art. You can mix and match different sizes and shapes to make it visually interesting.
Step 6: Seal the artwork
After you’ve glued down all the magazine pieces and you’re happy with the result, apply a thin, even layer of Mod Podge over the entire surface of the artwork. This will seal the pieces in place and give your wall art a nice finish. Let it dry completely.
Step 7: Optional embellishments
If you’d like to add more personal touches, consider using stencils or adding painted designs on top of your magazine collage. This can further enhance the visual appeal of your artwork.
Step 8: Hang it up
Once your upcycled magazine wall art is dry and you’re satisfied with the result, it’s time to hang it on your wall. You can use picture-hanging hardware or adhesive strips to securely attach it.
Creating wall art from old magazines is not only a fun and creative DIY project, but it also reduces waste and adds a unique and personal touch to your home decor. Enjoy your one-of-a-kind masterpiece!
Recycled Magazine Stack Stools
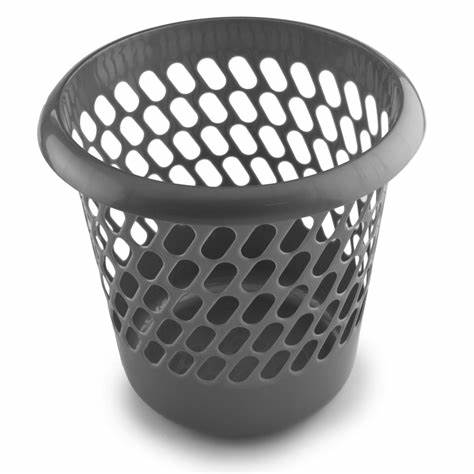
5. DIY Recycled Magazine Basket
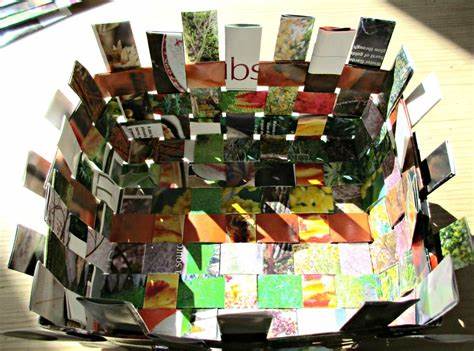
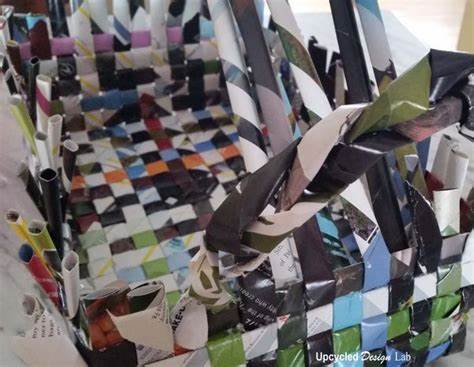
Creating a recycled magazine basket is a fantastic way to repurpose old magazines and create a functional and decorative item for your home. Here’s a step-by-step guide on how to make your very own magazine basket:
Materials you’ll need:
Old magazines
Glue (strong craft or adhesive glue)
Scissors
Ruler
Pencil
Clothespins or paperclips
Clear adhesive tape (optional)
Step 1: Prepare your magazines
Collect a stack of old magazines. The more colorful and diverse they are, the more interesting your basket will be. Ensure the magazines are clean and free of any debris.
Step 2: Create magazine tubes
Start by folding a magazine page in half lengthwise, ensuring it’s aligned perfectly. Use a ruler to help you achieve a straight fold. Repeat this step for several pages until you have a small stack of folded pages.
Step 3: Roll the magazine tubes
Take one of the folded pages and roll it tightly into a tube. Secure the end with a dab of glue, making sure the tube maintains its shape. You’ll use these magazine tubes as the building blocks for your basket. Repeat this process with all the folded pages.
Step 4: Prepare the base
For the basket’s base, create a flat, circular shape using a piece of cardboard or a thick piece of poster board. Measure and cut the base to your desired size. The diameter of the base will determine the basket’s size.
Step 5: Start building the basket
Apply a thin line of glue along one of the magazine tubes and press it onto the center of the cardboard base. This tube will serve as the starting point for your basket. Use clothespins or paperclips to hold it in place while the glue dries.
Step 6: Continue adding tubes
Take additional magazine tubes and glue them around the center tube in a circular pattern. Make sure they are tightly spaced and secured to the base. As you work your way outward, the basket will begin to take shape.
Step 7: Build up the sides
Gradually build up the sides of the basket by stacking the magazine tubes vertically. Apply glue to the base of each tube and press it against the previous layer, ensuring a secure attachment. Continue stacking and gluing until the basket reaches your desired height.
Step 8: Trim excess length
If the magazine tubes extend above the desired height of your basket, trim them to create an even edge.
Step 9: Secure the top edge
To finish the top edge, fold the last magazine tube over the edge and glue it down securely. This provides a neat and finished appearance to the basket.
Step 10: Optional reinforcement
For added durability, you can reinforce the entire basket by applying clear adhesive tape around the outside and inside. This will help hold the magazine tubes in place.
Your recycled magazine basket is now complete! You can use it to store items such as magazines, books, or even as a decorative piece in your home. It’s a great way to give new life to old magazines while adding a unique and eco-friendly touch to your space.
6. DIY Round Magazine Coasters
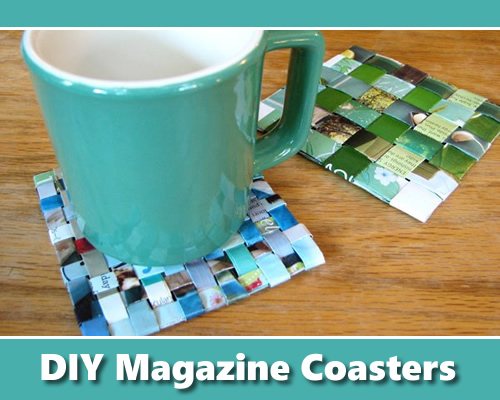
Creating round magazine coasters is a fun and eco-friendly DIY project that can add a unique touch to your home decor. These coasters are made from rolled magazine pages and are not only functional but also a great way to upcycle old magazines. Here’s how you can make your own round magazine coasters:
Materials you’ll need:
Old magazines or colorful paper
Glue (craft glue or glue stick)
Mod Podge or clear varnish (optional)
Scissors
Pencil
Ruler
Round template (a small plate or lid can work)
Instructions:
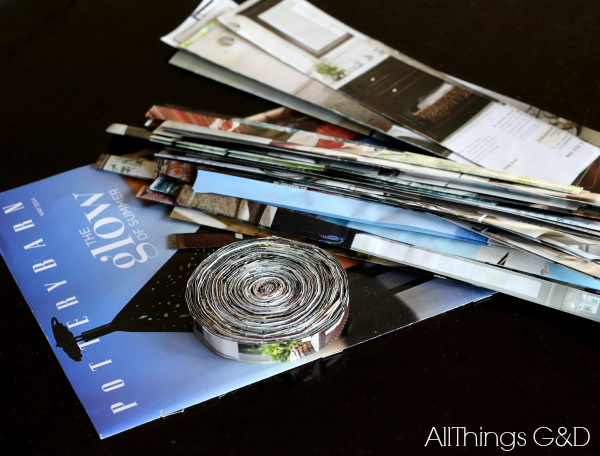
Choose your magazines: Select magazines with colorful pages or images that you’d like to feature on your coasters. The pages can have various sizes, as you’ll be cutting them down to create uniform strips.
Prepare your template. Find a round object that’s the size you want your coasters to be. A small plate or lid often works well. Place the round template on a magazine page and trace around it with a pencil. Cut out the circle.
Create strips: Cut the magazine pages into long, narrow strips that are about 1 inch (2.5 cm) wide. You’ll need enough strips to cover the entire coaster, so make as many as you can.
Roll the strips: Take a strip and roll it tightly into a tube, keeping the colorful side of the paper facing out. Apply a small amount of glue to the end of the strip to secure it in place. Repeat this process with all the strips.
Form the base: To create the base of your coaster, place one rolled strip in the center of your round template. Continue adding rolled strips around the center one, gluing them in place to form a tight circle. Make sure the rolls are close together to create a sturdy base.
Build the coaster: Continue adding rolled strips around the center, gradually increasing the size of the coaster. Overlap the strips slightly and glue them together as you go. Keep building until your coaster reaches the desired size.
Trim and seal (optional): Once you’ve completed the coaster, trim any excess strips that may be hanging over the edge to create an even, neat circle. If you want to add extra durability and shine to your coasters, you can apply a coat of Mod Podge or clear varnish to seal and protect the surface. Allow it to dry completely.
Let it dry: Allow your coasters to dry completely, which may take a few hours. Once they are dry, they are ready to use.
These round magazine coasters make great conversation pieces and can be a wonderful addition to your home decor. They’re also a fantastic way to showcase your creativity while upcycling old magazines. Enjoy your DIY project!
7. Upcycled Rolled Paper Frame

Creating an upcycled rolled paper frame is a creative way to give new life to old magazines, newspapers, or other paper materials. This project results in a unique and colorful frame that you can use to display your favorite photos or artwork. Here’s how to make an upcycled rolled paper frame:
Materials you’ll need:
Old magazines, newspapers, or colorful paper
Cardboard (for the backing)
Craft glue or a glue gun
Scissors
Ruler
Pencil
Craft knife (optional)
Acrylic paint and brushes (optional)
Instructions:
Prepare the cardboard backing.
Measure and cut a piece of cardboard to the size you want for your frame. You can make it any shape you like, but a rectangular frame is most common.
If you want to paint the cardboard for a decorative touch, now is the time to do it. Let it dry completely before proceeding.
Choose your paper:
Select old magazines, newspapers, or colorful paper with patterns and images you like. The paper can be cut into strips or squares for this project.
Create paper strips or squares.
If you’re using long strips, cut the paper into strips about 1 inch (2.5 cm) wide.
If you’re using squares, cut the paper into small, equal-sized squares, typically about 1 inch by 1 inch (2.5 cm by 2.5 cm).
Roll the paper:
Take a paper strip or square and roll it tightly into a tube. Make sure to keep the colorful side of the paper facing out.
Apply a small amount of glue at the end of the strip to secure it in place. Hold it for a moment until the glue sets. If you’re using a glue gun, be careful not to burn yourself.
Start covering the frame.
Begin gluing the rolled paper tubes onto the cardboard frame backing. You can start at one corner and work your way around the frame, or use a specific pattern.
Overlap the rolls slightly to create a textured and colorful design. Continue adding rolls until the entire frame is covered. You can use different colors and patterns to create a unique look.
Trim excess paper.
Once you’ve covered the entire frame, trim any excess paper that hangs over the edges to create a clean, finished look.
Add a hanger (optional):
If you want to hang your frame, you can attach a piece of string or wire to the back. Secure it with glue or by making small slits in the cardboard to thread the hanger through.
Allow the frame to dry.
Let the frame dry completely before inserting your photo or artwork. This might take a few hours, depending on the type of glue you use.
Your upcycled rolled paper frame is now ready to display your favorite images or artwork. This project is not only environmentally friendly but also allows you to add a personalized touch to your home decor. Enjoy your creative endeavor!
8. DIY Collage Art
Creating a DIY collage art piece is a wonderful way to express your creativity and showcase your artistic style. Collages are versatile and can be made from a wide range of materials, making them a perfect choice for artists of all levels. Here’s a step-by-step guide to making your own unique collage art:
Materials you’ll need:
Various magazines, newspapers, or colored paper
Scissors
Glue (stick or liquid)
A piece of cardboard or canvas as your base
Paints, markers, or other drawing materials (optional)
Brushes (if using paint)
A palette or mixing dish (if using paint)
Pencils and erasers (optional)
Old fabric, ribbons, buttons, or any other embellishments (optional)
Protective newspaper or plastic sheet to cover your workspace
Instructions:
Prepare your workspace: Lay down a protective surface on your workspace to avoid any mess. Gather all your materials.
Gather source materials: Flip through magazines, newspapers, or colored paper to find images, text, and patterns that inspire you. Cut out these elements with scissors. You can choose a specific theme or mood for your collage or go for a more spontaneous approach.
Choose your base: Decide on the size and shape of your collage. You can use a piece of cardboard or canvas as your base. If using cardboard, you might want to paint it or cover it with colored paper to create a background.
Plan your layout: Before gluing anything down, arrange the cut-out elements on your base to plan your collage’s composition. Experiment with different arrangements until you’re satisfied with the design.
Glue down your elements: Once you’re happy with the layout, start gluing your cut-out elements onto the base. Use a glue stick or liquid glue, applying it evenly to the back of each element before pressing it onto the base. Be mindful of the placement and overlap of your elements to create depth and dimension.
Add your personal touch: If you like, use paints, markers, or other drawing materials to enhance your collage. You can draw around or on top of your glued elements, add highlights, or create additional details.
Incorporate other materials (optional): Get creative by including fabric, ribbons, buttons, or any other embellishments you like. Glue or stitch these items onto your collage to give it texture and dimension.
Fine-tune your collage. Step back and take a look at your collage. If there are any elements that don’t quite fit or if you want to make adjustments, feel free to do so. This is your chance to fine-tune your creation.
Let it dry: Allow your collage to dry completely before handling it or framing it. The drying time will depend on the type of glue and materials you use.
Display or frame: Once your collage is dry, you can frame it or simply display it as desired. Collages make great wall art, and they also make unique gifts for friends and family.
Remember that collage art is a form of self-expression, so there are no strict rules. Let your creativity flow, and have fun with the process. Your collage can tell a story, convey emotions, or simply be a visual feast of colors and shapes. Enjoy your artistic journey!
9. Paper Waste Basket
Creating a paper waste basket is a simple and eco-friendly DIY project that helps you manage your paper waste in a sustainable way. Here’s how to make your own paper waste basket:
Materials you’ll need:
Cardboard box or thick cardboard sheets (large enough for your desired waste basket size)
Old newspapers, magazines, or colored paper
Scissors
Craft glue or a glue gun
Ruler
Pencil
Decorative materials (optional)
Craft knife (optional)
Instructions:
Select your cardboard base.
Choose a cardboard box or cut large cardboard sheets into the shape you want for your waste basket. The size and shape are up to you, but a rectangular or cylindrical shape works well.
Prepare your paper strips.
Take old newspapers, magazines, or colored paper and cut them into strips. These strips will be used for weaving the basket. The width of the strips can vary, but they should generally be around 1-2 inches (2.5–5 cm) wide.
Weave the sides:
To create the sides of your waste basket, start weaving the paper strips around the cardboard base. Begin by applying a thin line of craft glue along the bottom edge of the cardboard to secure the first strip.
Weave the strips in an over-under pattern around the base, making sure they are tightly packed and overlap slightly. Apply glue as needed to keep the strips in place.
Build the height.
Continue weaving the strips upward to create the desired height for your waste basket. You can make it as tall or short as you like. Ensure that the strips are secure and evenly spaced.
Finish the top edge.
Once you’ve reached the desired height, fold the ends of the paper strips over the top edge of the cardboard to create a neat, finished rim. Glue these folded ends in place.
Decorate (optional):
If you’d like to add a decorative touch, consider painting the outside of the waste basket, applying decoupage, or attaching additional embellishments like ribbon, fabric, or buttons.
Trim excess paper (optional):
If any paper strips extend beyond the bottom edge of the cardboard, you can trim them with scissors or a craft knife for a cleaner look.
Let it dry.
Allow the glue to dry completely before using your paper waste basket.
Now you have a handmade paper waste basket that not only helps you organize and dispose of paper waste but also adds a touch of creativity to your space. You can place it in your home office, craft room, or any other area where paper waste tends to accumulate. Enjoy your eco-friendly DIY project!
10. DIY Starburst Clock
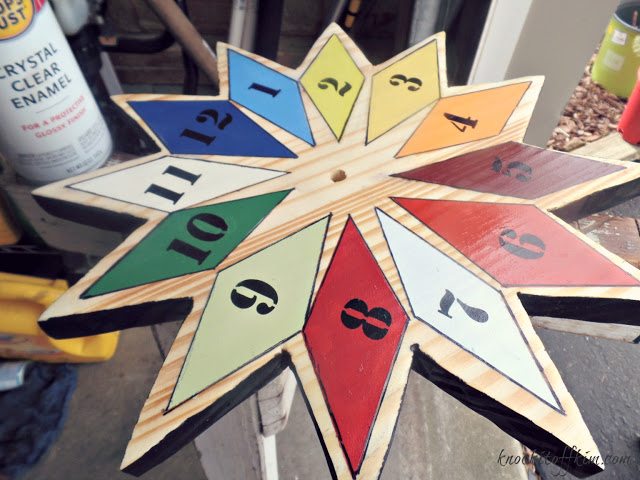
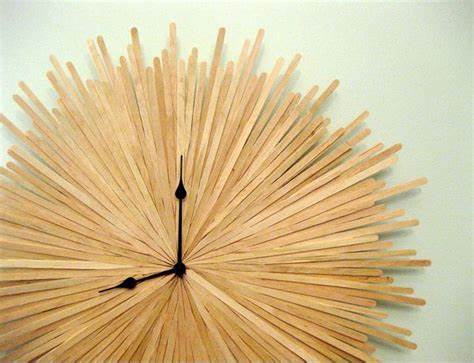
Creating a DIY starburst clock is a fantastic way to add a mid-century modern flair to your home decor. This iconic design is characterized by its sunburst shape and can be customized to match your style. Here’s how to make your own starburst clock:
Materials you’ll need:
Round clock mechanism kit with clock hands (available at most craft stores)
A round wooden base or backing board (usually around 12–18 inches in diameter)
Wooden dowels or wooden craft sticks (for the starburst rays)
Small wooden beads (optional)
Acrylic paint and brushes
Ruler
Pencil
Sandpaper
Wood glue
Saw (if cutting wooden dowels)
Mounting hardware (to hang the clock)
Painter’s tape (optional)
Decorative items like metallic spray paint (optional)
Instructions:
Prepare your wooden base:
Begin by sanding the wooden base to smooth out any rough edges or surfaces. You can also paint the base with your desired color using acrylic paint. Let it dry completely.
Create the starburst rays.
Measure and cut wooden dowels or wooden craft sticks into equal-length pieces. The number of pieces you’ll need depends on the design you want. Typically, you’ll use 12 to 24 pieces for a starburst clock.
If you want to add small wooden beads to the ends of the rays, glue them in place at this stage. This adds a decorative touch.
Paint or decorate the starburst rays.
You can paint the wooden rays in a single color or create a two-tone effect by using painter’s tape to mask off sections before painting. Alternatively, you can use metallic spray paint for a classic look.
Arrange and glue the starburst rays:
Once your starburst rays are dry, arrange them evenly around the wooden base to create the sunburst effect. Use a ruler or protractor to ensure they are evenly spaced. The clock mechanism should fit in the center.
Glue the rays to the base.
Apply wood glue to the ends of each starburst ray and press them firmly onto the wooden base. Allow the glue to dry thoroughly. It’s a good idea to apply some weight on top of the rays to ensure a strong bond.
Assemble the clock mechanism.
Follow the instructions on the clock mechanism kit to install it on the wooden base. This usually involves making a hole in the center of the base and attaching the clock hands.
Install mounting hardware:
Attach mounting hardware to the back of your clock to hang it on the wall.
Set the time.
Install a battery in the clock mechanism and set the timer to complete your starburst clock.
Your DIY starburst clock is now ready to adorn your wall and add a touch of mid-century modern style to your decor. Customize the colors and design to match your personal taste, and enjoy the unique and timeless look of your handcrafted clock.