Createcrafta
Createcrafta
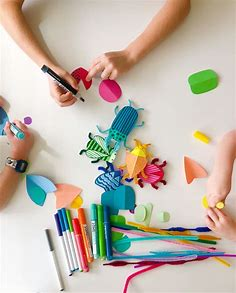
In the long term, teaching your children to recycle and not waste anything will benefit both them and the environment. And by that, I mean their old toys, paper scraps, and other materials that are still usable but can be recycled or repurposed. That being said, these 10 upcycled and recycled projects for kids are perfect if you and your kids are locked indoors and you have a lot of unused material lying around the house. You can perform them all with ease, I promise.
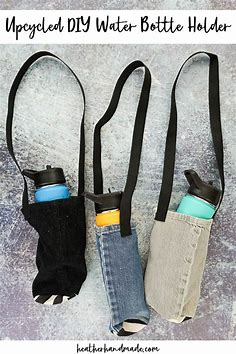
- Upcycled DIY Water Bottle Holder
Createcrafta
Createcrafta
Creating an upcycled DIY water bottle holder is a fantastic idea! You can make something practical while also contributing positively to the environment. Here’s a simple guide to get you started:
Materials Needed:
- Plastic bottle: Choose a sturdy plastic bottle like a 1-liter soda bottle or a similar size that will hold your water bottle securely.
- Scissors or craft knives: for cutting the bottle.
- Decorative materials: optional, such as stickers, markers, paint, or fabric scraps, to personalize your holder.
- String or yarn: for making a strap or handle.
- Hole punch (optional): To create holes for the strap.
Step-by-Step Instructions:
1. Clean and prepare the bottle:
- Wash and dry the plastic bottle thoroughly. Remove any labels if necessary.
2. Cutting the bottle:
- Decide on the height you want for your water bottle holder. Typically, you’ll want the bottom of the bottle to be intact to hold the water bottle, and the top to serve as the opening where you can insert and remove your bottle.
- Using scissors or a craft knife, carefully cut the bottle around the desired height. Make sure to leave enough space at the top to comfortably insert and remove your water bottle.
3. Creating a Strap or Handle:
- Decide how you want to carry your water bottle holder. You can use a piece of string, yarn, or even a cut-out strip of the bottle itself.
- If you’re using string or yarn, punch holes near the top edges of the bottle (if you have a hole punch), or you can simply tie the string around the bottle securely.
4. Decorating (optional):
- This is where you can get creative! Use markers, paint, stickers, or fabric scraps to decorate your water bottle holder. This step adds personality and makes your holder unique.
5. Testing and Final Adjustments:
- Insert your water bottle into the holder to ensure it fits well and is secure. Make any necessary adjustments to the strap or handle for comfort and functionality.
6. Enjoy Your Upcycled Water Bottle Holder:
- Once everything is in place and you’re satisfied with the look and function, your DIY water bottle holder is ready to use! Take pride in knowing you’ve created something useful from materials that might otherwise have been discarded.
Tips:
- Safety first: Be careful when cutting the plastic bottle to avoid injury.
- Customize: Feel free to personalize your holder with colors, patterns, or even additional features like pockets or hooks.
- Experiment: Don’t hesitate to try different bottle sizes or shapes to suit your specific needs.
By upcycling a plastic bottle into a functional water bottle holder, you’re not only reducing waste but also demonstrating creativity and resourcefulness. Enjoy your DIY project.
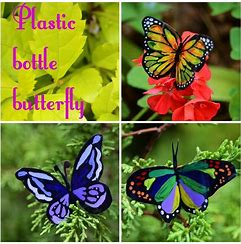
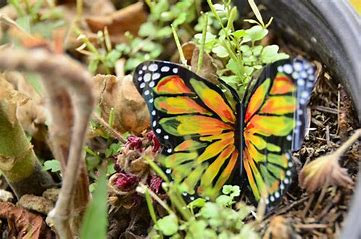
2. Plastic Bottle Butterflies: Recycled Art
Createcrafta
Createcrafta
With this simple recycled art project, you can create plastic bottle butterflies while learning about the migration of monarch butterflies.
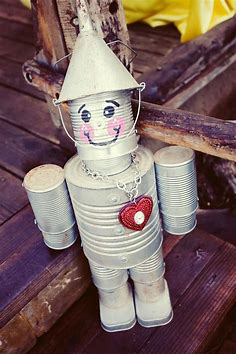
3. DIY Tin Can Robot Craft
Createcrafta

Createcrafta
Creating a DIY tin can robot craft is a fun and creative project that allows you to repurpose materials while making something cool. Here’s a step-by-step guide to help you create your own tin can robot:
Materials Needed:
- Empty tin cans: Different sizes can add variety to your robots.
- Paint and paintbrushes: Acrylic paints work well for decorating the cans.
- Googly eyes: Various sizes for adding character.
- Pipe cleaners: For antennae or arms.
- Hot glue gun and glue sticks: To attach parts securely.
- Scissors: For cutting and shaping.
- Decorative materials: Optional, like buttons, beads, or stickers.
- Screwdriver and screws: Optional, for more secure assembly.
Step-by-Step Instructions:
1. Prepare the Tin Cans:
- Make sure your tin cans are clean and dry. Remove any labels and sharp edges if necessary.
2. Paint the Tin Cans:
- Use acrylic paints to give your tin cans a base color. Let them dry completely before moving on to the next step. You can paint them in solid colors or get creative with patterns.
3. Attach Googly Eyes:
- Use hot glue to attach googly eyes to the front of the tin cans. Googly eyes come in various sizes, so you can choose ones that suit the size of your tin cans and the look you want for your robots.
4. Add Antennae or Arms:
- For antennae, twist pipe cleaners into spirals or straight lines and attach them to the top of the tin cans using hot glue. You can also use pipe cleaners to create arms by bending them into shapes and attaching them to the sides of the tin cans.
5. Decorate Further (Optional):
- Get creative with additional decorations like buttons, beads, stickers, or other small craft materials. Attach these with hot glue to personalize your tin can robots.
6. Assemble the Robots:
- Stack smaller tin cans on top of larger ones to create a multi-level robot, using hot glue to secure them together. You can also attach arms or legs made from additional tin cans or other materials if desired.
7. Test and Adjust:
- Once your tin can robot is assembled, make sure it stands upright and that all parts are securely attached. Make any necessary adjustments before displaying or playing with your robots.
8. Display or Play:
- Your DIY tin can robots are now ready to be displayed as fun decorations or used for imaginative play. Arrange them on a shelf or give them as creative gifts!
Tips:
- Safety first: When using a hot glue gun, handle it carefully to avoid burns.
- Experiment: Mix and match colors and materials to create unique robots.
- Recycle: Consider using other recyclable materials for additional robot features.
Creating tin can robots is a great way to encourage creativity and sustainability by repurposing materials that might otherwise be thrown away. Have fun crafting your own unique robot characters.
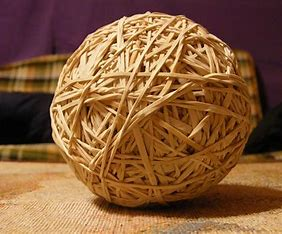
4. How to Make a Rubber Band Ball
Createcrafta
Createcrafta
Are you interested in creating a rubber band ball? Are you looking for a quick way to keep the kids from getting bored? I’m going to walk you through making these simple rubber band balls today.
5. How To Make A Sticky Animal
Createcrafta
CreatecrAfta
Making a stick animal is a delightful and straightforward craft project, perfect for both children and adults. Here’s a step-by-step guide to creating your own stick animal:
Materials Needed:
Stick: Find a straight and sturdy stick of suitable length for your animal.
Yarn or string: for wrapping around the stick and creating the body of the animal.
Googly eyes are optional for adding personality to your animal.
Felt or fabric: Optional for creating ears or other features.
Scissors: for cutting materials.
Hot glue gun and glue sticks: To attach eyes and other decorations securely (adult supervision is required for children).
Step-by-Step Instructions:
- Choose and prepare your stick:
Select a stick that is straight and long enough for the size of the animal you want to make. Ensure it’s clean and free from loose bark or rough edges.
- aroundWrap Yarn or SaroundAround the stick.
Start at one end of the stick and secure the yarn or string with a knot. Wrap it tightly around the stick, covering the entire length,, to create the body of the animal. You can change colors or add patterns as you wrap.
- Create Features:
Head: If you want to create a distinct head, shape a small piece of felt or fabric into ears or a snout and attach it to one end of the stick using hot glue.
Eyes: Attach googly eyes or draw eyes directly onto the head with markers or paint.
- Add Details:
Use additional yarn, felt, or fabric to create other features such as a mane, tail, or spots. Secure these with hot glue as needed.
- Customize Further (Optional):
embellishments,Get creative embellishments, embellishments like beads, buttons, or small accessories,, to give your stick animal more character.
- Allow to Dry and Display:
Once all decorations are securely attached, allow the hot glue to dry completely. Your stick animal is now ready to be displayed or played with!
Tips:
Safety: If using a hot glue gun, handle it carefully and supervise children closely to avoid burns.
Experiment: Try different colors and textures of yarn or string to create unique animals.
Inspiration: Look at pictures of real animals or cartoons for ideas on shapes and features.
Creating stick animals is a fun way to explore creativity and nature. Whether you make a simple stick horse, a fanciful stick unicorn, or any other creature, enjoy the process of bringing your imagination to life.
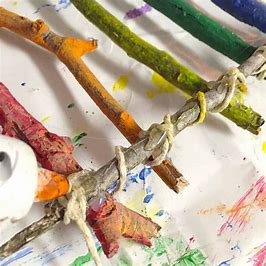
6. Twig Crafts
Createcrafta
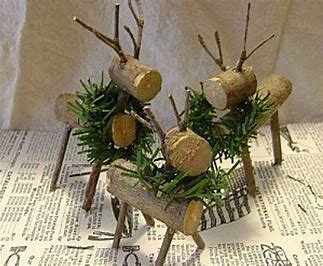
Createcrafta
The technological age we live in has brought us many benefits, but it has also made us more indoor-focused and less likely to go outside than in the past. Even thoughh it is unsettling, the fact that our kids are doing it is even more worrisome.
7. Free DIY Cat Toys:Mice And Fish Sewing Patterns
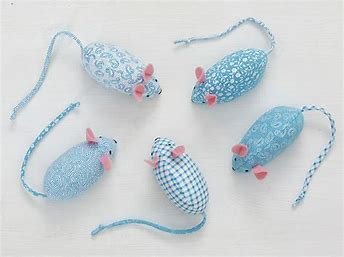
Createcrafta

Createcrafta
Creating DIY cat toys like mice and fish can be a fun and rewarding project. Here are simple sewing patterns for making these toys:
Materials Needed:
- Fabric: Use scrap fabric or old clothes (cotton or fleece works well).
- Thread: matching thread for sewing.
- sewingNeedsewingSewing machine: depending on your preference and skill level.
- Stuffing: polyester fiberfill or cotton batting.
- Catnip (optional): To add extra appeal for your cat.
- Scissors: for cutting fabric and thread.
- Marker or chalk: for tracing the pattern onto fabric.
- Pins: To secure fabric layers together during sewing.
Mouse Toy Sewing Pattern:
1. Cut the fabric:
- Use the template provided (or draw your own) to cut out two identical mouse shapes from your fabric. Make sure to leave a small seam allowance (about ¼ inch) around the edges.
2. Sew the Mouse:
- Place the two fabric pieces together with the right sides facing inward. Sew around the edges, leaving a small opening for turning and stuffing.
stuff3. TurnstuffStuff the mouse.
- Turn the fabric right side out through the opening.
- Stuff the mouse with polyester fiberfill or cotton batting. Add catnip at this stage if desired.
4. Close the opening:
- Hand stitch or use a sewing machine to close the opening securely.
5. Add Details (Optional):
- Use embroidery floss or fabric markers to add eyes, a nose, and whiskers to the mouse.
Fish Toy Sewing Pattern:
1. Cut the fabric:
- Use the fish template to cut out two identical fish shapes from your fabric. Again, remember to leave a small seam allowance.
2. Sew the fish:
- Place the two fabric pieces together with the right sides facing inward. Sew around the edges, leaving a small opening.
stuff3. TurnstuffStuff the fish:
- Turn the fabric right side out through the opening.
- Stuff the fish with polyester fiberfill or cotton batting. You can also add catnip at this stage.
4. Close the opening:
- Hand stitch or use a sewing machine to close the opening securely.
5. Finishing Touches (Optional):
- Use embroidery floss or fabric markers to add eyes, gills, and scales to the fish.
Tips:
- Safety: Ensure all stitches are secure to prevent your cat from swallowing loose threads.
- Variety: Experiment with different fabrics and sizes to find what your cat likes best.
- Washable: Make sure the toys are washable in case they get dirty.
- Supervision: Always supervise your cat when introducing new toys to ensure they play safely.
These DIY cat toys provide a great way to recycle fabric scraps and create personalized toys that your cat will love. Have fun sewing and watching your furry friendss enjoy their new toys!
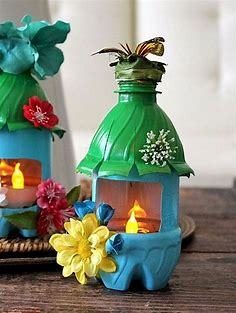
cycling Plastic Bottles into Mickey Mouse Flower Pots
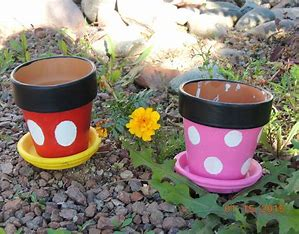
Createcrafta
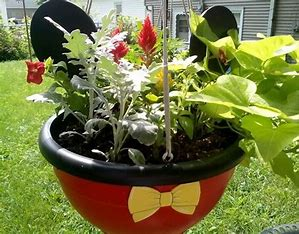
Createcrafta
Reusing plastic water bottles is an excellent method of preventingng trash from entering marine environments. Upcycling, however, is superior to recycling. Additionally, we adore repurposing plastic bottles to create adorable Mickey Mouse (and Minnie Mouse) flower pots.
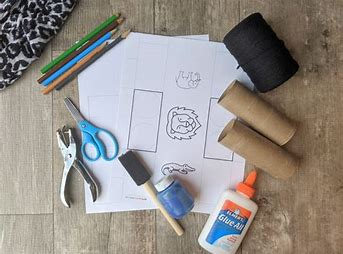
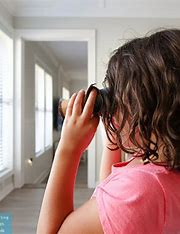
9. Toilet Paper Roll Binoculars with only Three Materials
Createcrafta
Createcrafta
Creating toilet paper roll binoculars with only three materials is a simple and fun craft project, perfect for children. Here’s how you can make them:
Materials Needed:
- Toilet paper rolls: 2 rolls (or paper towel rolls cut in half).
- Decorative paper or wrapping paper: For covering the rolls.
- String or yarn: For making the strap.
Step-by-Step Instructions:
1. Prepare the Toilet Paper Rolls:
- Take the two toilet paper rolls and ensure they are clean and dry. If using paper towel rolls, cut each roll in half to create two shorter rolls.
2. Decorate the Rolls:
- Cut a piece of decorative paper or wrapping paper large enough to wrap around each toilet paper roll.
- Wrap the paper around each roll and secure it with glue or tape. This step adds color and makes the binoculars more appealing.
rolls3. AttachrollsRolls together:
- Place the two decorated rolls side by side, with the decorated sides facing outward.
- Secure the rolls together by wrapping a strip of tape or glueing them together where they touch.
4. Create the strap:
- Take a piece of string or yarn and measure it around your child’s neck to determine the desired length for the strap.
- Attach each end of the string to one end of the binoculars using tape or by punching holes in the rolls and tying knots in the string to secure it.
5. Optional Decorations:
- Decorate further by adding stickers, drawings, or other embellishments to personalize the binoculars.
6. Use and Enjoy:
- Your DIY toilet paper roll binoculars are now ready to use! Encourage your child to explore and play with their new binoculars, whether it’s for pretend play, outdoor adventures, or observing objects indoors.
Tips:
- Variations: Experiment with different types of paper and decorations to create unique binoculars.
- Safety: Ensure that all materials used are safe for children and that the binoculars are securely assembled.
- Educational Play: Use the binoculars to encourage exploration and learning about nature or distant objects.
This simple craft not only encourages creativity but also teaches children about repurposing everyday materials into something fun and functional. Enjoy making and playing with your toilet paper roll binoculars.
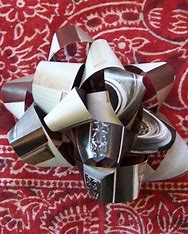
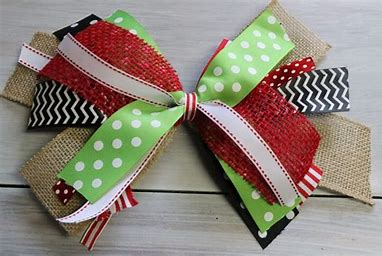
10. How to Make Colorful, Recycled Gift Bows
Createcrafta
Createcrafta
This Christmas, one little way you can reduce the expense of packaging is with our vibrant, recycled gift bows. Although they are quite easy to build from junk mail and old magazines, they look just as amazing as anything you could buy in a store.