Upcycling food packaging into crafts is a creative and eco-friendly way to reduce waste. Here are some ideas for crafts you can make from food packaging:
1. Cardboard Box Organizers
- Materials: Cereal boxes, pasta boxes, or any other cardboard food packaging.
- Craft: Cut and fold the boxes into smaller compartments for organizing drawers, desk supplies, or kitchen utensils. You can decorate them with wrapping paper, fabric, or paint for a polished look.
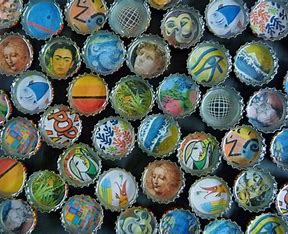
2. Bottle Cap Magnets
- Materials: Bottle caps from soda or juice bottles.
- Craft: Glue magnets onto the back of the bottle caps and decorate the front with paint, photos, or beads to make colorful fridge magnets.
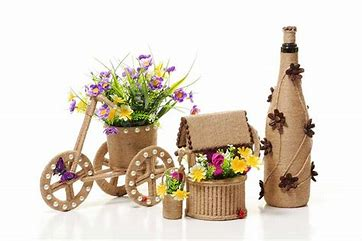
3. Tin Can Planters
- Materials: Empty food cans (soup, beans, etc.).
- Craft: Clean the cans, remove labels, and decorate them with paint, washi tape, or fabric. Drill holes in the bottom for drainage, and fill them with soil and small plants.
4. Plastic Lid Coasters
- Materials: Plastic lids from yogurt containers, peanut butter jars, or other packaged food items.
- Craft: Paint or decoupage the lids to make custom coasters. You can glue several lids together to form a larger coaster or mat.
5. Cereal Box Wall Art
- Materials: Cereal boxes or large food packaging.
- Craft: Flatten and cut the boxes into shapes or strips to make a collage or geometric wall art. You can paint or decorate them with other materials, such as old magazine cutouts.
6. Egg Carton Flowers
- Materials: Egg cartons (paper or styrofoam type).
- Craft: Cut out individual cups from the egg carton and trim them to look like petals. Paint them and attach them to a stem (real or made from a stick or straw) to create beautiful flowers for home décor or a handmade bouquet.
7. Food Container Jewelry
- Materials: Plastic food containers (like yogurt cups, granola bar wrappers, etc.).
- Craft: Cut and shape the plastic into earrings, bracelets, or necklaces. You can paint them, add beads, or use other decorative elements.
8. Plastic Bag Totes
- Materials: Old snack bags, chip bags, or candy wrappers.
- Craft: Turn colorful food wrappers into a unique tote bag by cutting them into strips, weaving them together, or sewing them to create a sturdy, reusable bag.
9. Fruit and Veggie Pouch
- Materials: Produce mesh bags or old potato bags.
- Craft: Repurpose mesh bags as produce pouches for carrying fruits and vegetables. You can add fabric embellishments or paint to make them more decorative.
10. Jar Lid Wall Hooks
- Materials: Metal or plastic jar lids (e.g., jam or pickle jars).
- Craft: Attach the lids to a piece of wood or a wooden board. Install hooks into the lids for a rustic wall hook organizer for coats, hats, or bags.
These are just a few ideas, but you can come up with even more fun and creative ways to turn food packaging into useful or decorative items! The key is to be imaginative and experiment with different materials.
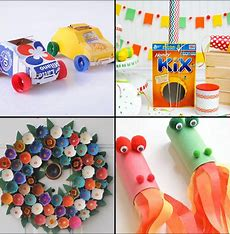
- Classic Tin Can Telephone
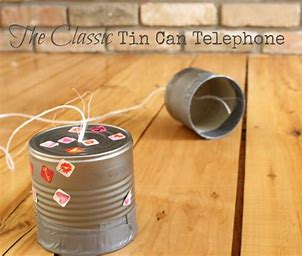
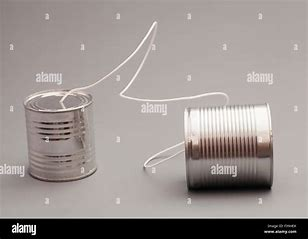
The majority of us have at least one treasured childhood memory that involves a sibling, a tin can telephone, and a summer afternoon.
Joel Henriques of Made by Joel has you covered if you want to share those sentimental, happy moments with your children but are having trouble remembering how to assemble the improvised phones.
This helpful instruction, which includes pictures, advice, and all the other materials you need to maintain the tin can heritage, was made by the designer, artist, and father of two.
Note: Create an additional phone for yourself. It’s likely that you will want to experiment with this yourself!
2. Plastic Bottle Bowling Game
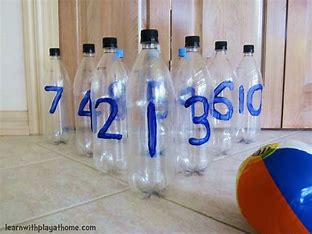
Plastic bottle bowling is a fun and easy-to-set-up game that you can enjoy indoors or outdoors. Here’s how you can create your own version:
Materials:
- 10 plastic bottles (empty and cleaned)
- A ball (a small rubber or bouncy ball works best)
- A flat surface (like a driveway, hallway, or open area)
- Tape or markers (optional, to create the bowling “lane” or to decorate the pins)
Setup:
- Set up the pins: Arrange the 10 plastic bottles in a triangular formation, just like a real bowling setup. The back row should have 4 bottles, the second row 3 bottles, the third row 2 bottles, and the front row 1 bottle.
- A typical bowling setup looks like this:CopyEdit
1 2 3 4 5 6 7 8 9 10
- A typical bowling setup looks like this:CopyEdit
- Mark the start line: Set a “bowling line” about 10-15 feet away from the pins (you can adjust the distance based on the space available and how challenging you want it to be).
How to Play:
- Take turns: Players take turns rolling the ball towards the plastic bottle pins. Each player has 2 attempts to knock down as many pins as possible, just like in traditional bowling.
- Scoring: Keep score as you would in regular bowling. A strike is knocking all the pins down in the first roll, and a spare is knocking them all down in two rolls.
- Optional Variations:
- Use different-sized balls for different levels of difficulty.
- Decorate the bottles to make them look like traditional bowling pins.
- You can create teams or play individually to compete for the highest score.
Extra Tips:
- If you’re playing indoors, make sure to use a soft ball to avoid breaking anything.
- You can use different-colored bottles to make it visually fun.
- For younger kids, you can reduce the distance or use lighter plastic bottles.
This game is great for family fun, parties, or as a simple activity for kids to help improve their coordination!
3. Egg Carton Boat
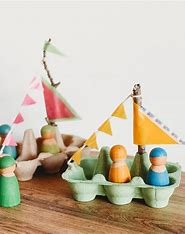
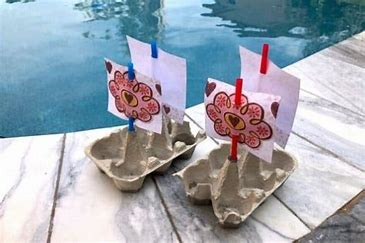
Young children will love this cute egg carton boat lesson from Life at the Zoo, which is sure to spark hours of creative play.
Your child just needs a few basic supplies and a little imagination. This entertaining craft teaches children that it’s acceptable to play with rubbish on sometimes.
4. Tin Can Stilts
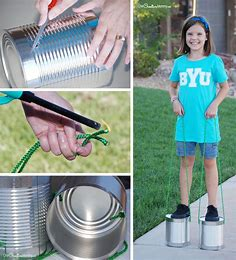
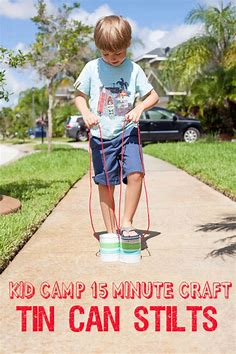
Tin can stilts are a fun and simple craft project that lets you make your own stilts using two empty tin cans. They’re great for kids or anyone looking for a nostalgic, DIY activity. Here’s a general guide on how to make them:
Materials:
- 2 empty tin cans (soup cans or similar)
- Strong rope, string, or a sturdy wire (about 3-4 feet long for each can)
- A hammer and nails (or a drill) for making holes
- Paint and decorations (optional)
Instructions:
- Prepare the Cans:
- Clean the cans and remove any labels. You can also paint or decorate them if you like.
- Make Holes in the Cans:
- Using a hammer and a nail or a drill, make two holes in the bottom of each can (opposite sides) so you can thread your string or rope through them. Ensure the holes are large enough for the rope or string to pass through.
- Prepare the String or Rope:
- Cut a piece of rope or string about 3-4 feet long for each can. You want it long enough to tie around your ankles when you’re standing.
- Attach the Rope:
- Thread the rope or string through the holes you made in the cans. Tie knots on the inside of the cans to secure the rope in place. Make sure the length of the rope is equal on both sides.
- Test the Height:
- Hold the cans with the ropes hanging down to your sides and adjust the rope length to make sure you can step comfortably onto the cans with your feet.
- Use the Stilts:
- Once the rope is tied securely, step onto the cans and hold the ropes for balance. Start walking slowly as you get used to the height and balance.
Safety Tips:
- Ensure the cans are smooth on the edges (use sandpaper if needed) to avoid cutting yourself.
- Use sturdy rope to avoid accidents.
These tin can stilts are a simple, budget-friendly way to get creative and have fun! Have you made any before, or is this a new idea for you?
5. Bottle Cap Memory Game

Kids may improve their critical thinking skills and learn numbers with this entertaining matching game created by East Coast Mommy blogger Gina Bell.
Additionally, you won’t have to pay a thing because this craft is entirely created from recycled bottle caps.
Visit Bell’s East Coast Mommy lesson for advice and directions.
6. Cereal Box Piñata
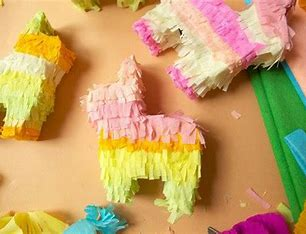

A cereal box piñata is a fun and creative DIY craft project that’s perfect for a birthday party or any celebration! Here’s how you can make one:
Materials:
- 1 empty cereal box
- Tissue paper (different colors)
- Glue stick or hot glue gun
- Scissors
- String or ribbon (for hanging)
- Tape
- Candy or small toys for filling
- Markers, stickers, or paint (for decorating)
- A craft knife or box cutter (for cutting)
Instructions:
- Prepare the Cereal Box:
- Start by removing all the contents from the cereal box. If the box is too tall, you can trim it down to a size that fits your needs.
- Cut out one side of the cereal box so you have an open side for stuffing it later.
- Decorate the Box:
- Use markers, stickers, or paint to decorate the exterior of the box, giving it a fun and colorful look. You can make it look like a traditional piñata, with bold designs or patterns.
- Add any characters or themes based on the party’s theme if you’d like.
- Fill the Box:
- Once decorated, fill the box with candy, small toys, or any treats you like. Leave enough space at the top to close the box.
- Close the Box:
- Fold the open side of the box back into place, and secure it with tape to make sure it stays shut. You can also glue the flaps down for added security.
- Make a Hanging Hole:
- Use a craft knife or box cutter to make two small holes at the top of the cereal box (on the corners).
- Thread some string or ribbon through the holes to create a loop to hang the piñata.
- Cover with Tissue Paper:
- Cut tissue paper into strips or squares. Then, use glue to cover the entire box with the tissue paper, creating a fringed effect by layering it in rows.
- Continue adding tissue paper until the box is completely covered.
- Final Touches:
- Add extra decorations or details to make your piñata stand out even more. You could add fringes, cut-out shapes, or anything else that adds a festive flair.
- Hang and Enjoy:
- Once finished, hang the piñata in a safe spot, and it’s ready to be enjoyed!
This is a great project that allows you to customize the piñata however you like, and it’s a fun way to reuse materials you already have. Enjoy making and breaking your cereal box piñata!