

Sure! Here’s a summary in English of “Cardboard Tube Crafts for Kids” by Crafts by Amanda:
Cardboard Tube Crafts for Kids
From: Crafts by Amanda
Website: craftsbyamanda.com
Amanda Formaro shares fun, creative, and easy craft ideas for kids using cardboard tubes (like toilet paper or paper towel rolls). These crafts are perfect for recycling and encouraging kids’ imagination.
🧒 Fun Craft Ideas Include:
- Animal Tubes: Make zebras, pigs, cows, chicks, polar bears, and more with paint, felt, and googly eyes.
- Holiday Crafts:
- Halloween: Spooky monsters and ghosts.
- Christmas: Angels, reindeer, and Santa.
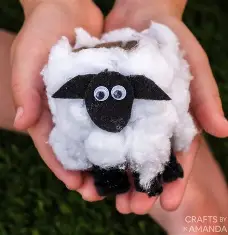
- Easter: Bunnies, lambs, and chicks.
- Superheroes: Create Batman, Wonder Woman, and Superman with colorful paper and paint.
- Fantasy & Nature: Mermaids, bees, butterflies, and jellyfish.
🛠 Materials You’ll Need:
- Cardboard tubes (toilet paper or paper towel rolls)
- Paint and paintbrushes
- Glue and scissors
- Googly eyes, felt, pom-poms, pipe cleaners, cotton balls
- Construction paper or tissue paper
✅ Why These Crafts Are Great:
- Eco-friendly: Teaches kids about recycling and reusing.
- Educational: Learn about animals, seasons, and holidays.
- Creative fun: Perfect for rainy days, classrooms, or themed activities.
Would you like a step-by-step guide for a specific craft from her list?
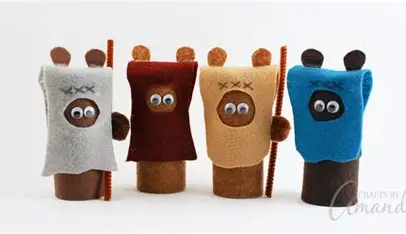
One of my favourite things from my Star Wars Mania book are these cardboard tube Ewoks! Your children will appreciate creating these adorable cardboard tube ewoks if they are Star Wars enthusiasts!
Who knew that cardboard tubes could be used to create so many different things? Keep it and use it to create a fun project the next time you get one!
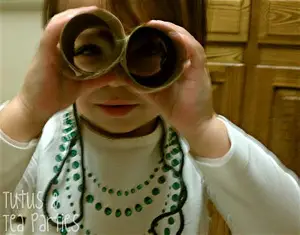
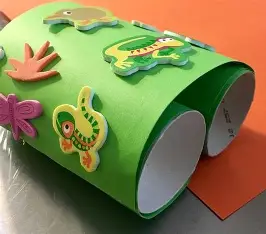
Sure! Here’s a simple and fun Cardboard Tube Binoculars craft project for kids, written clearly in English:
🕵️♂️ Cardboard Tube Binoculars Craft for Kids
Perfect for pretend play, nature walks, or a safari-themed activity!
🎨 Materials Needed:
- 2 cardboard toilet paper tubes (or 1 paper towel tube cut in half)
- Paint or markers (optional – to decorate)
- Glue or tape
- Hole punch
- String, yarn, or ribbon (about 24–30 inches)
- Stickers or paper for extra decoration (optional)
🛠 Instructions:
- Decorate the Tubes
Let kids paint or color both cardboard tubes. They can use stickers, washi tape, or draw designs for a fun look. Allow paint to dry. - Attach the Tubes Together
Place the tubes side-by-side and glue or tape them together. You can use a hot glue gun (with adult help) or strong craft glue. Tape works well too if you wrap it around the middle. - Punch Holes for the Strap
Use a hole punch to make one hole near the top outer side of each tube. - Add the Neck Strap
Thread a piece of yarn, string, or ribbon through each hole and tie knots to secure. This creates a strap so the binoculars can hang around the neck. - Let’s Play!
Once everything is dry and secure, kids can wear their homemade binoculars and go on an indoor or outdoor adventure!
✅ Why Kids Love This Craft:
- Encourages imaginative play (explorer, safari guide, birdwatcher).
- Easy to customize with favorite colors or themes (jungle, space, pirate).
- Great use of recycled materials.
Would you like a printable version or a themed version (like pirate or space explorer binoculars)?
3. Cardboard Tube Bunny Rabbit Family
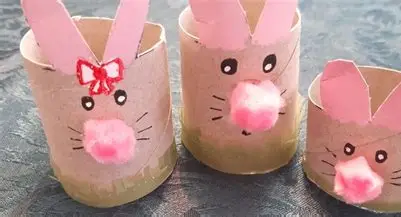
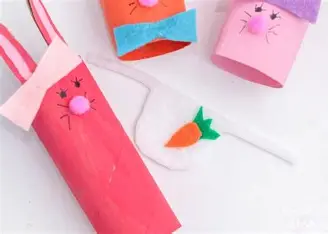
Your children will love making this cute Easter bunny rabbit craft, which they can then display throughout the house for the occasion.
4. Cardboard Tube Polka Dot Tulips-
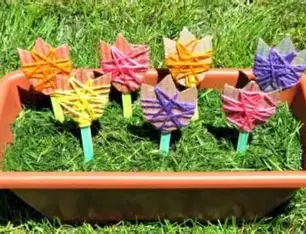
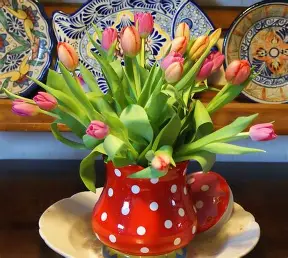
“Cardboard Tube Polka Dot Tulips” sounds like a fun and creative craft project! Here’s how you might interpret or create this:
🌷 Cardboard Tube Polka Dot Tulips Craft
Perfect for: Kids’ spring crafts, classroom art projects, or Earth Day activities using recycled materials.
🧻 Materials Needed:
- Empty cardboard tubes (like toilet paper rolls or paper towel tubes)
- Acrylic or tempera paint (various tulip colors)
- Paintbrushes or sponge daubers
- Scissors
- Green construction paper or pipe cleaners (for stems/leaves)
- Glue or tape
- Cotton swabs or the end of a pencil (for making polka dots)
- Optional: googly eyes or glitter for extra flair
🎨 Instructions:
- Flatten and Shape the Tube
Gently flatten the cardboard tube, then cut one end into 3 or 4 rounded petal shapes. When opened, this will resemble a tulip flower. - Paint the Tulip
Paint the tulip in bright colors like pink, red, yellow, or purple. Let dry. - Add Polka Dots
Use the end of a cotton swab or pencil eraser to dip into white or contrasting paint and dot the tulip. This adds a whimsical, polka dot pattern. - Create the Stem
Glue or tape a green pipe cleaner or a rolled green paper strip to the bottom inside of the tube. - Add Leaves (Optional)
Cut leaf shapes out of green paper and glue them to the stem or sides of the flower.
Would you like a printable version of this activity or variations (e.g., a classroom version or template)?
The beaker crafta, which resembles him exactly, was a lot of fun to do. A fantastic crafta for fans of the Muppets!

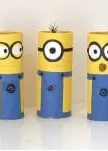
Cardboard Tube Minions are a super fun and easy craft—perfect for kids who love Despicable Me or Minions! Here’s a simple guide to make your own little army of these adorable yellow guys using recycled cardboard tubes (like toilet paper rolls):
🛠️ DIY Cardboard Tube Minions
Great for: Kids’ craft time, movie-themed parties, or boredom busters with a recyclable twist.
🎨 Materials Needed:
- Empty cardboard tubes (toilet paper rolls work best)
- Yellow and blue paint (or colored paper)
- Black and gray markers or black pipe cleaners
- Googly eyes (or white paper circles)
- Glue or glue stick
- Scissors
- Tape
- Optional: black construction paper or washi tape for goggles
🧑🎨 Instructions:
- Paint the Body
Paint the top half of the cardboard tube yellow (Minion head), and the bottom half blue (Minion overalls). Let dry. - Make the Goggles
- Cut a strip of black paper or use a black marker to draw a horizontal band for the goggles around the tube.
- For eyes: Glue on googly eyes or cut out white circles with smaller black circles for pupils. Place them over the black band.
- Add a gray ring around the eyes if you want to mimic the metal goggle effect.
- Add Minion Details
- Draw or paint a mouth (smile, grin, or frown—Minions have a lot of expressions!).
- Use a black marker or paper to add overall straps.
- Optional: Add little black “hair” by cutting tiny slits in the top and bending them upward or gluing on bits of black paper or pipe cleaner.
- Finish with Arms & Feet (Optional)
- Glue on paper arms or small strips of felt.
- Use small black paper ovals for shoes.
💡 Tips:
- Vary the height of the cardboard tubes to create Minions of different sizes.
- Try making Kevin, Stuart, and Bob by giving them unique facial features, eye counts (1 or 2), and hairstyles.
Would you like printable templates for their eyes, overalls, or goggle bands?
Use this Superman cardboard tube project to finish the superhero set!
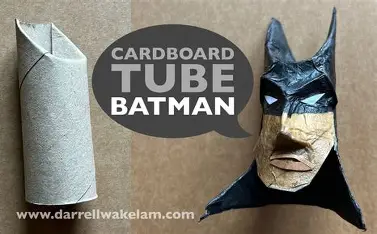
Creating a Cardboard Tube Batman is a fun superhero-themed craft for kids using recycled materials! Here’s how you can make your own mini Dark Knight:
🦇 DIY Cardboard Tube Batman Craft
Perfect for: Superhero fans, rainy day crafts, or themed birthday party activities.
🧻 Materials Needed:
- Empty toilet paper roll (or any cardboard tube)
- Black, gray, yellow, and white construction paper or paint
- Black marker or pen
- Scissors
- Glue stick or tape
- Optional: Googly eyes or mini cape fabric (like felt or old t-shirt scraps)
🛠️ Instructions:
- Paint or Cover the Tube
- Paint the top half of the tube black (for the mask and cowl) and the bottom half gray (for the suit), OR
- Wrap the tube in construction paper cut to size—black on top, gray on the bottom.
- Make the Bat Ears
- Cut two small triangle shapes from black construction paper.
- Glue or tape them inside the top of the tube so they stick up like Batman’s ears.
- Create the Face
- Leave a small oval area unpainted or uncovered on the black “mask” to draw a face.
- Add googly eyes or draw eyes and a serious Batman expression.
- Add the Bat Symbol & Utility Belt
- Cut a small yellow oval and draw a bat symbol with black marker, then glue it to the chest.
- Cut a yellow strip of paper and glue it around the tube’s “waist” to make a utility belt.
- Make a Cape
- Cut a small rectangle or triangle shape from black paper or felt.
- Glue it to the back of the tube so it hangs like a cape.
🦹 Bonus Ideas:
- Create villains like Joker, Penguin, or Catwoman with other tubes.
- Add a cardboard Gotham City backdrop for pretend play!
Would you like a printable Batman symbol or a step-by-step coloring template to go with this?
9. Cardboard Tube Wonder Woman
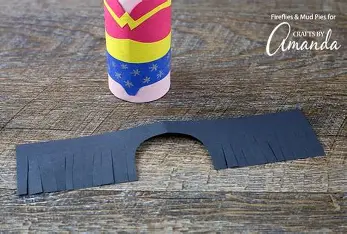
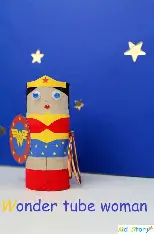
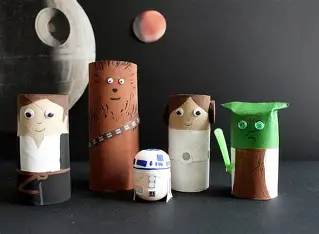
Use cardboard tubes to create your own Wonder Woman statue! Below, join her with Superman and Batman!
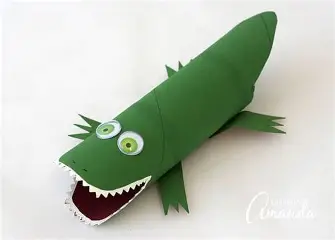
Making a Cardboard Tube Alligator is a super fun craft—great for jungle, swamp, or animal-themed projects! 🐊 Here’s a step-by-step guide to turn a plain cardboard tube into a toothy, green alligator:
🐊 DIY Cardboard Tube Alligator Craft
Perfect for: Kids’ animal crafts, classroom projects, or learning about reptiles.
🧻 Materials Needed:
- 1–2 empty toilet paper rolls or 1 paper towel roll
- Green paint or green construction paper
- White paper (for teeth)
- Googly eyes or white paper circles
- Glue, tape, or glue stick
- Scissors
- Black marker
- Optional: green pipe cleaners for legs or tail
🎨 Instructions:
- Paint or Wrap the Tube Green
- Paint the entire cardboard tube green (or wrap it in green paper).
- Let it dry completely.
- Shape the Mouth
- Flatten one end of the tube slightly and cut a “V” notch into it to make an open mouth.
- Optionally, cut the tube in half and reconnect at an angle to make a longer snout.
- Add the Teeth
- Cut small triangles out of white paper and glue them inside the mouth to create sharp teeth.
- Add the Eyes
- Glue googly eyes to the top of the tube near the mouth.
- OR create “pop-out” eyes by rolling small strips of paper into tubes, gluing them on top, and adding paper or drawn pupils.
- Add Legs and Tail (Optional)
- Cut and glue small green paper legs to the sides or bottom.
- For a tail, cut a long, pointed strip of green paper or use a green pipe cleaner and glue to the back.
- Draw Details
- Use a black marker to add nostrils, scales, or smile lines around the mouth.
🐊 Tips & Ideas:
- Use two tubes connected to make a long alligator body.
- Add texture with bubble wrap stamping or dot with a sponge for a scaly look.
- Create a whole swamp scene with lily pads, frogs, and more cardboard critters!
Would you like printable templates for the alligator’s eyes, teeth, or legs?
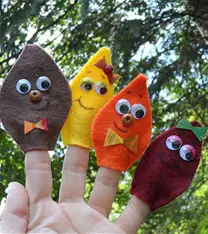
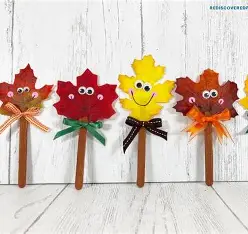
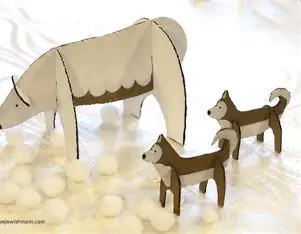
An enjoyable cardboard tube activity with an autumn theme that uses wood, rocks and leaves from the outdoors!
12. Cardboard Tube Christmas Village
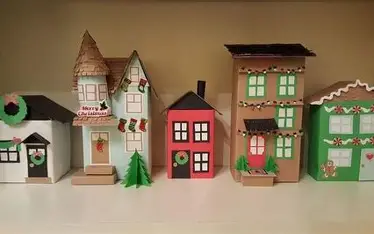
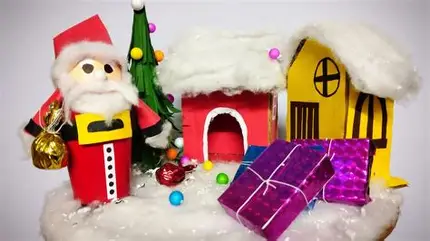
Creating a Cardboard Tube Christmas Village is a cozy, magical winter craft that combines recycling with holiday creativity! It’s perfect for classrooms, family crafting nights, or festive home decor. 🎄🏠
🏘️ DIY Cardboard Tube Christmas Village
Perfect for: Holiday décor, classroom displays, advent calendars, or imaginative play.
🧻 Materials Needed:
- Cardboard tubes (toilet paper or paper towel rolls)
- Acrylic or tempera paints (white, red, green, blue, etc.)
- Colored paper or scrapbook paper
- Cotton balls, felt, or white paint (for snow)
- Scissors
- Glue or tape
- Markers or paint pens
- Optional: LED tealights (battery-powered), glitter, stickers
🏡 Instructions:
1. Make the Houses
- Use full-size toilet paper tubes for regular homes.
- Paint each tube in cheerful colors (red, pastel blue, mint green, etc.) or wrap them in festive paper.
- Add windows and doors using marker, cut paper, or paint.
2. Create Roofs
- Cut a circle out of cardstock or paper, then cut a slit to the center and overlap the edges to make a cone-shaped roof.
- Glue or tape the cone to the top of the tube.
- Decorate with “snow” using cotton balls, white felt, or dabs of white paint.
- Sprinkle glitter for a sparkling snow effect.
3. Add Details
- Use small rectangles of paper or marker to add shutters and bricks.
- Glue a small wreath or draw garlands around the doors.
- Add paper chimneys, candy cane poles, or even tiny mailboxes.
4. Optional: Light It Up
- Cut a small opening in the back or bottom and place an LED tealight inside to illuminate your village!
5. Make Trees & Accessories
- Use green construction paper or cone shapes for trees.
- Add fake snow, paper street signs, or popsicle stick fences.
- Place your village on cotton batting for a snowy base.
❄️ Display Ideas:
- Line them up on a mantel or windowsill.
- Arrange them on a tray or cardboard base with lights.
- Number each house and turn it into a countdown advent village!
Would you like:
- Printable house fronts (doors, windows, wreaths)?
- A template for cone roofs?
- Ideas for themed houses like a bakery, post office, or Santa’s workshop?
13. Cardboard Tube Beaded Butterfly
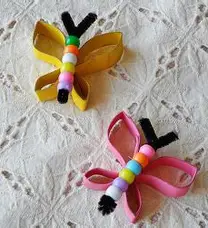
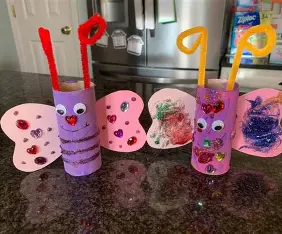
These beaded butterflies are very adorable. Ideal for a classroom project or a girl scout craft!
14. Cardboard Tube Coiled Snakes
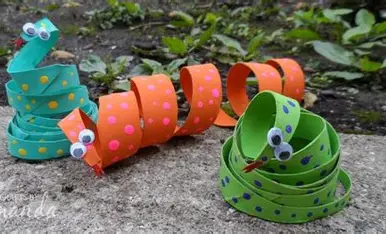
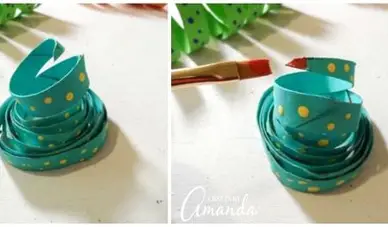
Making Cardboard Tube Coiled Snakes is a fun and easy reptile-themed craft—perfect for kids learning about animals, celebrating jungle themes, or just enjoying a creative recycling project! 🐍
🐍 DIY Cardboard Tube Coiled Snakes
Perfect for: Animal crafts, preschool activities, or jungle-themed parties.
🧻 Materials Needed:
- 1–2 empty cardboard tubes (toilet paper or paper towel rolls)
- Paint or markers (greens, browns, or fun patterns)
- Scissors
- Googly eyes or paper circles
- Red construction paper or felt (for tongue)
- Glue
- Optional: string (to hang it), glitter, stickers
🛠️ Instructions:
1. Flatten & Cut the Tube
- Gently flatten the tube to make cutting easier.
- Cut the tube into a spiral strip starting from one edge and working around in a coil toward the center.
- You’ll end up with a long, curling snake shape.
2. Paint or Decorate
- Paint the snake green, brown, or any fun color (try rainbow or jungle patterns!).
- Add dots, stripes, or diamond patterns using markers, paint, or even stamps.
- Let dry completely.
3. Add the Face
- Choose one end to be the snake’s head.
- Glue on googly eyes or draw them on.
- Cut a small red paper forked tongue and glue it under the “head” end.
4. Optional: Hang Your Snake
- Punch a hole in the “head” and tie on a piece of string to hang it so it dangles and spins like a real snake.
🐍 Fun Add-Ons:
- Add glitter for a magical snake.
- Use pipe cleaners or beads for texture.
- Teach patterns (ABAB, ABCABC) by painting the coils in color sequences.
Would you like a printable spiral cutting template or snake skin pattern ideas?
15. School of Cardboard Tube Fish
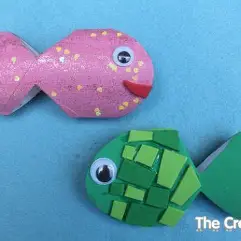
Creating a School of Cardboard Tube Fish is a colorful and engaging ocean-themed craft that’s perfect for classrooms, under-the-sea parties, or rainy-day fun! 🐠🌊
🐟 DIY Cardboard Tube Fish Craft
Perfect for: Ocean units, preschool art, or summer crafts.
🧻 Materials Needed:
- Empty cardboard tubes (toilet paper rolls work great)
- Acrylic paint or markers (bright, tropical fish colors)
- Googly eyes or paper circles
- Construction paper or tissue paper (for fins and tails)
- Scissors
- Glue or tape
- Optional: glitter, sequins, yarn for hanging
🛠️ Instructions:
1. Flatten and Cut the Tube
- Flatten one end of the tube and glue or staple it shut to make the fish face.
- Cut the other end into a V shape (or just flatten and glue in the opposite direction) to form a tail fin.
2. Paint the Body
- Paint the tube in bright fish colors (like orange, blue, yellow, or pink).
- Add dots, stripes, or scales with markers, sponges, or stamps.
- Let dry completely.
3. Add Eyes and Details
- Glue on googly eyes near the closed end for the fish’s face.
- Use markers or cutouts to add a smile or gills.
4. Add Fins and Tails
- Cut fins from construction paper or tissue paper.
- Glue one fin on top, one on the bottom, and decorate the tail if desired.
- You can fringe the tail end for a flowy effect.
5. Optional: Create a School of Fish
- Make multiple fish in different colors and sizes.
- Hang them from a mobile, classroom ceiling, or a blue posterboard “ocean wall.”
- Use yarn or fishing line to hang them in a 3D “swim” display.
🐠 Learning Tie-Ins:
- Use different fish shapes and colors to teach patterns, sorting, or counting.
- Label each fish with a letter or name for classroom displays.
Would you like:
- Printable fin and tail templates?
- Ideas for specific fish types (clownfish, angelfish, etc.)?
- A group activity version for a classroom bulletin board?
16. Cardboard Tube Children & Snowmen
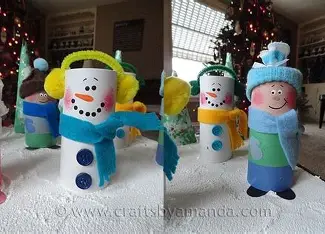
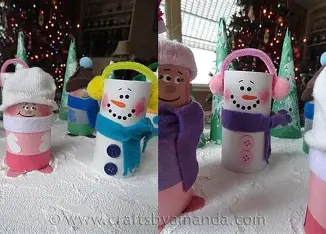
These adorable children and snowmen made of cardboard tubes create a charming Christmas décor piece for any room in the house. You can make scarves and hats out of discarded mittens!
17. Cardboard Tube Ghoul Family
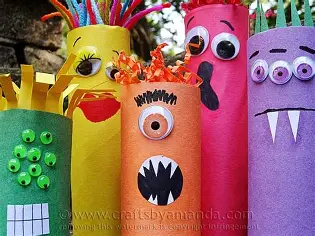
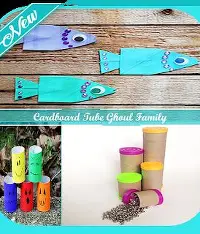
Creating a Cardboard Tube Ghoul Family is a spooky-fun Halloween craft that’s perfect for kids and families who love making seasonal decorations using recycled materials! 👻🎃
👻 DIY Cardboard Tube Ghoul Family
Perfect for: Halloween décor, classroom displays, or a creepy-cute craft session at home.
🧻 Materials Needed:
- Cardboard tubes (toilet paper or paper towel rolls)
- White, black, gray, green, and purple paint or construction paper
- Googly eyes or paper circles
- Glue or glue stick
- Scissors
- Markers or paint pens
- Optional: gauze, tissue, cotton balls, glitter, felt
🧟♂️ Ghoul Family Members (Ideas):
- 👻 Ghost
- Paint the tube white or wrap in white paper.
- Add big black eyes and a mouth (round or “O” shaped).
- Optional: wrap loosely with tissue paper or gauze for a “floating” ghost look.
- 🧟 Zombie
- Paint the tube green or gray.
- Add stitches, scars, and a scary expression with markers.
- Tear small pieces of fabric or paper to glue on as tattered clothes.
- 🧛 Vampire
- Paint the tube black (cloak) with a pale face area.
- Draw or glue on fangs, red eyes, and a widow’s peak.
- Use red or purple paper for a cape—glue it around the back.
- 🧙 Witch
- Paint the tube green or purple.
- Add a black pointy hat (cut from construction paper).
- Glue on yarn or paper hair.
- Decorate with a broom or potion bottle drawn on.
- 💀 Skeleton
- Paint the tube black.
- Use white paint or marker to draw ribcage, bones, and a skull face.
🛠️ Assembly Instructions:
- Paint or Wrap Tubes
- Use bright or spooky colors for each character. Let dry fully before decorating.
- Add Faces & Features
- Use googly eyes or draw expressive eyes, mouths, scars, fangs, etc.
- Cut out and glue on accessories (hats, hair, cloaks).
- Display Together!
- Stand them in a row like a creepy little family.
- Use as table décor, on a mantel, or as part of a Halloween village scene.
🎃 Tips:
- Add names to each ghoul (e.g., “Granny Ghoul,” “Baby Boo,” “Count Tubeula”).
- Place them on a spooky cardboard stage or graveyard backdrop.
- Insert LED tealights inside for a glowing effect!
Would you like:
- Printable face and accessory templates?
- A haunted house backdrop to match the ghoul family?
- Instructions for turning the ghouls into puppets or treat holders?
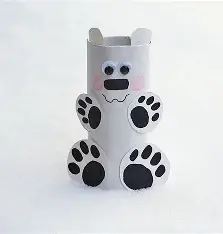
Another adorable animal craft that your child might do while learning facts and the value of polar bears in the wild.

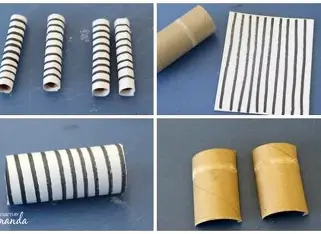
Creating a Cardboard Tube Zebra is a fun and educational craft—perfect for zoo animal themes, safari studies, or just some creative recycling time! 🦓✨
🦓 DIY Cardboard Tube Zebra
Perfect for: Animal units, preschool crafts, or jungle-themed activities.
🧻 Materials Needed:
- Empty toilet paper roll (cardboard tube)
- White and black paint or white paper & black markers
- Googly eyes or paper circles
- Black construction paper or yarn (for mane and tail)
- Scissors
- Glue or tape
- Optional: pipe cleaners for legs, pink marker for cheeks
🛠️ Instructions:
1. Paint or Wrap the Tube
- Paint the entire tube white and let it dry completely.
- OR wrap it in white paper if you prefer a no-paint option.
2. Add Zebra Stripes
- Use black paint, marker, or cut black paper strips to make vertical or diagonal stripes all around the tube.
3. Create the Face
- Choose one end to be the head side.
- Glue on googly eyes or draw them.
- Add small paper ears (white with pink centers) at the top.
- Draw or glue on a black oval for the nose/muzzle.
4. Make the Mane & Tail
- Cut thin strips of black paper or use black yarn for the mane.
- Glue them along the top of the tube (from head to middle).
- For the tail, tape a small bunch of yarn or a narrow strip of black paper to the back/bottom of the tube.
5. Optional: Add Legs
- Use 4 short black pipe cleaners, bend into “L” shapes, and glue or tape them to the bottom.
- Or draw legs on a paper base and glue the zebra tube on top.
🦓 Fun Add-Ons:
- Make a cardboard savanna scene with trees and grass for your zebra to stand in.
- Pair with other cardboard animals like a giraffe, elephant, or lion.
- Use it in a “zoo” diorama or story time activity.
Would you like:
- Printable ear and stripe templates?
- A lesson plan tie-in for learning about African animals?
- Instructions to turn it into a rocking zebra toy?