Absolutely! Upcycling is a fun, eco-friendly way to transform old or unused items into something beautiful or functional. Here are some creative DIY upcycling projects to spark your imagination and help give new life to forgotten treasures:
🎨 Home Decor & Furniture
1. Drawer Shelves
Old dresser drawers can be painted and mounted on the wall as quirky, vintage-style shelves. Add hooks underneath for keys or mugs.
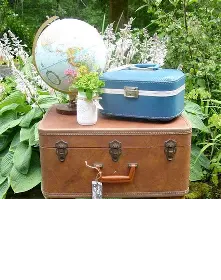
2. Suitcase Side Table
Stack vintage suitcases or attach legs to one to create a unique side table with hidden storage.
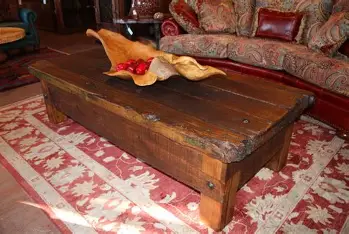
3. Pallet Coffee Table
Reclaim wooden pallets to build a rustic coffee table. Add wheels for mobility and a glass top for a refined touch.
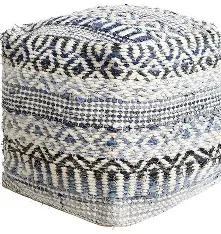
4. T-shirt Yarn Rug
Cut old t-shirts into strips, braid or crochet them into a colorful rug for your living room or bathroom.
🌿 Garden & Outdoor Ideas
5. Tin Can Lanterns
Punch holes into used tin cans, paint them, and place tea lights inside for lovely outdoor lanterns.
6. Boot Planters
Turn worn-out rain boots into whimsical planters. Great for kids’ gardens or porch decorations.
7. Ladder Plant Stand
Repurpose a wooden ladder as a vertical plant stand. Paint or distress it for a shabby chic vibe.
🛠 Functional Upcycled Items
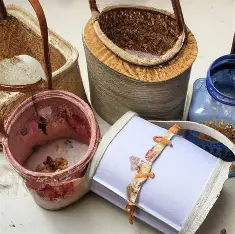
8. Mason Jar Organizers
Attach hose clamps to a wooden board, secure mason jars inside, and hang on the wall for a bathroom or kitchen organizer.
9. Denim Pocket Organizer
Cut pockets from old jeans and sew them onto a canvas or hang them as a wall organizer for tools, art supplies, or mail.
10. Keyboard Key Magnets
Pop keys off an old keyboard, glue magnets to the back, and stick them on your fridge with messages or initials.
🎁 Gifts & Personal Items
11. Book Planter
Hollow out an old hardcover book, waterproof the inside, and plant succulents in it for a unique gift.
12. CD Mosaic Art
Break old CDs into small pieces and use them to create mosaic frames, mirrors, or wall art with a holographic finish.
13. Lightbulb Terrariums
Remove the filament from old lightbulbs and turn them into tiny hanging terrariums or mini vases.
🧵 Clothing & Accessories
14. Sweater Mittens
Repurpose a wool sweater into cozy mittens. Use a simple pattern and line with fleece for extra warmth.
15. Scarf from Old T-Shirts
Braid or loop strips from soft old t-shirts into a chunky infinity scarf—no sewing needed.
Would you like a printable guide, tutorial links, or project ideas for specific materials (like glass, fabric, or plastic)?
- Wine Cork Bulletin Board
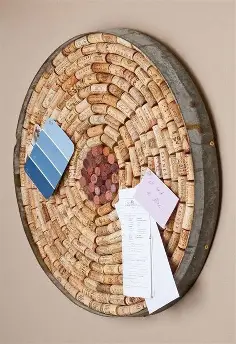

A bulletin board can be made by adhering wine corks together. This project is a creative method to show reminders, notes, and pictures.
2. Drawer Planter Box
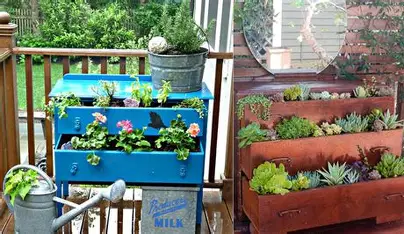
A drawer planter box is a charming and eco-friendly way to reuse old furniture! Here’s a step-by-step guide to help you turn an old drawer into a beautiful planter:
🌿 DIY Drawer Planter Box
🧰 Materials Needed:
- An old wooden drawer (dresser drawers work great)
- Sandpaper
- Paint or wood stain (optional)
- Drill with drainage bit
- Landscaping fabric or plastic liner (optional)
- Potting soil
- Plants or flowers
- Handles or legs (optional, for raised design)
- Protective sealant (optional, for outdoor use)
🪚 Instructions:
1. Clean and Sand
- Clean the drawer thoroughly.
- Sand down any rough edges or peeling paint to prep for painting or sealing.
2. Add Drainage Holes
- Drill a few small holes in the bottom of the drawer to prevent waterlogging your plants.
3. Paint or Decorate (Optional)
- Paint, stain, or decorate the drawer to match your outdoor or indoor décor.
- Consider stenciling plant names, floral patterns, or rustic designs.
4. Seal the Wood (for Outdoor Use)
- Apply a waterproof sealant to protect against weather damage if placing outdoors.
5. Line the Drawer (Optional)
- Add a layer of landscaping fabric or a plastic liner (with holes poked for drainage) to extend the life of the wood.
6. Fill with Soil and Plants
- Add potting soil, then plant flowers, herbs, succulents, or even small vegetables.
7. Add Legs or Mount (Optional)
- Attach short table legs, vintage chair legs, or even caster wheels for mobility.
- Alternatively, mount the drawer to a wall or fence for a vertical planter.
🌸 Plant Suggestions:
- For sunny spots: Petunias, marigolds, herbs like basil or thyme.
- For shady spots: Ferns, impatiens, coleus.
- Succulent option: Use well-draining soil and mix with cacti or jade plants.
💡 Creative Twist Ideas:
- Use multiple drawers stacked in a tiered fashion for a vertical garden.
- Add chalkboard labels to the front to identify plants.
- Paint each drawer a different color for a fun, eclectic look.
Would you like a visual layout, printable PDF, or even a project checklist?
3. Spoon Handle Coat Hooks
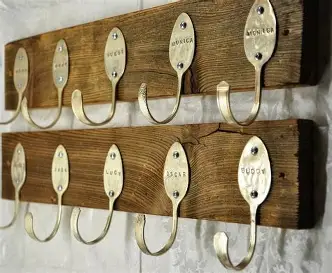
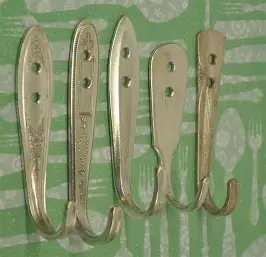
Make fashionable coat hooks out of those spoon handles. Cut off the spoons’ handles first. Next, use a hammer and a vice to bend the handles into a hook shape. When your spoon handle hooks are done, mount them to your wall or a piece of repurposed wood.
4. Old Tire Ottoman

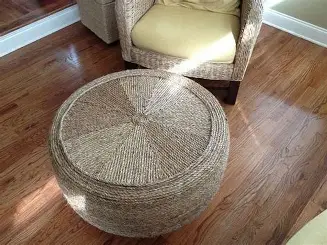
An old tire ottoman is a fantastic upcycling project—stylish, durable, and surprisingly easy to make. Here’s a detailed guide to turn a used tire into a cozy and chic piece of furniture:
🛞 DIY Old Tire Ottoman
🧰 Materials Needed:
- 1 old tire (clean and dry)
- MDF or plywood circles (2 pieces, cut to fit the tire opening)
- Thick rope (e.g., sisal or jute) – approx. 100–150 feet
- Hot glue gun and plenty of glue sticks (or construction adhesive)
- Drill and screws
- Staple gun (optional)
- Fabric (optional, for a cushioned version)
- Foam (optional, if making a soft top)
- Furniture legs or casters (optional)
🪚 Instructions:
1. Clean the Tire
- Scrub the tire thoroughly with soap and water.
- Let it dry completely.
2. Cut the Wood Circles
- Trace the diameter of the tire opening onto MDF or plywood.
- Cut two circles (one for the top, one for the bottom).
- Screw one into the bottom of the tire using a drill and screws to close off the base.
3. Attach the Top (Optional Cushion)
- For a soft-top ottoman:
- Cut foam and fabric to cover the second wood circle.
- Staple the fabric tightly around the back of the wood.
- Then screw the cushion top onto the tire.
- For a full rope design:
- Screw the top wood circle in place first, then begin wrapping rope over it.
4. Wrap with Rope
- Starting from the center of the top, coil and glue the rope in a tight spiral.
- Continue wrapping around the entire tire, gluing as you go.
- Be patient and press firmly—hot glue sets quickly!
5. Add Legs or Casters (Optional)
- Attach furniture legs or wheels to the base for mobility or elevation.
6. Seal (Optional)
- Spray or brush on a sealant to protect against stains or fraying.
🪑 Styling Tips:
- Use natural jute rope for a coastal/boho look.
- Paint the rope for a colorful or ombré design.
- Add decorative studs or handles for flair.
🛋️ Where to Use It:
- Living room footrest
- Patio furniture (add a waterproof sealant!)
- Kids’ playroom (very sturdy and fun)
Would you like a printable instruction sheet, materials shopping list, or modern vs rustic design ideas for the ottoman?
5. Skateboard Shelf
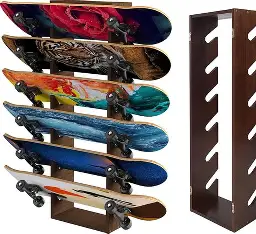
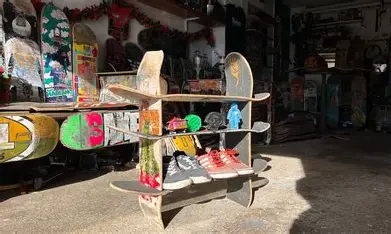
You can upcycle a skateboard into a stylish bookcase. Mount the board on a wall after attaching some brackets to it. This project is ideal for a sports enthusiast’s den or a kid’s room.
6. Bathtub Sofa

A bathtub sofa is the ultimate upcycling statement piece—quirky, vintage, and surprisingly comfy when done right! Whether you’re going for a retro glam look or industrial chic, turning an old clawfoot tub into a sofa creates a stunning and unique piece of furniture.
Here’s how to make your own:
🛁 DIY Bathtub Sofa
🧰 Materials Needed:
- Old cast iron or steel bathtub (clawfoot tubs work best)
- Angle grinder or jigsaw (with metal-cutting blade)
- Protective gear (gloves, goggles, mask)
- Sandpaper or sanding discs
- Rust-resistant primer and paint
- Cushions, upholstery foam, or a custom bench seat
- Fabric or vinyl (for upholstered seating)
- Optional: throw pillows, legs, or a back panel for added comfort
✂️ Step-by-Step Instructions:
1. Choose and Prep Your Tub
- Find an old clawfoot or freestanding tub. Flea markets, salvage yards, or classified ads are goldmines.
- Clean it thoroughly inside and out. Remove any hardware.
2. Mark the Opening
- Use chalk or masking tape to mark the area you’ll cut out for the seating—typically a wide front panel.
- Leave enough of the sides for structural support and comfort.
3. Cut the Tub
- Using an angle grinder or jigsaw with a metal-cutting blade, carefully cut out the front panel.
- ⚠️ Safety Tip: Wear full protective gear—cutting cast iron or steel can create sparks and sharp edges.
- Smooth the edges with a metal file or sander.
4. Sand and Paint
- Sand the exterior to remove old paint or rust.
- Apply a rust-inhibiting primer.
- Paint with a durable metal paint (spray or brush-on). Glossy white, pastel, or bold colors work well depending on your style.
5. Create the Seat
- Measure the opening and cut foam to fit.
- Cover the foam with upholstery fabric or vinyl, using a staple gun to secure it to a plywood base if needed.
- Alternatively, use pre-made bench cushions or make a custom one.
6. Decorate and Finish
- Add throw pillows, a blanket, or even LED strip lighting underneath for flair.
- Attach wooden or metal legs if you want to raise the sofa or change the angle.
💡 Style Inspiration:
| Theme | Paint & Fabric Ideas |
|---|---|
| Vintage Glam | Gold claw feet, blush pink velvet cushion |
| Industrial | Matte black tub, leather seat, rivet details |
| Coastal | Seafoam green paint, striped cushion |
| Boho | Hand-painted designs, eclectic mix of pillows |
🏡 Perfect For:
- Living rooms or lounges
- Boutique shops or salons
- Outdoor covered patios (with waterproof cushions)
Would you like design mockups, printable plans, or links to examples and tutorials?
7. Old Window Picture Frame

An antique window can be transformed into a lovely picture frame. Replace the glass panes with your favourite pictures, clean the window, and paint it if needed. This project gives your home’s dcor a unique touch.
8. Vintage Suitcase Pet Bed
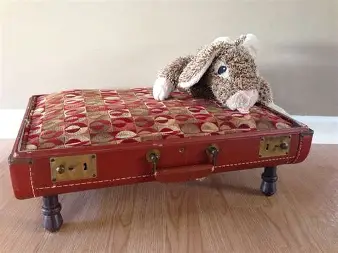
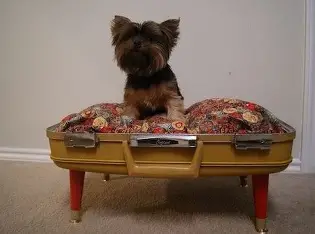
A vintage suitcase pet bed is a stylish and cozy upcycling project that adds charm to your home and comfort for your furry friend. It’s simple to make, budget-friendly, and works great for small to medium pets—especially cats and small dogs.
Here’s how to create your own:
🧳 DIY Vintage Suitcase Pet Bed
🧰 Materials Needed:
- 1 vintage suitcase (hard-sided, clean, and sturdy)
- Pillow or foam cushion (to fit inside the suitcase)
- Fabric to cover the cushion (optional)
- Short furniture legs, bun feet, or blocks (optional for elevation)
- Drill and screws (or strong glue)
- Hot glue gun (optional for fabric)
- Pet-safe paint or sealant (optional)
- Optional: stuffing, buttons, or decorative touches
🐾 Step-by-Step Instructions:
1. Pick the Right Suitcase
- Choose a hard-shell suitcase with a sturdy lid and no sharp edges.
- Make sure it’s the right size for your pet to lie down comfortably.
2. Clean and Prep
- Clean thoroughly with mild soap and water.
- Remove any inner lining or partitions that might be dusty or worn.
3. Secure the Lid (Optional)
- If you don’t want the lid to stay open:
- Remove it entirely for a “basket” style bed.
- Or attach safety chains or hinges to keep it at a safe angle.
4. Add Legs (Optional)
- For a raised bed, attach short legs or feet to the bottom:
- Drill small pilot holes and screw them into place.
- Or use industrial-strength glue if you can’t drill.
- Elevation adds style and keeps the bed off cold floors.
5. Make the Cushion
- Use a store-bought pillow, foam insert, or repurpose old bedding.
- Cover it with soft fabric that matches your decor.
- Sew or glue fabric around the cushion for a tailored look.
6. Assemble and Decorate
- Place the cushion inside the suitcase.
- Add optional finishing touches like your pet’s name tag, a bow, or a mini blanket.
🐶 Design Ideas:
| Style | Details |
|---|---|
| Retro Chic | Polka dot fabric, mid-century feet, pastel paint |
| Rustic Farmhouse | Burlap cushion cover, wooden bun feet, neutral tones |
| Glam Pet Pad | Velvet cushion, gold-painted suitcase, button tufting |
| Travel Theme | Vintage travel stickers, map-printed fabric, passport tag |
🏡 Best Places to Use:
- Living rooms as a stylish pet nook
- Bedrooms for a cozy sleeping spot
- Entryways or reading corners for multi-purpose charm
Would you like printable instructions, fabric suggestions, or help matching the suitcase bed style to your interior design?
9. Bicycle Wheel Clock
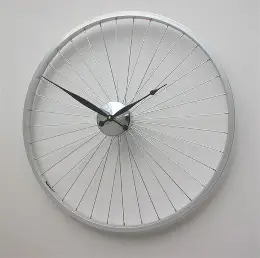
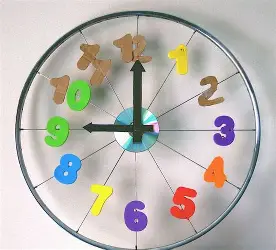
You can make a unique wall clock out of an old bicycle wheel. Hang the clock on a wall after attaching the hands and numbers on the wheel. This project is a stylish way to keep track of time.
10. Glass Bottle Vase
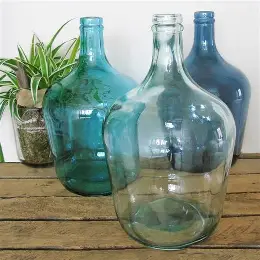
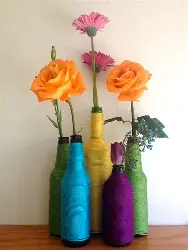
Turning a glass bottle into a vase is one of the easiest and most beautiful upcycling projects you can do—plus, it adds a personal, artsy touch to your space using something you’d normally toss or recycle.
Here’s how to make your own DIY Glass Bottle Vase in a variety of styles:
🧪 DIY Glass Bottle Vase
🧰 Materials (Basic Version):
- Empty glass bottle (wine, soda, or olive oil bottles work great)
- Hot soapy water
- Goo remover or rubbing alcohol
- Flowers or dried stems
✨ Steps:
1. Clean the Bottle
- Soak it in warm, soapy water for 30–60 minutes.
- Peel off any labels; use rubbing alcohol or goo remover for leftover residue.
- Let it dry completely.
2. Optional: Cut the Bottle (For a Short Vase)
- Use a bottle cutting kit or a glass cutter with heat/cold shock method.
- Sand the cut edges with fine sandpaper or a glass sanding block until smooth.
🎨 Decoration Ideas
1. Painted Bottles
- Use acrylic or glass paint to add patterns, stripes, or abstract designs.
- For a frosted look, use frosted glass spray paint.
- Metallic paints (gold, silver, copper) look chic and modern.
2. Twine-Wrapped Rustic Vase
- Wrap twine, rope, or jute around the bottle and secure with hot glue.
- Cover the whole bottle or just the neck for a rustic/farmhouse style.
3. Etched Glass Vase
- Use glass etching cream and stencils to create permanent patterns or quotes.
- Apply cream, wait as directed, and rinse for a frosted effect.
4. Chalkboard Label
- Paint a square of chalkboard paint and write labels like “Grow,” “Love,” or seasonal greetings.
- Great for gifting or wedding decor!
5. Beaded or Fabric-Wrapped
- Use scrap fabric, lace, ribbon, or beads to wrap and embellish the bottle for a boho or romantic look.
🌼 How to Style It
| Use It For… | Pair With… |
|---|---|
| Table centerpieces | Fresh cut flowers, eucalyptus, or wheat stems |
| Single-stem display | Long-stem roses, pampas grass, or lavender |
| Outdoor lantern | Fill with fairy lights or battery tea lights |
| Mini herb holder | Basil, mint, rosemary with chalkboard labels |
♻️ Bonus Tips:
- Mix different shapes and heights for a vignette display.
- Upcycle colored glass bottles for instant impact—think green, cobalt blue, or amber.
- Add water-tinted with food coloring for a cool twist in transparent bottles.
Would you like ideas for seasonal versions (e.g. fall, holiday), party/wedding decor, or group display layouts for your bottle vases?
11. Wooden Crate Shoe Rack
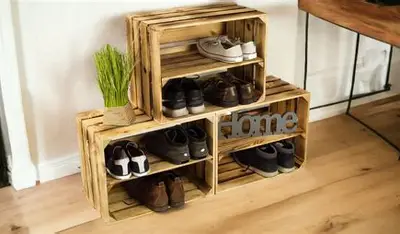
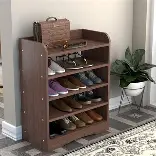
You can make a shoe rack out of wooden crates by stacking them. This idea is simple, practical, and keeps your foyer neat.
12. Tin Can Planters
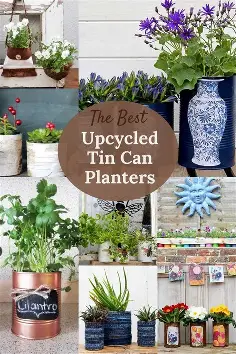
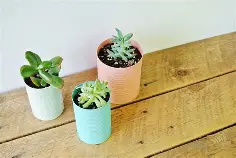
Tin can planters are a fun, eco-friendly way to upcycle cans into cute containers for herbs, flowers, succulents, or even small vegetables. They’re perfect for indoor windowsills, balconies, or garden decor—and best of all, they’re super affordable and customizable.
🪴 DIY Tin Can Planters
🧰 Materials Needed:
- Empty tin cans (soup, beans, coffee, etc.)
- Hammer and nail (or drill with a small bit)
- Potting soil
- Plants or seeds
- Optional: paint, twine, washi tape, fabric, stencils, labels
🧑🌾 Step-by-Step Instructions
1. Clean and Prep
- Wash out the can thoroughly and remove the label.
- Sand any sharp edges around the rim for safety.
2. Add Drainage
- Use a nail and hammer or a drill to punch a few holes in the bottom for water drainage.
- Place a saucer or small tray underneath if using indoors.
3. Decorate (Optional but Fun!)
- Paint: Use spray paint, acrylic paint, or chalk paint. Seal with a clear coat for durability.
- Wrap: Try jute rope, fabric, or washi tape for a rustic or colorful touch.
- Stencil/Label: Write plant names or add cute messages with a chalkboard label or stencil.
4. Plant Your Greenery
- Add a layer of small pebbles (for drainage) if desired.
- Fill with potting soil.
- Plant herbs (basil, thyme, mint), succulents, or small flowers.
- Water gently and place in appropriate sunlight.
🌿 Creative Style Ideas
| Style | Materials & Finish |
|---|---|
| Rustic Farmhouse | Burlap wrap + jute twine + chalkboard label |
| Modern Minimalist | Matte white or black paint + metal label or clean font |
| Boho | Colorful patterns + pom-pom trim or washi tape |
| Industrial Chic | Leave bare metal, polish it, and stencil numbers |
🏡 Where to Use Tin Can Planters
- Windowsills – Great for growing fresh kitchen herbs.
- Balcony railing – Hang with twine or attach to railings with clamps.
- Wall-mounted – Screw into a board or wooden pallet for a vertical garden.
- Table centerpiece – Group several with seasonal flowers for a rustic touch.
🧠 Bonus Tips:
- Use larger cans (like coffee or paint cans) for bigger plants.
- Want to avoid rusting? Line the inside with a plastic cup or coat with a waterproof sealant.
- Punch small side holes to add hooks or hangers for vertical or hanging displays.
Would you like printable plant labels, a list of easy herbs to grow in cans, or ideas for making a full vertical tin can garden?
13. Mason Jar Lanterns
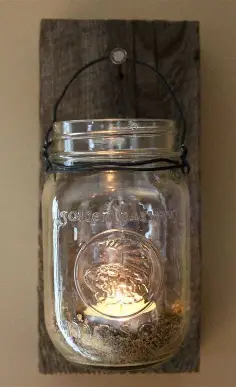
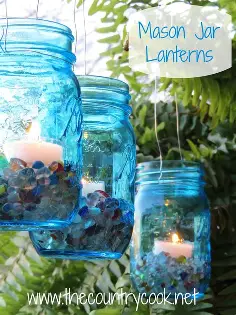
Beautiful lanterns can be made out of Mason jars. Simply hang it from a hook and place a candle or fairy lights inside the jar. These lanterns can be used as a dinner table centrepiece or to offer a cosy glow to your outdoor area.
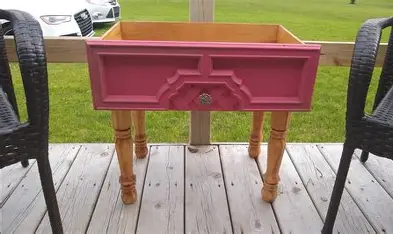
14. Suitcase Side Table
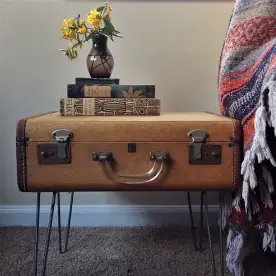
A suitcase side table is a perfect blend of vintage charm and functionality—a fantastic way to give an old suitcase a stylish new purpose. It’s ideal for living rooms, bedrooms, entryways, or even as a quirky nightstand.
Here’s your full guide to creating a DIY suitcase side table:
🧳 DIY Suitcase Side Table
🧰 Materials Needed:
- 1 vintage hard-shell suitcase (flat-bottomed works best)
- Table legs or stool base (4 wooden legs, hairpin legs, or an old stool)
- Drill and screws (or strong adhesive if avoiding screws)
- Measuring tape and pencil
- Wood for internal support (optional, for sturdiness)
- Paint or wood stain (optional, to match your decor)
- Furniture pads (optional, to prevent floor scratches)
🛠️ Step-by-Step Instructions
1. Choose the Right Suitcase
- Look for one with a hard, flat bottom and a sturdy structure.
- Clean it thoroughly, inside and out.
- Remove any broken hardware or lining if needed.
2. Prep the Legs
- Choose your base style:
- Wooden furniture legs: found at hardware or furniture stores.
- Metal hairpin legs: for a modern look.
- Upcycled stool or small table base: for easy repurposing.
- Stain or paint the legs if you want to match a specific color scheme.
3. Attach the Legs
- Flip the suitcase upside down.
- Measure and mark where each leg will go—make sure they’re evenly spaced and level.
- Option 1: Drill through the bottom of the suitcase into the legs (use washers for extra support).
- Option 2 (No drill): Glue a plywood insert inside the suitcase and screw the legs into that.
4. Reinforce the Interior (Optional)
- Add a wooden base inside the suitcase if the bottom is soft or unstable. You can also use this to add a hidden storage compartment under the table’s surface.
5. Add Finishing Touches
- Add decorative paper, fabric, or velvet lining inside for a luxury look.
- Attach furniture pads to the bottom of each leg.
- Use the inside for hidden storage—books, remotes, or other small items.
🪑 Style Ideas
| Style | Suggestions |
|---|---|
| Vintage Chic | Distressed suitcase + cabriole legs + floral lining |
| Industrial | Metal suitcase + pipe legs + exposed hardware |
| Boho/Travel Theme | Stickers, maps, or passport-themed liner |
| Modern Minimalist | Monochrome paint + sleek hairpin legs |
🏡 Where to Use It
- Bedside Table – With room inside for books or electronics
- Living Room Accent Table – Display plants, candles, or a lamp
- Entryway Organizer – Store gloves, sunglasses, or mail
- Reading Nook Storage – Pair with a cozy chair and blanket inside
Would you like a printable project sheet, leg style recommendations, or travel-themed design ideas for your suitcase side table?
15. Denim Ottoman
Why not make a stylish ottoman out of some old denim pants you have laying around? Sew the jeans shut after stuffing them with filling and adding legs. This project is a creative and useful method to recycle used apparel.
16. Old Door Coffee Table
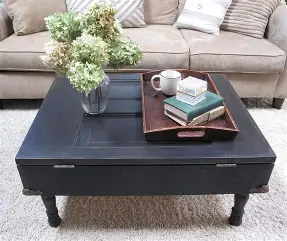
An old door coffee table is a bold and beautiful upcycling project that transforms architectural salvage into a functional statement piece. It adds instant character and history to your home—and best of all, you can customize it to match nearly any style, from rustic farmhouse to industrial loft.
🚪 DIY Old Door Coffee Table
🧰 Materials Needed:
- 1 solid wood door (preferably panel-style, not hollow-core)
- Saw (circular or jigsaw, if cutting the door)
- Sander or sandpaper (medium + fine grit)
- Wood filler (optional, for smoothing dents)
- Table legs, hairpin legs, or a repurposed base
- Paint, stain, or sealant
- Glass top (optional, for a smooth surface)
- Screws, brackets, and drill
- Optional: storage crate or shelf underneath
🛠️ Step-by-Step Instructions
1. Choose and Prep Your Door
- Look for a solid, vintage door—panel-style doors work well visually.
- Remove any hardware, nails, or hinges.
- If needed, cut the door to the size you want for your table (standard coffee table size: ~48″ x 24″).
2. Sand and Fill
- Sand the entire door surface smooth, especially if the paint is chipping.
- Use wood filler to smooth out any major dents or gaps (especially if you’re not going for a distressed look).
- Wipe clean.
3. Paint, Stain, or Distress
- Rustic look: Dry brush with chalk paint, then distress edges.
- Modern look: Clean white or black paint with clean lines.
- Natural wood: Stain and seal to highlight the grain.
- Apply a polyurethane top coat or wax seal for durability.
4. Attach the Legs
- Choose your base style:
- Hairpin legs – for a mid-century modern vibe.
- Turned wood legs – for a farmhouse feel.
- Repurposed base – like an old bench or crates.
- Use screws and brackets to attach legs securely to the underside of the door.
5. Add a Glass Top (Optional)
- For a smooth, drink-friendly surface, have a piece of tempered glass cut to size and place it over the top.
- This is especially useful if the door has recessed panels.
🪑 Design Ideas
| Style | Details |
|---|---|
| Farmhouse | White distressed paint, chunky wood legs, clear glass top |
| Industrial | Dark-stained door, matte black pipe legs, metal accents |
| Vintage Boho | Bright painted panels, mismatched legs, stenciled details |
| Minimalist | Smooth finish, neutral tones, sleek hairpin legs |
🏡 Great Uses For:
- Living room coffee table with storage baskets underneath
- Patio table (sealed for outdoor use)
- Conversation piece in studios or lounges
- Entryway bench-table hybrid with added hooks or a mirror above
Would you like:
- Design mockups for different styles?
- A shopping list for materials?
- A guide to choosing the right door (types, sizes, etc.)?
Let me know how hands-on or design-focused you want the project to be!
17. Pallet Garden
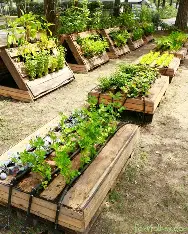
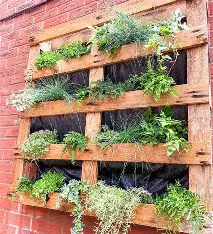
Why not make a vertical garden out of old wooden pallets? Just attach your pallet to a wall, fill it with dirt, and plant your preferred flowers or herbs. For people who enjoy gardening but have little outdoor space, this project is ideal.
18. Ladder Bookshelf
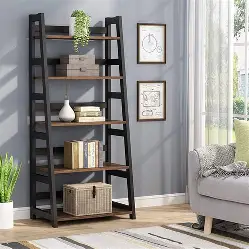
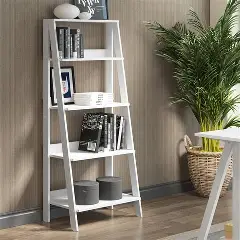
A ladder bookshelf is a clever and eye-catching upcycle project that adds vertical storage and rustic charm to any space. Whether you use a whole ladder or just part of one, it can become a stylish shelf for books, plants, or décor items.
Here’s a full guide on how to turn an old ladder into a bookshelf—plus a few creative variations:
🪜 DIY Ladder Bookshelf
🧰 Materials Needed:
- 1 old wooden ladder (A-frame or straight)
- Wood planks (for shelves)
- Sandpaper or sander
- Paint, stain, or sealant (optional)
- Screws or brackets
- Drill and level
- Optional: L-brackets, wood glue, wall anchors (for stability)
🛠️ Step-by-Step Instructions
Option 1: Leaning Ladder Shelf (Straight Ladder)
1. Prep the Ladder
- Clean and sand down the ladder to remove dirt and splinters.
- Paint or stain it, or keep the weathered look for rustic style.
2. Cut and Add Shelves
- Cut wood planks to fit across the rungs horizontally.
- Secure them in place using brackets, nails, or wood glue.
- For a leaning style: Place the base of the ladder on the floor and lean it against the wall. The shelves will tilt slightly back, so items stay in place.
3. Secure It
- Attach the top of the ladder to the wall using wall anchors or hooks for safety.
Option 2: A-Frame Ladder Shelf (Step Ladder)
1. Open the Ladder
- Use both sides of an A-frame ladder as supports.
- Place planks across each set of rungs, starting with wider planks at the bottom and narrower ones at the top.
2. Attach Shelves
- Rest the shelves on the rungs or screw them in from below.
- Optionally use small L-brackets for extra support.
3. Style and Decorate
- Add books, baskets, plants, and personal décor.
- You can even add string lights or hanging plants to elevate the look.
🖌️ Styling Ideas
| Style | Finish & Décor Ideas |
|---|---|
| Rustic Farmhouse | Whitewashed or stained wood, mason jars, baskets |
| Industrial | Black-painted ladder + reclaimed wood shelves |
| Scandi Minimal | Natural wood + clean white planks, light decor |
| Boho | Bright painted ladder + patterned textiles, succulents |
📚 Creative Variations
🔧 Repurposed Ladder Ideas:
- Wall-mounted ladder shelf – Hang a ladder horizontally and use the rungs as mini shelves or towel bars.
- Hanging bookshelf – Suspend a ladder from the ceiling with chains and place boards across the rungs.
- Corner ladder shelf – Cut an A-frame ladder in half and mount it in a corner with triangular shelves.
🏡 Where to Use It:
- Living room – Books, plants, framed photos
- Bathroom – Towels, baskets, small storage
- Kitchen – Cookbooks, jars, herbs
- Bedroom – Nightstand alternative or décor storage
Would you like:
- A visual layout/mockup?
- A material shopping checklist?
- Plans for a folding ladder desk combo or other hybrid pieces?
Let me know how you’d like to use the shelf, and I can tailor the design!
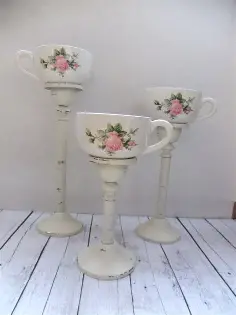
19. Teacup Candle Holder

Why not make a beautiful candle holder out of an old teacup and saucer set you have laying around? Start by giving the teacup and saucer a good cleaning. Next, pour some melted wax into the teacup (you may do this with used candle stubs). Before it hardens, insert a wick into the wax. You have a lovely candle holder with a vintage feel once the wax has solidified.
20. License Plate Birdhouse
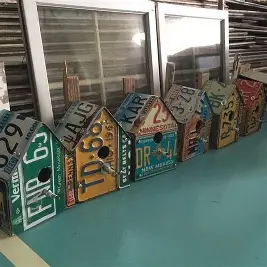
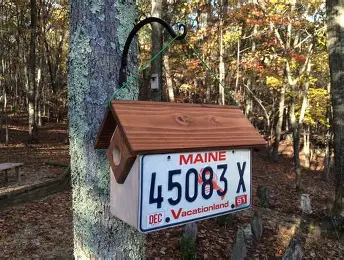
A license plate birdhouse is a charming, rustic upcycling project that blends function with Americana flair. It’s perfect for backyard bird lovers, vintage decor enthusiasts, or anyone looking to repurpose old license plates in a creative way.
🐦 DIY License Plate Birdhouse
🧰 Materials Needed:
- 1–2 old license plates (flat and not too rusted)
- Wood (scrap cedar, pine, or pallet wood work great)
- Screws or nails
- Drill and screwdriver
- Tin snips or metal shears (to cut license plates)
- Sandpaper
- Wood glue (optional)
- Paint or stain (optional)
- Hinges (optional, for cleanout access)
🛠️ Step-by-Step Instructions
1. Cut and Prepare the Wood
- Cut wood pieces to build a simple birdhouse box:
- Front & Back Panels: ~6″–8″ wide x 8″–10″ tall
- Sides: ~5″–6″ wide x 6″–8″ tall
- Base: matches the width/depth of your box
- Drill a 1¼” hole in the front for small birds (e.g., wrens, chickadees).
- Sand all edges and surfaces.
2. Assemble the Wooden Box
- Nail or screw the front, back, sides, and bottom together.
- Add wood glue to joints for extra strength (optional).
- Leave the top open for now—that’s where the license plate goes!
3. Shape the License Plate Roof
- Bend a license plate in half (carefully!) using a straight edge or table corner to create a peaked roof.
- For a flat roof: Use two plates and overlap them slightly.
- Use tin snips to trim edges if needed (gloves recommended—metal edges can be sharp).
4. Attach the License Plate Roof
- Screw the license plate directly onto the top of the birdhouse.
- Drill pilot holes to prevent the metal from splitting the wood.
5. Add Hanging or Mounting Hardware
- Drill a small hole at the back for hanging.
- Or screw directly onto a post, tree, or fence.
- Consider adding a hinged panel for easy cleaning later.
🧑🎨 Style Variations
| Style | Details |
|---|---|
| Rustic Farmhouse | Natural wood + vintage, weathered plate |
| Patriotic Americana | Red, white, and blue paint + a state license plate |
| Industrial | Dark-stained wood + shiny plate with metal rivets |
| Whimsical Garden | Bright painted wood + colorful old plate and fun patterns |
🐤 Tips for Bird-Friendly Design
- Use untreated wood to avoid harming birds.
- Add small drainage holes in the bottom.
- Don’t include a perch—many bird species don’t need them and it deters predators.
- Mount it in a quiet, shaded area 5–10 feet above ground.
♻️ Bonus Ideas for License Plates
- Roof shingles for garden sheds
- Wall art or signs (“Welcome” or “Bird Crossing”)
- Key holders or hooks
Would you like a printable plan, bird species guide for your region, or ideas for matching garden décor to go with your birdhouse?