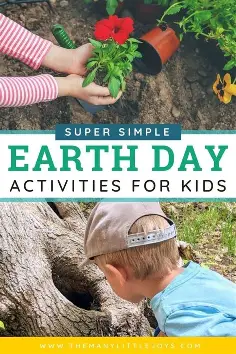
Sure! Here are some fun Earth Day activities for celebrating and appreciating our planet. These activities are great for individuals, families, classrooms, or communities:
🌱 Outdoor Activities
- Plant a Tree or Garden
- Help offset carbon emissions and add beauty to your local area.
- Nature Scavenger Hunt
- Create a list of natural items to find (leaf, rock, feather, flower).
- Park or Beach Cleanup
- Gather friends and family to remove litter from natural areas.
- Hiking or Nature Walk
- Explore a local trail and observe wildlife and plants.
- Bird Watching
- Bring binoculars and a guidebook to identify local birds.
♻️ Sustainable Living Activities
- DIY Recycled Crafts
- Make art or useful items from old jars, cardboard, or bottle caps.
- Start a Compost Bin
- Learn how to turn food scraps into rich soil for gardening.
- Eco-Friendly Home Audit
- Identify ways to reduce waste, energy, and water use at home.
📚 Educational Activities
- Watch a Nature Documentary
- Choose one that explores ecosystems, wildlife, or climate change.
- Read Environmental Books
- Select books about nature, conservation, or Earth heroes.
- Create a Climate Change Poster
- Design something educational to raise awareness at school or online.
🧑🤝🧑 Community & Group Activities
- Host a Clothing Swap
- Reduce textile waste by trading gently used clothes with others.
- Organize a Car-Free Day
- Encourage walking, biking, or carpooling in your community.
- Join a Local Earth Day Event
- Attend fairs, workshops, or environmental talks near you.
🌎 Creative Activities
- Make an Earth Day Pledge
- Write down one habit you’ll change to help the environment.
- Earth-Themed Art or Poetry
- Express your love for nature through creative writing or painting.
- Build a Bug Hotel
- Help pollinators and insects by creating a safe space for them.
Would you like printable worksheets, event ideas for schools, or suggestions for kids of a certain age?
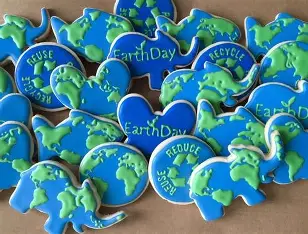
- Earth Day Cookies – Mom Does Reviews
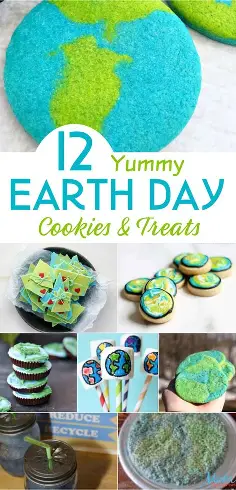
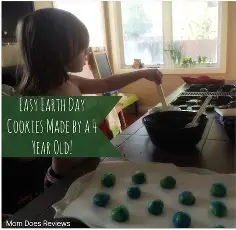
Oh my goodness, these cake mix cookies look really amazing! Those hues! That swelliness! This recipe for Earth Day cookies is fantastic.
2. Earth Day Microwave Mochi – Squirrels of a Feather
Here’s a festive and eco‑friendly twist on Microwave Mochi—perfect for celebrating Earth Day with a little “Squirrels of a Feather” flair! 🐿🌍
🌿 Earth Day Microwave Mochi Recipe
Ingredients
- 1 cup mochiko (sweet glutinous rice flour) cookinghawaiianstyle.com+1food.com+1thefoodietakesflight.com+13dirtydishesmessykisses.com+13allrecipes.com+13
- 1 cup water cookanyday.com+8dirtydishesmessykisses.com+8allrecipes.com+8
- ¼–½ cup sugar, to taste
- Optional flavor additions: matcha powder, cocoa, fruit purees (think green!) foodandwine.com
- Fillings (eco‑conscious picks): red bean paste, black sesame paste, or chopped seasonal fruit (like strawberries or mango) the350degreeoven.com+6alenashen.com+6alenashen.com+6
- Potato starch, cornstarch, or desiccated coconut (for dusting) athomewiththeresa.com+6alenashen.com+6dirtydishesmessykisses.com+6
Directions
- Mix dry & wet: In a microwave-safe bowl, whisk mochiko, water, sugar, and optional flavoring until smooth and lump-free allpurposeveggies.com+12onehungrymish.com+12dirtydishesmessykisses.com+12.
- Microwave step:
- 2 min on high → stir → another 1 min → stir. Mochi is done when slightly translucent and stretchy alenashen.com+14alenashen.com+14sunset.com+14.
- Prep your surface: Dust a tray with potato starch (or coconut) and turn out the hot mochi to cool slightly.
- Fill & shape:
- Cut into 8–16 pieces, depending on size.
- Flatten each piece, place ~1 tbsp filling or fruit in the center, then wrap and pinch edges to seal into round dumplings allrecipes.com+6onehungrymish.com+6athomewiththeresa.com+6alenashen.com+1alenashen.com+1.
- Optional dusting: Roll each mochi in starch or coconut to prevent sticking.
🌏 “Squirrels of a Feather” Earth Day Twist
- Colors of Nature:
- Use matcha for green, butterfly-pea tea for blue vibes food.comonehungrymish.com+1food.com+1.
- Dust with green tea powder or natural food coloring—perfect for a forest squirrel theme!
- Nature-inspired fillings:
- Fill with nuts and seeds, or fruit to mimic nuts squirrels love.
- Eco-friendly presentation:
- Serve on a wooden tray, with edible flowers or leaves as decoration.
🍡 Earth Day Activity Ideas
- DIY food coloring tour: Show kids how to make natural dyes using spinach (green), beet juice (red), or tea.
- Seed-planting wrappers: Gift mochi wrapped in compostable paper embedded with wildflower seeds.
- Earth pledge notes: Have guests pair mochi-making with pledges written on recycled paper.
🎁 Storage & Serving Tips
- Store at room temperature in an airtight container, ideally within 24 hours alenashen.comfood.com3jamigos.com+2dirtydishesmessykisses.com+2alenashen.com+2.
- For longer storage, freeze individually and microwave to thaw when serving.
Enjoy crafting these chewy treats while celebrating Earth’s vibrant colors and textures. Then, nibble them with gratitude for our planet’s bounty! Would you like printable recipe cards or kid-friendly handouts to go with this?
3. Earth Day Cupcakes – DessAarts

With these adorable Earth Day cupcakes that have swirled marbled frosting, Urvashee truly made something unique.
4. Earth Day Cookie Bites – The Decorated Cookie
Here’s a vibrant, bite‑sized way to celebrate Earth Day with Earth Day Cookie Bites from The Decorated Cookie! These mini globe-themed sweets are fun to decorate, perfect for all ages, and a festive addition to any eco-celebration. prettypetunias.com+11thedecoratedcookie.com+11thedecoratedcookie.com+11
🌍 Ingredients You’ll Need
- Cut‑out sugar cookie dough (homemade or store‑bought) allrecipes.com+10thedecoratedcookie.com+10thedecoratedcookie.com+10
- Royal icing, divided into five small bowls thedecoratedcookie.com+1thedecoratedcookie.com+1
- Food coloring: blue, green, yellow, white, black sherisilver.com+1thedecoratedcookie.com+1
- Baking tools: mini round cutter, piping bags/ziplocs (5), decorating tip (#2 or 3), rubber bands, toothpick or scriber tool allrecipes.com+6thedecoratedcookie.com+6thedecoratedcookie.com+6
🥣 How to Make Them
- Bake & cool cookies
Roll out chilled dough, use mini cutter to cut circles, bake per recipe, then cool completely. raisingveggielovers.com+13thedecoratedcookie.com+13thedecoratedcookie.com+13 - Prep your icing colors
Mix royal icing and split into five bags/bowls. Tint one thick black, and the rest (blue, green, yellow, white) slightly fluid for popping. allrecipes.com+11thedecoratedcookie.com+11thedecoratedcookie.com+11 - Decorate each cookie
- Outline with black icing.
- Flood with blue for oceans.
- Dot green in between for continents.
- Add white/yellow swirls for clouds.
- Use a toothpick to swirl these colors together, creating a marbled “planet” effect. farmwifecrafts.com+13thedecoratedcookie.com+13thebearfootbaker.com+13fabeveryday.comshortgirltallorder.comsherisilver.com+6thedecoratedcookie.com+6thebearfootbaker.com+6
- Let them dry
Allow icing to set completely overnight before serving. reddit.com+11thedecoratedcookie.com+11thebearfootbaker.com+11
🌟 Tips for Success
- Go messy! Imperfections give each cookie a unique Earth‑like look—no precise geography needed. bitzngiggles.com
- Use gel colors—they provide vibrant hues without thinning the icing.
- Simplify for kids: Use blue frosting with green sugar sprinkles and swirl white drizzle—no piping needed! b-inspiredmama.com
🎨 Why These Shine on Earth Day
- Educational & Delicious: Kids learn about colors, continents, and ocean-themed design.
- Creative and Hands-On: A great activity for classrooms, community events, or family gatherings.
- Eco-Minded Twist: Serve with compostable plates, and after decorating, play an Earth Day game like a recycle relay or tree-planting pledge!
🕒 Storage & Serving
- Store in an airtight container at room temperature for up to 5–7 days.
- Make ahead: Bake cookies and decorate 1–2 days before your event—just be sure icing fully dries first.
📋 Need More?
Would you like a printable instruction sheet, kid-friendly coloring/activity sheet to pair with the cookie decorating, or ideas for pairing cookies with Earth Day crafts? Just let me know!
5. Wholesome Dirt Pudding Cups – Yummy Mummy Kitchen
Who knew dirt could look so incredibly appetising? Marina truly went above and above with these dirt cups, which are packed with a variety of intriguing and healthful ingredients.
6. Raw Beetroot Salad Lettuce Wraps – My Pure Plants

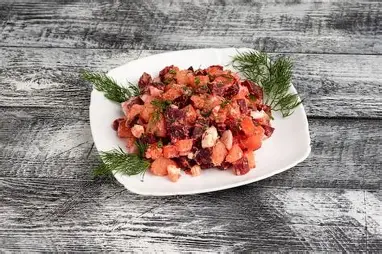
Here’s a delicious, nutrient-packed spin on Raw Beetroot Salad Lettuce Wraps, inspired by My Pure Plants and other vibrant beet root recipes! These wraps combine crunchy leaves with fresh, colorful beetroot salad for a refreshing plant-based meal.
🥗 Ingredients
For the Beetroot Salad:
- 2–3 fresh raw beetroots, peeled and grated veganwithgusto.com+3ascensionkitchen.com+3realgreekrecipes.com+3mymarketkitchen.tv
- 1 carrot, grated (optional for color & sweetness)
- ½ apple, finely diced or grated for a sweet crunch nutritionstudies.org
- 2 Tbsp raw pumpkin seeds or chopped nuts (for texture & protein) phoebespurefood.com+14ascensionkitchen.com+14mariaushakova.com+14
- Fresh herbs: dill, parsley, or mint (choose your favorite) veganwithgusto.com
Dressing:
- 2–3 Tbsp lemon juice or vinegar (lemon, balsamic, or apple cider)
- 2–3 Tbsp olive oil or pumpkin-seed oil (omit for oil‑free) rawplantkitchen.com+3cookingforpeanuts.com+3fitnessfirst.com.au+3
- Salt and pepper, to taste
- Optional extras: Dijon mustard, capers, garlic, or a hint of curry powder goodnessavenue.com+4healthylittlevittles.com+4realgreekrecipes.com+4phoebespurefood.com
Wraps:
- Large lettuce leaves, such as romaine, butter, collard greens, or iceberg leaves (rinsed and patted dry)
🥬 Instructions
- Prep salad base
In a large bowl, combine grated beetroot, carrot, apple, seeds/nuts, and herbs. foodwastefeast.com+9ascensionkitchen.com+9veganwithgusto.com+9ascensionkitchen.com+3nutritionstudies.org+3mariaushakova.com+3 - Mix dressing
Whisk together lemon/vinegar, oil (if using), salt, pepper, and any extras until well combined. - Dress the salad
Pour dressing over salad ingredients and toss thoroughly to ensure even coating. Let it marinate for at least 30 minutes to allow flavors to meld. - Assemble wraps
Lay lettuce leaves flat, spoon the beet salad into each leaf, then fold or roll gently into bite-sized wraps. - Serve & enjoy
These are perfect as appetizers, light lunches, or vibrant snack bites.
🌿 Why You’ll Love It
- Raw & nutrient-rich: Preserves enzymes, fiber, antioxidants—perfect for detox and digestion. lectinfreegourmet.com+1bowlofdelicious.com+1realgreekrecipes.com
- Vibrant & versatile: Bright colors, crunchy textures, and endless flavor variations. healthylittlevittles.com+1cookingforpeanuts.com+1
- Family‑ and plant-friendly: Easy to make ahead, grab‑and‑go, ideal for gatherings, picnics, or meal prep.
🔄 Variations & Serving Ideas
- Greek-style: Top with a dollop of Greek yogurt, crumbled feta, cucumber, and mint
- Crunch twist: Add toasted walnuts or candied pecans for extra texture phoebespurefood.com
- Flavor fusion: Use dukkah (Middle Eastern spice blend) or sumac for tanginess fitnessfirst.com.au+1mymarketkitchen.tv+1
💡 Storage Tips
- Keep the dressed salad in an airtight container in the fridge for up to 3 days.
- Lettuce leaves will stay crisp if stored separately and assembled just before serving.
Would you like a printable recipe card, kid-friendly visuals, or party serving ideas? I’d be happy to help!
7. Roasted Potato Peelings with Rosemary and Sea Salt – Veggie Desserts
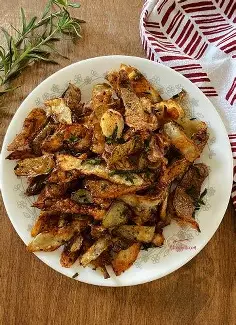
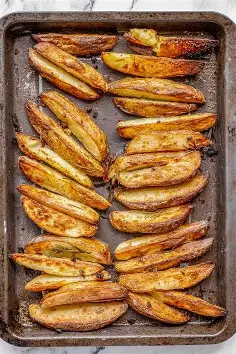
By repurposing potato peelings to create these delicious, crispy snacks that resemble potato chips, Kate demonstrates to us how to reduce waste! Excellent Earth Day concept.
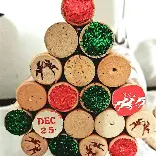
8. Earth Day Jello Balls – Squirrels of a Feather
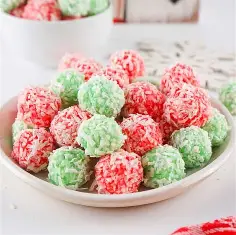
Here’s a fun, Earth-themed treat perfect for celebrating the planet: Earth Day Jello Balls from Squirrels of a Feather. These blue-and-green spheres look like mini-globes, doubling as a playful sensory snack with Oreo “dirt” and whipped cream “clouds.”
🌍 Earth Day Jello Balls Recipe
🍬 Ingredients
- 1 pack lime (green) Jello
- 1 pack berry blue Jello
- ¾ cup heavy whipping cream (for green layer; can substitute cold water)
- Gel food coloring (optional, for deeper green) foodmeanderings.com+7squirrelsofafeather.com+7squirrelsofafeather.com+7
- Oreo cookies (crushed into “dirt”)
- Whipped cream (“clouds”) squirrelsofafeather.com+1squirrelsofafeather.com+1
- Cooking spray (to grease molds) squirrelsofafeather.com+2squirrelsofafeather.com+2notimeforflashcards.com+2
🛠 Tools
- Sphere molds (e.g. Bella Amazing)
- Cookie sheet
- 2 bowls
- Measuring cup & spoons
- Spoons for stirring
🧩 Instructions
1. Make the Jello Mixtures
- Boil 2 cups of water.
- In bowl #1, combine blue Jello with 1 cup boiling water; stir 2 minutes.
- In bowl #2, combine green Jello with 1 cup boiling water; stir 2 minutes. Add a few drops of gel coloring if desired. squirrelsofafeather.com+3squirrelsofafeather.com+3squirrelsofafeather.com+3
- To blue mix, add ¾ cup cold water; stir.
- To green mix, add ¾ cup heavy cream; stir to enhance color separation. squirrelsofafeather.com+1squirrelsofafeather.com+1
2. Chill Until Slightly Set
- Refrigerate both bowls for 25–40 minutes, just until mixtures begin to thicken but aren’t firm. squirrelsofafeather.com
3. Prep Sphere Molds
- Spray molds lightly with cooking spray, wipe excess. Place on cookie sheet for stability. squirrelsofafeather.com
4. Fill and Seal
- Spoon green and blue layers into molds—no need to fully fill or layer precisely; casual swirling works.
- Tap molds gently to remove bubbles and help layers settle. riananelson.com+3squirrelsofafeather.com+3squirrelsofafeather.com+3
- Close molds, securing silicone lids until they “click.”
5. Refrigerate to Set
- Chill overnight (or at least 8 hours) until fully set. squirrelsofafeather.com
6. Serve Earth-Style
- Remove spheres gently from molds.
- Plate on Oreo “dirt” and top with whipped cream “clouds.” squirrelsofafeather.com+3squirrelsofafeather.com+3squirrelsofafeather.com+3
🌟 Why This Works for Earth Day
- Looks like the planet – blue and green layers mimic land and oceans.
- Hands-on sensory fun – kids can mix, tap, and serve with interactive toppings.
- Flexible & festive – change colors for other celebrations or keep it simple for general fun.
💡 Tips & Trivia
- Use gel food coloring to enhance green vibrancy. squirrelsofafeather.com+2pinterest.com+2pinterest.com+2pieceofpie.ca+10squirrelsofafeather.com+10squirrelsofafeather.com+10
- Adding cream to the green layer improves color contrast. squirrelsofafeather.com+2squirrelsofafeather.com+2squirrelsofafeather.com+2
- Let molds chill long enough—opening too soon causes collapse. pieceofpie.ca
🍽️ Storage & Serving
- Keep refrigerated until serving; best eaten the same day of un-molding.
- For a sensory station, place balls in bowls of Oreo crumbs and topping options.
Would you like a printable recipe card, jelly mold recommendations, or activity ideas to go with these tasty Earth globes?
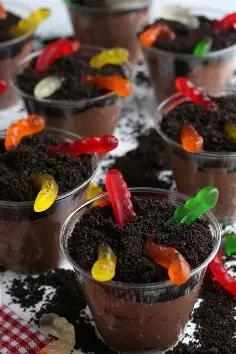
9. Earth Day Dirt Cups – 5 Minutes for Mom

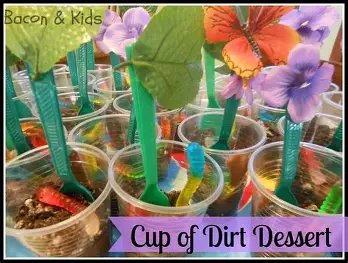
With an abundance of delicious “dirt” and slurp-licious gummy worms, Janice and Susan made these incredibly cute dirt cups! The perfect balance of delicious and disgusting!
10. DIY Little Fairy Home – My Sweet Things
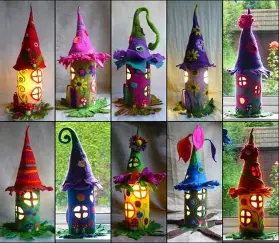
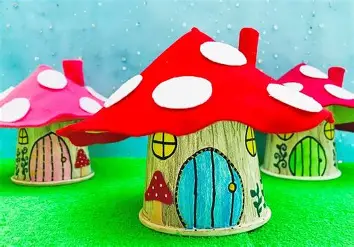
Here’s a charming DIY to build your own Little Fairy Home, inspired by My Sweet Things. Delightfully simple, upcycled, and perfect for Earth Day fun or everyday magic in the garden 🌿.
🏡 Materials You’ll Need
- Empty milk carton (washed and dried) jennifermaker.com+6sweethings.net+6reddit.com+6
- Tree leaves, small pebbles, cardboard, assorted nature finds from your yard sweethings.net
- Glue gun & wood glue (or stronger like Gorilla Glue) sweethings.net
- Optional: Hot glue gun, for extra hold on stones youtube.com+14sweethings.net+14thedecoratedcookie.com+14
✂️ Step-by-Step Directions
1. Prep the Carton Base
- Use a clean milk carton as the structure—no cutting needed unless you want a door or window. sweethings.net+3ourbeautifullymessyhouse.com+3wehavekids.com+3
- Some folks spray-prime the carton to help paint or glue adhere—optional but helpful if you paint it first.
2. Shape the Roof
- Trace a circle on cardboard, score lines to bend it into a dome shape, and glue to the top for a rustic roof frame. sweethings.net
- Cover with tree leaves and glue securely. Let a thin layer of white glue soak through for added strength. sweethings.net
3. Decorate Walls & Windows
- Create a tiny door or windows with cardboard scraps—kids’ hands are great for drawing on those shapes. etsy.com+11sweethings.net+11diyncrafts.com+11
- Adorn the walls with small pebbles or bark—use generous glue for a solid hold. sweethings.net
4. Glue It All Together
- Hot glue is fine for general use, but Gorilla glue or waterproof wood glue ensures durability outdoors.
5. Add Finishing Touches
- Natural extras like tiny sticks, moss, acorn caps, or wildflowers bring whimsical charm. diyncrafts.com
- Sprinkle pebbles around for a path and lay bark or moss as a cozy base. mommyonpurpose.com+15thepioneerwoman.com+15wehavekids.com+15
🌱 Eco & Creativity Wins
- Upcycled and zero‑waste: transforms a simple milk carton and found-foraged items into something magical. mommyonpurpose.com+4reddit.com+4reddit.com+4
- Fun for all ages: perfect for engaging kids in creative nature play and teamwork.
- Outdoors‑ready: sturdy glue and natural materials make it suitable for patio or garden display.
💬 Real-Life Tips from Fairy Garden Fans
“Going with found items from outside. Gorilla glue for wooden structures holds up the best.” reddit.com
“I used Gorilla Glue for wood, and in some places just a regular hot glue gun.” reddit.com
🛠 Variation Ideas
- Wooden birdhouse base: paint, varnish, then apply bark and stones—more durable for long-term outdoors. sewmuchado.com
- Pot or jar base: invert a clay pot or mason jar, add miniature door and moss for indoor fairy decor.
🌸 Display & Play Ideas
- Set in a potted fairy garden or flowerbed.
- Add battery-powered fairy lights or a tiny lantern for evening glow.
- Invite little ones to create fairy furniture or craft a twig bench. laurascraftylife.comthedecoratedcookie.com
Would you like a printable guide, list of kid-friendly decorating ideas, or a materials checklist? Let’s bring the magic to life!
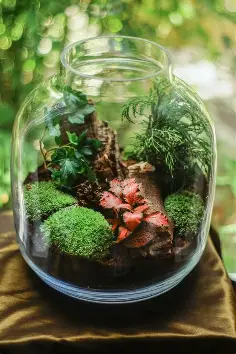
11. How to Make a Succulent Terrarium – Mom Advice
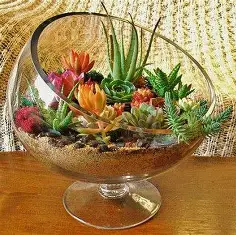
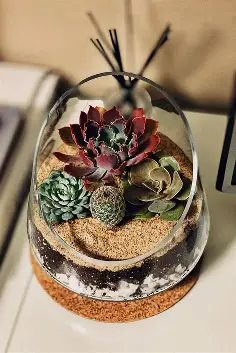
Amy assures us that even those with poor gardening skills can create this chic layered terrarium with low-maintenance succulents! Take a look.
12. DIY Doggy Poo Backpack – The Carpenter’s Daughter
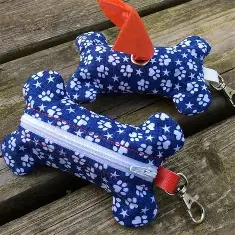

Here’s a practical and charming DIY project from The Carpenter’s Daughter-inspired style: the DIY Doggy Poo Backpack, a fabric poop‑bag holder that clips onto your dog’s leash—or your belt—so you’re always prepared during walks!
🐶 What You’ll Need
- Fabric scraps (~10×10 in) – quilting cotton, canvas, faux leather, etc. weallsew.com+12ageberry.com+12thecarpentersdaughter.co.uk+12
- Fusible interfacing or quilt batting (optional for sturdiness) seekatesew.com+1seekatesew.com+1
- 7–10″ zipper
- Tab piece & swivel hook (lobster or carabiner) to clip onto leash seekatesew.comseekatesew.com+1seekatesew.com+1
- Basic sewing tools: machine, thread, scissors, pins, ruler fabricartdiy.com+2weallsew.com+2seekatesew.com+2
✂️ Step‑by‑Step Instructions
- Cut Fabric Pieces
- Two side panels: ~4″×3″
- Two zipper side panels: ~4″×3″
- One tab: ~3″×6″ sawsonskates.com+13seekatesew.com+13seekatesew.com+13sawsonskates.com+2happiestcamper.com+2happiestcamper.com+2
- Add Interfacing
- Fuse interfacing or batting to fabric panels for structure.
- Create the Tab
- Fold tab edges ¼″ inwards, then fold in half, top‑stitch ⅛″ from edge.
- Thread through swivel hook, stitch to secure. cascadiannomads.com+7seekatesew.com+7seekatesew.com+7
- Sew Zipper Panels
- Affix zipper between the two zipper panels, right sides together.
- Top‑stitch edges and attach tab at the end. happiestcamper.com+2thecarpentersdaughter.co.uk+2seekatesew.com+2seekatesew.com+1seekatesew.com+1
- Add Dispensing Opening
- On one side panel, mark and cut a small oval/buttonhole. Finish raw edges with zigzag or buttonhole stitch. cascadiannomads.com+4seekatesew.com+4thecarpentersdaughter.co.uk+4
- Assemble the Pouch
- With zipper open, place side panels (right sides facing zipper panels), aligning edges.
- Sew all around with ¼″ seam, leaving corners unstitched. fabricartdiy.com+11seekatesew.com+11freshlyfuji.com+11
- Finish Corners & Turn
- Snip corners, turn right‑side out, poke out edges neatly. weallsew.com
- Insert Bags & Clip On
- Use zipper to refill roll. Pull first bag through the oval opening.
- Clip pouch onto leash, belt loop, or backpack. sawsonskates.com+2instructables.com+2happiestcamper.com+2seekatesew.comfreshlyfuji.com+2seekatesew.com+2freshlyfuji.com+2
🌟 Why It Works
- Customizable & reusable: Sew in fun patterns or use eco‑friendly fabrics.
- Keeps bags handy: Never forget one again!
- Great gift: Add a roll of biodegradable bags and you’ve got a perfect, thoughtful present. fabricartdiy.com+12happiestcamper.com+12instructables.com+12
💡 Pro Tips
- Apply interfacing if using lightweight cotton for durability.
- Got scrap leather or vinyl? Use it! Even faux leather looks sleek. happiestcamper.com+4ageberry.com+4weallsew.com+4
- Use high-contrast fabric and zipper for easier location in a bag.
Would you like a printable pattern, cut‑and‑sew PDF, or video tutorial recommendations? I can also suggest kid‑friendly versions if you’re sewing together!
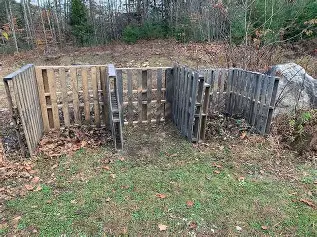
13. DIY Compost Bin from Wood Pallets – Pink Fortitude
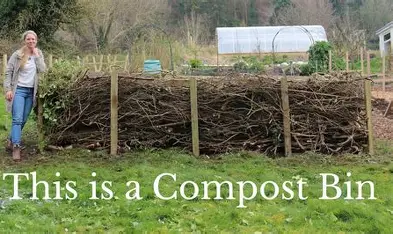
This wood pallet compost bin is just one of many fantastic do-it-yourself projects that Holly shares on her blog. Composting is a wonderful way to show your world that you care, even if it’s not Earth Day! I wish I had a garden so I could do this myself!
14. DIY Beeswax Wraps – Crafta Invaders
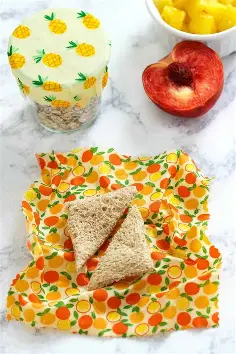

Here’s a delightful, eco-friendly DIY to make your own beeswax food wraps, perfect for reducing plastic use and celebrating crafty sustainability with Crafta Invaders! 🐝🌍
✨ Why Beeswax Wraps?
- Reusable, washable alternatives to plastic wrap—last up to 1 year with care christines-crafts.com+14thespruceeats.com+14ehow.com+14
- Naturally moldable and slightly tacky, thanks to beeswax, resin, and oil en.wikipedia.org
- Compostable at end-of-life—no landfill waste epicurious.com+4en.wikipedia.org+4bees4life.org+4
🧰 Materials You’ll Need
- 100% cotton or linen fabric (washed) in sizes 8×8″, 10×10″, etc. bees4life.org+3abeautifulmess.com+3ilsr.org+3
- Food-grade beeswax pellets or grated blocks (≈½ oz per 8×8″ wrap) bees4life.org+15ilsr.org+15goodhousekeeping.com+15
- Optional: pine resin & jojoba or coconut oil for extra stickiness and flexibility epicurious.com+1thespruceeats.com+1
- Parchment paper, pinking shears (to prevent fraying), baking sheet or ironing board, and paintbrush or iron en.wikipedia.org+15abeautifulmess.com+15goodhousekeeping.com+15
🔥 Two Easy Methods
1. Oven Method
- Preheat oven to 90–150 °C (~200–300 °F) .
- Place fabric on parchment-lined baking sheet; evenly sprinkle beeswax (and resin/oil if using).
- Bake until wax melts (~5–10 min).
- Use a paintbrush to spread wax to all edges. Check for light spots; add wax and repeat if needed thespruce.com+12homesteadingfamily.com+12thespruceeats.com+12wgtn.ac.nz.
- Remove and hang or lay flat to cool and harden (~1 min) carolinahoneybees.com.
2. Iron Method
- Lay fabric between two pieces of parchment on ironing board.
- Sprinkle wax (± resin/oil).
- Gently iron on medium heat, pressing until wax melts and saturates fabric .
- Peel off parchment and cool wrap flat or hang (~1 min) .
🧼 Care & Use Tips
- Warm with your hands to shape around containers, cut fruit, cheese, or bread brightly.eco+9en.wikipedia.org+9farmhouseonboone.com+9.
- Clean gently with cold water and mild soap—hot water can melt wax brightly.eco+3wgtn.ac.nz+3goodhousekeeping.com+3.
- Air-dry away from heat.
- Refresh with new wax if fabric dries out or cracks. Compost old wraps after ~1 year en.wikipedia.org.
🌿 Eco Crafting & Gifting
- Upcycle scrap fabrics like pillowcases or old cotton shirts! mypoppet.com.au
- Customize sizes: small for snacks, mid-size for bowls, large for loafs.
- Package as handmade eco‑gifts—complete with pouch and care instructions!
🐝 Why It Matters
Beeswax wraps help ** reduce plastic waste**, preserve food, and bring handmade charm to your kitchen rituals kindlingwild.com+1farmhouseonboone.com+1wgtn.ac.nz+3bbc.co.uk+3nhm.ac.uk+3epicurious.com+12en.wikipedia.org+12bees4life.org+12. Even crafting a few saves money over time—mini and maxi packs alike cost ~$70/year in disposable bags versus DIY wraps .
Would you like a printable step-by-step guide, printable gift tags, or video tutorial links for this project? Happy crafting!
15. Recycled Succulent Planters – Creative Green Living
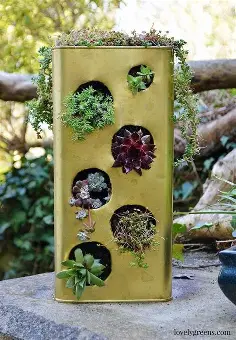
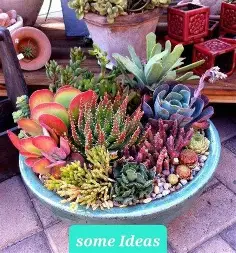
Carissa’s entire blog is filled with fantastic Earth Day activities! Her blog is a great place to visit if you’re looking for exciting Earth Day activities, and these lovely succulent planters are just one of hundreds of fantastic ideas!
16. Wine Cork Board – Amber Oliver
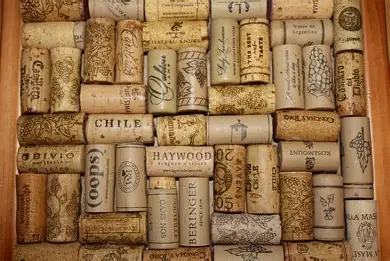
Here’s a charming tutorial for making your own Wine Cork Board, inspired by Amber Oliver’s style—perfect for organizing reminders in a creative, eco‑friendly way!
🍷 Materials Needed
- Wine corks (collect a large batch—120–170 pieces for a standard board) greenwithdecor.com+13amber-oliver.com+13girljustdiy.com+13
- Frame or base: upcycle a shoebox lid, shallow picture/shadow box, or plywood mounted in a frame
- Hot glue gun + sticks (or E6000 / super glue)
- Ribbon or twine (for hanging) savedbylovecreations.com+13amber-oliver.com+13itscourtneymichael.com+13
- Paint (optional – chalk paint, spray paint, or acrylics) jailavie.com+7itscourtneymichael.com+7simplydesigning.net+7
🛠 Step‑by‑Step Instructions
1. Prep Your Base
- Remove any glass or mat, leaving just the backing from a frame or shoebox lid jailavie.com+3jlohr.com+3savedbylovecreations.com+3.
- If needed, attach foam board or plywood to reinforce the backing greenwithdecor.com+13jailavie.com+13instructables.com+13.
2. (Optional) Paint
- Paint the base and/or some cork ends for a pop of color factotum-of-arts.com+13amber-oliver.com+13itscourtneymichael.com+13.
3. Design & Layout
- Arrange whole corks first in your desired pattern (brick, vertical/horizontal alternating, herringbone, circular, etc.) jailavie.wordpress.com+3jailavie.com+3jlohr.com+3.
4. Glue Corks in Place
- Use hot glue on each cork’s bottom and sides. Work from the center outward jlohr.com+1itscourtneymichael.com+1.
- Trim corks at edges with a serrated knife to fill gaps jlohr.com.
5. Add Hanging Option
- For a shoebox lid version, poke two small holes and thread ribbon or twine to hang .
- For framed boards, attach sawtooth or D‑rings on the back .
💡 Pro Tips
- Soak corks in a water–vinegar mix first to reduce odor youtube.com+14instructables.com+14instructables.com+14.
- Select corks of similar height for a flat surface—cut any extras to match jailavie.wordpress.com+2jailavie.com+2itscourtneymichael.com+2.
- Seal with a wood‑finish for shine and durability jlohr.com+13instructables.com+13savedbylovecreations.com+13.
🎨 Design Inspiration
- Brick or grid pattern: neat and even (see circular board image).
- Paint accents: use color pops or spray paint sections for a decorative twist amandaseghetti.com.
- Whimsical shapes: arrange corks in circles, hearts, or monogram letters .
⏱ Quick Facts
| Aspect | Details |
|---|---|
| Time | ~30 min setup (plus drying/pattern layout) |
| Cost | ~$1 if repurposing items + free corks |
| Cork Count | ~120–170 corks depending on size/base |
✅ Why It’s Great
- Upcycles used corks for a functional and decorative home item.
- Customizable style—choose shape, paint, and layout to suit your space.
- Easy to use—perfect for pinning notes, photos, or reminders in offices, kitchens, or entryways.
Would you like a printable instructions sheet, pattern ideas, or supplier suggestions for corks and glue? Happy crafting!
17. DIY Mason Bee House – Turning Back the Clock
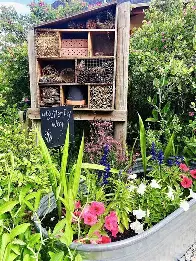
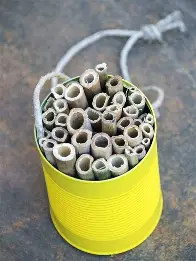
Even though Diane’s blog is all about green living, I have a particular soft spot for this do-it-yourself mason bee house! Because we don’t give bees the respect they deserve, this do-it-yourself bee house is the ideal Earth Day project. Take care of your bees!
18. Upcycled Mini Pot Planters – Projects with Kids
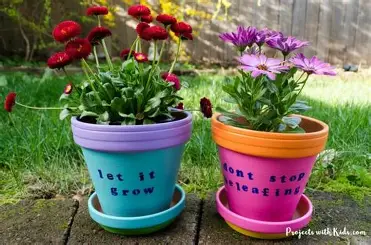
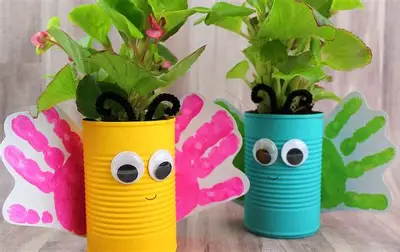
Here’s a delightful and eco-friendly DIY for Upcycled Mini Pot Planters, inspired by Projects with Kids—perfect for creative fun with children while teaching sustainability! 🌱
🧰 Materials You’ll Need
- Small terracotta or plastic pots, or use empty yogurt cups, tin cans, milk/juice cartons cchobby.com+10reddit.com+10projectswithkids.com+10
- Craft materials: paint, washi tape, decorative paper, googly eyes, stickers, or fabric scraps familyfocusblog.com
- Potting soil and seeds or succulent cuttings familyfocusblog.com
- Tools: hammer & nail (for drainage holes in cans/cartons), scissors, brushes, decoupage glue or Mod Podge projectswithkids.com+9familyfocusblog.com+9handmadecharlotte.com+9
👣 Step-by-Step Guide
- Prep the Planters
- Wash and dry your containers (cans, cartons, yogurt cups).
- Make drainage holes in tin cans or plastic tubs with a hammer & nail thespruce.com+15handmadecharlotte.com+15handmadecharlotte.com+15.
- Decorate & Personalize
- Kids can paint pots in bright colors or patterns, glue on washi tape, fabric, stickers, googly eyes, or roll on decoupage glue and paper scraps .
- Let creativity shine—little characters and vibrant designs are encouraged!
- Add Soil & Seeds
- Fill the decorated pots with potting soil.
- Plant seeds, herb cuttings, or succulents. Water lightly.
- Display & Learn
- Place on windowsills, patios, or a sunny spot.
- Talk about plant needs: sunlight, water, and love! Gardening together nurtures responsibility and environmental compassion lifestyle.co.za+14greenchildmagazine.com+14handmadecharlotte.com+14nfamilyclub.com.
🌟 Why This Project Rocks
- Upcycling in action: repurposing household items like cans, cups, and cartons teaches kids about recycling and reducing waste fabeveryday.com+1thespruce.com+1.
- Creative and educational: kids express themselves through design while learning biology basics and responsibility .
- Customizable for all: scale up by using shoe planters, colanders, teacups, or even boots for bigger impact .
💡 Pro Tips & Variations
- Biodegradable pots: use newspaper, toilet rolls, or egg cartons so plants can be planted directly into the garden—no waste! sunhatsandwellieboots.com
- Fun containers: turn fruit peels, seashells, tin cans, or candle jars into whimsical planters at home countryliving.com+6cosyowl.com+6bespokegardens.xyz+6
- Drainage matters: always include holes or line the base with pebbles for healthy plant roots thespruce.com+12cosyowl.com+12sunhatsandwellieboots.com+12.
🌸 Project Summary Table
| Step | Details |
|---|---|
| Containers | Recycled cans, milk cartons, yogurt cups, terracotta, or biodegradable |
| Decoration | Paint, decoupage, washi tape, googly eyes, stickers |
| Planting supplies | Potting soil, drainage pieces (pebbles, holes), seeds or cuttings |
| Educational focus | Responsibility, ecology, plant biology |
Would you like a printable activity sheet, seed-label tags, or ideas for a green-themed craft party around these mini planters? Let me know—happy to help your garden goodies bloom!
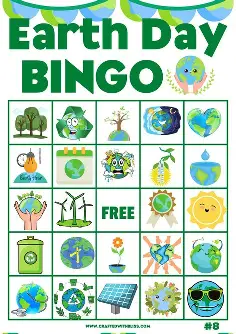
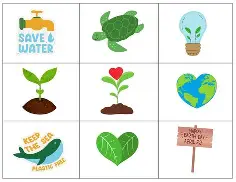
19. Free Printable Earth Day Bingo – Artsy-Fartsy Mama
This free bingo card from Lindsay at AFM is sure to delight your children. I adore how she covered her cards with transparent crystals that resemble raindrops!
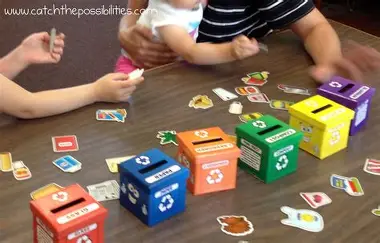
20. Preschool Recycling Activities – Blue and Hazel
Here are some engaging recycling activities for preschoolers inspired by Blue and Hazel and supplemented with proven hands-on and craft ideas:
♻️ Everyday Life & Practical Recycling
- Real‑life recycling moments: Encourage children to pick up litter or sort their lunch waste when it happens naturally—turn everyday moments into learning opportunities reddit.com+15blueandhazel.com+15twinkl.com.pk+15.
- Recycling bins at home or school: Set up labeled bins (paper, plastic, metal) and teach sorting—kids help decide where items go .
📚 Educational Lessons
- Watch a recycling plant video: Use age‑appropriate videos showing how waste is collected and transformed—kids see the journey from garbage to recycled. Suggestions include those from LeVar Burton and similar educational channels .
- Learn to make recycled paper: A slightly messy but memorable activity—create pulp, press and dry handmade paper reddit.com+12blueandhazel.com+12reddit.com+12.
🎨 Creative & Sensory Crafts
- Recycled crafts like:
- Egg‑carton caterpillars, plastic‑bottle planters, magazine‑page bead jewelry blueandhazel.com+5kokotree.com+5reddit.com+5
- Cardboard puzzles, scrap‑paper mosaics, tin‑can sculptures thealternativewaytoprek.com+3classroomjourney.com+3funfoxprogram.com.au+3
- Bottle‑cap stamping, paper‑plate masks, box town creations shinepreschool.com.au+3kokotree.com+3thealternativewaytoprek.com+3
- Sensory bins filled with clean recyclables—plastics, egg cartons, bottles—for sorting and exploring .
🎲 Games & Role‑Play
- Recycling sorting games: Lay out mixed items (plastic, paper, metal) and have kids sort with or without magnets .
- Recycling relay races: Kids pass items to bins or through obstacle courses—fun and active! ohmyclassroom.com+1reddit.com+1.
- Role‑play recycling center: Set up bins, badges, gloves, hats—kids take turns being “recycling workers” twinkl.com.pk.
🌱 Nature & Eco‑Awareness
- Composting introduction: Teach how food scraps turn into soil—kids help add compost or explore simple worm bins .
- Earth‑Day scavenger hunts: Find recyclable items or natural treasures like leaves and rocks; great outdoor activity .
📝 Literacy & Creativity
- Cut‑and‑paste sorting worksheets: Kids decide where pictures go (recycle/trash/compost); enhances fine motor skills ohmyclassroom.com+15twinkl.com.pk+15thealternativewaytoprek.com+15.
- I‑Spy recycling items: Count and identify items in pictures; reinforces recognition and counting preschoollearningonline.com+3twinkl.com.pk+3funfoxprogram.com.au+3.
- Recycling-themed word searches and lists: Build vocabulary linked to recycling twinkl.com.pk+1preschoollearningonline.com+1.
🎨 Low‑Prep Earth‑Friendly Art
- Paint with recyclables: Use bottle caps, cardboard pieces as stamps or brushes for unique textures .
- DIY watercolors: Reuse dried markers in water bottles for kid-made paints .
- Masking on paper towels or coffee-filter Earth art: Create Earth motifs using simple tools and painting techniques .
🏡 Ongoing Habits
- Use compostable plates and personal water bottles in class to reduce daily waste reddit.com+2blueandhazel.com+2thealternativewaytoprek.com+2.
- Involve kids in your recycling routines—sorting, rinsing, bin changing becomes part of their daily care for the planet .
🌟 Why This Matters
| Benefit | Explanation |
|---|---|
| Builds lifelong habits | Consistent recycling and composting instills responsibility early. |
| Enhances skills | Sorting, crafting, and playing support fine motor, cognitive, and social development. |
| Fosters eco-awareness | Kids learn why we recycle—not just that we should. |
Would you like printable worksheets, labels, or a themed activity pack to run a “Recycle Week” at preschool? I’d be happy to help design it!
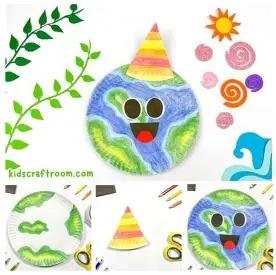
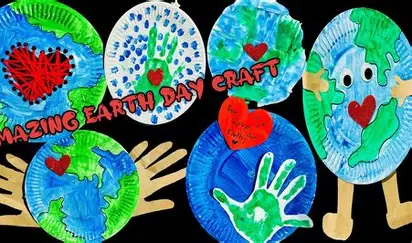
21. Paper Plate Earth Day Craft – The Inspiration Edit
For Earth Day, Angela will demonstrate how to create this adorable paper plate craft that resembles the globe!
22. Eggshell Herb Garden – Homemade Interest
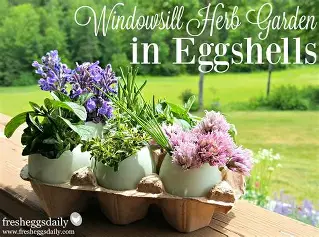
Here’s a lovely, eco‑friendly project from Homemade Interest: growing an Eggshell Herb Garden—perfect for a kitchen windowsill and a zero‑waste twist on gardening!
🥚 Why Eggshells are Great for Herbs
- They provide a natural calcium boost as the shell slowly decomposes—vital for herbs like basil, mint, oregano, thyme & rosemary motherearthliving.com+9idealhome.co.uk+9agricultureforlife.ca+9.
- Crushed shells may deter slugs and help with soil structure .
- Fully biodegradable—just plant the shell directly into a bigger pot or garden bed discovery.com+2simplybeyondherbs.com+2simplybeyondherbs.com+2.
- Stylish and zero-waste, especially when reusing Easter egg shells webmd.com+11simplybeyondherbs.com+11simplybeyondherbs.com+11.
🛠 Materials Needed
- Clean, dried eggshell halves (large size or even duck egg shells) nhm.org+2fresheggsdaily.blog+2motherearthliving.com+2
- Egg carton or small tray to hold shells nhm.org+3motherearthliving.com+3fresheggsdaily.blog+3
- Potting mix or seed starter soil
- Herb seeds (basil, chives, mint, parsley, etc.) fresheggsdaily.blog+9experiencelife.lifetime.life+9agricultureforlife.ca+9agricultureforlife.ca+1foodnetwork.com+1
- Small spoon or tweezers
- Nail or thumbtack
- Spray bottle with water stockland.com.au+9motherearthliving.com+9agricultureforlife.ca+9simplybeyondherbs.com+2nhm.org+2nhm.org+2
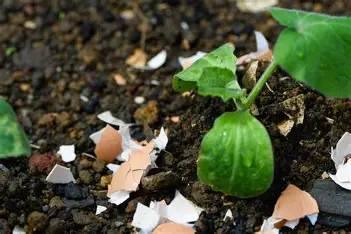
🌱 Step-by-Step Guide
- Prep your shells
- Carefully remove the top third of each egg and save the rest.
- Rinse, boil briefly to sanitize, and let air-dry completely experiencelife.lifetime.life+3discovery.com+3agricultureforlife.ca+3.
- Add drainage
- Use a nail or thumbtack to make a small hole at the bottom of each shell agricultureforlife.ca.
- Fill with soil
- Place shells upright in the egg carton, fill ~¾ full with damp potting soil simplybeyondherbs.com+13nhm.org+13mysweetgreens.com+13agricultureforlife.ca+1agricultureforlife.ca+1.
- Sow seeds
- Add 1–3 seeds per shell according to packet directions, then lightly cover with soil discovery.com.
- Water and place
- Mist gently to moisten soil without soaking.
- Set the tray in a sunny spot—windowsill is ideal simplybeyondherbs.com+1simplybeyondherbs.com+1simplybeyondherbs.com+13nhm.org+13nhm.org+13.
- Watch them grow
- Keep soil moist with daily sprays.
- Once seedlings have a few true leaves, they’re ready to transplant agricultureforlife.ca+8experiencelife.lifetime.life+8nhm.org+8.
- Transplant and enrich
- Gently crack the shell beneath the seedling and plant it in a pot or garden.
- The shell will decompose and provide a slow calcium release spar.co.za+11experiencelife.lifetime.life+11stockland.com.au+11backyardgardenersnetwork.org+5idealhome.co.uk+5agricultureforlife.ca+5.
🌿 Care Tips
- Water when soil is lightly damp—don’t overwater, as shells have limited drainage .
- If shells are too strong for small sprouts, you can lightly crush them before planting.
- Use larger shells for bigger seedlings if mixed herbs together.
🌍 Benefits & Why You’ll Love It
- Educational & fun—great for kids to learn about plant cycles and zero-waste 🌱.
- Eco‑smart—reuses kitchen waste and enriches soil naturally.
- Stylish décor—mini plant planters look charming on any windowsill or tabletop discovery.com.
Whether for a nature-themed classroom activity, an Earth Day craft, or sprucing up your countertop, these eggshell planters are as charming as they are sustainable. Want printable labels, seed starter tags, or transplanting reminders to go along with these? I’m happy to help!