Sure! Here’s a list of easy crafts you can do at home for some instant fun. These are simple, require minimal supplies, and are great for all ages:
🎨 1. Paper Plate Masks
What you need: Paper plates, markers/crayons, scissors, string, glue
How to do it:
- Cut out eye holes from the plate.
- Decorate the plate with markers, paper cutouts, or yarn for hair.
- Add string to the sides so you can wear your mask!
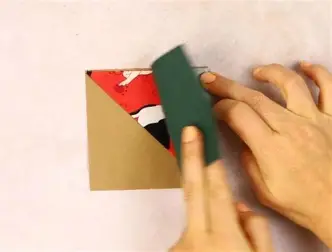
✂️ 2. DIY Bookmark Corners
What you need: Colored paper, glue, markers
How to do it:
- Fold a square piece of paper into a triangle.
- Fold both bottom corners up to meet the top corner.
- Decorate with doodles, googly eyes, or stickers.
🖌️ 3. Painted Rocks
What you need: Smooth stones, paint or markers, sealer (optional)
How to do it:
- Wash and dry the rocks.
- Paint fun designs—animals, mandalas, or quotes.
- Optional: Seal with a clear coat to protect your artwork.
🧵 4. No-Sew Sock Puppets
What you need: Old socks, buttons, yarn, glue
How to do it:
- Glue on buttons for eyes, yarn for hair, and draw or sew a mouth.
- Put on a puppet show afterward!
✨ 5. Toilet Paper Roll Crafts
What you need: Empty toilet paper rolls, glue, paper, paint
How to do it:
- Turn the roll into animals, monsters, or mini rockets with simple cutouts and decorations.
🕯️ 6. Mason Jar Lanterns
What you need: A jar, tissue paper, glue, LED tealight
How to do it:
- Glue tissue paper pieces onto the outside of the jar.
- Place a tealight inside for a glowing lantern.
🎈 7. Balloon-Powered Car
What you need: Plastic bottle, straws, bottle caps, balloon
How to do it:
- Use the bottle as a car body, caps as wheels.
- Insert a straw into a balloon, tape it to the car, and watch it zoom when you blow it up.
Would you like a list tailored for kids, teens, or adults? I can also include holiday-themed ideas!
- Fabric Covered Books
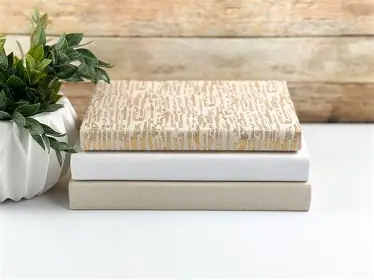
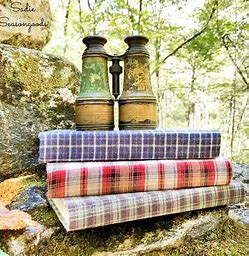
With the help of this simple do-it-yourself fabric-covered book tutorial, you can turn your books into chic décor.
2. Recycle Pill Bottles into Useful Organizers
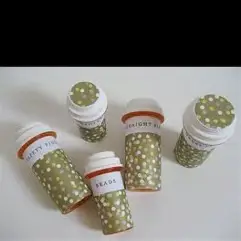
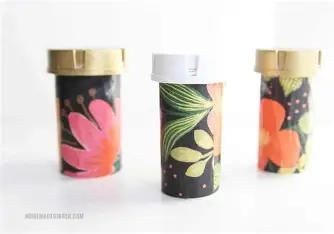
Absolutely! Recycling pill bottles is a great way to reduce waste and create useful organizers at home. These small containers are durable, compact, and perfect for holding all kinds of little items. Here are some creative and practical ways to repurpose pill bottles into organizers:
♻️ Recycle Pill Bottles into Useful Organizers
1. Mini First Aid Kit
How to use it:
- Clean the bottle thoroughly.
- Fill with band-aids, alcohol wipes, pain relievers, and small antiseptic packets.
- Keep it in your bag, car, or backpack.
2. Travel-Sized Toiletry Containers
Perfect for: Lotion, shampoo, hair gel, or even cotton swabs.
- Label each bottle clearly.
- Ideal for camping, air travel, or gym use.
3. Hardware Organizer
Use for: Screws, nails, thumbtacks, pushpins, washers, and other small tools.
- Store by type and label the lids.
- Keep them in a toolbox or drawer.
4. Craft Supply Holder
Great for: Beads, sequins, buttons, googly eyes, or thread spools.
- Group similar items together.
- Store them in a shoebox or drawer organizer.
5. Portable Sewing Kit
What you need: Needle, thread, a few buttons, safety pins, and a small pair of scissors or thread cutter.
- A pill bottle is the perfect size for an emergency mending kit.
6. Coin Holder
Great for: Spare change for parking meters, laundry, or toll booths.
- Label it “Car Change” or “Laundry Money” for quick access.
7. Desk Organizer for Small Office Supplies
Store: Paper clips, rubber bands, erasers, or push pins.
- Paint or decorate the outside for a cleaner look on your desk.
8. Earbud or Charger Cord Holder
- Wind up earbuds or charging cables and tuck them inside to avoid tangles.
- You can even drill a small hole in the side for the cord to come out while charging.
9. Gardening Seed Saver
How to use: Store seeds from your garden in dry, labeled pill bottles.
- Protects seeds from moisture and pests.
10. Emergency Candle Holder or Match Case
- Store waterproof matches or a small tealight inside.
- Keep it in a survival or camping kit.
🧼 TIP: Always clean pill bottles thoroughly and remove any labels before reusing, especially if you’re using them for food-related or travel purposes.
Would you like printable labels or decorating ideas for these bottles?
3. Paper Plate Bowl Weaving
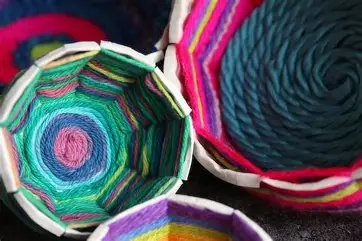
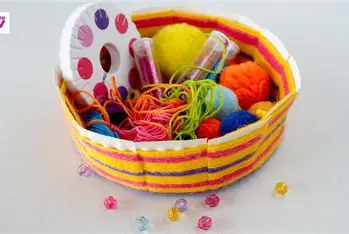
Who doesn’t need additional storage? These adorable paper plate bowls are a lot of fun, simple, and vibrant!
4. DIY Tote Bag from a Tea Towel in Less Than an Hour
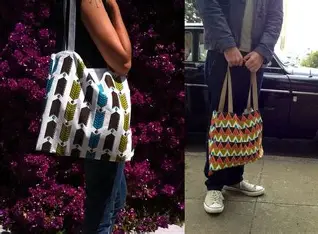
Absolutely! Making a DIY tote bag from a tea towel is a fun, quick, and beginner-friendly project — and yes, you can finish it in less than an hour! No fancy materials needed, just a few basics. Here’s a simple guide:
👜 DIY Tote Bag from a Tea Towel (Under 1 Hour!)
🧵 What You’ll Need:
- 1 tea towel (standard size, about 18″ x 28″)
- Scissors
- Sewing machine (or needle and thread if sewing by hand)
- Pins or clips
- Matching thread
- Two strips of cotton webbing or ribbon (about 18″–22″ each) for handles
✂️ Step-by-Step Instructions:
Step 1: Fold & Pin
- Fold your tea towel in half, width-wise (so the shorter sides meet).
- The folded side will become the bottom of the bag.
- Pin or clip the sides together, leaving the top open.
Step 2: Sew the Sides
- Sew along both pinned sides using a ½-inch seam allowance.
- For extra durability, sew a second seam just inside the first.
Optional: Zigzag or serge the raw edges to prevent fraying.
Step 3: Create Boxed Corners (Optional but Recommended)
- With the bag still inside out, pinch the bottom corners to form a triangle.
- Measure about 2 inches from the point and mark a straight line.
- Sew across the line, then trim the excess fabric.
This gives your tote bag a flat bottom and more space inside.
Step 4: Attach the Handles
- Turn the bag right side out.
- Take your two fabric strips (or webbing) and pin the ends about 3 inches from each side seam, on the inside or outside of the bag (your choice).
- Make sure the handles aren’t twisted.
- Sew a square or “X” at each handle end for strength.
Step 5: Finish the Top Edge (Optional)
- If you’d like a clean edge, fold over the top of the bag about ½ inch and sew all around for a polished hem.
🌟 You’re Done!
You’ve now created a stylish, eco-friendly tote bag using just a tea towel and basic materials. Great for groceries, books, or gifting!
Would you like a no-sew version using fabric glue or fusible tape instead? I can share that too!
5. Fabric Covered Shelves
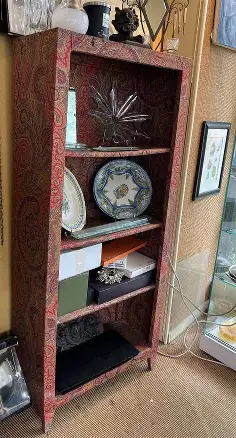
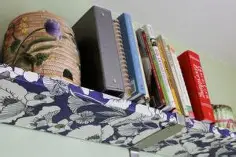
Discover how to use Mod Podge to cover shelves with fabric! It’s incredibly simple to make these decoupage shelves.
6. Make Coasters Out of Wood
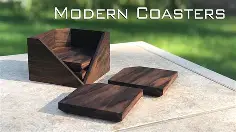

Absolutely! Making wood coasters is a fun, practical, and easy DIY project that adds a rustic or modern touch to your home. Here’s how to make your own wooden coasters, step by step.
🪵 DIY Wooden Coasters
🧰 Materials You’ll Need:
- Wood slices or small wood planks (4″ x 4″ is a good size)
- Sandpaper (medium and fine grit)
- Wood stain or acrylic paint (optional)
- Paintbrush or rag
- Clear sealant (polyurethane, lacquer, or Mod Podge)
- Felt pads or cork backing (optional)
- Pencil and ruler (if cutting your own shapes)
- Saw (if starting from raw wood)
✂️ Step-by-Step Instructions:
Step 1: Cut the Wood (Skip if Using Pre-cut Slices)
- Use a saw to cut a square, round, or hexagon shape about ¼ to ½ inch thick.
- Try to make all coasters the same size.
Step 2: Sand the Surface
- Sand all sides with medium-grit sandpaper to remove rough edges.
- Follow up with fine-grit sandpaper for a smooth finish.
Step 3: Stain or Paint (Optional)
- Apply wood stain for a natural look or paint them in any color or pattern you like.
- Let dry completely.
Step 4: Add Designs (Optional)
- Use stencils, stamps, or freehand painting for custom designs.
- Great ideas include initials, geometric shapes, or botanical prints.
Step 5: Seal the Surface
- Apply a clear sealant (polyurethane or Mod Podge) to protect against moisture and spills.
- Let dry fully, and apply 1–2 more coats if needed.
Step 6: Add a Backing (Optional)
- Stick felt pads or a thin cork square to the bottom to protect surfaces and prevent slipping.
🌟 Tips for Success:
- Use live edge wood slices for a rustic farmhouse vibe.
- Add resin or metallic accents for a modern touch.
- Make a set of 4 or 6 as a great handmade gift!
Would you like printable labels, stencil templates, or coaster holder ideas to go with your project?
7. T-Shirt Stamp from a Takeout Box (Easy DIY!)

Discover how to use the most unlikely surfaces to create a DIY t-shirt imprint in any design! You’ll adore this easy fashion project that even youngsters can participate with! Teens and tweens will love this craft.
8. Yarn Wall Hanging on a Budget
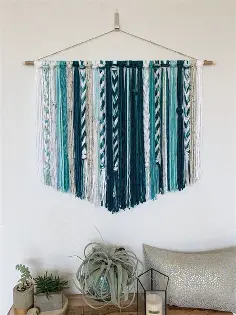
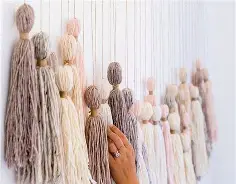
Sure! Here’s a simple guide to making a beautiful yarn wall hanging on a budget. It’s easy, customizable, and perfect for adding a cozy, handmade touch to any room.
🧶 Yarn Wall Hanging on a Budget
What You’ll Need:
- Yarn in your favorite colors (you can use leftover yarn or buy inexpensive skeins)
- A wooden dowel, branch, or even a sturdy stick (about 12–24 inches)
- Scissors
- Optional: beads, feathers, or other small decorations
Step-by-Step Instructions:
Step 1: Cut Your Yarn
- Cut multiple strands of yarn to your desired length (usually 18–24 inches works well).
- Cut more strands for a fuller look.
Step 2: Attach Yarn to the Dowel
- Fold one yarn strand in half.
- Place the loop end under the dowel or stick.
- Pull the loose ends through the loop and tighten around the dowel (this is called a lark’s head knot).
- Repeat until the dowel is filled with yarn strands.
Step 3: Trim and Shape
- Trim the bottom of the yarn to make a straight edge, a triangle shape, or a zigzag—whatever style you like.
Step 4: Add Decorations (Optional)
- Thread beads onto some yarn strands for texture.
- Tie on feathers or charms for a boho vibe.
Step 5: Create a Hanging Cord
- Tie a piece of yarn or twine to both ends of the dowel to make a hanger.
- Adjust the length depending on where you want to hang it.
Tips to Keep It Budget-Friendly:
- Use yarn scraps or shop at thrift stores for yarn.
- Use a sturdy branch from outside instead of buying a dowel.
- Keep it simple with one or two colors for a chic, minimalist look.
This craft takes about 30 minutes to an hour and adds a warm, artistic vibe to your space without breaking the bank!
Would you like some color palette ideas or patterns for your yarn wall hanging?
9. Make Wine Cork Stamps The Easy Way!

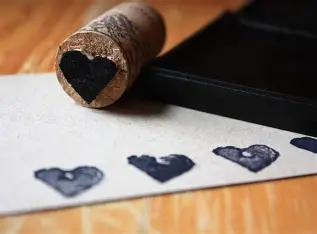
Save a few dollars and manufacture your own stamps out of wine corks rather than buying them at the shop. It’s really simple. To learn how to make them, see the video in this page.
10. Packing Tape Transfer
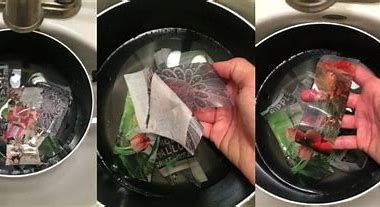
Absolutely! A packing tape transfer is a super fun and easy DIY technique that lets you transfer printed images or text onto surfaces like glass, paper, or wood. It’s budget-friendly and great for crafting, journaling, or mixed media art.
📦 How to Do a Packing Tape Transfer
🧰 What You’ll Need:
- Clear packing tape (wide tape works best)
- A laser-printed image or text (NOT inkjet—it must be laser!)
- Scissors
- Spoon or craft stick (for rubbing)
- Bowl of warm water
- Towel or paper towel
- Surface to stick the transfer on (glass, journal, candle holder, etc.)
✂️ Step-by-Step Instructions:
Step 1: Choose and Cut Your Image
- Pick a black-and-white or color laser-printed image from a magazine, newspaper, or laser printer.
- Cut out the portion you want to transfer.
Step 2: Apply the Tape
- Place clear packing tape directly over the image, pressing it down firmly.
- Smooth it out with your fingers or use a spoon/craft stick to burnish the tape (this helps the ink stick).
Step 3: Soak in Water
- Place the taped image in a bowl of warm water for about 5–10 minutes.
- This loosens the paper backing.
Step 4: Rub Off the Paper
- Gently rub the back of the paper with your fingers or a soft cloth.
- The paper will come off, but the ink/image will remain on the tape.
Step 5: Let It Dry
- Lay the tape sticky-side up on a towel or paper towel.
- Once dry, the tape will be clear with your image still on it.
Step 6: Use Your Transfer
- Stick it to a window, candle holder, glass jar, notebook cover, or wherever you like!
- If the stickiness fades, use a glue stick or Mod Podge to re-adhere it.
🔍 Tips for Best Results:
- High-contrast images (bold black text or photos) work best.
- Don’t use inkjet prints—they’ll smudge or won’t transfer properly.
- You can seal the transfer with Mod Podge for a permanent finish.
Want ideas for what to put your transfers on, or free printable designs to try? I can help with that too!
11. DIY Keychain from a Soda Can
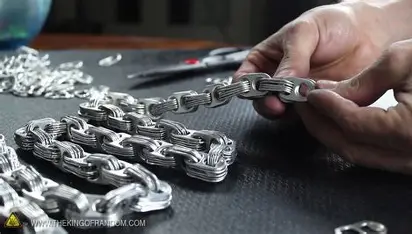
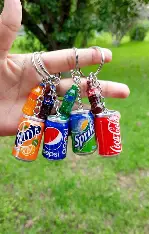
Made from a Coke can, this do-it-yourself keychain is really original! With Dimensional Magic and your preferred soda, you may create your own version.
12. DIY Spin Art Machine with a Salad Spinner
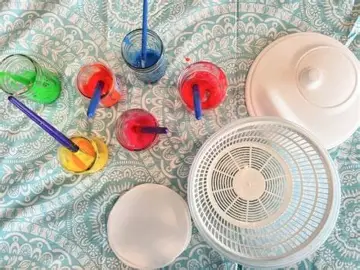

Absolutely! A DIY spin art machine using a salad spinner is a fun, safe, and easy craft project—perfect for kids or anyone looking for a creative outlet. You’ll make colorful art in minutes with minimal mess!
🎨 DIY Spin Art Machine with a Salad Spinner
🧰 What You’ll Need:
- A salad spinner (the kind with a removable basket works best)
- Washable paint or liquid acrylic paint
- Cardstock or thick paper
- Scissors
- Drop cloth or newspaper (to protect surfaces)
- Apron or old clothes (optional but helpful!)
🌀 Step-by-Step Instructions:
Step 1: Prep Your Paper
- Cut cardstock into circles or squares to fit the bottom of your salad spinner basket.
- Tip: Trace the bottom of the basket to get the perfect size.
Step 2: Place the Paper Inside
- Put one piece of paper at the bottom of the basket.
- Make sure it lies flat so the paint spreads evenly.
Step 3: Add Paint
- Drip small amounts of paint onto the paper—use different colors for a fun effect!
- Less is more; you can always add more later.
Step 4: Spin!
- Close the lid and spin the salad spinner quickly for a few seconds.
- Open it up and check out your design!
Tip: You can spin again after adding more paint for layered effects.
Step 5: Remove and Dry
- Carefully take out the artwork and lay it flat to dry.
- Replace with a new sheet and repeat for more spin art fun!
🖌️ Fun Variations:
- Use metallic or glow-in-the-dark paints for special effects.
- Try black paper with neon paint for a cool contrast.
- Add a few drops of water to thin the paint if it’s too thick.
🧼 Clean-Up Tips:
- Wash out the salad spinner with warm, soapy water when you’re done.
- Line the inside with paper towels before spinning for quicker cleanup.
This project is great for:
- Kids’ parties
- Art class activities
- Rainy day crafts
- DIY greeting cards or wall art
Want templates for shapes or creative spin art challenges? Just let me know!
13. Fabric Covered Boxes Made with Mod Podge
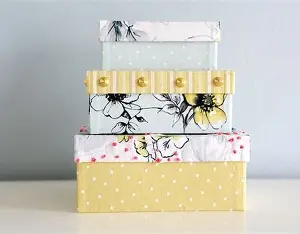

Discover how to create fabric-covered boxes with fabric, Mod Podge, and recyclable materials! This craft project is simple and reasonably priced.
14. DIY Patchwork Jeans
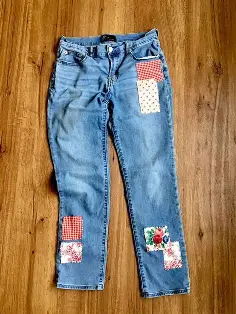
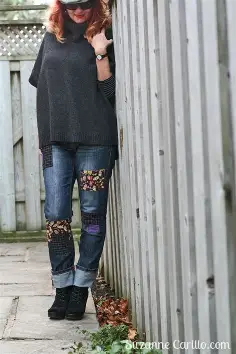
Absolutely! DIY patchwork jeans are a fun and stylish way to upcycle old denim or give new life to a worn-out pair of jeans. You don’t need to be a sewing expert—this can be done with simple hand stitching, fabric glue, or even iron-on patches.
👖 DIY Patchwork Jeans – Step-by-Step Guide
🧰 What You’ll Need:
- A pair of jeans (new or old)
- Fabric scraps (denim, flannel, cotton, etc.)
- Scissors
- Needle and thread OR sewing machine
- Fabric pins or clips
- Fabric glue or iron-on adhesive (optional, for no-sew method)
- Iron (if using adhesive)
✂️ Step-by-Step Instructions:
Step 1: Choose Your Fabrics
- Use scraps from old shirts, jeans, or fabric you already have.
- Mix colors, patterns, and textures for a bold look or stick to similar tones for a more subtle style.
Step 2: Cut Your Patches
- Cut patches into squares, rectangles, or any shape you like.
- Don’t worry about perfect edges—frayed looks are trendy!
Step 3: Lay Out Your Design
- Arrange the patches on your jeans before attaching them.
- Try placing them over worn areas, knees, thighs, or just for decoration.
Step 4: Attach the Patches
Sewing Method (Recommended for Durability):
- Pin patches in place.
- Use a basic running stitch or zigzag around the edges.
- You can sew directly on top or tuck edges under for a cleaner look.
No-Sew Method (Quick & Easy):
- Use fabric glue or iron-on adhesive to secure patches.
- Follow the adhesive instructions and press with an iron if needed.
🧽 Optional: Distress the Edges
- For a worn-in look, lightly sand the edges or tug at the threads to create a frayed finish.
🌟 Style Tips:
- Use different shades of denim for a classic patchwork look.
- Mix in flannel or floral fabrics for a boho or vintage vibe.
- Try back pocket patches or asymmetrical layouts for a modern twist.
🧼 Care Instructions:
- Wash inside out on gentle cycle to preserve your patches.
- Line dry or tumble dry low.
This is a great upcycling project for fashion lovers, and it’s also a creative way to personalize your wardrobe sustainably. Want templates for patch shapes or ideas for matching tops? I can help with that too!
15. Decorate a Ceiling Fan
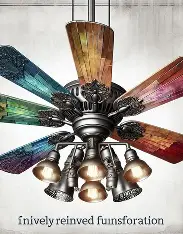
Discover how to use Mod Podge and paper to design a ceiling fan! This project can be completed with wrapping paper, cloth, and other materials.
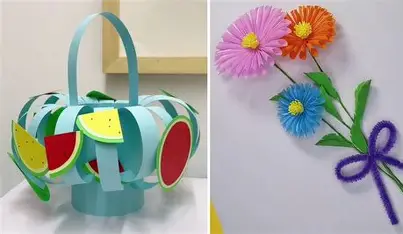
16. Easy Crepe Paper Flowers, Made in Five Minutes!
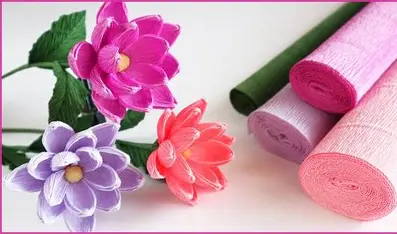
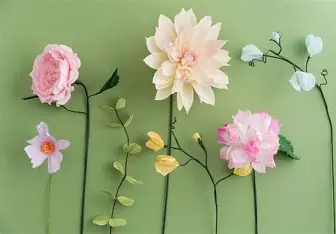
Absolutely! Here’s a super simple and beautiful craft: Easy Crepe Paper Flowers you can make in just five minutes! These flowers are perfect for home decor, gift wrapping, or party decorations.
🌸 Easy Crepe Paper Flowers (Made in 5 Minutes!)
🧰 What You’ll Need:
- Crepe paper (any color for petals, green for leaves/stem)
- Scissors
- Floral wire or pipe cleaners
- Glue stick or craft glue
- Optional: tape (floral or washi)
✂️ Step-by-Step Instructions:
Step 1: Cut the Petals
- Cut 5–8 rectangles of crepe paper (about 2″ x 3″).
- Round one edge of each rectangle to create a petal shape.
Step 2: Shape the Petals
- Gently stretch the center of each petal horizontally to give it a curved, natural look.
- Crepe paper is flexible—be gentle, it tears easily!
Step 3: Make the Flower Center
- Take a small strip of yellow or contrasting crepe paper, fringe it with scissors, then roll it up and glue the base.
- Wrap the fringed center around the top of your floral wire or pipe cleaner.
Step 4: Attach the Petals
- One by one, glue or wrap petals around the flower center.
- Slightly overlap each petal for a full, layered look.
Step 5: Add the Stem and Leaves
- Wrap green crepe paper or floral tape down the stem.
- Cut out a leaf or two and glue them to the side of the stem.
🌼 Done in 5 Minutes!
You’ve got a delicate, handmade flower that looks gorgeous in bouquets, centerpieces, or as gift toppers.
🌈 Fun Variations:
- Use multiple colors for a rainbow bloom.
- Make mini flowers for party favors or cards.
- Add glitter to the edges for a touch of sparkle.
Would you like a printable template for petals and leaves or ideas for arranging your paper flowers into a bouquet? Just say the word!
17. Mod Podge Lamp Shade Makeover in Minutes
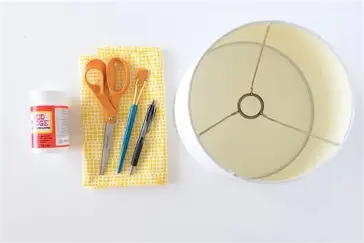
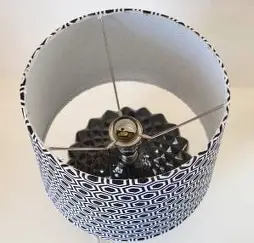
This Mod Podge lamp shade makeover project is very simple to complete and takes less than 30 minutes! Make use of your preferred fabric. Get all of our ideas for lampshades here.
18. Cute DIY Pencil Holder from a Jar (Free to Make!)
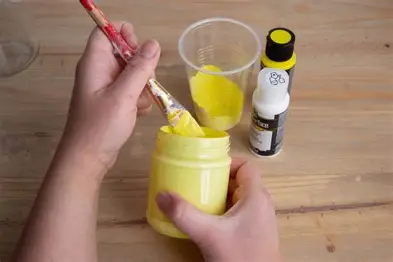

Absolutely! Here’s a super easy and cute DIY pencil holder made from a jar — and the best part is, it’s practically free if you’re using things you already have at home. Perfect for kids, students, or anyone who wants to tidy up their desk in style!
✏️ Cute DIY Pencil Holder from a Jar (Free to Make!)
🧰 What You’ll Need:
- An empty jar (jam jar, mason jar, or even a small can)
- Paint or markers (optional)
- Scrap fabric, paper, or washi tape (optional)
- Glue or double-sided tape
- Scissors
- Ribbons, buttons, stickers, or any craft scraps (optional for decoration)
🖌️ Step-by-Step Instructions:
Step 1: Clean Your Jar
- Remove the label and wash the jar thoroughly.
- Let it dry completely.
Step 2: Decorate the Outside
Pick one or more of these fun decorating ideas:
- Paint It: Use acrylic paint to give your jar a solid color or pattern (like polka dots or stripes). Let it dry before using.
- Wrap It: Cover the jar in leftover fabric, scrapbook paper, or even newspaper for a vintage vibe.
- Tape It: Use washi tape to create colorful stripes or fun designs.
Tip: Add googly eyes and a smile to turn it into a cute face!
Step 3: Add Final Touches
- Tie a ribbon or string around the top for a cute finish.
- Glue on buttons, stickers, or little charms if you like.
- Optional: Add a label that says “Pens,” “Create,” or your name.
Step 4: Fill It Up!
- Add your pens, pencils, scissors, paintbrushes — whatever you need!
🌟 Ideas to Make It Even More Fun:
- Make a set of 3 jars for pencils, markers, and scissors.
- Use glass jars for a chic look or metal cans for an industrial vibe.
- Create themed jars (e.g., rainbow colors, animals, or space designs) for kids’ desks.
This project is quick, fun, and basically free — and it makes a great weekend or rainy-day activity.
Would you like printable labels, matching desk organizer ideas, or jar decoration templates? I’d be happy to help!
19. Mod Podge Collage with a Magazine
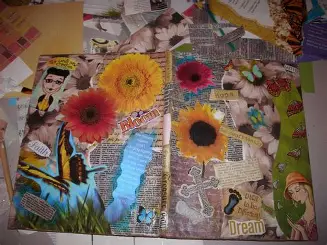
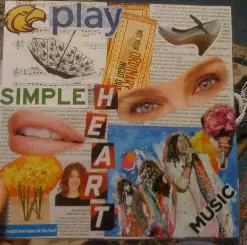
Discover how to use magazines to create a Mod Podge collage! You may use this technique to make any pattern you wish. This was done on canvas.
20. DIY Corner Bookmarks In a Few Easy Steps!
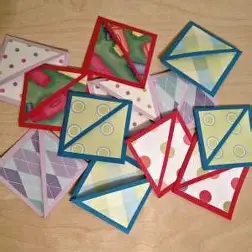
Of course! Making DIY corner bookmarks is a fun, fast, and super easy craft that’s perfect for all ages. These bookmarks slide neatly onto the corner of your page and can be customized in endless ways!
📚 DIY Corner Bookmarks – In a Few Easy Steps!
🧰 What You’ll Need:
- A square piece of paper (origami paper, cardstock, or any craft paper)
- Scissors
- Glue (optional)
- Markers, stickers, or embellishments to decorate
✂️ Step-by-Step Instructions:
Step 1: Start with a Square
- Use a 6×6 inch square (or any size you prefer).
- Fold the paper in half diagonally to form a triangle.
Step 2: Fold the Corners
- Take the right corner of the triangle and fold it up to the top point.
- Do the same with the left corner—you’ll now have a square shape again.
Step 3: Unfold the Corners
- Unfold both flaps—you should see crease lines.
- Take only the top layer of the bottom point and fold it up to the top point.
Step 4: Tuck in the Corners
- Now fold each side corner back up, and tuck them inside the pocket created in Step 3.
- Press down the folds—congrats, you have your basic corner bookmark!
🎨 Time to Decorate!
- Turn your bookmark into a fun animal face (cat, panda, fox, etc.), a monster, or just use patterns and doodles.
- Use googly eyes, washi tape, or stickers for extra flair.
🌟 Tips:
- Use double-sided paper for a colorful effect.
- Make themed sets for holidays, favorite books, or characters.
- Try laminating your finished bookmark for extra durability.
This easy craft is perfect for:
- Classrooms
- Party favors
- Gifts for book lovers
- Rainy day fun
Would you like templates, printable designs, or theme ideas (like animals or holidays)? I can help with that too!