
Absolutely! Upcycling is a fantastic way to repurpose old or unused items and give them new life—while also being environmentally friendly. Here are some creative and practical DIY upcycling ideas and projects to inspire you:
🛋️ Home Decor Upcycling Ideas
1. Old Ladder → Bookshelf or Plant Stand
- Sand and paint an old wooden ladder.
- Lean it against a wall and use the steps as shelves.
- Great for holding books, plants, or decorative items.
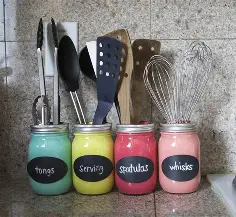
2. Mason Jars → Light Fixtures or Organizers
- Add fairy lights inside for ambient lighting.
- Use as bathroom organizers by mounting them on a wooden board.
3. Wine Corks → Bulletin Board
- Glue corks in a frame to create a rustic message board.
- Functional and aesthetically pleasing!
4. Drawer → Wall Shelf
- Remove an old drawer from discarded furniture.
- Add some paint or wallpaper to the back.
- Mount it on the wall as a shelf or shadow box.
🧵 Fashion & Accessories Upcycling
5. T-Shirts → Tote Bags
- Cut and sew the bottom of an old t-shirt.
- Reinforce the handles (the sleeves), and you’ve got a no-cost grocery tote.
6. Jeans → Denim Organizer
- Cut out pockets from old jeans.
- Mount them on a canvas or wooden board for a unique wall organizer.
7. Sweater → Pillow Cover
- Use the fabric from an old sweater.
- Sew into a cozy, textured pillowcase for the couch or bed.
🌱 Garden & Outdoor Projects
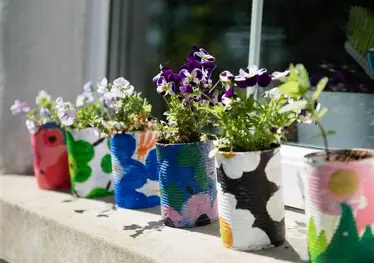
8. Tin Cans → Planters
- Remove labels, clean thoroughly, and add drainage holes.
- Paint or decorate them, then plant herbs or succulents.
9. Wooden Pallets → Outdoor Furniture
- Use pallets to build a bench, coffee table, or even a vertical garden.
- Sand and stain for durability and aesthetics.
10. Old Boots → Quirky Planters
- Waterproof and fill with soil.
- Plant flowers for a fun and rustic garden touch.
🖼️ Creative & Art Projects
11. CDs → Mosaic Art
- Break into small pieces and glue onto frames, mirrors, or tables.
- The reflective surface adds sparkle and texture.
12. Old Picture Frames → Chalkboard or Tray
- Replace the glass with a chalkboard panel or painted wood.
- Use for notes, menus, or as a decorative serving tray.
🧰 Functional Upcycled Creations
13. Suitcase → Side Table
- Attach table legs to an old suitcase.
- Use the inside for storage—both practical and vintage chic.
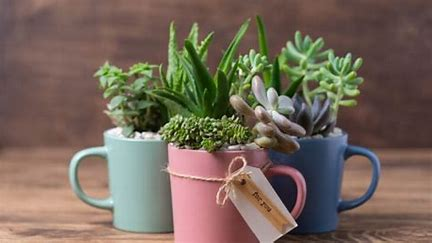
14. Coffee Mugs → Candle Holders
- Pour melted wax into mismatched or chipped mugs.
- Add a wick and let it set—great gifts or personal use.
15. Old Door → Headboard or Tabletop
- Paint or stain and mount behind your bed.
- Or add legs and turn into a rustic table.
Would you like a printable PDF or instructions for any of these projects? Or themed ideas (like holiday upcycles, kid-friendly crafts, or zero-cost options)?
- Handmade Coffee Can Planter
With this simple and environmentally responsible do-it-yourself project, you can turn your empty coffee cans into adorable planters. Follow the instructions on Instructables to revitalise your house or landscape. This article provides an easy approach to upcycle and customise your space while keeping the environment in mind. It’s time to get creative with what you have and create your own repurposed coffee can planter, which is ideal for both crafters and green thumbs.
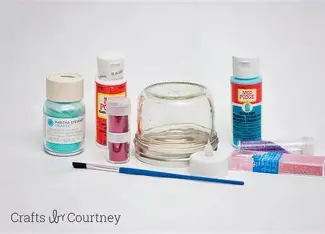
2. Turn a Broken Wine Glass Into a Fairy Garden Cloche
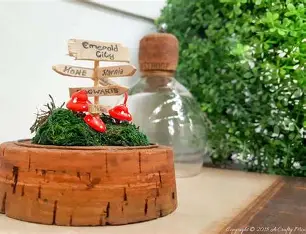
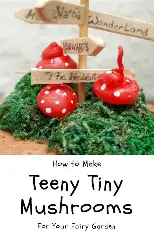
Absolutely! Here’s a charming and whimsical DIY project to turn a broken wine glass into a fairy garden cloche. It’s a great way to upcycle glassware you might otherwise throw away—especially if the stem is broken but the bowl is intact.
🍷✨ DIY: Turn a Broken Wine Glass Into a Fairy Garden Cloche
🌿 What You’ll Need:
- 1 broken wine glass (bowl intact, stem can be missing or cracked)
- Small decorative base (wood slice, ceramic plate, coaster, or upcycled lid)
- Miniature fairy garden elements (tiny mushrooms, pebbles, fairies, moss, etc.)
- Craft glue or hot glue
- Optional: paint or decorative ribbon for base
- Optional: LED tealight for glow effect
🛠️ Instructions:
Step 1: Clean the Wine Glass
- Carefully wash and dry the broken wine glass.
- If the stem is jagged, use sandpaper or a glass file to smooth any sharp edges.
- Safety first—wear gloves while handling!
Step 2: Prepare the Base
- Choose a flat surface slightly wider than the rim of your glass (like a wooden disc or ceramic tile).
- Paint or decorate the base if desired.
- Let it dry fully before assembling.
Step 3: Create the Mini Garden Scene
- Glue down a layer of moss or pebbles onto the base.
- Add tiny fairy figurines, a miniature bench, mushrooms, or any whimsical items you like.
- Be creative—this is the magical part!
Step 4: Position the Wine Glass
- Once your garden scene is complete, gently place the wine glass upside down over it, like a cloche (bell jar).
- If the rim is uneven or you want it secured, use a bead of glue around the rim and press it down gently onto the base.
- Let it dry and set.
Step 5: (Optional) Add Lighting
- Place a small LED tealight under or behind the cloche for a glowing fairy light effect in the evening.
- Never use a real flame—only battery-operated lights.
🌟 Display Ideas:
- On a windowsill, side table, bookshelf, or porch.
- Make several with different themes—seasonal, woodland, holiday, or beachy.
♻️ Why This Is Awesome:
- You save a broken item from the landfill.
- It adds a magical, personalized touch to your home.
- Makes a great gift or DIY project for kids (with adult supervision).
Would you like a printable instruction sheet or more fairy garden ideas for small spaces?
3. DIY No-Sew Zipper Case From Plastic Bottles
Use this creative way to organise your messy areas: make your own zipper cases out of plastic bottles! With just the zipper needed, these do-it-yourself no-sew zipper cases are not only incredibly affordable but also ideal for storing little treasures.
These cases are a fantastic way to recycle used plastic bottles and are perfect for organising little items like office supplies, crayons, or toy pieces. Explore the simple lesson at Make It & Love It with a helpful video presentation. For optimal effects, choose robust bottles, and take pleasure in a clutter-free space right now!
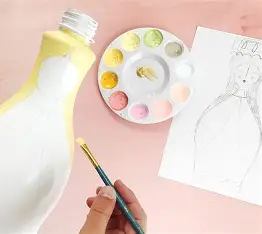
4. Creative Way to Make a Flower Pot
With this creative concept, you can turn a simple, functional flower pail into a pretty DIY flower pot. Learn how a straightforward excursion may inspire imagination and result in the upcycling of a commonplace object into a one-of-a-kind piece of home décor. From choosing the ideal appliques to painting, observe the transformation process and think about the countless options for your own projects. Go to Shabbyfufu.com for additional imaginative ideas and step-by-step instructions.
5. Affordable DIY Enamel Mug Organizer
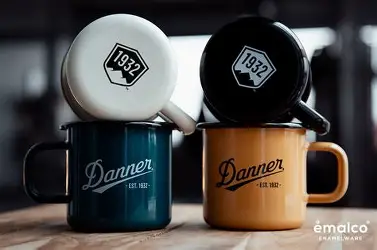

Here’s a simple and affordable DIY enamel mug organizer idea using everyday materials, ideal for a rustic, functional kitchen or coffee station:
🛠️ DIY Enamel Mug Organizer (Wall-Mounted)
Materials Needed:
- 1 wooden board (reclaimed wood or pine works well – around 24″ x 6″)
- 4–6 hooks or screw-in cup hooks (available at hardware or dollar stores)
- Screws and wall anchors
- Sandpaper or wood stain (optional)
- Paint or chalkboard paint (optional, for decoration)
- Hanging hardware (D-rings or sawtooth hangers)
Tools Required:
- Screwdriver or drill
- Ruler or measuring tape
- Pencil
- Level (optional)
🧰 Instructions:
- Prep the Wood Board
Sand the board to remove splinters. Optionally, stain or paint it for a finished look (e.g., natural wood, distressed white, or chalkboard label area). - Mark Hook Placement
Evenly space 4–6 dots across the bottom half of the board using a pencil and ruler — these will be your mug hook positions. Make sure there’s enough space for the mugs to hang without touching. - Install Hooks
Screw in the cup hooks where you marked. Hand-tighten them or use a drill if needed. - Attach Hanging Hardware
Flip the board over and attach D-rings or a sawtooth hanger for wall mounting. - Mount the Organizer
Use wall anchors and screws to mount it securely on the wall — especially important if your mugs are heavy. - Add Your Mugs
Hang your enamel mugs and enjoy your new rustic organizer!
💡 Optional Add-ons:
- Add a small shelf above the hooks for a plant or small decor.
- Use chalkboard paint on part of the board to label it (“Coffee Station”, etc.).
- Hang small S-hooks from a towel rod for a horizontal version.
Would you like a visual layout or printable template to go with this project?
6. Make a Three Tiered Stand From Baking Tins
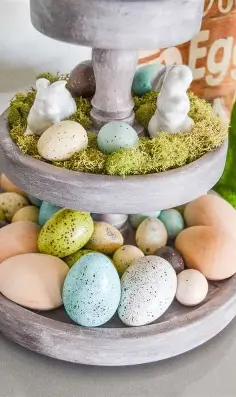
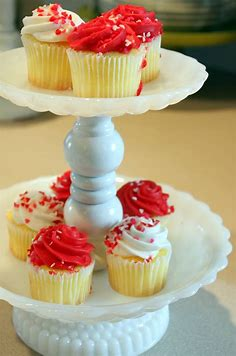
Use this simple do-it-yourself tutorial to turn your old baking tins into a fashionable and useful three-tiered stand. The project blends creativity and functionality, making it ideal for individuals who value distinctive home décor. Discover how to overcome the difficulty of utilising a rivet gun and utilise lazy Susan methods. Click here for a detailed tutorial on creating this beautiful piece: Grillo Designs. Show off your crafting abilities and improve the looks of your house.
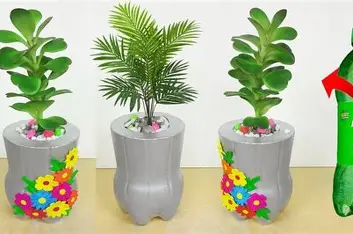
7. Homemade Plastic Bottle Planters
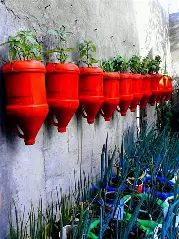
Here’s a fun, eco-friendly guide for making homemade plastic bottle planters — perfect for herbs, succulents, or small flowers. This DIY helps reduce waste and costs almost nothing to make!
🌱 Homemade Plastic Bottle Planters (3 Easy Styles)
🧃Materials You’ll Need:
- Empty plastic bottles (soda or water bottles work best)
- Scissors or utility knife
- Acrylic paint or spray paint (optional)
- Marker
- Potting soil
- Plants or seeds
- Nail or screwdriver (for drainage holes)
Style 1: Upright Bottle Planter
Instructions:
- Cut the Bottle
Cut the top third off a plastic bottle. Keep the bottom part. - Add Drainage Holes
Poke 3–4 small holes in the base using a nail or screwdriver (heated nail works too). - Decorate (Optional)
Paint the outside with fun colors, animal faces, or patterns. Let dry. - Add Soil & Plant
Fill with potting soil and your choice of small plant or seeds.
Style 2: Hanging Bottle Planter
Instructions:
- Cut a Side Window
Lay the bottle on its side. Cut out a rectangle from the side — wide enough to plant through. - Poke Drainage Holes
In the bottom (opposite the open window), poke holes for drainage. - Add Hanging Holes
Poke two small holes near the top corners of the bottle. Thread string or twine through for hanging. - Paint & Decorate (Optional)
Make it colorful or label the plants inside. - Add Soil & Plant
Add soil through the window and plant herbs or trailing plants like pothos.
Style 3: Self-Watering Planter
Instructions:
- Cut Bottle in Half
Cut a bottle in two around the middle. - Add Wick
Thread a piece of cotton string or shoelace through the bottle top (cap removed or drilled). The string should dangle into the bottom half. - Assemble
Flip the top half upside-down and place into the bottom half like a funnel. The wick draws water up from the reservoir. - Fill & Plant
Fill the top with soil and plant. Pour water into the bottom half.
🌼 Tips:
- Use clear bottles to let kids watch roots grow.
- Great for balconies, windowsills, or classrooms.
- Make a vertical garden by stacking or hanging several planters.
Would you like printable labels or a step-by-step photo guide to go with these instructions?
8. Cute DIY Knot Pillow From Old Sweaters

Use this entertaining tutorial to turn your worn-out, old sweaters into a warm and fashionable do-it-yourself knot pillow. Perfect for reusing those beloved jumper sleeves, this project not only revitalises your closet but also lends cosiness to any space. Every step is made simpler for smooth manufacturing, from choosing the ideal sweaters to perfecting the Celtic knot. Accept the challenge and take pleasure in creating a one-of-a-kind pillow that combines sustainability and creativity. Visit Pillarboxblue to find all the materials you require for this project.
9. How to Make a Mason Jar Night Light
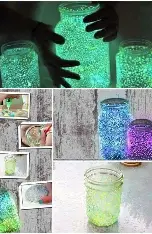
Here’s a simple and charming guide on how to make a Mason Jar Night Light — perfect for cozy decor, kids’ rooms, or as a handmade gift.
🌟 DIY Mason Jar Night Light
🧾 Materials You’ll Need:
- 1 Mason jar (any size)
- LED fairy lights (battery-operated or USB)
- Batteries (if needed)
- Decorative filler (optional: glass gems, sand, moss, etc.)
- Frosted glass spray or white acrylic paint (optional)
- Ribbon, twine, or stickers (for decoration)
🛠️ Instructions:
1. Prepare the Jar
Clean the mason jar with soap and water, and dry thoroughly.
2. (Optional) Frost the Glass
- Spray the outside of the jar with frosted glass spray for a soft glow effect.
- OR use white acrylic paint and a sponge to dab a frosted look.
- Let it dry completely before continuing.
3. Insert the Fairy Lights
- Coil the LED fairy lights and gently place them inside the jar.
- If battery-operated, keep the battery pack near the jar’s lid so it’s easy to access.
- For USB lights, make sure the cord can exit through the jar lid or stay partially open.
4. Add Decorative Fillers (Optional)
- Place items like glass pebbles, faux moss, sand, or tiny figurines at the bottom to customize your night light.
- This step adds texture and personality, especially for themed lights (e.g., ocean, forest, galaxy).
5. Close & Decorate the Lid
- Secure the lid loosely if needed (especially if using USB lights).
- Decorate the outside with twine, lace, stickers, or paint for a finished look.
6. Turn It On!
Switch on the fairy lights and enjoy your magical mason jar glow!
💡 Bonus Ideas:
- Galaxy Jar: Use deep blue/purple paint and glitter inside.
- Firefly Effect: Use warm white lights and black mesh on the lid.
- Name Jar: Add vinyl lettering or a child’s name for a personal touch.
Would you like printable tags, a kid-friendly version, or a video tutorial link to go with this?
10. Gray and White Chevron Scarf Camera Strap
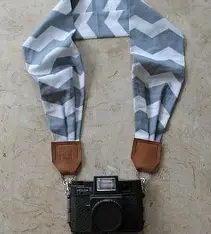
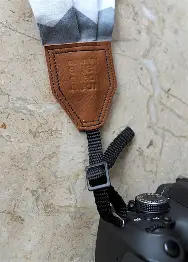
Add some flair and comfort to your shooting equipment. Country Eyes offers this grey and white chevron scarf camera strap. Ocean Heart blends style and practicality. It offers simplicity of use and durability because it is made entirely of cotton and has 100% caramel brown leather ends.
It is made for all photographers, whether they choose lightweight clasps for smaller cameras or conventional nylon for bulkier setups. Additionally, its distinctive scarf style guarantees that your neck and shoulders will stay comfy during all of your shooting excursions. Ideal for individual usage or as a considerate present for photographers.
11. DIY Cell Phone Holder From Lotion Bottle
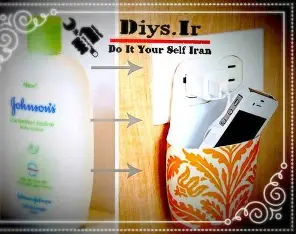
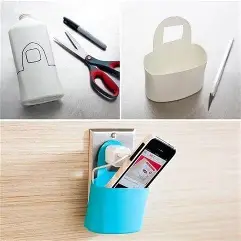
Sure! Here’s a fun and functional guide to making a DIY Cell Phone Holder from a Lotion Bottle — perfect for charging your phone without cluttering your counter.
📱 DIY Cell Phone Holder from a Lotion Bottle
♻️ Materials You’ll Need:
- 1 empty plastic lotion bottle (medium to large size, like 12–16 oz)
- Scissors or utility knife
- Marker or pen
- Sandpaper or nail file
- Acrylic paint or fabric (optional, for decoration)
- Mod Podge or glue (if decorating with fabric)
🛠️ Instructions:
1. Choose and Clean Your Bottle
- Pick a sturdy plastic bottle with a flat back (lotion, shampoo, or body wash bottles work well).
- Wash it thoroughly and remove the label (use warm water and soap or adhesive remover).
2. Mark the Holder Shape
- Hold your phone against the front of the bottle to figure out the right height.
- Use a marker to draw:
- A U-shape at the top front where the phone will slide in.
- A cutout at the back/top where the charger plug will go through.
3. Cut the Shape
- Carefully cut along your lines using scissors or a utility knife.
- Trim and round the edges as needed.
- Use sandpaper or a nail file to smooth out sharp edges.
4. Decorate (Optional)
- Paint the outside with acrylic paint (spray or brush-on). Let dry fully.
- Or wrap it with fabric using Mod Podge or glue for a more finished look.
- Let everything dry thoroughly before using.
5. Attach and Use
- Plug your charger into the wall.
- Slide the charger through the back cutout so it holds the weight of the phone.
- Place your phone in the front holder while it charges — no more tangled cords or countertop mess!
💡 Tips:
- Make sure the bottle is tall enough to support your phone.
- Use fun patterns or washi tape for a custom look.
- Works great for kids’ rooms, dorms, or travel.
Would you like a printable pattern template or drawing to help guide the cutting step?
12. Upcycle Old Yogurt Cups to Make a Wreath
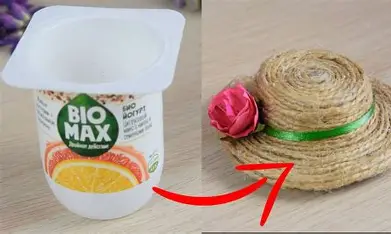
Experience the delight of upcycling with this inventive take on the traditional wreath, which is made by hand from yoghurt cups. This project, which was featured in Pretty Prudent, promotes environmental awareness while also showcasing your creative side. With a simple paint job, it may be easily customised to fit any interior motif or season. Encourage your artistic side and help create a more sustainable world with this easy-to-make and endearing crafta.
13. Beginner-Friendly DIY Paint Chip Lampshade
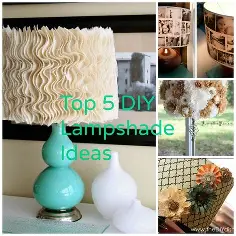
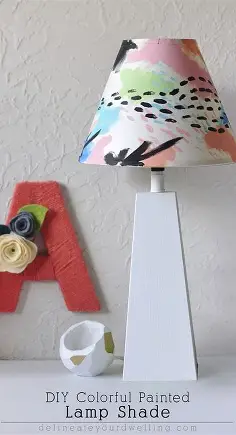
Absolutely! Here’s a beginner-friendly guide for making a DIY Paint Chip Lampshade — a creative and colorful way to upcycle paint samples into stylish home decor.
🎨 DIY Paint Chip Lampshade (Beginner-Friendly)
🧾 Materials You’ll Need:
- A plain lampshade (drum or cone shape works best)
- Paint chips (grab a variety of colors or gradients from the hardware store)
- Scissors or craft punch (circle, leaf, or triangle shapes work well)
- Double-sided tape or glue stick
- Ruler and pencil (optional)
- Clear spray sealant (optional, for durability)
🛠️ Instructions:
1. Choose Your Color Scheme
- Pick a color palette: ombré (light to dark), rainbow, pastels, or a color mix that matches your room.
- You’ll need about 20–50 paint chips depending on the size and shape of your lampshade and how much you want to cover.
2. Cut Out Shapes
- Use scissors or a craft punch to cut shapes from your paint chips.
- Popular options: circles, rectangles, triangles, or leaves.
- For a sleek look, keep shapes consistent.
3. Plan Your Layout
- Lay your paint chip pieces out on a table to plan your design:
- Horizontal stripes for ombré
- Random mosaic for colorful chaos
- Vertical strips for a modern look
4. Attach Paint Chips
- Apply double-sided tape or a glue stick to the back of each paint chip piece.
- Carefully stick them onto the lampshade, starting from the bottom and working your way up in rows.
- Slightly overlap pieces if you want a “scale” effect.
- Press firmly to ensure everything sticks well.
5. (Optional) Seal Your Work
- Once the design is complete and dry, spray lightly with a clear sealant to protect against dust and fading.
6. Install and Enjoy
- Put the lampshade back on the lamp base.
- Turn it on and enjoy the soft, colorful glow your handmade shade gives off!
💡 Tips:
- Use warm LED bulbs — they’re safer and don’t heat up the paper.
- Try cutting heart or star shapes for kids’ rooms.
- Use metallic paint chips for a glam touch.
Would you like a printable template for the shapes or a color palette suggestion guide?
14. Turn Almond Milk Bottle Into Dolls Vases
Learn about upcycling projects that demonstrate the beauty of reused materials and transform trash into wonder. Make adorable dolls or chic vases out of your unused almond milk bottles with this imaginative and entertaining upcycling project. Acrylic paint, some empty bottles, and a little creativity are all you need.
This project is ideal for crafters of all ages because it not only gives recyclable materials new life but also gives your home’s decor a unique touch. To paint, sketch, and personalise your one-of-a-kind creations, simply follow the simple instructions. A comprehensive guide can be found at Handmade Charlotte. Start now and create art out of your recycling!
15. Making Your Own Mason Jar Organizer
Sure! Here’s a simple guide for making your own Mason Jar Organizer — a stylish and practical way to store office supplies, kitchen tools, bathroom items, or craft materials.
🧰 DIY Mason Jar Organizer
🧾 Materials You’ll Need:
- 3–4 Mason jars (any size, depending on your space)
- Wooden board (about 18–24 inches long, or as wide as needed)
- Pipe clamps (1 per jar – available at hardware stores)
- Screws and wall anchors
- Drill and screwdriver
- Pencil and ruler
- Paint or stain (optional, for the board)
- Hanging hardware (e.g., D-rings or sawtooth hangers)
🛠️ Instructions:
1. Prepare the Wood Board
- Sand it smooth.
- Optionally, paint or stain it to match your decor.
- Let dry completely.
2. Mark Jar Placement
- Lay the board flat.
- Use a pencil and ruler to evenly mark where each jar will go (usually spaced about 4–6 inches apart depending on jar size).
3. Attach Pipe Clamps
- Align each clamp over your marked spots.
- Screw the clamp directly into the board using a drill. Leave it slightly loose at first.
4. Insert Mason Jars
- Slide each jar into a clamp.
- Tighten the clamp using a screwdriver until the jar is snug and secure.
5. Add Hanging Hardware
- Attach D-rings or a sawtooth hanger to the back of the board.
- Be sure it’s level when hanging on the wall.
6. Mount & Organize
- Use wall anchors if hanging on drywall.
- Hang your board, and fill jars with whatever you need: makeup brushes, pens, utensils, cotton balls, herbs, etc.
💡 Optional Upgrades:
- Label the jars with chalkboard stickers or paint.
- Use tinted Mason jars for extra color.
- Add hooks or knobs under the jars for keys or scissors.
Would you like a printable version or measurements for a specific room (e.g., bathroom or craft station)?
16. Simple and Easy DIY Rag Rug Basket
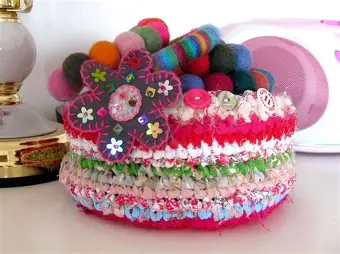
Add some creativity to your house organisation to make it even better! With the help of our DIY Rag Rug Basket Ikea Hack, you can turn an ordinary rag rug into a chic storage option. Ideal for providing a pop of colour while maintaining a clean environment. This project works with any rag rug you love and is a creative way to repurpose an Ikea rag rug.
Explore this simple project to find a useful and adorable method to organise your necessities, such as linens and art items, while also making decluttering seem nice. For those who love home décor, this 30-minute do-it-yourself project is revolutionary.
17. Handmade Soap Dispenser Using Alcohol Bottle
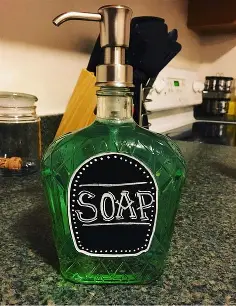
Absolutely! Here’s a creative and eco-friendly guide for making a handmade soap dispenser using an empty alcohol bottle — perfect for your bathroom, kitchen, or home bar area.
🧼 DIY Soap Dispenser from an Alcohol Bottle
🍾 Materials You’ll Need:
- 1 empty alcohol bottle (whiskey, gin, wine, etc. – glass works best)
- Soap pump top (can reuse one from an old dispenser or buy one online)
- Liquid soap or hand sanitizer
- Goo Gone or warm soapy water (to remove labels)
- Optional: funnel, paint, chalk labels, or twine for decoration
🛠️ Instructions:
1. Clean the Bottle
- Rinse the bottle thoroughly to remove any remaining alcohol.
- Soak in warm water to remove the label. Use Goo Gone or rubbing alcohol to get rid of sticky residue.
- Let the bottle dry completely.
2. Find a Soap Pump
- Use a pump from an old soap bottle OR buy a new one online (measure the bottle opening — most liquor bottles fit 28mm pump tops).
- Test that it fits snugly or wrap the neck with waterproof tape to help it seal.
3. Customize the Bottle (Optional)
- Add a chalkboard label, paint, or etching cream for a personal touch.
- Wrap twine, jute, or ribbon around the neck for a rustic or boho look.
4. Add Soap
- Use a funnel to pour liquid soap or hand sanitizer into the bottle.
5. Attach the Pump
- Insert the pump into the top. If it’s a bit loose, you can use hot glue, epoxy, or plumber’s tape around the base for a better seal.
💡 Ideas:
- Use clear bottles for colorful soap or layered liquids.
- Repurpose bottles from your favorite brands for a themed bathroom or bar sink.
- Add a custom label or tag (“Hand Soap”, “Dish Soap”, etc.).
Would you like printable labels or a recommendation for where to buy the pump tops?
18. How to Make a Copper Pipe iPad Holder
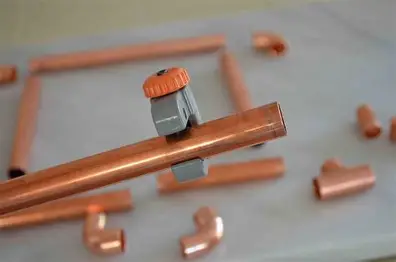
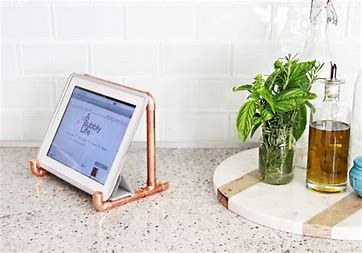
With this DIY Copper Pipe iPad Holder, you may find a straightforward yet fashionable method to keep your iPad safe and handy. Ideal for people with hectic schedules who balance working, dancing in the kitchen, and cooking. This project is very cost-effective in addition to being simple.
You can create a robust and stylish tablet stand by getting some basic plumbing components from your neighbourhood home improvement store. Visit A Bubbly Life for comprehensive guidelines and innovative suggestions on how to keep it looking brand new. Prepare to improve your workstation or kitchen with this stylish and useful iPad holder.
19. Cool DIY Chalk Paint Chair Makeover
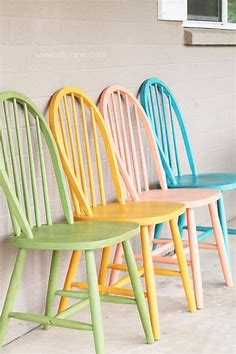
Absolutely! Here’s a fun and beginner-friendly guide for a Cool DIY Chalk Paint Chair Makeover — perfect for turning an old or thrifted chair into a fresh statement piece.
🪑 Cool DIY Chalk Paint Chair Makeover
🎨 Materials You’ll Need:
- Old wooden chair (dining chair, accent chair, etc.)
- Chalk paint (any color you like – no primer needed!)
- Soft wax or clear sealant (to protect the finish)
- Sandpaper (medium and fine grit)
- Paintbrush or foam brush
- Drop cloth or newspaper (to protect your workspace)
- Damp cloth (for cleaning)
🛠️ Instructions:
1. Clean the Chair
- Wipe the chair thoroughly with a damp cloth to remove dust, dirt, and grease.
- Let it dry completely before painting.
2. Lightly Sand (Optional)
- If the chair is glossy or has old peeling paint, lightly sand it with medium-grit sandpaper to help the chalk paint stick better.
- Wipe off any dust with a clean cloth.
3. Apply Chalk Paint
- Stir the chalk paint well.
- Apply the first coat using a brush or foam brush, working with the grain.
- Let it dry for 30–60 minutes (follow the paint brand’s instructions).
- Apply a second coat for full coverage.
4. Distress the Chair (Optional)
- If you want a vintage or shabby chic look, lightly sand edges, corners, and raised areas after the paint dries.
- Use fine-grit sandpaper to gently remove small sections of paint to expose the wood underneath.
5. Seal the Paint
- Once the paint is dry and any distressing is done, apply a thin coat of soft wax or clear polyurethane sealant to protect the surface.
- Buff with a soft cloth if using wax for a smooth finish.
6. Let It Cure
- Let the chair cure for a couple of days before heavy use to ensure the finish hardens properly.
💡 Fun Style Ideas:
- Color Pop: Paint the legs or seat a different color for a bold accent.
- Stenciling: Add patterns or words with stencils and a contrasting paint color.
- Two-Tone Look: Paint the backrest and seat one color and the frame another.
✅ Great For:
- Dining sets
- Kids’ rooms
- Desks and vanities
- Porch or patio decor (with exterior sealer)
Would you like a color palette suggestion or stencil ideas to go with your chair project?
20. Making a Hand-Painted Wood Sign

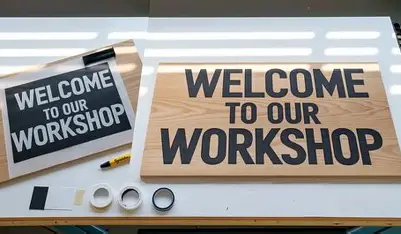
With our simple tutorial on creating a gorgeous hand-painted wood sign, you can discover the joy of crafting! This guide simplifies the procedure into easy-to-follow steps, making it ideal for giving a piece of your heart or personalising your environment. We help you at every stage, from assembling your materials (wood, chalk paint, and vinyl stencil) to painting and completing your masterpiece. Embrace a little imagination and use your own handmade sign to provide cosiness to any space. Visit Polka Dot Chair to begin this fulfilling project right now.
21. Magazine Rack Before and After – IKEA Hacks
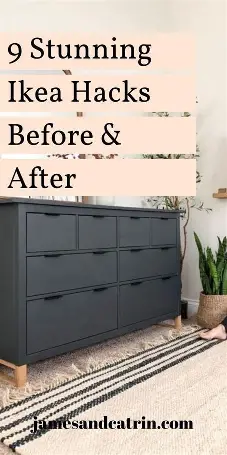
Sure! Here’s a creative “Before and After” IKEA Hack for a Magazine Rack — perfect for adding personality and function to your space using affordable IKEA basics.
🗞️ Magazine Rack Before & After – IKEA Hack Edition
🪑 Before: The Basic IKEA Magazine Rack
Product example: IKEA KVISSLE, KNALLBÅGE, or even a basic file sorter from IKEA’s office section.
- 💬 Plain metal or wood finish
- 😐 Functional but boring
- 🎯 Blends into the background, not a statement piece
🎨 After: Stylish DIY Upgrade Options
✨ Hack 1: Boho Rattan Look
What You’ll Need:
- Rattan or cane webbing
- Hot glue gun or strong adhesive
- Scissors
- Optional: spray paint (matte gold, white, or black)
Steps:
- Spray paint the magazine rack for a fresh base color.
- Cut rattan to fit the panels or sides.
- Glue it to the inside or outside of the frame.
- Let dry, and enjoy your boho-chic organizer.
🖌️ Hack 2: Chalkboard Paint + Labeling
What You’ll Need:
- Chalkboard paint or adhesive chalkboard vinyl
- Painter’s tape
- Chalk or chalk marker
Steps:
- Tape off a section of the rack (front or side).
- Paint that area with chalkboard paint.
- Once dry, label it (e.g., “Mail”, “To Read”, “Kids’ Art”).
🌈 Hack 3: Color Pop Modern Makeover
What You’ll Need:
- Spray paint in bold or pastel colors
- Painter’s tape (if doing color blocking)
- Clear sealant spray (optional)
Steps:
- Disassemble if possible and spray each piece evenly.
- Create a color block effect with tape and a second paint color.
- Let everything dry and reassemble.
🪵 Hack 4: Rustic Wood and Leather Look
What You’ll Need:
- Thin plywood panels or wood veneer
- Leather straps or faux leather belt
- Strong glue or screws
- Stain or wood wax (optional)
Steps:
- Stain or finish the wood panels.
- Cut to size and attach to the front/back of the rack.
- Add leather straps as handles or accents.
📸 Display Idea:
Place your upgraded rack in the living room with curated magazines, in the entryway with mail and catalogs, or beside your bed or couch for a cozy reading nook.
Would you like a printable step-by-step version of one of these hacks or help choosing which IKEA product to start with?