
Here’s a full, engaging write-up for “Upcycled Crafts: Innovative DIY Projects for Sustainable Creativity” that could work as a blog post, article, or workshop guide.
Upcycled Crafts: Innovative DIY Projects for Sustainable Creativity
Upcycling isn’t just about reducing waste—it’s about transforming the ordinary into the extraordinary. By giving discarded materials a second life, you can create functional, beautiful, and eco-friendly items while reducing your environmental footprint. Whether you’re an experienced crafter or a beginner, upcycling offers endless opportunities for creativity.
Why Upcycling Matters
- Eco-friendly impact: Keeps materials out of landfills and reduces demand for new resources.
- Budget-friendly: Many materials are free or low-cost, sourced from your own home or thrift stores.
- Unique results: Each upcycled project has its own character—no two pieces are ever exactly the same.
Materials to Start Collecting
- Glass jars & bottles
- Cardboard boxes & tubes
- Old clothes & fabrics
- Wooden crates & pallets
- Metal tins & cans
- Scraps of paper, magazines, or books
- Broken jewelry & hardware pieces
Innovative DIY Upcycling Ideas
1. Tin Can Lanterns
Punch holes in clean, empty cans to create patterns, then place a tealight or LED candle inside. Perfect for garden lighting.
2. Sweater Pillow Covers
Repurpose old knitwear into cozy, textured pillow covers for a rustic home feel.
3. Wine Cork Bulletin Board
Glue used wine corks onto a wooden frame to create a stylish pinboard.
4. Jar Terrariums
Turn empty glass jars into self-contained plant ecosystems or mini succulent gardens.
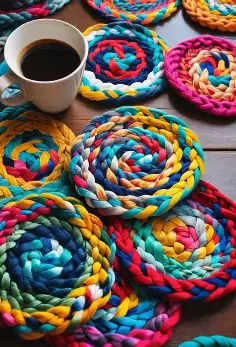
5. Magazine Coasters
Roll magazine strips tightly and glue them into flat spirals to make colorful, water-resistant coasters.
6. Denim Storage Baskets
Cut and sew old jeans into sturdy fabric bins for organizing household items.
7. Broken Jewelry Art
Arrange and glue old or damaged jewelry onto a canvas for an eclectic, shimmering wall display.
Tips for Successful Upcycling
- Clean & prepare materials before starting.
- Plan your design but be open to creative detours.
- Mix textures and materials for visual interest.
- Use the right adhesives or tools for durability.
- Think function + beauty—a good upcycled item should be useful and attractive.
Making It a Lifestyle
Upcycling is more than a weekend craft—it can be a way of living more sustainably. Start small, incorporate upcycled items into your home, gift them to friends, or even sell them at local markets. Every project is a chance to spark conversation about sustainability and inspire others to try it too.
♻ Creativity thrives when we reimagine waste as possibility. The next time you’re about to throw something away, pause and ask: What could this become?
If you’d like, I can also create a ready-to-print illustrated guide for these upcycled craft ideas so it’s visually inspiring and easy to follow. That would make it feel more like a DIY magazine spread. Would you like me to prepare that?
- Wine Cork Succulent Magnets

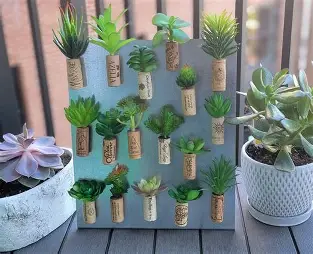
In addition to being a creative method to recycle common materials, upcycling wine corks into succulent magnets gives your home a little greenery. By skilfully fusing design and function, these little eco-friendly gardens breathe new life into your magnetic boards or refrigerator. Each piece is a one-of-a-kind addition to your home decor, fusing the brilliant vitality of succulents with the rustic appeal of wine corks.
Wine cork succulent magnets’ simplicity and environmental statement are what make them so lovely. You’re doing more than just crafting when you decide to upcycle; you’re also making a tiny contribution to waste reduction.
This project is proof that, with a little creativity, things that might otherwise be thrown away can be turned into something useful and lovely. Additionally, they make considerate, homemade presents for loved ones who value sustainability and a little bit of nature in their homes.
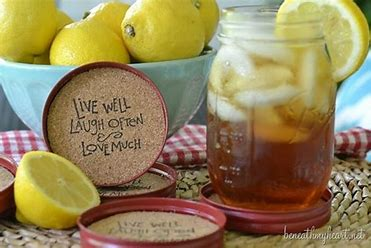
2. Mason Jar Coaster DIY

Here’s a simple and creative guide for Mason Jar Coaster DIY in clear English:
Mason Jar Coaster DIY
Mason jar lids aren’t just for sealing jars—they can be transformed into charming, rustic coasters that protect your tables and add a cozy, farmhouse touch to your home. This easy project is budget-friendly and perfect for beginners.
Materials You’ll Need
- Mason jar lids (rings + flat inserts)
- Fabric scraps, cork sheets, or decorative paper
- Scissors
- Hot glue gun or craft glue
- Mod Podge (optional, for a waterproof finish)
Step-by-Step Instructions
- Choose Your Design
Select a fabric pattern, cork texture, or decorative paper that matches your style. - Cut Your Base
Trace the flat insert of the lid onto your chosen material and cut out the circle. - Attach the Material
Glue the fabric, cork, or paper to the flat insert of the Mason jar lid. Smooth out any wrinkles or bubbles. - Secure the Insert
Place the decorated insert back into the Mason jar ring and glue it in place so it doesn’t slide out. - Optional Waterproofing
Brush a thin coat of Mod Podge over the top to make your coaster more durable and resistant to moisture. - Let It Dry
Allow everything to dry completely before using your coaster.
Extra Creative Touches
- Paint or spray the lid rings in metallic or pastel colors.
- Add twine or ribbon around the edge for a rustic look.
- Personalize with initials, quotes, or small stencils.
💡 Tip: You can make a whole set in different patterns for seasonal décor or give them as handmade gifts!
If you want, I can also give you a printable illustrated template for Mason jar coasters so the steps are even easier to follow. Would you like me to make that next?
3. Custom Tin Can Lanterns
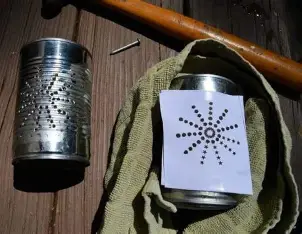

Convert common tin cans into charming lanterns with a sustainable twist! In addition to adding a distinctive touch to your home, upcycling your used cans into indoor or outdoor lights also helps reduce trash. Making unique punch designs on the cans is the first step in the magic, which is a straightforward procedure that gives plenty of opportunity for individual expression and creativity.
Making these glowing beauties is a chance to incorporate your memories and flair into the décor, not only to light up a few areas. Every lantern becomes a storybearer, from elaborate flower patterns to celestial patterns that narrate tales of starry nights. These tin can lanterns promote sustainable making methods while converting areas into enchanted worlds with their captivating shadows.
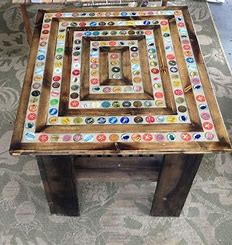
4. Bottle Cap Tabletop Design
Here’s a detailed and creative guide for Bottle Cap Tabletop Design in English:
Bottle Cap Tabletop Design
A bottle cap tabletop is a bold, colorful, and eco-friendly way to transform old furniture into a statement piece. By reusing metal or plastic bottle caps, you can create a mosaic-style surface that’s durable and full of personality.
Materials You’ll Need
- A table (coffee table, side table, or even a bar top)
- Bottle caps (metal or plastic, cleaned and sorted by color)
- Strong adhesive (E6000, epoxy glue, or hot glue for a temporary hold)
- Epoxy resin kit (for sealing)
- Protective gloves
- Mixing cups and sticks
- Painter’s tape (optional, to protect edges)
Step-by-Step Instructions
- Plan Your Design
- Sort bottle caps by color and pattern.
- Sketch out your design (geometric shapes, rainbow patterns, spirals, or random mosaic).
- Prepare the Tabletop
- Clean the surface thoroughly.
- Sand it lightly if it’s glossy, so the glue adheres better.
- Arrange the Bottle Caps
- Lay out all caps without glue first to see how they fit.
- Start from the center or a corner, depending on your design.
- Glue the Caps
- Attach each cap to the table using strong adhesive.
- Press firmly and let the glue set according to product instructions.
- Seal with Epoxy Resin
- Protect the table edges with painter’s tape if needed.
- Mix epoxy resin according to package directions.
- Pour resin slowly over the bottle caps until the surface is fully covered.
- Use a stick or brush to spread evenly and remove air bubbles (a heat gun or hair dryer on low can help).
- Let It Cure
- Leave the table in a dust-free area for 24–72 hours until the resin hardens completely.
Creative Variations
- Use glow-in-the-dark bottle caps for a fun nighttime effect.
- Arrange caps to make a flag, logo, or mandala pattern.
- Add glitter or tiny decorative stones between caps before sealing.
💡 Tip: If you don’t want to seal with resin, you can cover the table with a piece of clear glass for a removable and easier-to-clean finish.
If you’d like, I can also create a colorful bottle cap pattern chart so you can follow a ready-made mosaic layout for your tabletop design. That way, your finished table will look polished and professional.
5. Pet Bed from Vintage Suitcase
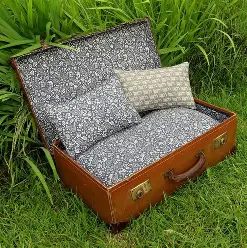

Not only is upcycling old suitcases into pet beds popular, but it’s also a clever method to give used luggage a new lease on life while giving your pet a comfortable haven. These custom beds offer a distinctive twist that store-bought beds just cannot equal, and they blend in perfectly with any type of interior design.
This project’s simplicity and potential for customisation only serve to increase its allure. All it takes to turn a forgotten suitcase into your pet’s new favourite hangout is a little cushioning, fabric, and maybe a coat of paint. It is a fashionable and eco-friendly option that gives any space a whimsical touch.
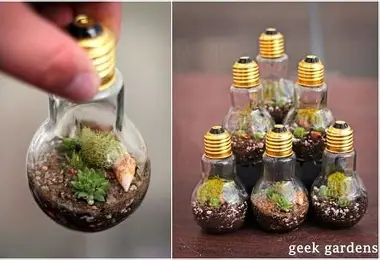
6. Bright Ideas: Lightbulb Terrariums
Here’s a complete guide for Bright Ideas: Lightbulb Terrariums in clear English:
Bright Ideas: Lightbulb Terrariums
Give burnt-out or unused lightbulbs a second life by turning them into miniature terrariums. These tiny ecosystems make beautiful desk ornaments, unique gifts, and conversation starters—all while promoting sustainable creativity.
Materials You’ll Need
- Burnt-out incandescent lightbulb (NOT LED or CFL)
- Small pliers and tweezers
- Screwdriver (small flathead)
- Safety gloves and safety glasses
- Small funnel or rolled paper cone
- Pebbles or small stones
- Activated charcoal (optional, helps prevent mold)
- Potting soil or sand
- Mini plants, moss, or air plants
Step-by-Step Instructions
- Prepare the Bulb
- Put on safety gloves and glasses.
- Use pliers to carefully remove the metal contact at the base of the bulb.
- Insert the screwdriver into the black glass insulator and twist gently until it breaks.
- Shake out the inner filament and discard it safely.
- Clean the Inside
- Rinse the bulb gently with water to remove any glass dust.
- Let it dry completely before adding plants.
- Layer Your Terrarium
- Using the funnel, add a thin layer of pebbles for drainage.
- Add a pinch of activated charcoal.
- Add a small layer of soil or sand, depending on your plant choice.
- Add the Plants
- Use tweezers to gently position moss, succulents, or air plants inside the bulb.
- Adjust until you like the arrangement.
- Display Your Creation
- You can place the bulb on a small wooden stand, hang it with wire, or nest it in a teacup for stability.
Care Tips
- Moss & air plants: Mist lightly every 1–2 weeks.
- Succulents: Water sparingly and ensure sunlight exposure.
- Keep out of direct, intense heat to prevent glass from overheating.
Creative Variations
- Add tiny figurines, shells, or colored sand for themed designs.
- Create a “floating” terrarium by suspending the bulb from fishing line.
- Paint the bulb’s base for a decorative accent.
💡 Tip: Lightbulb terrariums are best for plants that require little water—you don’t want excess moisture trapped inside.
If you want, I can design a step-by-step illustrated guide so this project looks like something out of a DIY eco-craft magazine. That way, it’s easy to follow and visually inspiring.
7. Sweater Pillow DIY Guide

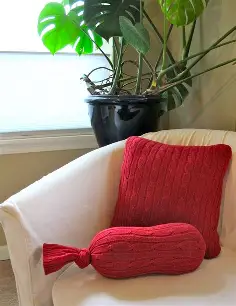
Making a comfortable throw cushion out of an old jumper is a great way to breathe new life into unused apparel. This project not only encourages sustainability but also gives your home’s design a unique touch. Commercial throw pillows hardly ever compare to the soft, distinctive sensation that the sweater’s material offers.
The simplicity of this upcycling project is among its best features. Anyone with rudimentary sewing skills and a few straight stitches may turn an old clothing into a chic accessory. This means your cosy creation can be a meaningful addition to any area by including the sweater’s colour, design, or perhaps a special memory.
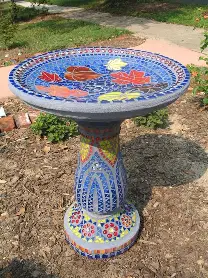
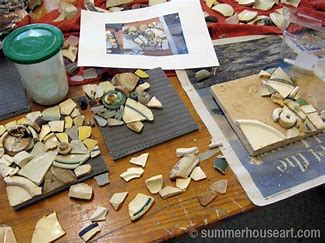
8. CD Mosaic Bird Bath
Here’s a clear and creative guide for CD Mosaic Bird Bath:
CD Mosaic Bird Bath
Turn old, scratched CDs into a shimmering mosaic that attracts birds and adds sparkle to your garden. This DIY project is not only eco-friendly but also stunning when sunlight hits the reflective surface.
Materials You’ll Need
- Old CDs or DVDs
- Scissors (or strong utility shears)
- A large ceramic or clay bowl (or an old shallow dish)
- Strong outdoor adhesive (waterproof)
- Grout (white or colored)
- Sponge and rag
- Protective gloves and eye protection
Step-by-Step Instructions
- Prepare the CDs
- Put on gloves and eye protection.
- Cut the CDs into small mosaic-like pieces (about 1–2 cm).
- If cutting is difficult, soak the CDs in warm water for 10 minutes to soften them slightly.
- Arrange Your Mosaic Pattern
- Place the CD pieces shiny side up on the inside surface of the bowl.
- Experiment with different layouts—random patterns, spirals, or geometric designs.
- Glue the Pieces
- Apply a thin layer of waterproof adhesive to the back of each CD piece.
- Press firmly onto the bowl, leaving small gaps between pieces for grout.
- Let the glue dry completely (check adhesive instructions).
- Grout the Design
- Spread grout over the mosaic using a sponge or your fingers (with gloves on).
- Press the grout into the gaps between the CD pieces.
- Wipe off excess grout with a damp sponge, being careful not to dislodge the CDs.
- Clean & Finish
- Once the grout dries, polish the surface with a dry cloth to bring out the shine.
- Place the bird bath on a pedestal, plant pot stand, or directly on the ground.
Extra Creative Ideas
- Use colored grout for a vibrant effect.
- Combine CD pieces with glass gems or stones for texture.
- Create matching mosaic garden pots for a coordinated look.
💡 Tip: Place your bird bath in a partly shaded spot—full sunlight will make it sparkle beautifully but can overheat the water in hot weather.
If you’d like, I can also give you a pattern layout chart so you can follow a ready-made mosaic design for your bird bath that looks perfectly balanced.
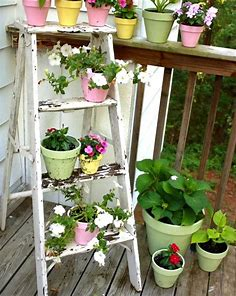
9. Pallet Vertical Garden DIY
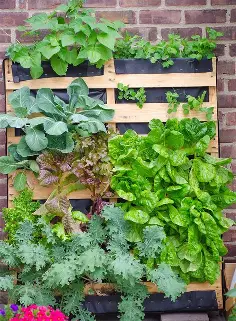
The pallet wood vertical garden is a perfect illustration of how upcycled crafts can give seemingly ordinary objects a new lease on life. You may add a rustic touch to your urban home and create an eco-friendly garden area by recycling used wooden pallets. Those with little outside space will particularly benefit from the vertical design, which enables urban gardeners to grow flowers, herbs, or even tiny crops in a stunningly original fashion.
Pallets’ accessibility and versatility make them an excellent tool. Since most retailers are ready to give them away for free, this project is both economical and environmentally friendly. Anyone can turn a plain wall into a lush, vertical garden haven with a little imagination, a few tweaks, and some simple gardening tools. In addition to recycling, this do-it-yourself project adds a little bit of the tranquilly of nature to your living area.
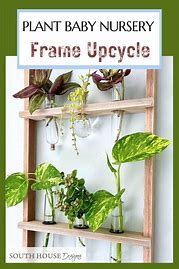
10. Window Frame Picture Display

Here’s a clear, step-by-step guide for Window Frame Picture Display:
Window Frame Picture Display
Give an old window frame a new purpose by turning it into a charming photo display. This rustic and vintage-inspired décor piece can showcase family memories, travel moments, or seasonal art, and it works beautifully in living rooms, bedrooms, or entryways.
Materials You’ll Need
- Old wooden window frame (glass panes intact or removed)
- Sandpaper
- Paint or wood stain (optional, for refinishing)
- Photos or printed artwork
- String, twine, or thin wire (if using without glass)
- Mini clothespins or clips (if using without glass)
- Tape, photo corners, or glue dots (if using with glass)
- Hanging hardware (sawtooth hanger, D-rings, or hooks)
Step-by-Step Instructions
- Prepare the Frame
- Remove any old hardware, nails, or peeling paint.
- Sand the wood to smooth rough spots and clean off dust.
- Optionally paint, stain, or distress the frame for a vintage or modern look.
- Decide on the Display Style
- With Glass: Tape or glue photos directly to the glass from the back.
- Without Glass: String twine or wire across the openings and attach photos with mini clothespins.
- Arrange Your Photos
- Choose a theme (black-and-white, travel, family, seasonal).
- Lay photos out before attaching to get the best arrangement.
- Attach the Photos
- Use tape, glue dots, or photo corners for a clean look behind glass.
- For the string method, clip photos so they hang evenly.
- Hang the Display
- Install sturdy hanging hardware on the back of the frame.
- Position on your wall at eye level for the best visual impact.
Creative Variations
- Add small fairy lights around the frame for a cozy glow.
- Mix in postcards, pressed flowers, or quotes alongside photos.
- Use seasonal photos and update them throughout the year.
💡 Tip: Flea markets, thrift stores, or even old houses often have inexpensive vintage window frames perfect for this project.
If you want, I can also give you a layout sketch showing different ways to arrange the photos in the window panes for maximum visual appeal.
11. Teacup Candle
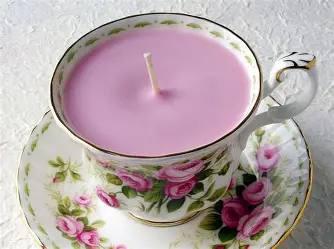
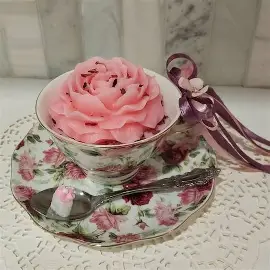
Teacup candles combine the calming atmosphere of flickering light with the allure of classic aesthetics. These adorable crafts turn abandoned teacups into stylish, environmentally responsible décor. They provide a sustainable craft alternative that gives a homely beauty to any area by repurposing old or mismatched teacups.
The distinctive storytelling potential of teacup candles is what makes them special. Every item, with its unique style and previous existence, has a story to tell. Making these candles is not just an artistic endeavour but also a voyage through sentiment and history, which makes them treasured presents and great discussion starters.
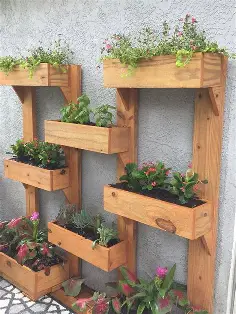
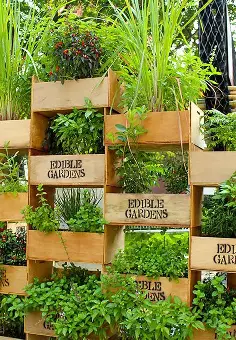
12. Vertical Herb Garden DIY

Here’s a clear, beginner-friendly guide for Vertical Herb Garden DIY:
Vertical Herb Garden DIY
A vertical herb garden is a space-saving way to grow fresh herbs indoors or outdoors. It adds greenery to your home, keeps fresh ingredients within reach, and is a stylish sustainable project you can do in a weekend.
Materials You’ll Need
- Wooden pallet, ladder shelf, or wall-mounted frame
- Small pots, mason jars, or tin cans
- Potting soil
- Herb plants or seeds (basil, mint, thyme, rosemary, parsley, etc.)
- Screws, hooks, or zip ties (to attach pots)
- Drill and screwdriver
- Optional: paint, wood stain, or waterproof sealant
Step-by-Step Instructions
- Choose Your Structure
Decide whether you want to use a recycled pallet, build a wooden frame, or repurpose a ladder shelf. Make sure it’s sturdy enough to hold the weight of soil-filled pots. - Prepare the Surface
Sand rough edges and, if desired, paint or stain the wood. Apply a waterproof sealant for outdoor use. - Attach the Pots
- Use screws, metal brackets, or strong hooks to secure the pots to the frame.
- For mason jars or cans, you can use hose clamps or zip ties for stability.
- Add Soil & Herbs
Fill each container with potting soil and plant your chosen herbs. - Position Your Garden
Place the vertical garden in a sunny location—most herbs need at least 6 hours of sunlight per day. - Water & Maintain
Water regularly, but make sure there’s proper drainage to prevent root rot. Trim herbs often to encourage growth.
Creative Ideas
- Paint each pot with chalkboard paint and label your herbs.
- Hang your garden on a kitchen wall for easy cooking access.
- Mix herbs with small flowers for a decorative touch.
🌿 Tip: If using indoors, place a tray or mat underneath to catch excess water.
If you’d like, I can give you three stylish layout designs for vertical herb gardens—one rustic, one modern, and one minimal—so you can pick a look that fits your space. Would you like me to make those designs?
13. Denim Pocket Wall Organizer
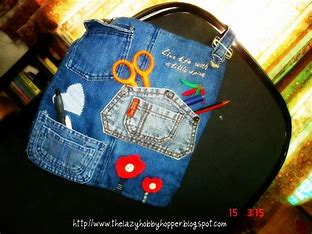
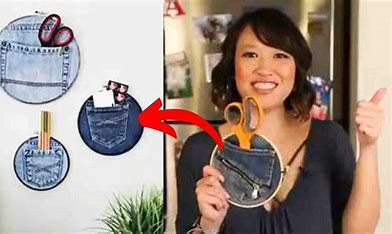
With good reason, upcycled crafts have become increasingly popular. Making a wall organiser out of used jeans is one of the many inventive upcycling ideas. You may create a useful and beautiful storage solution for your house by using the pockets and strong fabric of jeans.
Making a wall organiser out of trousers pockets is not only fun but also environmentally responsible. With their distinct fading and wear, each pocket tells a tale and gives your decor a touch of rustic character. Additionally, this project promotes minimum waste because it embodies the genuine essence of upcycling by using even the smallest fragments.
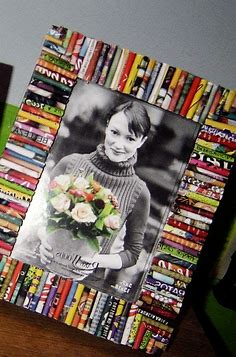
14. Magazine Page Canvas Craft
Here’s a simple and stylish guide for Magazine Page Canvas Craft in English:
Magazine Page Canvas Craft
Turn old magazines into vibrant wall art by transforming their colorful pages into unique designs. This upcycled craft is eco-friendly, inexpensive, and perfect for adding a pop of personality to any room.
Materials You’ll Need
- Old magazines
- Canvas or thick cardboard
- Scissors
- Glue stick or Mod Podge
- Pencil and ruler
- Optional: paint, stencils, or embellishments
Step-by-Step Instructions
- Select Your Pages
Flip through old magazines and tear out pages with interesting colors, patterns, or images. - Cut or Tear Shapes
- Cut pages into strips, squares, triangles, or abstract shapes.
- For a textured look, tear the paper instead of cutting it.
- Plan Your Design
Arrange the magazine pieces on your canvas before gluing. You could create:- A geometric pattern
- A mosaic-style collage
- An abstract artwork
- A specific image (flower, skyline, animal)
- Glue the Pieces
Once you’re happy with the arrangement, glue each piece onto the canvas, smoothing out wrinkles. - Seal the Surface
Brush a thin layer of Mod Podge over the entire surface to protect and give it a polished finish. - Let It Dry
Allow your artwork to dry completely before hanging it.
Creative Variations
- Use black-and-white magazine pages for a modern monochrome look.
- Add metallic paint accents for extra shine.
- Layer pages for a 3D textured effect.
🖌 Tip: This craft works well on any size canvas—from tiny 8×8 squares to large statement pieces.
If you want, I can create five themed magazine collage templates so you can recreate popular art styles without designing from scratch. Would you like me to prepare those?
15. Mini Toolbox Upcycling Ideas
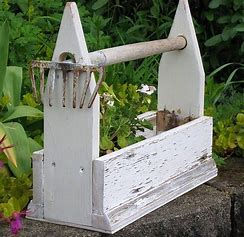
Upcycled crafts give commonplace objects a new lease on life and turn them into useful gems. The Altoid tin tiny toolbox is notable for its practicality and inventiveness among these. These mint containers that were once thrown away become portable, adaptable tool storage. It’s ideal for storing little necessities like mini screwdrivers, screws, and nails.
In addition to its practicality, the Altoid tin tiny toolbox is a marvel of ecological creation. It encourages a culture of reuse and repurposing by pushing us to look beyond an object’s original function. Making one is a step towards a clutter-free workspace as well as an eco-friendly crafts practice. This project offers a clever way to creatively arrange minor equipment while blending environmental consciousness with practical craftiness.
16. Tin Herb Planters

Here’s a clear, beginner-friendly guide for Tin Herb Planters:
Tin Herb Planters
Upcycling tin cans into herb planters is an easy, eco-friendly way to grow fresh herbs right in your kitchen or garden. It’s inexpensive, sustainable, and adds a rustic charm to your space.
Materials You’ll Need
- Clean, empty tin cans (soup, coffee, or vegetable cans)
- Hammer and nail (for drainage holes)
- Potting soil
- Herb plants or seeds (basil, mint, chives, cilantro, thyme, etc.)
- Optional: paint, spray paint, or washi tape for decoration
- Paintbrushes (if painting)
- Small stones or gravel (for drainage)
Step-by-Step Instructions
- Prepare the Cans
- Remove labels and wash cans thoroughly.
- Use a hammer and nail to make 3–5 small drainage holes in the bottom of each can.
- Decorate (Optional)
- Paint cans in solid colors, patterns, or metallic finishes.
- Wrap with twine, burlap, or washi tape for a rustic or colorful look.
- Let paint dry completely before planting.
- Add Drainage Layer
- Place a small layer of stones or gravel at the bottom of each can to prevent waterlogging.
- Fill with Soil & Plant Herbs
- Add potting soil, leaving about 2 cm (1 inch) from the top.
- Plant your chosen herbs or sow seeds according to the instructions.
- Place in Sunlight
- Position planters in a sunny spot—most herbs need at least 6 hours of light daily.
- Water & Maintain
- Water regularly, but don’t overwater—check soil moisture before adding more water.
- Harvest herbs by trimming leaves to encourage fresh growth.
Creative Ideas
- Paint each can with chalkboard paint and label your herbs.
- Hang cans on a wooden pallet or fence for a vertical herb wall.
- Use cans of different sizes for a tiered display.
🌱 Tip: If you’re keeping tin herb planters indoors, place a small saucer or tray underneath to catch excess water.
I can also give you three stylish tin planter display ideas—kitchen windowsill, hanging wall garden, and tiered outdoor rack—so you can choose a look that fits your space. Would you like me to prepare those?
17. Repurposed Ladder Bookshelf
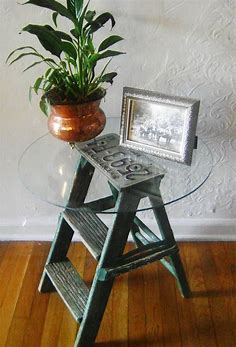
Through upcycling, an old ladder can be transformed into a rustic, quaint bookshelf. This creative makeover gives any space a distinct personality in addition to recycling. This craft’s simplicity and unique personal touch are what make it so lovely.
Imagine holding your favourite books or treasured mementos at each rung of the ladder, contrasting the old and the new. This do-it-yourself project tells a tale in addition to providing useful storage. An ancient ladder turned bookcase serves as a tribute to inventiveness and sustainable living, merging the past and current in lovely harmony.
18. Guitar Shelf Upcycling Project

Here’s a full guide for a Guitar Shelf Upcycling Project in English:
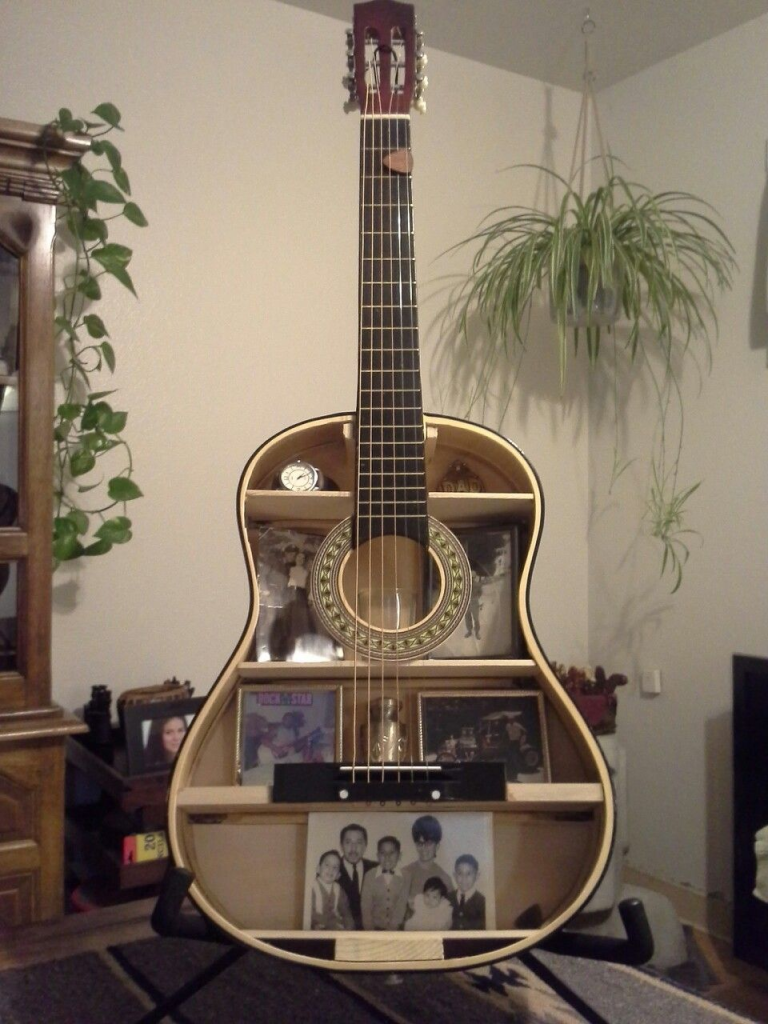
Guitar Shelf Upcycling Project 🎸
An old or broken guitar doesn’t have to gather dust in a corner—turn it into a one-of-a-kind storage piece! This upcycled guitar shelf combines music-inspired charm with practical functionality, making it a perfect conversation starter for your living room, bedroom, or music studio.
Materials You’ll Need
- An old acoustic guitar (damaged or unused)
- Small wooden boards or plywood (for shelves)
- Screwdriver
- Sandpaper
- Wood glue or screws/nails
- Paint or wood stain (optional)
- Clear varnish (optional)
- Measuring tape & pencil
Step-by-Step Instructions
- Prepare the Guitar
- Remove the strings and any hardware.
- Use a screwdriver to take off the guitar’s back panel (you may need to cut along the edges with care).
- Hollow It Out
- Ensure the inside is clean and free of loose wood or dust.
- Sand rough edges to avoid splinters.
- Plan Your Shelves
- Measure the inside of the guitar to determine shelf length and placement.
- Cut wooden boards or plywood to fit snugly inside.
- Install Shelves
- Secure each shelf with wood glue and/or small nails or screws into the inner guitar frame.
- Make sure they are level before drying.
- Add Finishing Touches
- Paint or stain the shelves (and the guitar exterior if desired).
- Seal with a clear varnish for protection.
- Mount or Display
- For a wall-mounted version, attach a sturdy bracket or hanging hardware to the back.
- Alternatively, stand it upright on a flat surface as a floor display.
Creative Variations
- Add LED strip lights inside for a glowing effect.
- Use decorative wallpaper or fabric as a backdrop behind the shelves.
- Incorporate hooks at the bottom for keys or jewelry.
💡 Tip: This project works best with acoustic guitars because of their hollow body, but you can also adapt the idea for electric guitars by adding a deeper frame.
If you’d like, I can also make a visual step-by-step diagram so the Guitar Shelf upcycle looks like a professional DIY magazine spread. That would make the instructions even easier to follow.
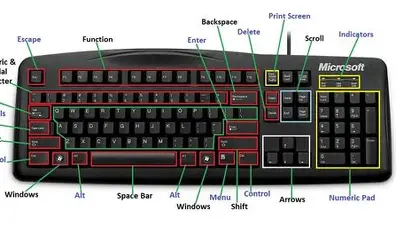
19. Keyboard Keys Message Board
Imagine holding your favourite books or treasured mementos at each rung of the ladder, contrasting the old and the new. This do-it-yourself project tells a tale in addition to providing useful storage. An ancient ladder turned bookcase serves as a tribute to inventiveness and sustainable living, merging the past and current in lovely harmony.
Imagine having a tactile, fulfilling way to type affirmations, quotes, or reminders every day. Every key has a unique click that adds enjoyment and nostalgia to routine work. This distinctive message board is an eco-friendly and inspirational statement piece that not only reduces waste but also encourages creativity and adds a whimsical touch to our overly digitised existence.
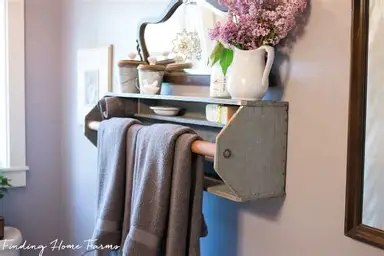
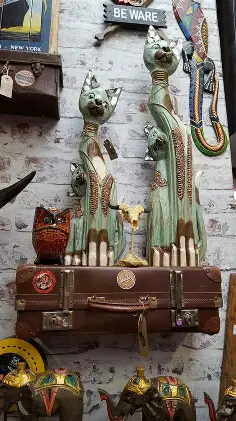
20. Suitcase Wall Shelf Transformation

Here’s a complete guide for a Suitcase Wall Shelf Transformation in English:
Suitcase Wall Shelf Transformation
Old suitcases have a certain vintage charm—and with a little creativity, they can become unique wall shelves that double as storage and décor. This project blends functionality with personality, making it perfect for eclectic or retro-inspired spaces.
Materials You’ll Need
- An old hard-shell suitcase (preferably lightweight)
- Measuring tape
- Pencil or chalk
- Saw (hand saw or jigsaw, depending on suitcase thickness)
- Sandpaper
- Wall brackets or L-shaped shelf brackets
- Screws & wall anchors
- Drill and screwdriver
- Optional: paint, wallpaper, or fabric for lining
Step-by-Step Instructions
- Choose Your Suitcase
Pick one with sturdy sides. Vintage finds from thrift stores or flea markets work best. - Plan Your Shelf Size
Decide how deep and wide you want the shelf to be. Use a measuring tape to mark a straight cut line on the suitcase. - Cut the Suitcase in Half
Carefully saw through the middle so you’re left with one half (the other half can be saved for another project). - Smooth the Edges
Use sandpaper to smooth the cut edges so they’re safe to handle. - Add Interior Décor (Optional)
Line the inside with patterned wallpaper, fabric, or a fresh coat of paint for a polished look. - Attach Wall Brackets
Secure wall brackets to the bottom of the suitcase half. Make sure they’re evenly spaced for stability. - Mount to the Wall
Drill holes into the wall where you want your shelf. Use wall anchors for extra support, then screw the brackets into place. - Style Your Shelf
Add books, small plants, candles, or other decorative items. Avoid overly heavy objects to maintain safety.
Creative Ideas
- Stack multiple suitcase shelves in different colors for a gallery wall effect.
- Use a suitcase with travel stickers for a nostalgic, wanderlust vibe.
- Add a small LED light strip inside for ambient lighting.
💡 Tip: This works especially well in entryways, home offices, or reading nooks for a quirky, conversation-starting focal point.
If you want, I can also make a step-by-step illustrated guide for this project so it looks like a stylish DIY magazine tutorial. That would make it easier to follow. Would you like me to prepare that?
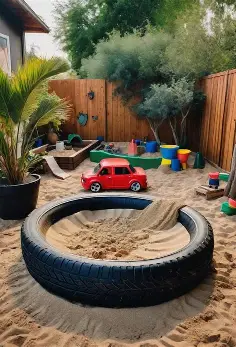
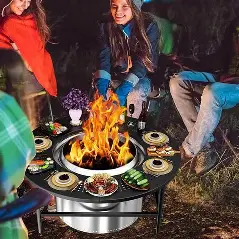
21. Tire Sandbox DIY
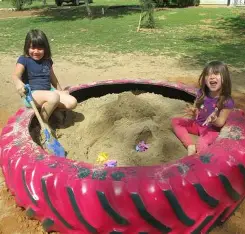
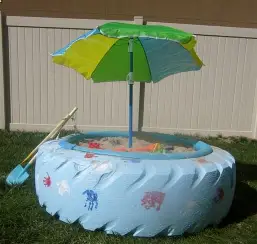
What would otherwise be landfill waste is given new life by turning an old vehicle tire into a sandbox. In addition to cutting waste, this environmentally friendly project provides a creative outlet and a chance for family time. An abandoned tyre can be transformed into a lively and secure play space for kids with a coat of non-toxic paint and a few simple tools.
A car tire sandbox’s strength and adaptability are what make it so great. Rubber tires are ideal for outdoor play areas since they are made to resist tough circumstances. They can be tucked away in backyards or gardens to create a focal point and give a whimsical touch. They may also be readily relocated or used for different purposes, so they can adapt to your family’s changing demands.