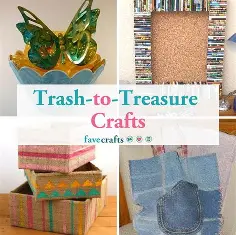
Here’s a list of Creative and Useful Trash-to-Treasure Projects that turn everyday waste into something beautiful and practical:
♻️ Creative and Useful Trash-to-Treasure Projects
- Tin Can Lanterns
- Clean tin cans, punch decorative holes, and add a candle or LED light for charming garden lanterns.
- Bottle Cap Magnets
- Glue small images or decorative paper inside bottle caps, add a magnet to the back, and use them on your fridge.
- Mason Jar Organizers
- Old jars can store craft supplies, kitchen utensils, or even become herb planters.
- Plastic Spoon Lamp
- Cut and arrange plastic spoons around a lightbulb base to create a modern and artistic lamp.
- Cardboard Drawer Dividers
- Use sturdy cardboard to create custom compartments for desk or dresser drawers.
- CD Mosaic Art
- Break old CDs into small pieces and use them to decorate photo frames, vases, or mirrors.
- Denim Pocket Organizers
- Cut pockets from old jeans, sew them onto fabric, and hang for a wall-mounted organizer.
- Wine Cork Bulletin Board
- Glue wine corks to a frame or board to make a functional pinboard.
- Plastic Bottle Bird Feeder
- Cut windows into a plastic bottle, add perches, fill with seeds, and hang outside.
- Shoe Box Charging Station
- Decorate a shoebox, cut cable holes, and keep chargers and wires neatly hidden.
- Broken Chair Plant Stand
- Repurpose a broken chair by turning the seat into a unique planter.
- Egg Carton Seed Starters
- Perfect for sprouting seeds before transferring them into your garden.
- Glass Bottle Garden Edging
- Bury empty glass bottles upside down along garden borders for a colorful edge.
- Old Ladder Bookshelf
- Stand up a wooden ladder and place planks across the steps for a rustic bookshelf.
- Tire Ottoman
- Cover an old tire with rope and a cushion top to make a stylish ottoman or coffee table.
✨ These projects not only reduce waste but also add creativity, personality, and function to your home.
Would you like me to make a kids-friendly version of trash-to-treasure projects (safe, fun, and easy), or should I expand this into a detailed DIY guide for adults?
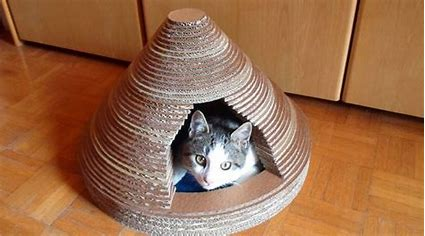
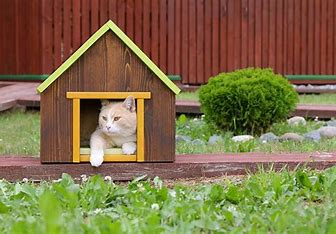
Check out the transformation of this old radio into a cat housing as part of a laundry room renovation. To truly understand how incredible this makeover is, you must view the prior photos!
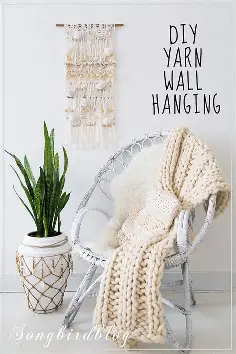
2. DIY yarn wall hanging. An unexpected thrift store upcycle
Here’s a creative write-up idea for your request:
🧶 DIY Yarn Wall Hanging: An Unexpected Thrift Store Upcycle
Wall hangings add warmth, texture, and personality to any space, and the best part is—you don’t need to buy expensive supplies to make one. A trip to the thrift store can provide the perfect base for a DIY yarn wall hanging that’s stylish, sustainable, and totally unique.
What You’ll Need:
- An old wooden hanger, frame, or even a curtain rod from the thrift store
- Assorted yarn or string (use leftover yarn scraps for a colorful effect)
- Scissors
- Optional: beads, tassels, or fabric strips for added flair
How to Make It:
- Prep Your Base
- Sand or paint your thrift store find if needed. A wooden hanger makes a great minimalist base, while a frame creates a more structured look.
- Cut Your Yarn
- Decide the length of your wall hanging and cut multiple strands of yarn. Mixing textures and colors gives it a modern, boho vibe.
- Attach the Strands
- Fold each yarn strand in half, loop it over your base, and pull the ends through to secure. Repeat until the base is covered.
- Shape Your Design
- Trim the bottom into a straight line, angled cut, or even a V-shape for a polished finish.
- Add Personality
- Weave in beads, tie knots, or add tassels and fabric scraps for a playful, eclectic touch.
Why This Project Rocks:
- Budget-Friendly: Yarn scraps and a thrift store find keep costs low.
- Eco-Friendly: Upcycling prevents items from ending up in landfills.
- Customizable: Perfect for matching your décor or experimenting with color schemes.
✨ With just yarn and a thrift store treasure, you’ll have a one-of-a-kind wall hanging that looks boutique-worthy but costs almost nothing.
Would you like me to turn this into a step-by-step tutorial with pictures/diagrams, or keep it as an inspiration-style blog write-up?
3. A Totally Unique Upcycled Firewood Holder
The materials I utilised to create this lovely firewood container will wow you. One of my favourite trash to treasure initiatives is this one!
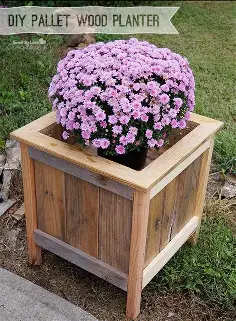
4. How to Make a DIY Fluted Wood Planter
Here’s a clear and creative guide for you:
🌿 How to Make a DIY Fluted Wood Planter
Fluted designs are all the rage in modern home décor, and you don’t need to spend a fortune to bring the look into your home. With a few simple supplies, you can make a DIY fluted wood planter that looks chic, custom, and high-end.
🛠 Materials You’ll Need:
- A plain cylinder planter (plastic, ceramic, or even a thrifted one)
- Wood dowels or half-round wooden trim (cut to the height of your planter)
- Strong adhesive (wood glue or construction adhesive)
- Sandpaper
- Paint, wood stain, or sealer (optional, depending on your finish preference)
- A saw or cutting tool (if dowels need trimming)
✨ Step-by-Step Instructions:
- Prep Your Base Planter
- Make sure the planter surface is clean and smooth. If it’s glossy, lightly sand it to help the glue stick better.
- Cut the Wood Pieces
- Measure the height of your planter and cut all dowels or trim pieces to size. Try to keep them consistent for a neat finish.
- Attach the Fluting
- Apply glue along the back of each dowel and press it firmly against the planter.
- Work your way around, placing the dowels side by side until the planter is fully covered.
- Sand and Smooth
- Once the glue is dry, lightly sand any rough edges to give your planter a polished look.
- Finish It Off
- Leave the wood raw for a natural, Scandi look, stain it for warmth, or paint it for a bold statement.
- If using outside, apply a protective sealer to help it withstand moisture.
🌸 Style Tips:
- Use different wood stains for a striped, modern look.
- Try painted dowels in pastel shades for a playful twist.
- Make a set of fluted planters in varying heights to create a designer-style arrangement.
✅ In just a few hours, you’ll have a gorgeous DIY fluted wood planter that looks like it came straight from a home décor boutique—without the hefty price tag.
Would you like me to also write a budget-friendly version using recycled materials (like cardboard rolls instead of dowels), or keep this as a polished wood project?
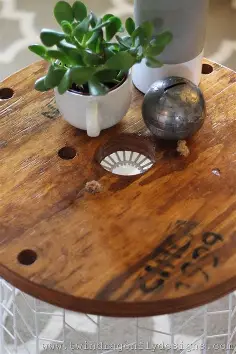
5. What would you do with…an empty globe stand

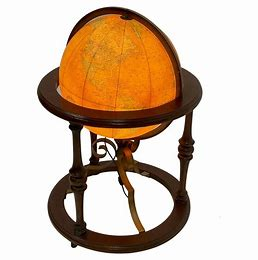
Who would have imagined that the ideal paper towel holder could be made out of an empty globe stand?
Here’s a creative write-up for your request:
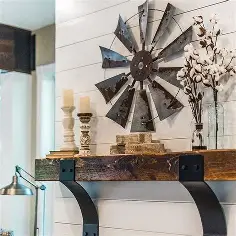
🌬️ DIY Windmill Wall Decor
Rustic windmills are a farmhouse favorite, adding charm and character to any space. Instead of buying one, you can create a DIY windmill wall décor piece that’s budget-friendly, eye-catching, and totally customizable.
🛠 Materials You’ll Need:
- A round base (wood round, foam board, or even an old clock face)
- Craft sticks, wood shims, or metal sheets (for the blades)
- Hot glue or strong adhesive
- Paint or spray paint (gray, white, or metallic for a rustic look)
- Optional: Sandpaper for distressing, stencils for added details
✨ Step-by-Step Instructions:
- Create the Base
- Use a round base as the center of your windmill. This will hold the blades in place.
- If you don’t have one, trace and cut a circle out of sturdy cardboard or wood.
- Make the Blades
- Cut your wood shims or craft sticks into equal lengths.
- Angle the ends slightly if you want a more authentic windmill look.
- Arrange and Attach
- Lay out the blades evenly around the circle before gluing.
- Once you’re happy with the layout, glue them firmly to the base.
- Add the Centerpiece
- Cover the middle with a decorative element—like a wooden disc, button, or metal washer—for a finished look.
- Paint and Distress
- Paint the windmill in a rustic metallic shade (silver, gray, or white).
- Lightly sand the edges or dry-brush a contrasting color to give it a weathered, farmhouse feel.
- Hang and Enjoy
- Attach hanging hardware to the back and display your windmill wall art indoors or on a covered porch.
🌸 Style Ideas:
- Farmhouse: Use white paint with distressed edges.
- Industrial: Try metallic spray paint for a galvanized steel look.
- Whimsical: Use bright colors for a playful, modern twist.
✅ With just a few materials, you can transform simple supplies into a beautiful DIY windmill wall décor piece that brings rustic charm and handmade character to your home.
Would you like me to also suggest a mini tabletop version of this windmill (like a centerpiece), or keep it strictly as wall décor?
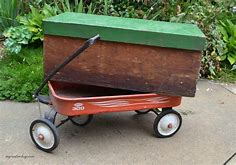
An old red waggon may be transformed into an incredibly inventive do-it-yourself waggon shelf with just a few low-cost materials. For a kids’ room, this is a lot of fun!
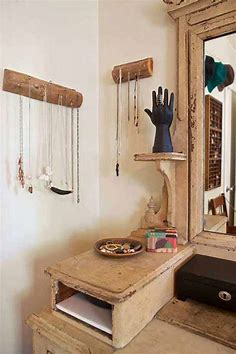
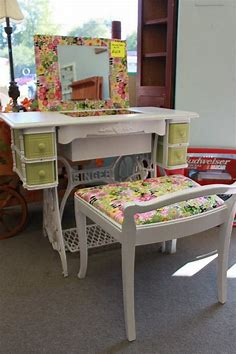
8. How to Repurpose a Vintage Sewing Machine Table as a Desk
Here’s a full, easy-to-follow guide for your idea:
🪡 How to Repurpose a Vintage Sewing Machine Table as a Desk
A vintage sewing machine table is a timeless piece with plenty of charm—and with a little creativity, it can be transformed into a functional, stylish desk. Whether you want a writing nook, a laptop workstation, or a decorative console, this upcycle project blends history with modern purpose.
🛠 Materials You’ll Need:
- A vintage sewing machine table (thrifted, inherited, or flea market find)
- Screwdriver (to remove the sewing machine and hardware)
- Sandpaper or electric sander
- Wood filler (if needed)
- Paint or stain + sealant
- A wooden or glass top (optional, for a larger surface area)
- Drawer liners or organizers (optional)
✨ Step-by-Step Instructions
- Remove the Sewing Machine
- Carefully detach the sewing machine and any unnecessary hardware. Keep any decorative metal details intact—they add to the table’s charm.
- Prep the Surface
- Sand down the wood to remove scratches, old varnish, or peeling paint. Fill any holes with wood filler if you want a smoother look.
- Refinish or Paint
- Stain for a classic, warm wood finish, or paint in a modern color (matte black, white, or sage green look stunning). Don’t forget to seal for durability.
- Add a Desktop Surface (Optional)
- If the original tabletop is small, attach a larger wood slab or a glass piece on top to create more workspace. Secure it with screws or adhesive pads.
- Use the Built-in Storage
- Sewing tables often come with little drawers and compartments—perfect for pens, notebooks, or craft supplies. Line them with drawer liners for a fresh look.
- Style It as a Desk
- Pair with a comfortable chair, add a desk lamp, and decorate with plants or stationery for a cozy workspace.
🌟 Creative Variations
- Minimalist Look: Paint the base white and top it with a light oak surface.
- Industrial Style: Highlight the cast iron base and pair it with a dark-stained wood slab.
- Craft Station: Use the desk for sewing, art projects, or journaling while honoring its origins.
✅ With a little vision, a vintage sewing machine table becomes more than just furniture—it transforms into a functional piece of history that’s as useful as it is beautiful.
Would you like me to also create a short styling guide (how to decorate around your new desk so it fits seamlessly into a modern home), or should I keep it strictly a DIY tutorial?
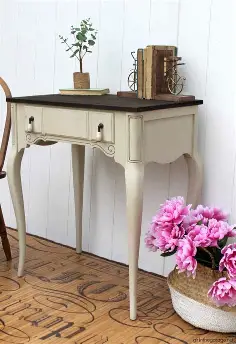
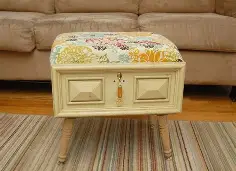
For around $12, this stunning accent table was created! It appears to be something from a posh home store, doesn’t it?
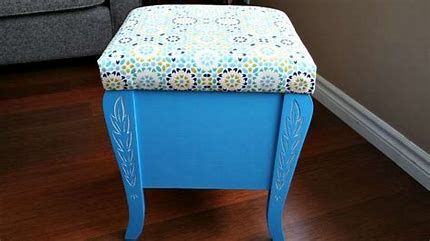
Here’s a practical and fun guide you can use:
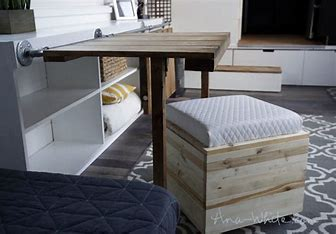
🧵 DIY Thread Storage Stool
If you love sewing or crafting, you know how quickly spools of thread can pile up. Instead of letting them clutter your space, why not make a DIY Thread Storage Stool? It’s a clever 2-in-1 project—extra seating and hidden thread organization all in one.
🛠 Materials You’ll Need:
- A sturdy wooden crate, box, or old stool base
- Cushion foam + fabric (for the seat)
- Hinges (to make the seat openable)
- Wooden dowels, rods, or pegs (to hold spools of thread)
- Wood screws, nails, or strong adhesive
- Staple gun (for attaching fabric to foam/seat)
- Paint or wood stain (optional, for a polished look)
✨ Step-by-Step Instructions:
- Build the Stool Base
- Start with a wooden crate or repurpose an old stool. If using a box, make sure it’s sturdy enough to sit on.
- Create the Seat Lid
- Cut a wooden board to fit the top. Place cushion foam on top and wrap it with fabric. Staple the fabric underneath for a neat, upholstered seat.
- Add Hinges
- Attach the seat lid to the box with hinges so it can open and close easily. This creates hidden storage inside.
- Install Thread Holders
- Inside the box, measure and attach wooden dowels (either vertically or horizontally) to neatly stack your spools of thread.
- For smaller spools, use short pegs; for larger ones, longer dowels work best.
- Finishing Touches
- Sand and paint or stain the exterior to match your craft room or sewing corner. Add wheels for mobility if you like.
🌸 Why This Project Works:
- Space-Saving: Combines seating with storage in one item.
- Customizable: Adjust the size to fit your thread collection.
- Eco-Friendly: Perfect way to repurpose an old stool or crate.
- Stylish: Can be upholstered to match your sewing room décor.
✨ In just a weekend project, you’ll have a stylish and functional thread storage stool—keeping your spools organized and your space tidy, while doubling as a comfy seat.
Would you like me to also sketch out a quick design diagram (showing where the dowels and hinges go), so it’s easier to visualize?
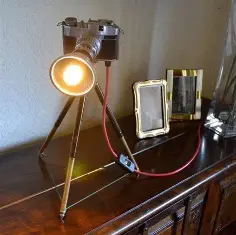
11. How To Turn A Vintage Camera Into A Lamp
Here’s a creative and practical guide you can use:
📸 How To Turn a Vintage Camera Into a Lamp
If you love vintage finds and want a conversation piece that doubles as home décor, turning an old camera into a lamp is the perfect DIY upcycle. It blends nostalgia, creativity, and function—all in one stylish project.
🛠 Materials You’ll Need:
- A vintage camera (look for a thrift store or flea market find—not a valuable collector’s piece)
- A lamp kit (available at hardware stores, includes socket, cord, and switch)
- Drill with metal bits (if your camera is metal)
- Screwdriver
- Light bulb (Edison bulbs look especially striking)
- Optional: tripod stand if you want a taller floor or table lamp look
✨ Step-by-Step Instructions:
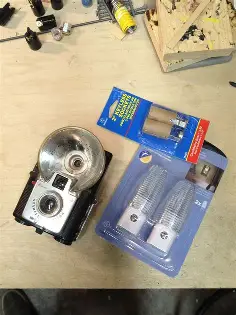
- Choose Your Camera
- Pick a vintage camera with a solid body. Box cameras and old SLRs work beautifully.
- Prepare the Camera
- Carefully remove any inner parts you don’t need (film reels, mirrors, etc.). This makes room for the lamp hardware.
- Drill an Opening
- Drill a hole where you want the lamp cord to exit—usually at the back or bottom of the camera.
- Install the Lamp Kit
- Fit the light socket where the camera’s lens is, or mount it on top depending on your design.
- Thread the cord through the hole you drilled and connect it to the socket following the kit instructions.
- Mount the Camera (Optional)
- If using a tripod or base, secure the camera to it for stability and extra height.
- Add the Bulb & Test It
- Screw in your bulb, plug in the cord, and test the switch.
🌟 Style Tips:
- Use an Edison bulb for a warm, vintage glow.
- Keep the camera raw for a true antique vibe, or polish/paint it for a modern twist.
- Place it on a desk, bookshelf, or bedside table for an eye-catching décor statement.
✅ In just a little time, you can transform a forgotten camera into a stunning lamp that celebrates history while lighting up your space.
Would you like me to also write a safety checklist for this DIY (since it involves electricity), so the instructions stay beginner-friendly and safe?
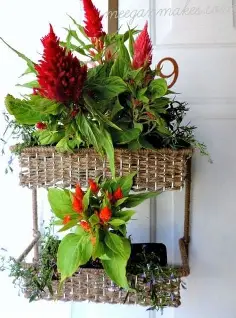
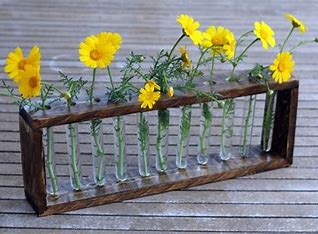
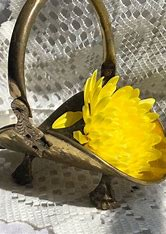
12. DIY Flower Basket from a Spice Rack
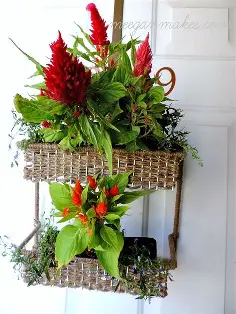

Here’s a simple guide for making a DIY Flower Basket from a Spice Rack:
Materials You’ll Need:
- An old spice rack (wooden or metal)
- Small jars, bottles, or spice containers
- Fresh or artificial flowers
- Floral foam (if using artificial flowers)
- Twine, ribbon, or rope (optional, for decoration)
- Paint or spray paint (optional, for a fresh look)
- Scissors
Instructions:
- Clean the Spice Rack
Wipe down the rack and jars to remove dust or labels. If you’d like, give it a coat of paint or spray paint to match your décor. - Prepare the Jars
- For fresh flowers: Fill the jars with a little water.
- For artificial flowers: Place a piece of floral foam inside each jar to hold stems in place.
- Arrange the Flowers
Trim flower stems to fit the jars and arrange them inside. You can mix colors and textures for a natural bouquet effect. - Decorate the Rack
Wrap twine or ribbon around the jars or the rack itself for a rustic, farmhouse-style touch. - Display Your Basket
Place the spice rack on a table, windowsill, or hang it on a wall as a unique vertical flower basket display.
✨ This project is a perfect way to upcycle an old spice rack and turn it into a charming floral arrangement for your home or garden.
Would you like me to make the instructions step-by-step with pictures/illustrations, so it feels more like a craft tutorial?
13. Step-by-step tutorial for a DIY tufted bench
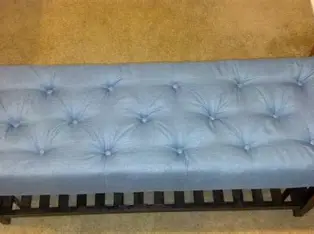
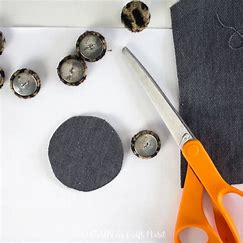
An antique wooden butcher block table served as the inspiration for this do-it-yourself bench. What a fantastic transformation from garbage to treasure!
14. DIY Play Kitchen
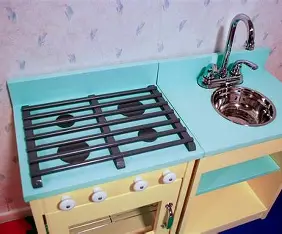
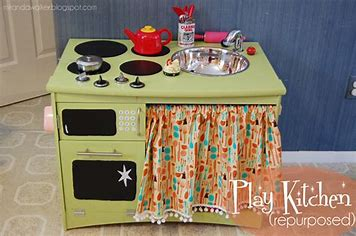
Here’s a fun guide for making a DIY Play Kitchen for kids:
Materials You’ll Need:
- Old nightstand, bookshelf, or cardboard boxes (as the kitchen base)
- Small bowl or metal mixing bowl (for the sink)
- Old faucet or knobs (or use drawer handles as pretend faucets)
- Bottle caps, wooden circles, or painted lids (for stove burners)
- Small handles or knobs (for oven/stove dials)
- Hinges (if you want an opening oven door)
- Paint (non-toxic, child-safe)
- Hot glue, screws, or nails (depending on material)
- Fabric (for a curtain or oven mitts, optional)
Instructions:
- Choose the Base
- Repurpose a nightstand, small shelf, or sturdy box as the main kitchen frame.
- If using cardboard, reinforce it with tape to make it more durable.
- Create the Sink
- Trace a circle the size of your bowl on the top surface.
- Cut it out and insert the bowl as a sink.
- Attach an old faucet or drawer handles above it to act as taps.
- Make the Stove
- Use jar lids, coasters, or painted circles as burners.
- Glue them onto the surface.
- Add knobs or bottle caps on the front as dials.
- Add an Oven (Optional)
- If your base has a door, paint it like an oven door.
- Attach a clear plastic sheet or plexiglass for a “window.”
- Install a handle to complete the look.
- Paint and Decorate
- Paint the kitchen in your child’s favorite colors.
- Add details like buttons, a clock, or labels for “oven” and “stove.”
- Finishing Touches
- Hang a small curtain under the sink for extra storage.
- Add hooks for play utensils or mini pots and pans.
- Place toy food, cups, and plates for pretend cooking fun.
✨ With a little creativity, you can transform old furniture or boxes into a mini kitchen set that sparks hours of imaginative play.
Do you want me to write a cardboard-only version (super budget-friendly), or a furniture-upcycle version (sturdier and long-lasting)?
15. Retro TV Cabinet to Repurposed Bar
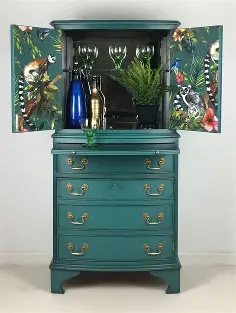
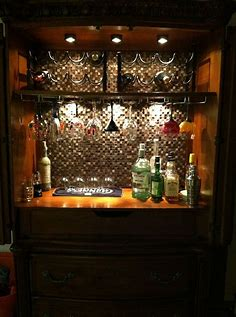
Make a fun bar cabinet out of an old retro TV cabinet by adding a French wine graphic, which you can download for free.
16. DIY Table Lamp from Recycled Ribbon Spools
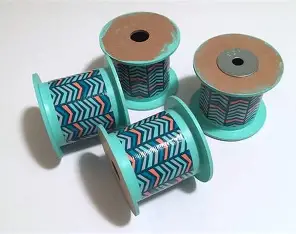
Here’s a creative guide for making a DIY Table Lamp from Recycled Ribbon Spools:
Materials You’ll Need:
- Empty ribbon spools (cardboard or wooden)
- Lamp kit (socket, cord, and bulb)
- Wooden base or sturdy board (for stability)
- Drill (for cord hole)
- Hot glue or strong adhesive
- Paint or decorative paper (optional, for finishing)
- Lampshade
Instructions:
- Prepare the Spools
- Clean and remove any leftover ribbon or labels.
- If you’d like, paint or wrap the spools in decorative paper to match your room décor.
- Create the Lamp Body
- Stack the ribbon spools on top of each other to form the lamp’s column.
- Use hot glue or strong adhesive between each spool to keep them steady.
- Make sure the hole in the center of the spools lines up for the cord.
- Attach to the Base
- Drill a hole in the wooden base for the lamp cord.
- Thread the cord from the lamp kit through the base and up through the stacked spools.
- Install the Lamp Kit
- Follow the lamp kit instructions to secure the socket at the top of the spool stack.
- Ensure the cord is pulled through tightly and safely connected.
- Add the Lampshade
- Place a lampshade over the socket.
- Screw in a bulb (preferably an LED for safety and efficiency).
- Finishing Touches
- Touch up with paint, fabric, or twine wrapping around the spools for a stylish look.
- Place your new lamp on a desk, bedside table, or reading corner.
✨ This project is a perfect way to upcycle empty ribbon spools into something both decorative and functional.
Would you like me to write this tutorial in a step-by-step photo style (like a Pinterest DIY guide), or in a short craft blog style?
17. Vintage Dresser Bathroom Vanity
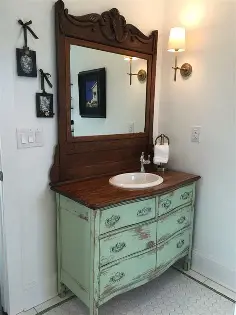
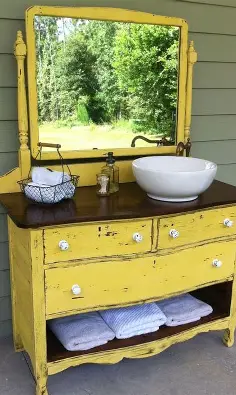
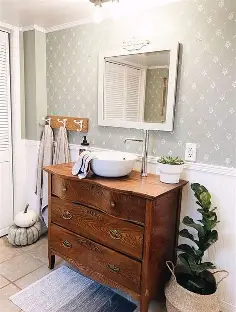
Before I gave this dresser a makeover and a completely new purpose as a bathroom vanity, it had undoubtedly seen better days.
18. DIY Dresser Into A Chair And Ottoman
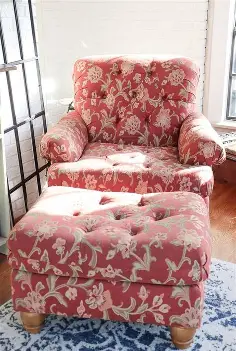
Here’s a creative guide for transforming an old dresser into a chair and ottoman:
Materials You’ll Need:
- An old dresser (sturdy, solid wood works best)
- Saw (hand saw or circular saw)
- Sandpaper or sander
- Screws, nails, and drill
- Wood glue
- Foam or old cushions (for seating)
- Upholstery fabric or durable cloth
- Paint or wood stain (optional, for finishing)
- Staple gun and staples
Instructions:
Step 1: Choose and Prepare the Dresser
- Select a dresser that’s strong and stable.
- Remove drawers and hardware (set some aside to reuse).
- Sand the surfaces to smooth out any rough edges.
Step 2: Build the Chair Frame
- Cut the dresser in half or down to the size you want for the chair base.
- Reinforce the inside with extra wood pieces if needed.
- Use one of the dresser’s side panels or drawer fronts as the chair’s backrest, attaching it securely with screws.
Step 3: Make the Ottoman
- Use one of the dresser’s leftover drawers or the cut-off section from the dresser.
- Reinforce it with wood slats for strength.
- Add foam padding on top and cover with fabric for a soft seat.
Step 4: Add Cushioning and Upholstery
- Cut foam to fit the chair seat and backrest.
- Wrap with upholstery fabric and staple it neatly underneath.
- Do the same for the ottoman.
Step 5: Paint or Stain (Optional)
- Paint the frame in your favorite color or apply a wood stain for a polished look.
- Let it dry completely before use.
Step 6: Final Touches
- Add small furniture legs or casters to the ottoman if desired.
- Accessorize with throw pillows or a cozy blanket.
✨ This upcycle project gives new life to an old dresser by turning it into a functional chair and ottoman set—perfect for a reading nook, bedroom corner, or kids’ play area.
Would you like me to create a sketch/visual plan of how the dresser is cut and reassembled into the chair and ottoman?
19. How to Completely Transform an Ugly Light Fixture
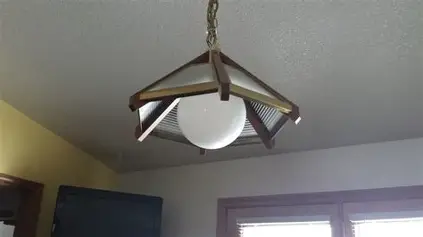
To believe it, you must view this repurposed light fixture’s before. With only a few dollars’ worth of materials and less than an hour’s labour, what began as an ugly but inexpensive lamp from the Habitat Restore is now elegant and contemporary.
20. How to Make Woven Leather Napkin Rings
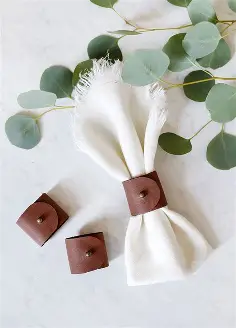
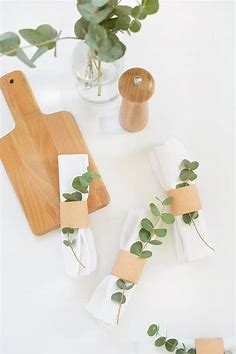
Here’s a simple guide on how to make Woven Leather Napkin Rings:
Materials You’ll Need:
- Leather strips (real or faux, about ½ inch wide)
- Scissors or rotary cutter
- Ruler and pencil/pen
- Strong glue (fabric/leather glue or hot glue)
- Binder clips or clothespins (for holding while drying)
- Optional: snap fasteners or small rivets for extra durability
Instructions:
Step 1: Cut the Leather Strips
- Cut several strips of leather about 6–7 inches long and ½ inch wide.
- Each napkin ring will need 3–4 strips depending on how wide you want it to be.
Step 2: Weave the Strips
- Lay the strips side by side.
- Start weaving by overlapping strips in an over-under pattern (like a basket weave).
- Adjust until the weave is tight and even.
Step 3: Form the Ring
- Once you’ve woven enough length (about 5–6 inches), wrap the piece into a circle.
- Overlap the ends slightly and glue them together.
- Hold in place with binder clips until the glue dries completely.
Step 4: Secure the Ends (Optional)
- For extra strength and style, add a rivet, snap, or stitch at the joint where the ends overlap