
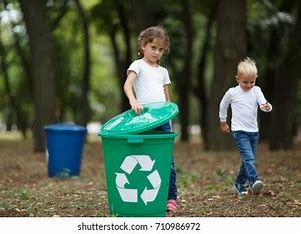
April 22nd is almost approaching, which is Earth Day, but there’s never a bad moment to celebrate Mother Earth. College students need to be made aware of the year-round environmental benefits of recycling, which include preserving energy and natural resources and lowering air and water pollution. Upcycling creates something new out of an existing object in its current state, whereas recycling breaks down obsolete objects to create something new. Challenge your children to make something unique and amazing out of leftover materials such as magazines, egg cartons, plastic water bottles, tin cans, and more. Check out our list of the top recycled crafts for Earth Day, or any other day! Here are a couple you should definitely try!
1. Make a treasure magnet
Creating a “treasure magnet” can be interpreted in a couple of ways depending on your goal. If you’re referring to a physical device for finding hidden metal objects, like a treasure hunter’s magnet, here’s how you might make one. If you’re thinking more metaphorically or spiritually, like a method for attracting positive experiences or opportunities, that’s a different approach.
For a Physical Treasure Magnet:
Materials Needed:
- Strong Neodymium Magnet: These are the most powerful commercially available magnets and are ideal for treasure hunting.
- Durable Rope or Chain: To attach to the magnet and allow for easy retrieval.
- Drill and Drill Bits: To create a hole in the magnet if needed.
- Metal Eye Bolt or Hook: For securing the rope to the magnet.
- Epoxy or Strong Adhesive: For additional security if needed.
- Protective Gloves: For safety while handling the magnet.
Steps:
- Choose a Neodymium Magnet: Purchase a strong neodymium magnet. The strength of the magnet will affect how well it can attract metal objects from a distance.
- Prepare the Magnet: If the magnet doesn’t already have a hole or attachment point, use a drill to create one. Be very careful, as neodymium magnets are brittle and can shatter.
- Attach the Eye Bolt or Hook: Insert the metal eye bolt or hook into the drilled hole. Secure it with epoxy or strong adhesive if needed to ensure it doesn’t come loose.
- Attach the Rope or Chain: Tie a strong rope or chain to the eye bolt or hook. Make sure it’s tightly secured and can handle the weight of any metal objects you might pull up.
- Safety Precautions: Wear protective gloves to avoid injury from the strong magnetic fields and sharp metal edges.
- Testing: Test your treasure magnet in a controlled environment to ensure it’s securely attached and working properly.
- Usage: Use the magnet by tossing it into bodies of water or other areas where you suspect there may be metal objects. Carefully pull it back and check for any finds.
For a Metaphorical Treasure Magnet:
If you’re aiming to attract positive experiences or opportunities in your life, you might approach it with a combination of mindset and actions:
- Set Clear Goals: Define what “treasures” (goals, opportunities, experiences) you want to attract.
- Positive Mindset: Cultivate a positive, open mindset. Believe that you can attract good things into your life.
- Visualize Success: Regularly visualize achieving your goals and experiencing the outcomes you desire.
- Take Action: Actively work towards your goals. Opportunities often come to those who are proactive.
- Network and Connect: Build relationships and network with people who can help you reach your goals or offer opportunities.
- Stay Grateful: Practice gratitude for the good things you already have. This can attract more positivity into your life.
- Learn and Grow: Continuously seek knowledge and personal growth. Being open to learning can lead to unexpected opportunities.
Whether you’re crafting a physical tool for treasure hunting or cultivating a mindset for success, both approaches can be fulfilling in their own ways.
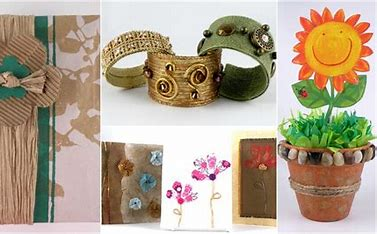
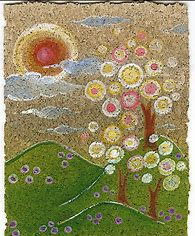
2. Flip outdated magazines into artwork

We adore how this recycled journal cut-paper art project may be adjusted for first-year college students or utilised to promote sophisticated high school college students’ artwork.
3. Construct an attractive DIY terrarium
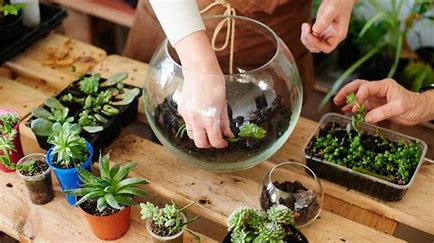

Creating a DIY terrarium is a fun and rewarding project that allows you to bring a bit of nature indoors. Here’s a step-by-step guide to making an attractive terrarium:
Materials Needed:
- Container: Choose a clear glass container. It can be a jar, fish tank, vase, or any glass vessel with an open top.
- Gravel or pebbles: for drainage.
- Activated charcoal: to prevent mold and odors.
- Potting Soil: For your plants.
- Plants: Select small plants suited for terrariums, like succulents, air plants, or small ferns.
- Decorative Elements: Optional items such as small figurines, stones, driftwood, or moss.
- Tools: small shovel or spoon, tweezers (for arranging small plants), and gloves (optional).
Instructions:
- Prepare the container:
- Clean your glass container thoroughly and let it dry. Make sure it’s free of dust or residues.
- Add Drainage Layer:
- Pour a layer of gravel or pebbles into the bottom of the container. This helps with drainage and prevents water from sitting at the bottom, which can cause root rot.
- Add activated charcoal:
- Add a thin layer of activated charcoal on top of the gravel. This helps with filtration and prevents unpleasant odors.
- Add potting soil.
- Place a layer of potting soil on top of the charcoal. The thickness will depend on the size of your plants’ root systems. For small plants, a few inches of soil should suffice.
- Arrange your plants:
- Remove your plants from their pots and gently shake off excess soil. Arrange them in the container, starting with larger plants and then filling in with smaller ones. Use tweezers or small tools to position them as needed.
- Add decorative elements:
- Place any additional decorations, like small figurines, stones, or driftwood, around your plants. This step is where you can get creative and personalize your terrarium.
- Water Your Plants:
- Lightly water the plants. Be careful not to overwater, especially in a closed container, as this can lead to mold and rot.
- Add Moss (optional):
- If you like, you can add a layer of moss around the plants. Moss can help retain moisture and add a natural look to your terrarium.
- Place and maintain:
- Place your terrarium in a location with indirect sunlight. Most terrarium plants thrive in bright, indirect light.
- Check the terrarium regularly for moisture levels. Water sparingly as needed, and ensure there’s adequate ventilation if the container is closed.
Tips:
- Choose the Right Plants: Ensure the plants you select have similar light and water needs. Succulents and cacti are ideal for dry conditions, while ferns and mosses thrive in more humid environments.
- Consider Airflow: If using a closed container, make sure it has some ventilation to prevent excessive moisture buildup.
- Regular Maintenance: Trim plants as needed to prevent overcrowding and remove any dead or yellowing leaves.
Creating a terrarium is not only a great way to add a touch of greenery to your home, but it can also be a relaxing and enjoyable craft project.
4. Paint with corks
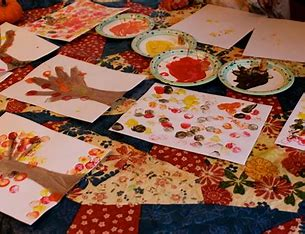
That kind of artwork is appropriate for Earth Day since it uses recyclable materials (corks) to colour your favourite natural landscape.
5. Arrange some self-watering planters
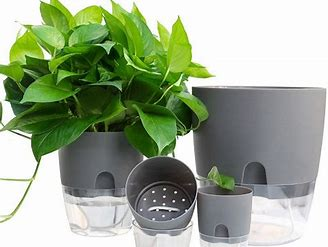
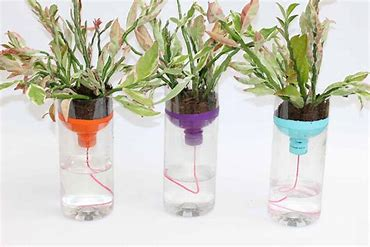
Self-watering planters are a fantastic solution for maintaining healthy plants with minimal effort. They use a reservoir system to provide consistent moisture to the plants, reducing the frequency of watering. Here’s how you can arrange and set up self-watering planters:
Materials Needed:
- Self-Watering Planters: Choose planters with an integrated reservoir system. These are available in various sizes and styles.
- Potting Soil: Select appropriate soil for the type of plants you’re using.
- Plants: Choose plants suitable for the environment where the planters will be placed (indoors or outdoors).
- Fertilizer: Optional, depending on plant needs.
- Watering can or hose: for initial watering and filling the reservoir.
Steps to Arrange and Set Up Self-Watering Planters:
- Select Planters:
- Choose self-watering planters that fit your space and aesthetic preferences. Ensure they are the right size for your plants and have an adequate reservoir.
- Prepare the planters:
- If your planters have a separate reservoir and planting area, assemble them according to the manufacturer’s instructions.
- Check the reservoir and ensure there are no blockages or issues that might affect water flow.
- Add potting soil.
- Fill the planter’s planting area with potting soil. Leave about an inch or so of space at the top to prevent soil from spilling out when watering.
- Plant your plants:
- Remove plants from their nursery pots and gently loosen any tightly bound roots.
- Position the plants in the planter, ensuring they are at the same depth as they were in their original pots. Fill around the roots with soil and press gently to eliminate air pockets.
- Water the plants.
- Water the plants thoroughly to help settle the soil and ensure good root-to-soil contact.
- Fill the reservoir with water according to the planter’s instructions. Most self-watering planters have a fill line or indicator.
- Add fertilizer (optional):
- If needed, add a slow-release fertilizer to the soil according to the plant’s requirements. Follow the instructions for the correct amount.
- Place the planters:
- Position your self-watering planters in their intended location. Consider light requirements and temperature preferences for the plants you’ve chosen.
- Monitor and maintain:
- Check the water level in the reservoir regularly, especially during the first few weeks, to ensure it’s working correctly.
- Add water to the reservoir as needed, and avoid overfilling. Some planters have an overflow mechanism to prevent excess water from causing issues.
- Occasionally check the soil moisture level with a moisture meter or by sticking your finger into the soil.
Tips for Success:
- Choose the Right Plants: Make sure the plants you select are compatible with the moisture level provided by the self-watering system. Some plants prefer drier conditions and may not do well in a consistently moist environment.
- Drainage: Ensure your planter has good drainage, even if it’s self-watering. Excess water should be able to escape to prevent root rot.
- Cleaning: Periodically clean the reservoir and planter to prevent algae and mineral buildup. Follow the manufacturer’s recommendations for cleaning.
By setting up your self-watering planters correctly, you’ll be able to enjoy lush, healthy plants with less frequent maintenance.
6. Kindly remove flowers from water bottles
Using water-based paint markers and plastic bottles, create these lovely flowers. Put them all together to create a vibrant garland for your classroom.
7. Construct cardboard castles
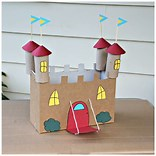

Building a cardboard castle is a fun and creative project that can be a great activity for kids and adults alike. Here’s a step-by-step guide to constructing a cardboard castle:
Materials Needed:
- Cardboard Boxes: Large and small boxes for different parts of the castle.
- Scissors or Box Cutter: For cutting the cardboard.
- Glue or Tape: Strong glue (like hot glue) or tape for assembling the pieces.
- Paint and brushes: for decorating the castle.
- Markers or crayons: For additional detailing.
- Ruler and pencil: for measuring and marking.
- Craft Supplies: Optional items like construction paper, fabric scraps, or stickers for added decorations.
Steps to Construct a Cardboard Castle:
- Plan Your Design:
- Decide on the size and layout of your castle. Sketch a rough design on paper, including towers, walls, and gates.
- Prepare the cardboard:
- Flatten out your cardboard boxes and cut them into the necessary shapes. For a basic castle, you’ll need large pieces for walls and smaller pieces for towers and other details.
- Create the base:
- Use a large piece of cardboard as the base of your castle. Cut it to your desired size. This will be the foundation where all the other parts are attached.
- Build the walls:
- Cut out rectangles or squares of cardboard for the castle walls. Fold and score the cardboard to create battlements (the notched tops of castle walls). Attach these pieces to the base using glue or tape.
- Add Towers:
- Cut cylindrical or square shapes for the towers. To make cylindrical towers, roll cardboard into tubes and secure them with tape or glue. For square towers, cut out additional cardboard pieces to form the tower shapes.
- Attach the towers to the corners of the castle walls.
- Construct the Gatehouse:
- Cut a doorway for the castle gate. You can make a large arch or a more traditional gatehouse design. Reinforce the doorway with additional cardboard to add stability.
- Add Details:
- Create details like flags, windows, and doorways. Cut out small rectangles or shapes and glue them onto the castle walls and towers.
- Use additional cardboard to make drawbridges, crenellations (the battlements), and other features.
- Decorate the castle:
- Paint the castle with the colors of your choice. Use gray for stone, brown for wood, or any other color that suits your design.
- Add textures and details with markers, crayons, or additional craft supplies. You can use construction paper for banners or fabric scraps for flags.
- Assemble the castle:
- Once all parts are decorated and dry, assemble the castle by attaching the towers, walls, and other elements to the base. Use glue or tape to secure everything in place.
- Finishing Touches:
- Add any final touches, such as miniature figures, landscaping (like trees or drawbridges), and extra decorations.
Tips:
- Reinforce Corners: Use extra cardboard pieces to reinforce corners and edges to make the castle sturdier.
- Modular Design: Consider making different parts of the castle modular (detachable) for easier storage and reconfiguration.
- Safety First: If using a box cutter, handle it with care or have an adult assist with cutting.
Building a cardboard castle can be a creative and enjoyable project, perfect for decorating a play area or just having fun with art and design.
8. Make these newspaper owls
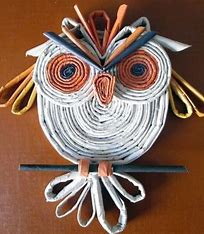
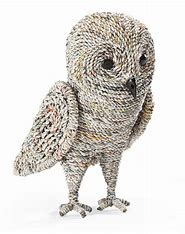
When old newspapers are revealed to be recycled newspaper owls, they find their spirit animal. To bring them to life, all you need are markers, watercolours, and leftover paper.
9. Assemble a plastic bottle recycling bin
Assembling a plastic bottle recycling bin is a practical project that can help encourage recycling and reduce waste. Here’s a step-by-step guide to creating a simple, functional recycling bin from common materials:
Materials Needed:
- Plastic Bottle (or Bottles): Large plastic bottles or jugs work well. You could use a single large bottle or multiple smaller ones.
- Scissors or Utility Knife: For cutting the plastic.
- Adhesive (glue or tape): for securing pieces together.
- Marker or Label: For labeling the bin.
- Optional Decorations: Paint, stickers, or other decorative items.
Steps to Assemble a Plastic Bottle Recycling Bin:
- Prepare the bottle:
- Clean the Bottle: Wash and dry the plastic bottle or bottles thoroughly to remove any residue.
- Remove Labels: Peel off any labels or stickers from the bottle.
- Design the bin:
- Decide on Size and Shape: Depending on the size of your plastic bottle, you can either use a single large bottle or multiple smaller ones to create the bin.
- Cutting the Bottle:
- Single Bottle Design: If using one large bottle, cut the top off to create an opening. Make sure the cut is clean and smooth.
- Multiple Bottle Design: If using multiple bottles, you can cut the bottoms off and join them together to create a larger bin. Alternatively, cut the top off each bottle and stack them to create height.
- Assemble the bin:
- Single Bottle: If you’re using one bottle, you’re mostly done. You can reinforce the edges with tape or glue if desired.
- Multiple Bottles: Align the bottles side by side or stack them. Use glue or tape to secure the bottles together. If stacking, ensure the bottles are aligned properly for stability.
- Create a lid (optional):
- Lid Design: You can create a simple lid by cutting out a piece of cardboard or another plastic bottle. Attach it with tape or hinges if you want a more secure lid.
- Label the bin:
- Mark for Recycling: Use a marker or label to clearly indicate that the bin is for plastic bottle recycling. You can write “Plastic Bottles Only” or similar instructions.
- Decorate the bin (optional):
- Personalize: Decorate the bin with paint, stickers, or other craft supplies to make it visually appealing.
- Place the bin:
- Choose a Location: Place the recycling bin in a convenient location where people are likely to use it, such as in a kitchen, office, or common area.
Tips:
- Reinforce if Needed: If the bin feels unstable, use additional tape or glue to reinforce the joints.
- Size Considerations: Ensure the size of the bin matches the number of plastic bottles you expect to collect.
- Regular Maintenance: Empty the bin regularly and clean it to keep it in good condition.
By creating a plastic bottle recycling bin, you can help promote recycling and make it easier for people to dispose of their plastic bottles responsibly.
10. Let your creativeness run wild with cardboard

Createcrafta
Without a doubt, one of the greatest and most affordable materials you can find is cardboard. Take advantage of it all and challenge your kids to produce better works of art. You never know what they might offer you.