Having plenty of reusable items, such as toilet paper rolls? Repurpose them into adorable and entertaining kid crafts.
Searching for enjoyable activities to keep your children occupied and foster a feeling of environmental responsibility in them? With recycled crafts, you can’t go wrong!
These projects not only encourage trash reduction but also develop your child’s inventiveness and resourcefulness.
We’ve compiled a list of 37 recycled projects for kids of all ages in honour of Earth Day. These crafts, which range from imaginative cardboard structures to vibrant tin can wind chimes, are sure to pique your interest and encourage creativity. So get your recyclables together and let’s get creative!
I make an effort to recycle everything that I can. At my place, it’s really simple. Recyclables are all placed in one container. Make an Earth Day creation using one of these repurposed materials.
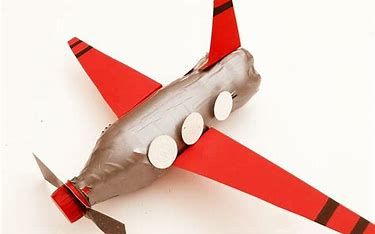
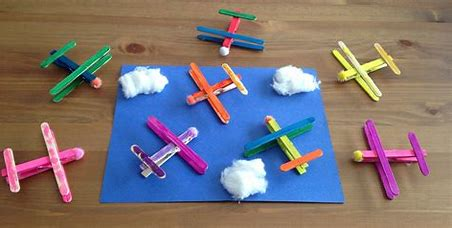
It sounds like you’re looking for a fun airplane bank craft for kids! Here’s a simple project you can do together:
Airplane Bank Craft
Materials Needed:
- Empty plastic bottle (like a soda bottle)
- Craft paints or markers
- Craft foam or construction paper
- Scissors
- Tape or glue
- Googly eyes (optional)
- Stickers or embellishments (optional)
Instructions:
- Prepare the Bottle:
- Rinse and dry the plastic bottle. Remove the label.
- Cut the Bottle:
- Use scissors to cut a slot in the bottle’s top or side for coins to go in. Make sure it’s wide enough for coins to fit through.
- Paint the Body:
- Let kids paint the bottle in bright colors to resemble an airplane. They can use markers for details, like windows and wings.
- Make Wings:
- Cut out wing shapes from craft foam or construction paper. Decorate them as desired and attach them to the sides of the bottle with glue or tape.
- Add Features:
- Glue on googly eyes, draw a nose, or add stickers to personalize the airplane.
- Finishing Touches:
- Let everything dry completely. Once dry, you can also seal it with a clear coat if desired.
- Using the Bank:
- Encourage kids to use their airplane bank to save coins. They can decorate it further or create a fun display!
This craft not only encourages creativity but also teaches kids about saving money. Have fun with it!
magazines made of different papers and transform them into lovely butterflies.
3. Rainbow Suncatcher Craft for Kids
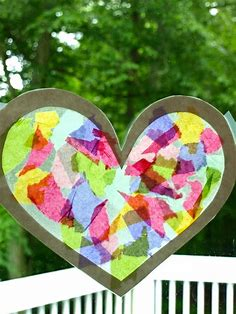
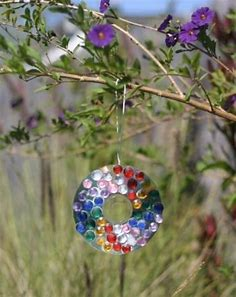
Rainbow Suncatcher Craft for Kids
Materials Needed:
- Clear contact paper or laminate sheets
- Tissue paper in various colors
- Scissors
- A black marker (optional)
- String or fishing line (for hanging)
- Hole punch (optional)
Instructions:
- Prepare the Base:
- Cut a piece of contact paper to your desired size (about 10×10 inches works well).
- If using laminating sheets, cut them in half and peel one side.
- Create a Rainbow Template (Optional):
- Use a black marker to draw a simple rainbow shape on the sticky side of the contact paper. You can also create cloud shapes if you like.
- Tear the Tissue Paper:
- Tear or cut the tissue paper into small squares or strips. Use a variety of colors to make your rainbow vibrant!
- Arrange the colors:
- Start placing the tissue paper pieces on the sticky side of the contact paper. You can layer them to create a colorful, overlapping effect. If you used a template, fill in the colors according to your rainbow pattern.
- Seal the Suncatcher:
- Once you’re happy with your design, carefully place another piece of contact paper on top to seal it. If you’re using laminating sheets, place the other half over your design and run it through a laminator (or seal it according to the instructions).
- Cut Out the Shape:
- Cut around the edges of your design to create a suncatcher shape, leaving a small border if using contact paper.
- Add a Hanging Mechanism:
- If desired, punch a hole at the top and thread string or fishing line through it to hang your suncatcher.
- Hang It Up:
- Find a sunny window and hang your rainbow suncatcher to enjoy the beautiful colors it creates when sunlight shines through!
Tips:
- Experiment with different shapes and patterns.
- For a more three-dimensional look, try adding some glitter or sequins between the layers.
- This craft is perfect for parties, rainy days, or as a colorful gift!
Enjoy crafting your beautiful rainbow suncatcher!
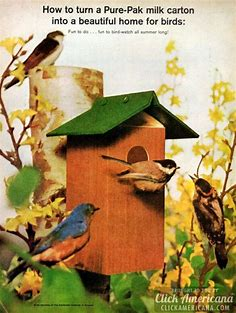
Creating a milk carton birdhouse is a fun and eco-friendly project! Here’s a simple guide to get you started:
Materials Needed
- Clean, empty milk carton
- Scissors
- Craft knife (optional)
- Paint or markers (non-toxic)
- Glue or tape
- Small twigs or popsicle sticks (for perches)
- String or wire (for hanging)
- Optional: decorations (like buttons, leaves, or beads)
Instructions
- Prepare the Milk Carton:
- Rinse out the milk carton and let it dry completely.
- Cut a small entrance hole about 2 inches in diameter, about 3-4 inches from the bottom.
- Create drainage and ventilation:
- Puncture a few small holes in the bottom for drainage.
- Make small holes near the top for ventilation.
- Add a Perch:
- Use a small twig or popsicle stick to create a perch just below the entrance hole. Puncture a hole for it and secure it with glue or tape.
- Decorate:
- Use paint, markers, or other decorations to personalize your birdhouse. Keep it safe for birds by avoiding toxic materials.
- Seal It Up:
- If you’d like, seal the top of the carton with tape or glue to ensure it remains sturdy.
- Add a Hanging Mechanism:
- Puncture two small holes at the top and thread a piece of string or wire through to hang it.
- Find a Good Spot:
- Hang your birdhouse in a sheltered location, preferably facing away from the wind and direct sun.
Tips
- Ensure that the birdhouse is safe for birds, avoiding sharp edges.
- Consider adding a small roof using cardboard or other materials for extra protection.
Enjoy watching the birds come and go!
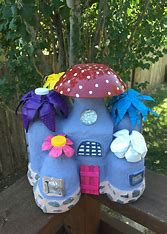
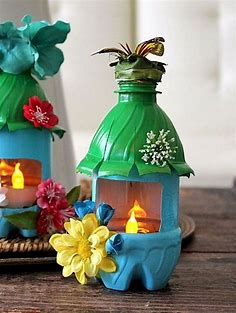
Plastic Bottle Fairy House
Creating a plastic bottle fairy house is a delightful and imaginative project! Here’s how you can make one:
Materials Needed
- Empty plastic bottle (1 or 2-liter)
- Scissors or craft knife
- Non-toxic paint or markers
- Hot glue gun (or strong adhesive)
- Decorative items (buttons, glitter, leaves, small stones)
- Optional: LED tea light (for lighting)
- Twine or string (for hanging)
Instructions
- Prepare the Bottle:
- Clean the plastic bottle thoroughly and remove any labels. Let it dry.
- Cut the Bottle:
- Use scissors or a craft knife to cut the bottle in half. You can use the top half or the bottom half, depending on your design.
- Create the Entrance:
- Cut a door shape into the bottle. You can make it arched or rectangular. Be careful with sharp edges!
- Paint and Decorate:
- Use non-toxic paint or markers to color the bottle. Think of whimsical colors like pastel shades or earth tones.
- Decorate with items like buttons for windows, glitter for a magical touch, or leaves for a natural look.
- Add a Roof (Optional):
- If you used the bottom half, you can create a roof using a piece of cardboard or more plastic. Decorate the roof to match!
- Light It Up (Optional):
- If you want to add some glow, place an LED tea light inside the house. It’s safe and adds a magical ambiance.
- Add final touches:
- Attach twine or string at the top if you want to hang the fairy house. You can also add small stones or pebbles around the base for added decoration.
- Find a Perfect Spot:
- Place your fairy house in a garden, on a shelf, or hang it from a tree branch to create a whimsical fairy corner.
Tips
- Get creative! Use materials you have at home to personalize your fairy house.
- If you want to make multiple houses, you can experiment with different shapes and sizes.
Enjoy bringing a touch of magic to your space!
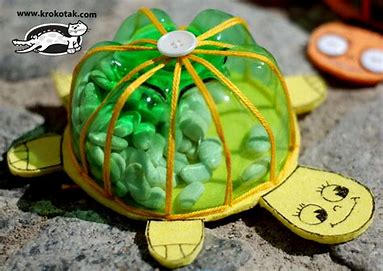
6. Egg Carton Turtle, Frog, and Caterpillar Recycled Kid Craft
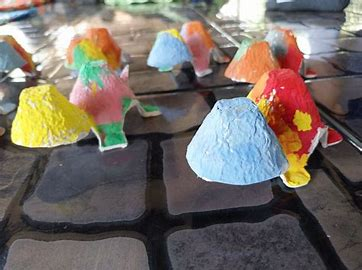
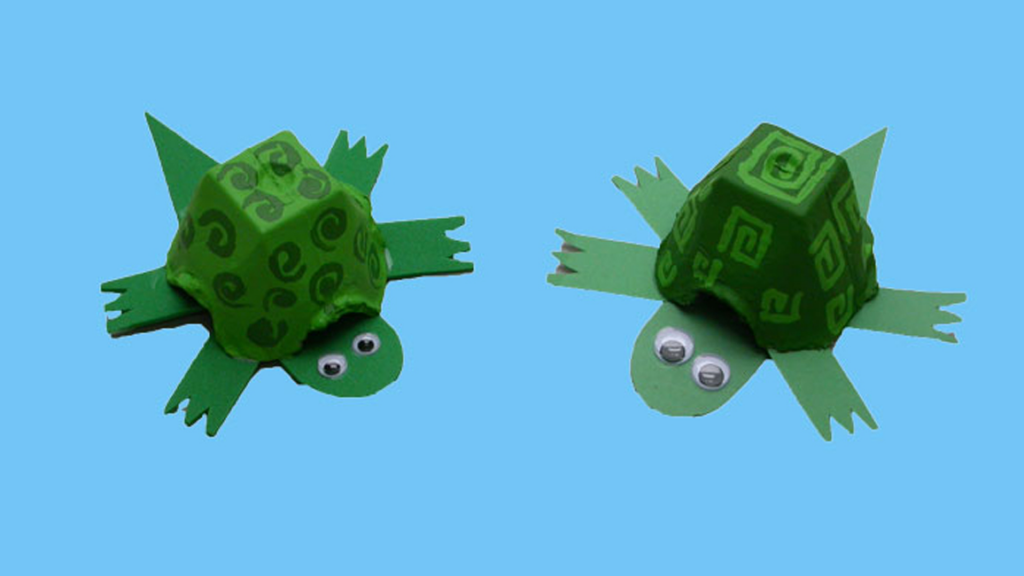
Egg Carton Turtle, Frog, and Caterpillar Craft
This fun recycling craft uses egg cartons to create cute animal figures! Perfect for kids, it’s simple and encourages creativity.
Materials Needed
- Empty egg carton (6 or 12-count)
- Scissors
- Paint (non-toxic)
- Paintbrushes
- Googly eyes
- Glue (craft glue or hot glue for adults)
- Markers or crayons
- Optional: pipe cleaners, buttons, or other decorative items
Instructions
1. Egg Carton Turtle
- Cut the Carton: Cut out one or two cups from the egg carton for the turtle’s shell and body.
- Paint: Paint the cup(s) green or brown. Let it dry.
- Add Details: Glue on googly eyes and use markers to draw a smile and spots on the shell.
- Legs: Cut small pieces from the carton or use bottle caps as legs, and glue them to the underside.
- Finish Up: You can also use pipe cleaners for legs or a tail if you want!
2. Egg Carton Frog
- Cut the Carton: Take one cup from the egg carton. This will be the frog’s body.
- Paint: Paint it green. Let it dry.
- Eyes: Glue on googly eyes or cut out white paper circles and draw pupils with a marker.
- Feet: Cut out two smaller cups or use cardboard to create webbed feet. Glue them to the sides.
- Finish: Draw a mouth and spots with markers, and your frog is ready to hop!
3. Egg Carton Caterpillar
- Cut the carton: Cut three or four cups in a row for the caterpillar’s body.
- Paint: Paint each cup a different color for a rainbow effect. Let it dry.
- Eyes and antennae: Glue on googly eyes at one end. For antennae, you can use short pieces of pipe cleaners.
- Details: Use markers to draw a smile and add spots or stripes on the body.
Tips
- Experiment: Encourage kids to be creative with colors and designs!
- Group Activity: This craft works well as a group project—kids can create a whole animal kingdom together.
- Recycling Awareness: Talk about the importance of recycling and reusing materials while crafting.
Enjoy crafting your little critters!
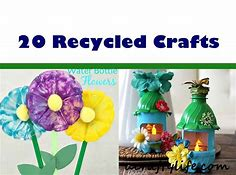
7. Water Bottle Flower Recycled
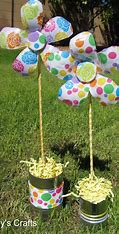
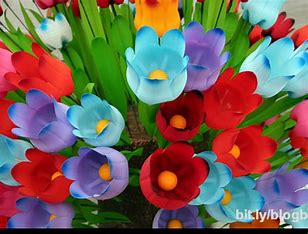
Water Bottle Flower Craft
Creating beautiful flowers from recycled water bottles is a fun and eco-friendly project! Here’s how to make your own colorful flowers using materials you probably already have at home.
Materials Needed
- Empty plastic water bottles
- Scissors
- Non-toxic paint or spray paint
- Paintbrush (if using paint)
- Craft glue or hot glue gun
- Green craft paper or green paint (for stems and leaves)
- Optional: beads or buttons (for decoration)
Instructions
- Prepare the Water Bottles:
- Rinse and dry the bottles thoroughly. Remove any labels.
- Cut the Flower Petals:
- Using scissors, cut the bottom part of the bottle off. The bottom section will form the flower.
- Shape the edges of the cut-out section to create petals. You can make them rounded or pointed, depending on the flower shape you want.
- Paint the Petals:
- Use non-toxic paint or spray paint to color the petals. Let the paint dry completely.
- Get creative with colors! You can use multiple colors for a more vibrant look.
- Create the stem and leaves:
- Cut a strip of green craft paper or use a green-painted stick for the stem.
- For leaves, cut leaf shapes from green paper and paint or decorate them as desired.
- Assemble the Flower:
- Once the petals are dry, use craft glue or a hot glue gun to attach the petals together, overlapping them slightly for a fuller look.
- Glue the stem to the back of the flower and attach the leaves at the base.
- Add Details:
- For extra decoration, glue beads or buttons in the center of the flower. You can also use markers to add designs to the petals.
- Display Your Flowers:
- You can place your water bottle flowers in a vase, stick them in the garden, or use them to brighten up any space!
Tips
- Experiment: Try making different types of flowers by varying the petals shapes and colors.
- Group Activity: This project is perfect for groups or family crafting sessions—everyone can create their own unique flowers.
- Environment Awareness: Discuss the importance of recycling while crafting, making it a learning experience too!
Enjoy your colorful, recycled flowers!
8. Cereal Box Elephant Recycled
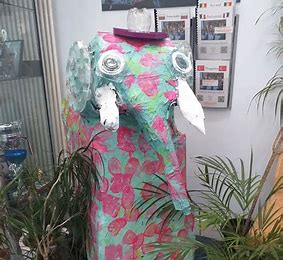
Cereal Box Elephant Craft
Making an elephant from a cereal box is a fun and easy recycling project! Here’s how you can create your own adorable elephant.
Materials Needed
- Empty cereal box
- Scissors
- Glue (craft glue or hot glue gun)
- Paint or markers (non-toxic)
- Googly eyes (optional)
- Construction paper (optional, for added decoration)
- Pencil
Instructions
- Prepare the Cereal Box:
- Open the cereal box and flatten it out. You can use the entire box or cut out a large section.
- Draw the elephant shapes:
- Use a pencil to sketch out the following shapes on the cardboard:
- Body: A large oval for the main body.
- Head: A smaller oval for the head.
- Ears: Two large, floppy shapes (like big leaves) for the ears.
- Trunk: A long, curved shape for the trunk.
- Legs: Four rectangular shapes for the legs.
- Use a pencil to sketch out the following shapes on the cardboard:
- Cut Out the Shapes:
- Carefully cut out the shapes using scissors.
- Assemble the elephant:
- Glue the head to the body.
- Attach the trunk to the front of the head.
- Glue the ears on each side of the head.
- Attach the legs to the bottom of the body.
- Paint and Decorate:
- Use paint or markers to color your elephant. Traditional gray works well, but feel free to get creative with fun colors!
- If you have google eyes, glue them on. If not, you can draw eyes with a marker.
- Add final touches:
- You can cut out and glue on details like toenails or a tail using construction paper.
- Display Your Elephant:
- Once everything is dry, your cereal box elephant is ready to be displayed or played with!
Tips
- Personalize: Encourage kids to add their own designs or patterns on the elephant.
- Group Activity: This is a great craft for groups—everyone can make their own animal or create a whole zoo!
- Educational Element: Discuss elephants and their habitats as part of the crafting process.
Enjoy making your recycled cereal box elephant!
9. Newspaper Flower Recycling Kid Craft
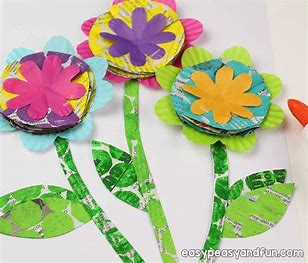
Newspaper Flower Craft
Creating flowers from old newspapers is a wonderful and eco-friendly craft for kids! Here’s a step-by-step guide to making your own recycled newspaper flowers.
Materials Needed
- Old newspapers
- Scissors
- Glue (craft glue or hot glue gun)
- Colored markers or paint (optional)
- Green paper (for stems and leaves) or green paint
- Pipe cleaners or straws (for stems)
- Buttons or beads (for decoration, optional)
Instructions
- Prepare the Newspaper:
- Tear or cut several pages from the newspaper into squares or circles, about 5-6 inches in diameter. You’ll need several pieces for each flower.
- Make the Petals:
- Take one square and fold it in half diagonally to create a triangle. Fold it in half again to make a smaller triangle.
- Cut rounded edges along the open side to create petal shapes. When you unfold it, you’ll have a flower petal shape.
- Repeat this step for several pieces of newspaper.
- Assemble the Flower:
- Layer the petal shapes on top of each other, slightly overlapping them to form a flower.
- Glue the layers together in the center.
- Add a Center:
- For the flower center, you can glue a button, bead, or a small circle of colored paper in the middle of the petals.
- Create the stem and leaves:
- For the stem, use a pipe cleaner or a straw. If you’re using paper, cut a strip of green paper and roll it tightly.
- Cut leaf shapes from green paper and glue them to the stem.
- Final Assembly:
- Glue the flower to the top of the stem. Make sure it’s secure.
- Optionally, you can paint or color the flower petals for a vibrant look.
- Display Your Flowers:
- Arrange your newspaper flowers in a vase or create a bouquet. You can also make a garden display!
Tips
- Get Creative: Encourage kids to use various colors and patterns from the newspaper for a unique look.
- Group Activity: This is a perfect craft for parties or classrooms where everyone can make their own flowers.
- Environmental Education: Discuss the importance of recycling and how it helps the environment while crafting.
Enjoy making your beautiful newspaper flowers!
10. Plastic Bottle Flower Turtle Recycled Kid Craft
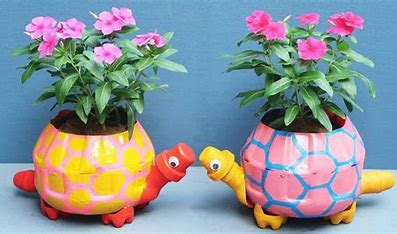
Plastic Bottle Flower Turtle Craft
Making a flower turtle from a recycled plastic bottle is a fun and creative project! This craft combines art and recycling, perfect for kids. Here’s how to create your own adorable flower turtle.
Materials Needed
- Empty plastic bottle (1 or 2-liter)
- Scissors
- Non-toxic paint or markers
- Craft glue or hot glue gun
- Green construction paper (for the turtle’s shell and legs)
- Googly eyes (optional)
- Flower-shaped embellishments (can be made from paper or plastic)
Instructions
- Prepare the Plastic Bottle:
- Rinse the bottle and remove any labels. Allow it to dry completely.
- Cut the Bottle:
- Cut the bottle in half horizontally. You’ll use the bottom half for the turtle’s body.
- For the turtle’s head, cut a small piece from the top part of the bottle, shaping it like a rounded head.
- Create the shell:
- Use green construction paper to cut out a circle slightly larger than the bottom of the bottle. This will be the turtle’s shell.
- Glue the construction paper circle to the top of the bottle bottom.
- Add Legs and Tail:
- Cut four legs from green construction paper (or use bottle caps). Make them oval or rectangular.
- Cut a small triangular shape for the tail.
- Glue the legs to the sides of the bottle and the tail to the back.
- Make the Face:
- Glue the turtle head onto the front of the bottle.
- Add googly eyes or draw eyes with markers, and create a smile.
- Add Flowers:
- Create small flower shapes from paper or use artificial flowers.
- Glue the flowers around the turtle or on top of its shell for decoration.
- Decorate:
- Use paint or markers to add patterns or designs on the shell, legs, and head.
- Let everything dry completely.
- Display Your Turtle:
- Place your flower turtle in a garden, on a shelf, or use it as a fun decoration!
Tips
- Get Creative: Encourage kids to personalize their turtles with different colors and flower designs.
- Group Activity: This is a great project for groups, allowing everyone to create their own unique turtle.
- Discuss Recycling: Talk about the benefits of recycling and reusing materials while crafting.
Enjoy your fun and colorful flower turtle!
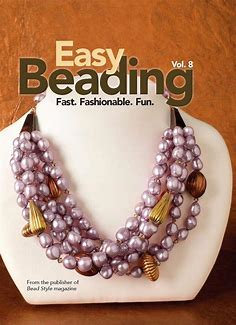
Easy Magazine Beads Craft
Making beads from old magazines is a simple and enjoyable craft project! These colorful beads can be used for jewelry, decorations, or other creative projects. Here’s how to make them:
Materials Needed
- Old magazines or colorful paper
- Scissors
- Glue stick or white school glue
- Toothpick or thin skewer (for rolling)
- Clear varnish or nail polish (optional, for sealing)
- String or elastic (for making jewelry)
Instructions
- Cut the Paper:
- Choose pages from the magazine with interesting colors or patterns.
- Cut the pages into long triangles. The wider the base, the thicker the bead will be; about 1 inch at the base and 6-8 inches long works well.
- Roll the beads:
- Take a triangle and start rolling it from the wide end around a toothpick or skewer. Roll it tightly to ensure it holds its shape.
- Keep rolling until you reach the point of the triangle.
- Secure the Bead:
- Apply a small amount of glue to the tip of the triangle to secure it in place.
- Slide the bead off the toothpick or skewer carefully.
- Let Dry:
- Allow the beads to dry completely. If you used glue, make sure it’s fully set before moving on.
- Optional Sealing:
- For a shiny finish and added durability, coat the beads with clear varnish or nail polish. Let it dry completely.
- Create Jewelry or Decor:
- String your beads together to make necklaces, bracelets, or keychains. You can mix and match with other beads or materials.
Tips
- Experiment: Try using different types of paper (like wrapping paper or scrap paper) for varied textures and colors.
- Group Activity: This craft is great for groups or parties, allowing everyone to create their own unique beads.
- Eco-Friendly: Discuss the benefits of reusing materials while crafting, making it an educational experience too!
Enjoy making your vibrant magazine beads!
12. Toilet Paper Roll Winter Tree
Toilet Paper Roll Winter Tree Craft
Creating a winter tree from a toilet paper roll is a fun and easy craft for kids! It’s a great way to recycle and add a festive touch to your decorations. Here’s how to make your own winter tree.
Materials Needed
- Empty toilet paper roll
- Green paint or markers
- Scissors
- Craft glue or hot glue gun
- Cotton balls or white tissue paper (for snow)
- Optional: Glitter, sequins, or decorative items (for embellishments)
Instructions
- Prepare the Toilet Paper Roll:
- Start by painting the outside of the toilet paper roll green. Allow it to dry completely. If you prefer, you can also use green markers.
- Cut the Tree Shape:
- Using scissors, cut the roll into a tree shape. You can create a pointed top by cutting the roll to a point, or you can simply leave it as is for a more traditional look.
- Create Branches:
- If you want a more textured look, cut slits down the sides of the roll (about halfway down) to create branches. Gently bend these flaps outwards.
- Add Snow:
- Glue cotton balls or pieces of white tissue paper onto the top and branches of the tree to represent snow. Make it as fluffy as you like!
- Decorate:
- If desired, add glitter, sequins, or other embellishments to your tree for a sparkling effect. You can also use markers to draw ornaments or lights on the tree.
- Display Your Tree:
- Once everything is dry, place your winter tree on a shelf, table, or as part of a winter scene.
Tips
- Get Creative: Encourage kids to use different colors or materials to personalize their trees.
- Group Activity: This is a great craft for groups, allowing everyone to create their own winter tree.
- Educational Element: Discuss the importance of recycling while crafting to make it a learning experience.
Enjoy making your festive winter tree!
13. Fun Toilet Paper Roll Christmas Tree
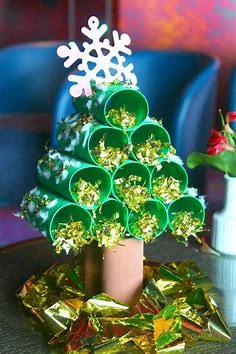
Fun Toilet Paper Roll Christmas Tree Craft
Creating a Christmas tree from a toilet paper roll is a simple and enjoyable holiday craft! It’s a great way to recycle materials while adding some festive cheer. Here’s how to make your own Christmas tree.
Materials Needed
- Empty toilet paper roll
- Green paint or green construction paper
- Scissors
- Craft glue or hot glue gun
- Decorative items (e.g., beads, sequins, buttons, glitter)
- Star or shiny paper (for the tree topper)
- Optional: Ribbon or string (for hanging)
Instructions
- Prepare the Toilet Paper Roll:
- If you’re using paint, start by painting the outside of the toilet paper roll green. Let it dry completely. If you prefer, you can wrap it in green construction paper instead.
- Cut the Tree Shape:
- Cut the roll into a tree shape. You can create a pointed top by cutting it to a point, or you can leave it straight for a more traditional tree look.
- Decorate the Tree:
- Use craft glue to attach decorative items like beads, sequins, or buttons to the tree. You can also sprinkle some glitter for a sparkling effect.
- Create a Tree Topper:
- Cut a star shape from shiny paper or use a small ornament as the tree topper. Glue it to the top of your tree.
- Add a Base (Optional):
- For added stability, you can create a base by cutting a circle from cardboard and gluing the bottom of the toilet paper roll to it.
- Display Your Tree:
- Once everything is dry, place your Christmas tree on a shelf, table, or as part of your holiday decorations. You can also attach a ribbon or string to hang it as an ornament.
Tips
- Personalize It: Encourage kids to use their favorite colors and decorations to make each tree unique.
- Group Activity: This craft is great for family gatherings or classrooms where everyone can create their own Christmas tree.
- Discuss Recycling: Use this opportunity to talk about recycling and how to repurpose everyday items.
Enjoy crafting your festive toilet paper roll Christmas tree!
14. Toilet Paper Roll Icicle Recycled Craft for Kids

Toilet Paper Roll Icicle Craft
Creating icicles from toilet paper rolls is a fun and easy winter craft for kids! It’s a great way to recycle materials while adding some sparkle to your decorations. Here’s how to make your own toilet paper roll icicles.
Materials Needed
- Empty toilet paper rolls
- Scissors
- White paint or silver/blue glitter paint
- Paintbrush
- Glitter (optional)
- String or ribbon (for hanging)
- Craft glue
- Clear tape (optional)
Instructions
- Prepare the Toilet Paper Roll:
- Start by cutting the toilet paper roll into strips. Each strip should be about 1 inch wide. You can cut as many strips as you want, depending on how many icicles you want to make.
- Shape the Icicles:
- Take each strip and taper one end to create a point. This will give the icicles a realistic shape.
- Paint the Icicles:
- Use white paint or glitter paint to cover the entire surface of each icicle. If using glitter, you can sprinkle it on while the paint is still wet for added sparkle.
- Let Them Dry:
- Allow the painted icicles to dry completely. This usually takes about 30 minutes to an hour.
- Add String for Hanging:
- Cut pieces of string or ribbon to the desired length. Use glue to attach one end of the string to the top of each icicle. You can also use clear tape to secure it if needed.
- Display Your Icicles:
- Hang your icicles from windows, ceilings, or even branches in your home to create a winter wonderland effect.
Tips
- Experiment with Colors: While traditional icicles are white, you can use silver or blue paint for a different look.
- Group Activity: This craft is great for classrooms or holiday gatherings where everyone can make their own icicles.
- Educational Element: Discuss the winter season and the beauty of icicles while crafting.
Enjoy making your beautiful toilet paper roll icicles!
15. Rainbow Paper Tube Bat Halloween Crafta
Rainbow Paper Tube Bat Halloween Crafta
Creating a rainbow bat from a paper tube is a fun and colorful Halloween craft! This project is perfect for kids and can brighten up your Halloween decorations. Here’s how to make your own rainbow paper tube bat.
Materials Needed
- Empty paper towel or toilet paper tube
- Black paint or black construction paper
- Scissors
- Craft glue or hot glue gun
- Colored markers or paint (red, orange, yellow, green, blue, purple)
- Googly eyes (optional)
- Cardstock or construction paper (for bat wings)
- String or ribbon (for hanging, optional)
Instructions
- Prepare the Paper Tube:
- If using a toilet paper roll, you may want to cut it in half for a smaller bat. Paint the tube black and let it dry completely. If using black construction paper, wrap the tube and glue it in place.
- Create the Bat Wings:
- Cut out wing shapes from cardstock or construction paper. You can make them big and pointy or rounded, depending on your design. Aim for two wings that are symmetrical.
- Color the Wings:
- Use colored markers or paint to decorate the wings with rainbow patterns. Alternate colors or create a gradient effect for a vibrant look. Allow the wings to dry if you used paint.
- Attach the Wings:
- Once the tube is dry, glue the wings to the back of the paper tube. Make sure they’re positioned so the bat can stand upright or hang properly.
- Add Bat Features:
- Glue on googly eyes or draw eyes with markers. You can also create a mouth using black paper or a marker.
- Create Hanging Option (Optional):
- If you want to hang your bat, cut a small piece of string or ribbon and glue it to the top of the bat.
- Display Your Bat:
- Hang your rainbow bat from a window, on a wall, or as part of a Halloween display.
Tips
- Get Creative: Encourage kids to personalize their bats with unique patterns or extra decorations.
- Group Activity: This craft is great for classrooms or Halloween parties, allowing everyone to create their own bat.
- Educational Element: Discuss bats and their importance in nature while crafting.
Enjoy making your colorful rainbow paper tube bat!
16. Toilet Paper Roll Pumpkin Stamp Crafta
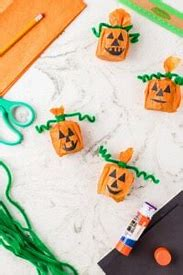
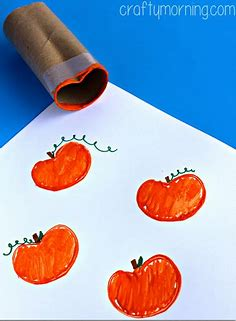
Toilet Paper Roll Pumpkin Stamp Crafta
Creating pumpkin stamps from toilet paper rolls is a fun and easy craft for kids, perfect for Halloween or autumn decorations! Here’s how to make your own pumpkin stamp.
Materials Needed
- Empty toilet paper roll
- Orange paint
- Green paint or green construction paper
- Scissors
- Paper plates (for paint)
- White paper or cardstock
- Paintbrush (optional)
- Craft glue (if using construction paper)
- Black marker (optional)
Instructions
- Prepare the Toilet Paper Roll:
- Take an empty toilet paper roll and gently press one end to create a flat surface. This will form the base for your stamp.
- Cut the Pumpkin Shape:
- Using scissors, cut a small notch or two at the top of the rolled end to resemble the pumpkin’s stem. You can also trim the edges slightly to give it a more rounded pumpkin shape.
- Paint the Stamp:
- Pour some orange paint onto a paper plate. Use a paintbrush to apply paint to the flat end of the toilet paper roll, ensuring it’s evenly coated.
- Stamp the Pumpkin:
- Press the painted end of the roll onto a piece of white paper or cardstock to create a pumpkin print. Repeat as needed to make multiple pumpkins.
- Add Details:
- Once the stamped pumpkins are dry, use green paint or green construction paper to add stems and leaves. You can either paint them directly onto the stamped pumpkins or cut leaf shapes from the green paper and glue them on.
- Optional Decorations:
- Use a black marker to draw faces on the pumpkins if you want to create jack-o’-lanterns. This is a fun way to personalize each stamp.
- Display Your Artwork:
- Once everything is dry, display your pumpkin art! You can make cards, decorations, or even a festive banner.
Tips
- Get Creative: Experiment with different colors for pumpkins, or try adding other details like glitter or stickers.
- Group Activity: This craft is great for classrooms or family gatherings, allowing everyone to create their own pumpkin stamps.
- Discuss Autumn: Use this opportunity to talk about pumpkins, harvest time, and the fall season while crafting.
Enjoy making your fun toilet paper roll pumpkin stamps!
17. Cherry Blossom Paper Roll Tree Crafta
Create this springtime cherry blossom tree project with a paper roll and a coffee filter.