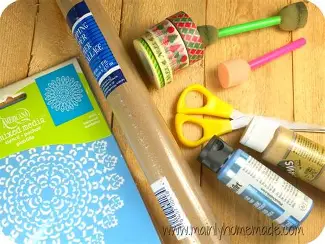
Sure! Here are 5 DIY Recycled Christmas Decorations with easy-to-follow instructions. These projects use materials you likely already have at home, making them affordable, sustainable, and fun for all ages.
🎄 1. Bottle Cap Snowman Ornaments
Materials:
- 3 plastic or metal bottle caps (same size)
- White paint
- Ribbon or string
- Glue or hot glue gun
- Markers or paint pens (black, orange, red)
- Cotton balls or scrap fabric (for scarf)
Instructions:
- Paint the inside of the bottle caps white and let dry.
- Glue the three caps vertically to create a snowman shape.
- Draw eyes, mouth, buttons (black), and a carrot nose (orange) on the caps.
- Tie a piece of scrap fabric or yarn around the “neck” as a scarf.
- Glue a loop of ribbon to the back for hanging.
🎁 2. Toilet Paper Roll Gift Boxes
Materials:
- Empty toilet paper rolls
- Wrapping paper or old magazine pages
- Glue or tape
- String or ribbon
- Small gifts or candy
Instructions:
- Flatten the roll slightly and fold both ends inward to close one side.
- Wrap the roll with festive paper or decorate with markers.
- Fill with small gifts or candy.
- Fold the other end to close.
- Tie with ribbon or string for a decorative touch.
⭐ 3. Cardboard Star Garland
Materials:
- Cereal boxes or any cardboard
- Pencil and scissors
- Gold or silver paint (optional)
- Hole punch
- String or twine
Instructions:
- Draw star shapes on the cardboard and cut them out.
- Paint or decorate them if you like, then let dry.
- Punch a hole in each star.
- Thread the string through each hole to create a garland.
- Hang on a wall, mantel, or tree!
🕯 4. Jar Lid Tea Light Holders
Materials:
- Metal mason jar lids
- Tealight candles (real or battery-operated)
- Glue
- Twine or ribbon
- Pinecones, cinnamon sticks, or faux greenery (optional)
Instructions:
- Clean the jar lids and dry completely.
- Decorate the rim with twine, ribbon, or small accents.
- Place a tealight candle inside the lid.
- Group several together for a festive table centerpiece.
🎅 5. Magazine Page Paper Chains
Materials:
- Old magazines or catalogs
- Scissors
- Glue stick or stapler
Instructions:
- Cut magazine pages into strips (about 1 inch wide).
- Loop the first strip into a circle and glue/staple it closed.
- Thread the next strip through and connect, repeating to form a chain.
- Keep adding until your chain is as long as you want.
- Use it to decorate your tree, windows, or stair rails.
Would you like this in printable format or as a checklist?
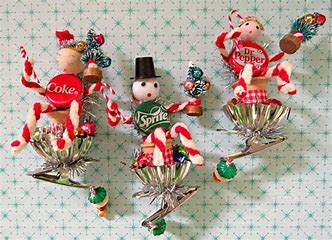
- Upcycled K-Cup Snowman Hat Ornaments
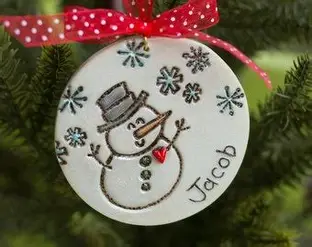
Over 75 million households use billions of K-Cups annually for convenience, yet they generate a significant quantity of garbage made of aluminium and plastic.
K-cups are thought to take a century or longer to completely degrade because about 95% of its plastic composite cannot be recycled. We advise using a BPA-Free Reusable K-Cup whenever feasible to help cut down on the quantity of K-cups that wind up in our landfills.
Nevertheless, if your loved ones, acquaintances, or coworkers are adamant about utilising the throwaway pods, you may save the environment this holiday season by turning them into adorable recycled Christmas ornaments.
The aforementioned video provides a variety of simple Christmas crafts that you may make to adorn your tree, including bells, snow buckets, snowmen, and even miniature Starbucks cups. Our favourite is the snowman cap for the holidays!
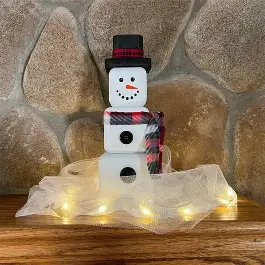
2. Upcycled Wood Snowman
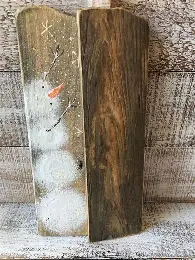
Creating an upcycled wood snowman is a fun, eco-friendly winter or holiday craft project that adds a rustic, handmade charm to your decor. Here are some ideas and a step-by-step guide to make your own:
🎨 Materials Needed (Upcycled & Basic Supplies)
- Scrap wood: Pallet wood, old fence boards, leftover 2x4s, etc.
- White paint (or whitewash)
- Black paint (for eyes, buttons, hat)
- Orange paint or marker (for the carrot nose)
- Fabric scraps or old scarves (for scarf)
- Hot glue gun / Wood glue
- Sandpaper
- Optional: Buttons, twigs (arms), burlap, ribbon, jute twine
🛠️ Simple Instructions
🔨 1. Cut the Wood
- Use 2-3 wooden blocks of descending size to stack like a snowman (head, middle, base).
- OR use one vertical board and paint sections for the head/body.
- Sand the edges for a smooth or distressed finish.
🎨 2. Paint the Snowman
- Paint all blocks or the board white.
- Once dry, lightly sand for a rustic/distressed look (optional).
👀 3. Add the Face & Buttons
- Use black paint or permanent marker to draw on coal eyes, a smile, and buttons.
- Paint or glue on an orange triangle for the carrot nose.
🧣 4. Decorate
- Wrap a scrap of fabric or an old flannel shirt strip as a scarf.
- Glue on buttons or twigs for arms.
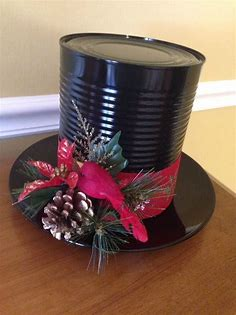
- Make a mini top hat using a jar lid and cardboard or use a small can.
🌲 5. Optional Add-ons
- Paint snowflakes or holiday words like “JOY” or “LET IT SNOW”.
- Add a sign held in twig arms.
- Drill holes and string fairy lights through it.
🧊 Inspiration Ideas
- Rustic Pallet Snowman – Tall, vertical piece with a hat made from a wood strip.
- Stacked Wood Block Snowman – Three blocks glued/stacked and decorated.
- Hinged Snowman – Blocks connected with metal hinges for flexibility/movement.
Would you like a visual mockup, SVG template, or a printable DIY instruction sheet for this craft?
3. Recycled Paint Brush Santa

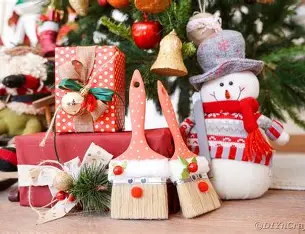
You probably have some old paintbrushes laying around, whether your interest in do-it-yourself Christmas crafts stems from your natural creative side or from a tight budget.
Creating a paintbrush out of recyclable materials Because there are so many possibilities to customise your design, Santa is a simple and enjoyable do-it-yourself activity for youngsters, regardless of their degree of craftiness.
You can customise it by writing a person’s name on the handle, painting a face, adding Google Eyes, dipping the brush in paint or leaving it unpainted, etc. The possibilities are endless!
Using felt, spackle, pompoms, greenery, and/or ribbon, kids will also enjoy making a Santa hat. Additionally, most paintbrushes have a hole in them, so your new ornament is ready to hang as soon as it dries.
4. DIY Christmas Card Wreath
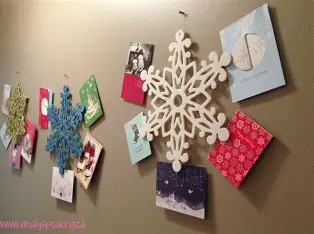
Sure! Here’s a simple and festive guide to making a DIY Christmas Card Wreath — a great way to display holiday cards from friends and family in a decorative way!
🎄 DIY Christmas Card Wreath
🧰 Materials Needed
- Wire wreath frame (or a sturdy cardboard circle)
- Clothespins (wooden or colored)
- Acrylic paint or spray paint (optional, to decorate the clothespins)
- Hot glue gun or craft glue
- Ribbon (for hanging or decorative bow)
- Holiday embellishments (optional: faux greenery, pinecones, bells, etc.)
✂️ Instructions
1. Prepare the Base
- Use a wire wreath form OR cut a large ring from cardboard (use two round objects like bowls to trace the outer and inner circles).
- You can paint the base green, red, gold, or leave it natural depending on your style.
2. Decorate the Clothespins
- Paint them in festive colors (red, green, gold, silver, white, or even glittery).
- Let them dry completely.
3. Attach Clothespins to the Wreath
- Clip or glue the clothespins evenly around the wreath form, all facing outward.
- Leave space between pins or place them close together for a fuller look.
- Tip: Angle the clothespins slightly so cards fan out attractively.
4. Add Embellishments
- Glue on bows, mini ornaments, pinecones, or sprigs of fake holly/greenery.
- Add a large bow or looped ribbon at the top for hanging.
5. Hang and Display Cards
- Hang the wreath on a door, wall, or over a mantel.
- Clip on Christmas cards as they arrive — it fills up and becomes more festive through the season!
🧡 Bonus Ideas
- Mini version: Use a small embroidery hoop for a desktop-sized wreath.
- Magnet version: Add magnets to the back of clothespins and use a metal ring or pizza pan as the base.
- Name tag version: Label pins with family names so everyone has a place for their cards.
Would you like a printable template, SVG cut file, or a visual guide for this wreath? I can create one for you!
5. Christmas Clothespin Crafts
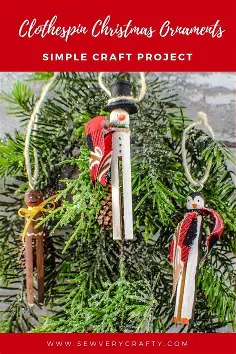
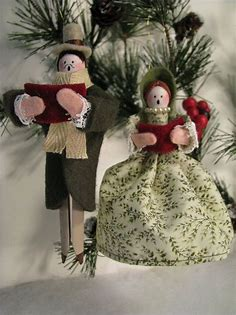
You can customise it by writing a person’s name on the handle, painting a face, adding Google Eyes, dipping the brush in paint or leaving it unpainted, etc. The possibilities are endless!
Using felt, spackle, pompoms, greenery, and/or ribbon, kids will also enjoy making a Santa hat. Additionally, most paintbrushes have a hole in them, so your new ornament is ready to hang as soon as it dries.
After that, you may add vibrant ornaments and cut out yellow paper to create a star tree topper. Alternatively, you could create a wreath by painting a few extra clothespins green and adhering them to a round piece of cardboard.
Additionally, you may make them come to life by painting each clothespin the colour of a reindeer, snowman, nutcracker, or Santa and adding the distinctive characteristics of each.
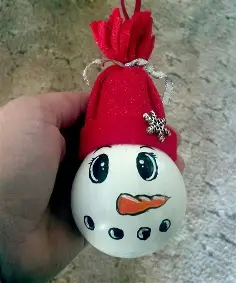
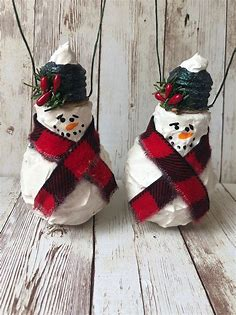
6. Snowman Lightbulb Ornament
Absolutely! Here’s a fun and easy tutorial for making a Snowman Lightbulb Ornament — a perfect upcycled holiday craft using old lightbulbs!
⛄ Snowman Lightbulb Ornament (DIY)
♻️ Materials Needed
- Old incandescent lightbulb (standard shape works best)
- White acrylic paint or spray paint
- Black & orange paint or permanent markers
- Small fabric scraps (for scarf and hat)
- Hot glue gun / craft glue
- Ribbon or twine (for hanging)
- Optional: buttons, glitter, fake snow, mini top hat, etc.
🎨 Instructions
1. Clean the Bulb
- Wipe the lightbulb with a damp cloth to remove dust and let dry completely.
2. Paint the Bulb
- Apply white acrylic paint or spray paint evenly over the entire surface of the bulb.
- Let it dry fully. Apply a second coat if needed.
- Optional: While the paint is wet, sprinkle a bit of glitter for a sparkly effect!
3. Add the Face
- Use black paint or a permanent marker to draw:
- Two coal eyes
- A dotted smile
- Paint a small carrot-shaped triangle for the nose using orange paint.
4. Dress the Snowman
- Scarf: Tie a small strip of fabric or ribbon around the neck (base of bulb).
- Hat:
- Use black felt to create a mini beanie or top hat.
- Or glue a small pom-pom or piece of fabric over the metal base.
- Optional: Add mini buttons to the belly.
5. Attach Hanger
- Tie a loop of ribbon, twine, or string around the bulb’s screw base or glue it securely.
- This is how you’ll hang the ornament on your tree.
🎁 Display Ideas
- Hang on your Christmas tree
- Use as a gift topper
- Group a few together in a bowl or on a garland
🧡 Bonus Tips
- Use different bulb shapes for a snowman family.
- Add rosy cheeks with a dab of pink paint or blush.
- For a more rustic look, wrap the screw base in twine and skip the hat.
Would you like a printable instruction sheet, kid-friendly version, or photo inspiration for this project? I can help with that too!
7. Tin Can Christmas Lanterns
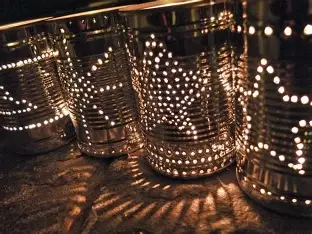
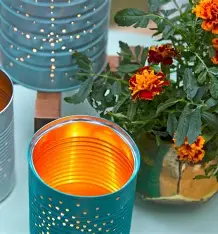
Making Tin Can Christmas Lanterns is a fun and festive DIY project that reuses old materials and adds a warm, rustic charm to your holiday decor. Here’s a step-by-step guide to creating them:
🎄 DIY Tin Can Christmas Lanterns
🧰 Supplies Needed:
- Empty tin cans (soup or vegetable cans work great)
- Water
- Freezer
- Nail or small hammer and punch
- Towel or thick gloves
- Tea light candles or LED lights
- Spray paint (optional — white, red, green, gold, silver for Christmas themes)
- Marker or printed template
- Wire and pliers (for handles, optional)
🛠️ Instructions:
- Clean the Cans
- Remove labels, glue, and residue.
- Wash and dry thoroughly.
- Fill with Water and Freeze
- Fill the can with water and freeze overnight.
- This makes the metal easier to punch without bending.
- Design Your Pattern
- Use a marker or printed paper template taped to the can.
- Ideas: Stars, Christmas trees, snowflakes, “JOY”, or random dot patterns.
- Punch Holes
- Wearing gloves or using a towel to hold the can, use a nail and hammer (or a metal punch) to create holes along your pattern.
- Let the Ice Melt
- After punching, let the ice melt and dry the can completely.
- Paint the Can (Optional)
- Use spray paint in festive colors.
- Let dry fully.
- Add a Handle (Optional)
- Drill two small holes near the top on opposite sides.
- Insert wire and twist ends to secure.
- Insert Light Source
- Use real tea lights for a cozy glow, or battery-operated LED lights for safety.
🎨 Design Ideas:
- “NOEL” or “JOY” spelled out in holes
- Star constellation style patterns
- Christmas tree shape using ascending dots
- Wrap with plaid ribbon or twine for extra charm
🕯️ Safety Tips:
- If using real candles, never leave them unattended.
- Consider LED lights for indoor or kid-friendly use.
- Always keep cans on a fire-safe surface.
Would you like printable templates or design stencils for your lanterns?
8. DIY Gingerbread House
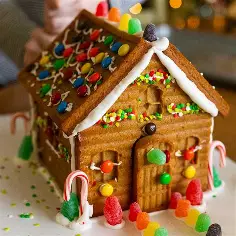
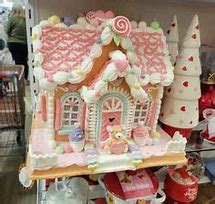
Even if purchasing a kit to construct gingerbread houses at home is simple, omitting the steps appears to take away a lot of the fun from the custom. It’s considerably more enjoyable to make a homemade gingerbread house from scratch.
In addition to being the best handcrafted Christmas décor, they also offer delectable scents and covert delicacies.
Most people already have many of the ingredients on hand, and making it at home doesn’t require a lot of additional packaging. If the house isn’t consumed, it could be composted. Not to mention that the entire process is enjoyable and reasonably simple. Here’s how:
- Cut out the following forms from some cardboard: two rectangle walls, two rectangular roof panels, and two square sides with triangles on top. Before baking the gingerbread, test the sizes by assembling the cardboard house.
- This is a simple structural gingerbread recipe. It is not particularly tasty, but it is edible. Doing this the day before building the house is a smart idea.
- Royal icing comes next, which is the glue that keeps the house together. A pound of powdered sugar, half a cup of pasteurised egg whites, and half a teaspoon of cream of tartar are required. After combining them for a few minutes, cover the icing and continue to apply it to the home. It will immediately dry out.
- Now that the royal icing and gingerbread pieces are ready, you can start assembling the house. Construct it on a piece of cardboard that is the right size. An easy pastry bag for icing application is a recycled plastic bag with the corner snipped off.
- Use Christmas decorations, such as candy canes, gumdrops, jelly beans, peppermints, and so forth, to adorn the outside of the house. Simply use royal icing to adhere them.
9. DIY Christmas Cracker
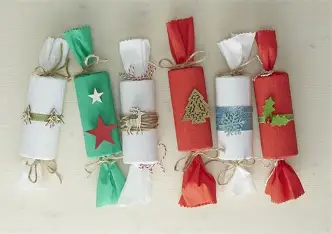
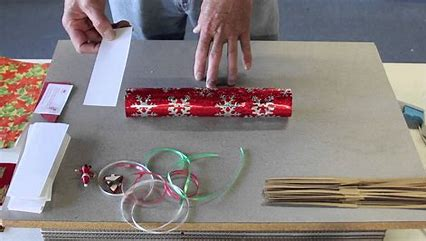
Sure! Here’s a fun and easy guide to making your own DIY Christmas Crackers — perfect for adding a festive touch to your holiday table!
🎄 DIY Christmas Crackers
Christmas crackers are traditional holiday party favors that “pop” when pulled apart, revealing little surprises inside. Here’s how to make your own at home!
🧰 Materials You’ll Need:
- Wrapping paper or decorative paper (about 12 x 6 inches per cracker)
- Cardboard tubes (e.g., from toilet paper rolls)
- Cracker snaps (optional, available online or at craft stores)
- Ribbon or twine
- Tape or glue stick
- Scissors
Filler ideas:
- Small toys or trinkets
- Jokes or riddles (print your own!)
- Candy or chocolates
- Paper crowns (DIY or store-bought)
✂️ Instructions:
1. Prepare the Cardboard Tubes
- Cut one toilet roll tube into 3 equal parts.
- Use the middle piece to create a gap, allowing the cracker to “pop” when pulled apart.
2. Wrap the Cracker
- Lay the wrapping paper face down.
- Place the three tube pieces in a row across the center (the small piece goes in the middle, with the full tubes on either side).
- If using a cracker snap, tape it along the length of the paper.
3. Roll It Up
- Roll the paper around the tubes and secure with tape or glue.
- Twist the ends gently at the gaps between the tubes.
4. Tie the Ends
- Use ribbon or twine to tie off one end.
- Fill the cracker through the open side with small gifts, a joke, and a crown.
- Tie the second end.
🎁 Filler Suggestions:
| Item Type | Ideas |
|---|---|
| Joke | “What do elves use to take notes? Elf-abet!” |
| Treat | Wrapped chocolate, mints, or hard candy |
| Toy | Mini puzzle, whistle, keychain |
| Crown | Tissue paper crown (DIY or bought) |
| Trinket | Lip balm, tiny nail polish, stickers |
✨ Tips:
- Want a personalized look? Print custom names or messages on the outside.
- Use kraft paper and natural twine for a rustic look, or go glam with metallic wrapping.
- For eco-friendly crackers, avoid plastic fillers and go with reusable or recyclable items.
Would you like printable templates for jokes or crowns? I can create those for you too
10. Christmas Crafts Made From Old Games
You probably have a trunk, closet or attic full with abandoned board games and puzzle boxes with missing pieces if your family house is similar to mine.
When it comes to Christmas crafts, the beauty of these items is that they offer a sense of play, which is ideal for creating holiday décor and presents.
You can glue puzzle pieces together in the shape of a candy cane after painting them red and white. Holiday-related words can be formed by connecting old Scrabble letters.
Many board games contain small pieces that can be used as characters for oddball Nativity scenes, garlands or wreaths, or as interesting tree ornaments.
The secret is to let your inner child out and allow your imagination run wild. Even better, if you have actual kids at home, let them enjoy themselves! Heck, it may even lead to a family game night without the need for iPads or iPhones.
The pieces can then be used to make homemade Christmas decorations once the games are over.
11. Homemade Gingerbread Playdough Men

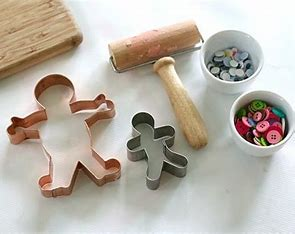
Absolutely! Here’s a cozy and fun activity: Homemade Gingerbread Playdough Men — perfect for holiday sensory play with kids, classroom crafts, or festive decorations!
🎄 Homemade Gingerbread Playdough Men
This soft, spiced playdough smells just like gingerbread cookies — but it’s not edible! Use it to mold adorable gingerbread men (and women), or create ornaments and decorations.
🧂 Ingredients for Gingerbread Playdough:
- 1 cup all-purpose flour
- 1/2 cup salt
- 2 tsp cream of tartar
- 1 tbsp vegetable oil
- 1 cup water
- 1 tsp ground cinnamon
- 1 tsp ground ginger
- 1/2 tsp ground nutmeg (optional)
- 1/2 tsp ground cloves (optional)
- Brown food coloring (or mix red + green to get a brown shade)
👩🍳 How to Make It:
- Mix Dry Ingredients
In a saucepan (off heat), combine:- Flour, salt, cream of tartar
- Spices (cinnamon, ginger, nutmeg, cloves)
- Add Wet Ingredients
- Stir in water, oil, and food coloring.
- Cook Over Medium Heat
- Stir constantly until the dough forms a ball and pulls away from the pan (about 2–3 minutes).
- Remove from heat and let cool slightly.
- Knead Until Smooth
- Once cool enough to touch, knead on a clean surface until soft and smooth.
🍪 Make Playdough Gingerbread Men:
- Use gingerbread man cookie cutters to shape the dough.
- Decorate with:
- Googly eyes
- Buttons
- Tiny beads (only if not used by toddlers)
- Mini pom-poms or bits of yarn for scarves
- Optional: let them air dry for a few days to make keepsakes or ornaments.
🎁 Storage Tips:
- Store in an airtight container or ziplock bag.
- Keeps fresh for up to 2 weeks (longer if refrigerated).
- Add a drop of water and knead if it starts to dry out.
🧸 Great For:
- Holiday sensory bins
- Preschool crafts
- Homemade gift kits (pack in jars!)
- Classroom fun
Would you like a printable version or gingerbread playdough gift tags? I can make those too!
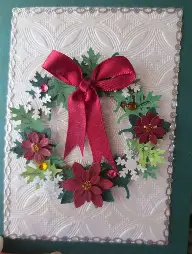
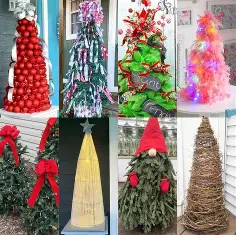
12. DIY Christmas Garland Ideas
One of the most underutilised yet powerful do-it-yourself Christmas decorations is garland. Festivity is literally everywhere, and there are many of possibilities for those of us doing it ourselves using natural or recyclable materials.
Paper chains, painted CDs, handmade paper beads, and paper snowflakes are a few of the supplies that can be used to create homemade garland.
However, there are other choices as well. Evergreen boughs, pinecones, and holly sprigs are examples of natural decorations that create a charming Christmas atmosphere. The majority of Christmas tree sellers will even give you their extra trimmings at no cost to you!
Stringing popcorn is a traditional Christmas craft, of course. We like to switch up ours with cranberries and popcorn, which look beautiful even when they dry up during the holidays. They can also last for a number of years if stored properly.
Using thin cardboard boxes (like those from Cere) for recycled garlandsfil or spaghetti), crafty folks may enjoy cutting out different Christmas symbols, like as candy canes, bells, trees, angels, snowflakes, presents, etc., and tying them together.
Additionally, old clothespins can be painted to resemble Santas, snowmen, and other Christmas figures, and then clipped onto lines as usual.
13. DIY Tomato Cage Christmas Tree
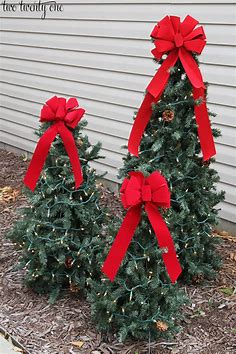
Of course! A DIY Tomato Cage Christmas Tree is a simple and budget-friendly holiday decoration that’s perfect for both indoor and outdoor use. Here’s how to make one:
🎄 DIY Tomato Cage Christmas Tree
Transform a basic garden tomato cage into a beautiful Christmas tree with lights, garlands, or greenery. It’s easy, customizable, and great for porches, patios, or small spaces!
🧰 Supplies You’ll Need:
- 1 tomato cage (standard metal type)
- Green garland or faux greenery (or tinsel garland)
- String lights (LED recommended)
- Zip ties, floral wire, or twist ties
- Ribbon, ornaments, bows, or other decorations
- Tree topper (optional)
- Wire cutters or scissors
🛠️ Instructions:
1. Flip the Tomato Cage
- Turn the cage upside down so the prongs point upward like the top of a tree.
- Bring the prongs together and secure with a zip tie or twist tie to form a cone shape.
2. Wrap with Garland or Greenery
- Starting from the bottom, wrap your garland or faux greenery around the cage.
- Work upward, covering the structure evenly.
- Use zip ties or floral wire to secure it in place as you go.
Tip: You can use green tinsel garland for a shinier, more artificial tree look.
3. Add Lights
- Wrap string lights around the tree, weaving them through the garland.
- Plug in to test before securing them.
- Secure the lights with twist ties or floral wire if needed.
4. Decorate Your Tree
- Add mini ornaments, bows, bells, or ribbon.
- Attach with hooks, wire, or glue (depending on placement).
- Top it off with a small star, bow, or mini tree topper.
5. Place and Plug In
- Set it on your porch, patio, or indoor space.
- Secure it with bricks or stakes if it’s windy outside.
🎨 Variations & Themes:
| Theme | Ideas |
|---|---|
| Rustic | Burlap ribbon, pinecones, wooden ornaments |
| Elegant | Gold/silver garland, white lights, crystal décor |
| Whimsical | Bright colors, oversized ornaments, candy canes |
| Natural | Real pine garland, dried oranges, cinnamon sticks |
✨ Optional Add-Ons:
- Fake snow spray for a snowy effect
- Battery-operated fairy lights for a cordless look
- Solar-powered lights for outdoor use
Would you like a printable checklist or inspiration photos for different styles? I can help with that too!
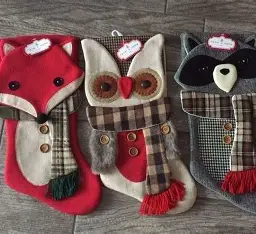
14. DIY Christmas Stockings From Sweaters
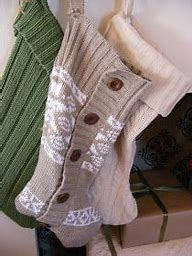
A good Christmas jumper competition is loved by all. However, let’s face it: these sweaters are typically one-hit wonders, meaning they have a lot of life left in them before being thrown away (either in the trash or the Goodwill bin).
They may be turned into fantastic rustic Christmas stockings instead of being thrown away. Don’t worry if you’re not a very good sewner. Very little stitching is needed for this, and only very basic stitching.
All you have to do is lay an old jumper flat on the table. Make a template for the desired stocking size and form using some paper or cardboard.
Make sure to cut both sides of the jumper when you cut around the template. Keep the top open and use some ribbon or thread to stitch around the edges.
Before hanging it on the mantel, embellish it with letters, jingles, glitter, or any other embellishments that feel appropriate.
If the jumper holds special memories for you, this is a great Christmas ornament to make for your loved ones!
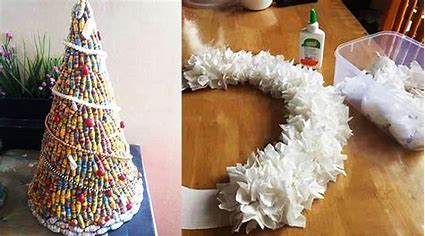
15. Recycled Paper Beads for Christmas
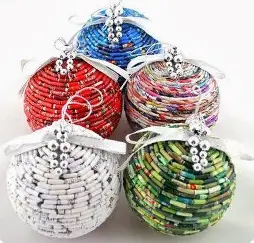

Absolutely! Making Recycled Paper Beads for Christmas is a fun, eco-friendly craft that’s perfect for kids and adults alike. You can use them to make garlands, ornaments, or even jewelry — all with a festive holiday twist!
🎄 Recycled Paper Beads for Christmas
Turn old magazines, gift wrap, junk mail, or used Christmas cards into colorful beads that can be used for holiday decorations!
🧰 Supplies You’ll Need:
- Old magazines, wrapping paper, newspaper, or Christmas cards
- Glue stick or white glue
- Scissors or paper cutter
- Pencil, skewer, toothpick, or straw (to roll the beads)
- Ruler
- Mod Podge or clear nail polish (optional, to seal)
- String, twine, or elastic cord (for garlands or jewelry)
✂️ Instructions:
1. Cut Paper into Triangles
- Cut long, skinny triangle strips:
- Base: ~1 inch wide
- Length: ~6–8 inches
- The longer the strip, the fatter the bead.
2. Roll the Beads
- Start at the wide base and roll the paper tightly around a toothpick or skewer.
- Add glue to the last 2 inches of the strip and continue rolling to seal it in place.
3. Let Dry
- Slide the bead off the skewer and let it dry completely on wax paper.
4. Seal (Optional)
- Brush with Mod Podge or clear nail polish for a shiny, durable finish.
- Let dry before using in crafts.
🎁 Holiday Project Ideas:
🎅 Beaded Garland
- String beads on twine or yarn.
- Alternate with popcorn, pom-poms, or cinnamon sticks.
❄️ Tree Ornaments
- Thread beads onto a loop of string.
- Add a ribbon bow and hang on your tree!
🎀 Holiday Jewelry
- Make bracelets or necklaces as DIY gifts using elastic cord and festive-colored paper.
♻️ Eco Tips:
- Use old holiday cards for extra color and sturdiness.
- Mix in natural elements like wooden beads, dried orange slices, or small pinecones.
- Let kids decorate beads with glitter or stickers before sealing.
Would you like a printable bead template or holiday-themed bead strip designs? I can make those for you
16. Recycled CD Craft Ideas for Christmas
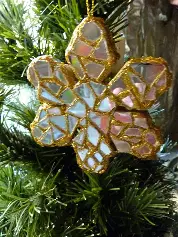
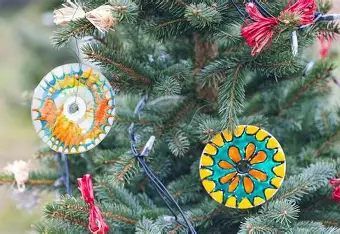
We Gen Xers and Gen Yers have clung tenaciously to our CDs and DVDs. We put a lot of effort into building a collection, but technology is sweeping us aside with on-demand TV, music, and movies.
Saying goodbye to those discs for good is a challenging move.
They can, however, be recycled into Christmas décor when the time is appropriate. Cutting them into festive shapes (oh, the pain!) and hanging them as glittering Christmas tree ornaments is a simple method.
CD letter chains are simple Christmas decorations for individuals who are more inclined to do crafts. You may either paint the CDs or cover them with pieces of leftover wrapping paper that have been glued on. You can also paint or make some letters to put on the CDs.
Hang seasonal slogans and phrases on the wall, under door jambs, along bannisters, or anywhere else that could use some brightening up.
If and when you decide to discard CDs (and cases), please follow the recycling guidelines for those with sizable collections.
17. HOMEMADE WRAPPING PAPER

Creating homemade wrapping paper is a fun, creative, and sustainable way to personalize your gifts. Here are some ideas, materials, and methods to make your own wrapping paper at home:
🎨 1. Kraft Paper Canvas
Use plain kraft paper (brown or white) as your base — it’s eco-friendly and versatile.
Decorating Ideas:
- Stamps: Use potato stamps, rubber stamps, or carved erasers with paint or ink.
- Paint: Splatter, brush, or roll acrylic paint in patterns.
- Markers/Pens: Draw doodles, write quotes, or make patterns like stars, trees, or snowflakes.
- Crayons/Colored Pencils: Great for kids to help decorate!
🍂 2. Natural & Rustic Wrap
Add an organic touch using materials from nature.
Materials:
- Leaves (pressed or fresh)
- Pine sprigs
- Dried citrus slices
- Twine or raffia
How to use:
- Tape or tie these items onto your paper after wrapping.
- Combine with kraft paper or newspaper for a rustic effect.
📰 3. Upcycled Materials
Repurpose materials you already have.
Ideas:
- Newspaper or comic strips
- Old maps or sheet music
- Paper bags from grocery stores
- Magazine pages (best for small gifts)
✂️ 4. Fabric Wrap (Furoshiki)
Try the Japanese method of fabric wrapping.
Use:
- Scarves
- Tea towels
- Fabric scraps
Bonus: It’s reusable and becomes part of the gift!
👣 5. Personal Touches
Add unique details for a special touch.
Ideas:
- Handwritten notes or poems on the paper
- Photos or printed images glued on
- Fingerprint art (great for kids)
- Custom name tags from cardstock or recycled boxes
🧰 Basic Supplies You Might Need:
- Kraft paper or upcycled paper
- Scissors
- Tape or glue
- String/twine/ribbon
- Markers, pens, paint, crayons
- Natural items or stamps
Want ideas for a specific holiday or occasion (e.g., Christmas, birthdays, baby showers)? I can tailor the designs and themes for that!
18. FAMILY CHRISTMAS GAMES

We tend to find more and more excuses to spend Christmas away from the family and instead glued to our small screens. Making a fun DIY Christmas game for the group to play is a definite way to address that.
There is nothing new about family Christmas games. All they need to do is have a suitable topic.
Making Christmas bingo cards only requires a few crayons and paper. Have each person make their own bingo cards on cardboard boxes instead of printing one from the internet.
Cover what has been named with chocolate kisses or chestnuts.
Another fantastic game that’s simple to construct at home is Christmas bowling. Santa Claus, Mrs. Claus, Rudolph, Frosty, elves, and other Christmas characters can be painted on old tin cans. They can then be arranged similarly to bowling pins.
Or we construct a pyramid out of the same painted cans. After that, we roll up a sock into a “snowball” and compete to see who can toss them all down.
These easy-to-make family Christmas games are adorable. Additionally, they offer the kind of homemade entertainment that people will cherish for years to come.
19. HOMEMADE SNOW GLOBES
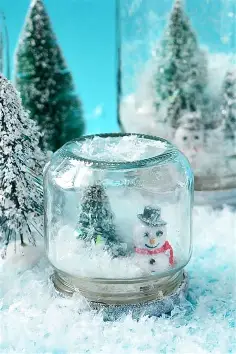
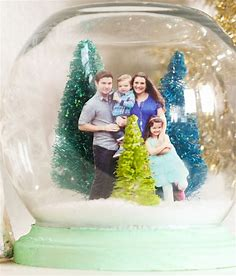
Absolutely! Making homemade snow globes is a fun and festive DIY project that’s perfect for the holidays or winter crafts. Here’s a simple guide to help you create your own magical snow globes at home.
❄️ HOMEMADE SNOW GLOBES
🧂 Materials You’ll Need:
- A clean glass jar with a tight-sealing lid (baby food jars, mason jars, or spice jars work great)
- Distilled water
- Glycerin (optional, but helps the “snow” fall slowly — available at pharmacies or craft stores)
- Glitter or fake snow
- Waterproof figurines or decorations (e.g., mini trees, holiday figures, plastic animals)
- Strong waterproof glue (like epoxy or hot glue)
- Ribbon or decorations for the lid (optional)
🛠️ Instructions:
1. Choose and Prepare Your Jar
- Wash and dry your jar and lid thoroughly.
- Test that the lid seals tightly to avoid leaks later.
2. Glue Your Figurine
- Use strong waterproof glue to attach your figurine(s) to the inside of the jar lid.
- Let the glue dry completely according to the product instructions (usually a few hours).
3. Fill the Jar
- Fill the jar almost to the top with distilled water.
- Add a few drops of glycerin (about 1/4 teaspoon for a small jar). This helps the glitter fall slowly.
- Add glitter or fake snow (start with a pinch — you can add more as needed).
4. Seal the Globe
- Once the figurine is dry and secure, carefully screw the lid onto the jar (figurine should go into the water).
- Seal the lid with waterproof glue or hot glue for extra protection from leaks (optional but recommended).
5. Decorate the Outside (Optional)
- Tie a ribbon or twine around the lid.
- Add stickers, tags, or paint to the jar for a personal touch.
🌟 Tips:
- Avoid paper or cardboard figures—they’ll dissolve in water.
- Plastic or resin decorations work best.
- You can color the water with a drop of food coloring for a unique look.
- Make themed globes: snowmen, trees, reindeer, or miniatures from old toys.
🎁 Great For:
- Holiday gifts
- Winter decorations
- Crafting with kids (with adult supervision)
- Party favors
Would you like a printable version of this guide or themed ideas for specific occasions like Christmas or birthdays?
20. CHRISTMAS CRAFTS MADE FROM SOCKS
Back when people actually had to create their own socks, it was customary to receive new socks for Christmas. It might not be the most ostentatious of presents, but occasionally they are ideal and useful.
It’s possible that many old socks are ready to be thrown out around Christmas if this occurs in your household. However, old socks can be simply turned into recycled Christmas décor instead of being thrown away.
A sock snowman would be the most obvious and straightforward illustration. Simply put, it’s a white sock packed with rice at the bottom (a small weight at the bottom keeps it erect) and anything light, fluffy, and convenient at the top. Form everything into a couple of snowballs with white string.
Your snowmen can be far more imaginative than that, of course. They can have little carrot pieces for the nose, buttons for eyes, and crocheted scarves and hats.
Additionally, you may create more intricate creatures like penguins, reindeer, or even Santa himself using old socks of various colours.
Just a heads up: Don’t discard old socks in any form. Tell people that, like bottles and cans, used clothing, including filthy old socks, can be recycled. It’s crucial!
21. DIY CHRISTMAS GIFT TAGS
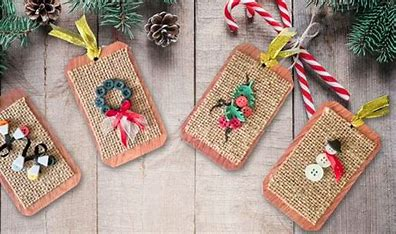
Creating DIY Christmas gift tags is a fun and festive way to personalize your holiday presents. Here are some creative ideas and simple instructions to make your own gift tags:
🎁 1. Classic Kraft Paper Tags
Materials:
- Kraft paper or brown cardstock
- Scissors or tag punch
- Hole punch
- Twine or ribbon
- Stamps, markers, stickers
Instructions:
- Cut kraft paper into tag shapes (rectangles, circles, or classic tag shape).
- Punch a hole at the top.
- Decorate with holiday stamps, draw little trees or snowflakes, or use festive stickers.
- Write the recipient’s name on the front and your message on the back.
- Tie with twine or ribbon to your gift.
❄️ 2. Snowflake Cut-Out Tags
Materials:
- White or pastel cardstock
- Scissors or craft knife
- Snowflake template (optional)
Instructions:
- Cut cardstock into rectangles or circles.
- Cut out snowflake patterns in the center or corner (use a craft knife for details).
- Add glitter glue or silver gel pen for sparkle.
- Write your holiday message.
🎨 3. Watercolor Tags
Materials:
- Watercolor paper
- Watercolors and brush
- Hole punch
- Ribbon or twine
Instructions:
- Paint abstract winter or Christmas colors (reds, greens, blues) over watercolor paper.
- Once dry, cut into tag shapes.
- Add names using a metallic or black marker.
- Punch a hole and tie.
🌲 4. Felt or Fabric Gift Tags
Materials:
- Felt or holiday fabric scraps
- Fabric glue or needle and thread
- Scissors
- Ribbon or twine
Instructions:
- Cut felt into festive shapes (trees, stars, stockings).
- Decorate with buttons, sequins, or embroidery.
- Attach a small paper tag with the name/message or write directly on the felt with a fabric pen.
🖨️ 5. Printable Tags (Free DIY Style)
How to Do It:
- Design your own tags in Canva, Word, or Google Docs.
- Use festive fonts, clip art, or personal photos.
- Print on cardstock and cut out.
- Hole punch and attach with ribbon.
Let me know if you’d like a printable PDF template or custom design and I can help create one for you!
Would you like some fun phrases or quotes to put on the tags, too?
22. SNOWMAN CRAFTS FROM TIN CANS
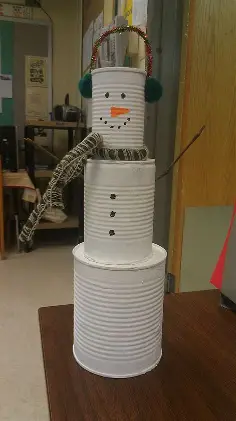
Just a heads up: Don’t discard old socks in any form. Tell people that, like bottles and cans, used clothing, including filthy old socks, can be recycled. It’s crucial!
A short peek inside the sewing kit may reveal a few colourful buttons that you may use to create a coat and face.
You may make a scarf out of an extra piece of ribbon from the present-wrapping inventory. A carrot nose and a top hat might be made with a little felt or construction paper.
The kids will love making these homemade Christmas decorations. They can then exhibit their repurposed holiday decorations for Grandma and Grandpa to see.