Plastic water bottles are one of the most recyclable materials available and are used extensively in many households. You’ll be shocked at how much more it can become, beyond just your carry-along liquid container. Let us extend our imaginations and make the most of these bottles!
The world slowed down during this quarantine period, when we are all advised to stay indoors. There are fewer people on the streets causing pollution, many companies have closed, and factories have stopped operating. Recycling is one of the best ways we can support the healing of our planet.
Recycling plastic bottles can reduce waste in the environment and allow them to be used for new projects. You can use these plastic water bottles for the following crafts and ideas.
- Cap Lamp
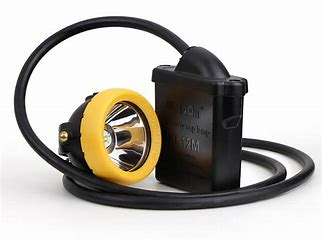
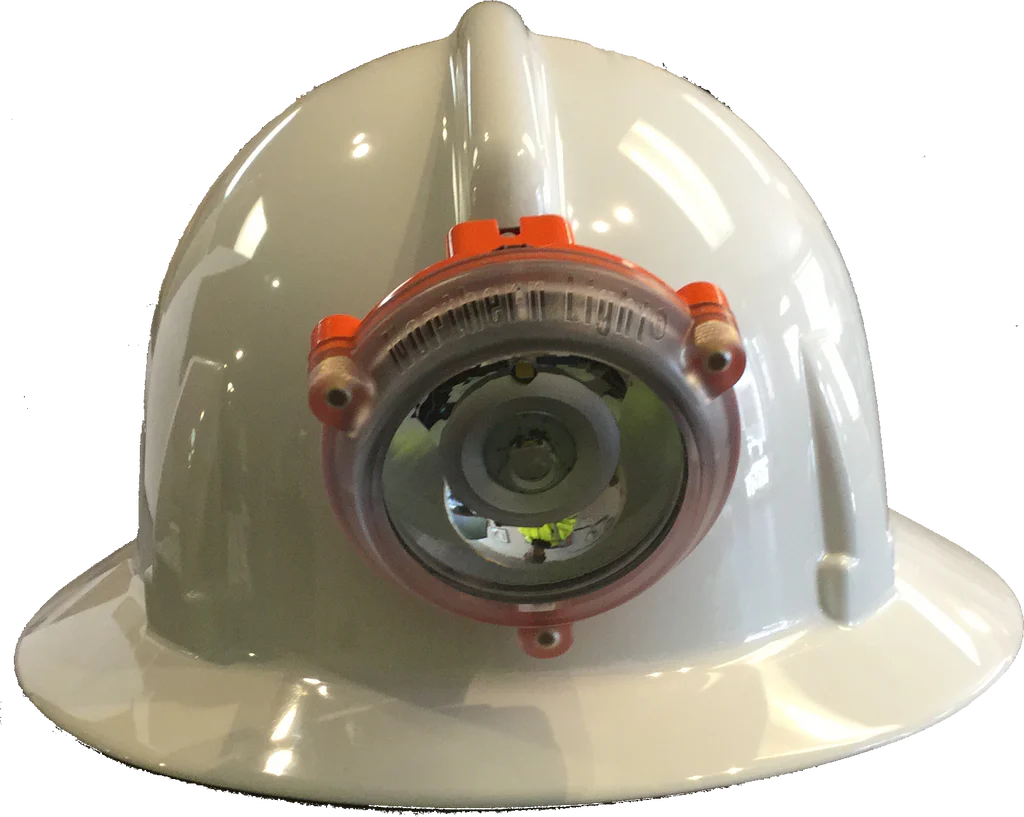
A cap lamp is a portable, hands-free lighting device typically worn on a cap or helmet. Here are some key points about cap lamps:
Features
- Light Source: Usually LED, providing bright, energy-efficient illumination.
- Mounting: Designed to attach securely to the brim of a cap or helmet.
- Adjustable Brightness: Many models offer different brightness settings for various tasks.
- Rechargeable: Often comes with a rechargeable battery, reducing waste from disposable batteries.
- Durability: Built to withstand rugged conditions, making them suitable for outdoor activities.
Uses
- Outdoor Activities: Ideal for camping, hiking, fishing, and hunting.
- Work Environments: Useful for mechanics, electricians, and construction workers who need hands-free light.
- Emergency Preparedness: Great for keeping in emergency kits for power outages.
Benefits
- Hands-Free Operation: Keeps your hands free for tasks while providing illumination where you need it.
- Portability: Lightweight and easy to carry, making it convenient for travel.
- Versatility: Can be used in various situations, from everyday tasks to specialized work environments.
If you’re considering getting one or have specific questions, feel free to ask!
2. Jetpack for Kids
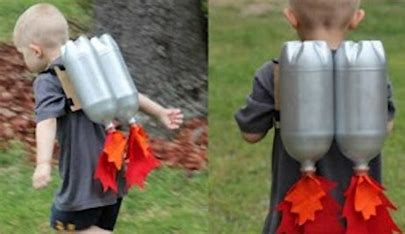
Yes, what you just read is true! This costume is great for saving you a tonne of time if your child wants one right now!
Using grey paint from your craft tools, affix two large plastic bottles to a cardboard backing.
Subsequently, drill holes for the strings so your child can wear it on their back.
Add some red paper strips for extra flare and pushing effect if desired.
3. DIY Sprinkler
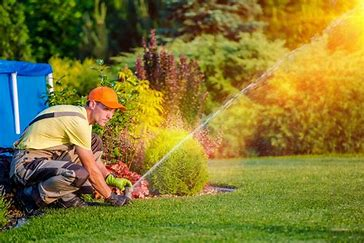
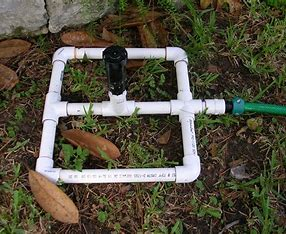
Creating a DIY sprinkler is a simple and cost-effective way to water your garden or lawn. Here’s how you can make one using common materials:
Materials Needed
- Plastic bottle (1-2 liters)
- Drill or sharp nail
- Water hose
- Tape or a hose connector
- Scissors
- Optional: A spray nozzle or garden connector
Instructions
1. Prepare the Bottle
- Rinse out the plastic bottle and remove the label.
- If using a 1-liter bottle, cut it in half if you want to make a larger sprinkler.
2. Make Holes
- Using a drill or a sharp nail, poke several small holes in the cap and around the sides of the bottle. This will create the sprinkler effect. Space them evenly for better coverage.
3. Connect the Hose
- Option 1: If you have a spray nozzle or garden connector, you can attach it directly to the bottle cap.
- Option 2: If you’re using standard water hose, tape the hose securely to the bottle opening, making sure it doesn’t leak.
4. Set Up the Sprinkler
- Place the bottle in your desired location. You can bury it slightly in the ground for stability or use stakes to hold it in place.
- Turn on the water supply to the hose. Adjust the flow as needed to achieve the desired spray pattern.
5. Test and Adjust
- Watch how the water sprays and make adjustments if necessary. You might want to change the hole sizes or add more holes for a different watering pattern.
Tips
- Use Multiple Bottles: For larger areas, consider making multiple sprinklers and placing them strategically.
- Decorate: You can paint the bottle or decorate it to blend into your garden if desired.
This DIY sprinkler is a great way to save water and keep your plants healthy. If you have any specific questions or need further details, let me know!
4. Toy Car
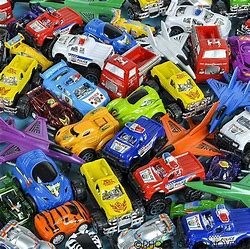
Children are happy with the smallest things. All you need are extra bottle caps and a wire to connect the left and right wheels to create a toy vehicle out of plastic bottles that will definitely catch their attention.
To ensure that it rolls effectively, put a little hole on each end that is next to one another.
Your child will have an immediate toy if you add some amazing design.
5. Trash Can
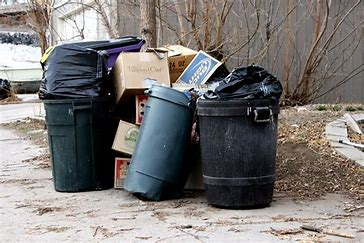
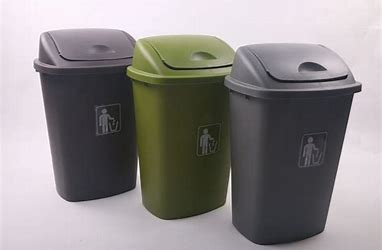
A trash can is a container used for the disposal of waste. Here are some key points about trash cans, including types, uses, and tips for choosing one:
Types of Trash Cans
- Kitchen Trash Cans: Designed for food waste and general household trash. Often have lids to minimize odors.
- Bathroom Trash Cans: Smaller and often designed for disposable items like toiletries.
- Recycling Bins: Separate containers for recyclable materials, often color-coded for easy identification.
- Outdoor Trash Cans: More durable, designed to withstand weather conditions. Used for yard waste and general outdoor trash.
- Pedal Trash Cans: Feature a foot pedal for hands-free operation, making them hygienic and convenient.
- Touchless Trash Cans: Use motion sensors to open the lid, providing a high-tech, sanitary option.
Uses
- Waste Disposal: Primary purpose is to hold waste until it can be collected for disposal or recycling.
- Organizing: Helps keep spaces tidy and organized by providing a designated spot for trash.
Tips for Choosing a Trash Can
- Size: Consider the space where it will be used and how much waste you typically generate.
- Material: Options include plastic, metal, or stainless steel. Choose based on durability, ease of cleaning, and aesthetics.
- Lid Type: Decide if you prefer a lid for odor control and pest prevention, and if so, choose between a swing lid, step-on lid, or touchless option.
- Ease of Cleaning: Look for features that make it easy to clean, such as removable liners or smooth surfaces.
- Recycling Options: If recycling is important to you, consider a trash can with separate compartments for easy sorting.
Maintenance
- Regular Cleaning: Wash the trash can periodically to prevent odors and buildup.
- Use Liners: Trash liners can make it easier to clean and prevent spills.
- Proper Disposal: Ensure that waste is disposed of correctly according to local guidelines.
If you have specific questions or need recommendations, feel free to ask!
6. Pencil Case
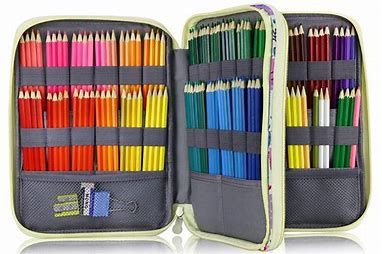
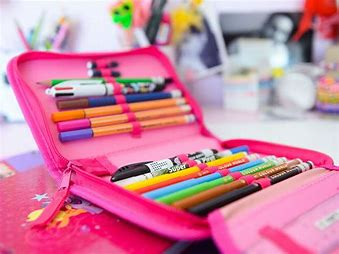
A pencil case is a small container used to organize and carry writing instruments and other school supplies. Here’s an overview of pencil cases, including types, uses, and tips for choosing one:
Types of Pencil Cases
- Zippered Cases: The most common type, featuring a zipper closure for easy access.
- Hard Cases: Made from sturdy materials, providing extra protection for contents.
- Pouch Style: Soft, flexible cases that can hold a variety of items and are often lightweight.
- Multi-compartment Cases: These have several sections for organizing different supplies, such as pens, pencils, erasers, and more.
- Personalized Cases: Customized with designs, names, or colors to reflect personal style.
Uses
- Organizing Supplies: Keeps pens, pencils, markers, erasers, and other stationery items neatly arranged.
- Portability: Makes it easy to transport school supplies to classes or while traveling.
- Protecting Items: Helps prevent breakage or damage to writing instruments.
Tips for Choosing a Pencil Case
- Size: Consider how many items you need to carry. Choose a size that fits comfortably in your backpack or bag.
- Material: Look for durable materials that can withstand daily use. Waterproof options are great for added protection.
- Closure Type: Decide between a zipper, snap, or Velcro closure based on ease of use and security.
- Design: Choose a design that reflects your personality or matches your school supplies.
- Functionality: If you need to carry more than just pencils, consider a case with extra pockets or compartments for organization.
Maintenance
- Regular Cleaning: Clean the pencil case regularly to remove dirt and stains.
- Declutter: Periodically go through the contents to remove items you no longer use or need.
A pencil case is a practical accessory for students, artists, and anyone who uses writing tools regularly. If you have specific questions or need suggestions, feel free to ask!
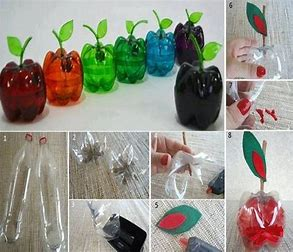
7. Water Bottle Tulips
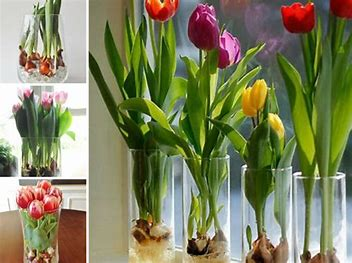

Creating water bottle tulips is a fun and eco-friendly craft project! Here’s how to make them step by step:
Materials Needed
- Plastic water bottles (empty and clean)
- Scissors
- Paint or markers (optional for decoration)
- Green pipe cleaners or stems (like wooden dowels)
- Tape or glue
- Floral tape (optional)
- Optional decorations: Glitter, stickers, or washi tape
Instructions
1. Prepare the Water Bottles
- Cut the Bottles: Take a plastic water bottle and cut the top portion off, around 3-4 inches from the top, depending on how big you want the tulip petals to be.
- Shape the Petals: Gently squeeze the cut edge to create petal shapes. You can cut slits around the top edge to help shape the petals better.
2. Decorate the Petals
- Paint or Color: Use acrylic paint or markers to color the outside of the cut bottle, creating vibrant tulip petals. Let it dry completely.
- Add Details: Use a darker color to add details like lines or spots for a more realistic look.
3. Create the Stem
- Attach a Stem: Use green pipe cleaners or wooden dowels as stems. If using a dowel, secure it to the bottom of the bottle with tape or glue.
- Optional: Wrap the stem with floral tape for a more polished look.
4. Assemble the Tulip
- Combine Parts: Push the petals down over the top of the stem. If necessary, secure the petals with glue or tape to keep them in place.
- Adjust Petals: Arrange the petals to give your tulip a natural look.
5. Display Your Tulips
- Create a Bouquet: Make several tulips in different colors and arrange them in a vase or jar.
- Decorate Your Space: Place your water bottle tulips on a desk, table, or anywhere you want to add a splash of color.
Tips
- Color Variety: Use different colored bottles or paint to create a variety of tulip colors.
- Add Leaves: Cut additional pieces from green plastic bottles to create leaves and attach them to the stem for extra detail.
This project is a great way to recycle plastic bottles and add a touch of spring to your home! If you have any questions or need further guidance, let me know!
8. Vertical Garden
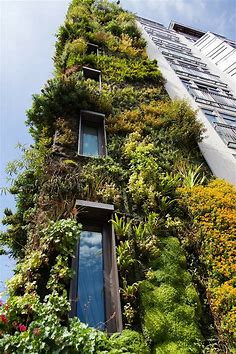
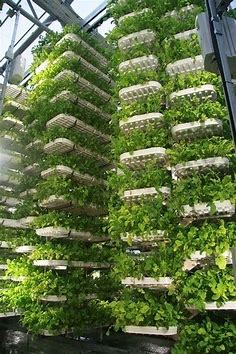
Creating a vertical garden is a great way to maximize space and add greenery to your home or outdoor area. Here’s a guide on how to set one up:
Benefits of a Vertical Garden
- Space-Saving: Ideal for small areas like balconies, patios, or indoor spaces.
- Aesthetic Appeal: Adds beauty and visual interest to walls or fences.
- Improved Air Quality: Plants can help purify the air.
- Growing Food: You can grow herbs, vegetables, and flowers vertically.
Materials Needed
- Vertical Planter: Options include wall-mounted planters, shelves, or pocket planters made from fabric or felt.
- Plants: Choose plants that thrive in vertical arrangements, such as herbs, succulents, ferns, or trailing plants.
- Soil: Use potting soil suitable for the plants you select.
- Watering System: Consider a drip irrigation system or regular watering cans.
- Hanging Hardware: Hooks, brackets, or mounting materials to secure your planters.
Steps to Create a Vertical Garden
1. Choose a Location
- Select a wall or fence that receives adequate sunlight for your chosen plants. Ensure it’s accessible for watering and maintenance.
2. Select Your Planters
- Decide on the type of vertical planter you want. You can use:
- Wall-mounted pots: Simple containers attached to the wall.
- Pocket planters: Fabric planters with pockets for each plant.
- Shelves or ladders: Create a tiered effect with shelves or a ladder structure.
3. Prepare the Planters
- If using pockets or fabric planters, ensure they are properly installed and secure. For pots, make sure they have drainage holes.
4. Choose Your Plants
- Select plants based on your sunlight availability and space. Good choices include:
- Herbs: Basil, mint, or thyme.
- Succulents: Echeveria or sedum.
- Trailing Plants: Pothos or ivy.
5. Planting
- Fill your planters with potting soil. Plant your selected plants, ensuring they have enough space to grow.
6. Watering and Maintenance
- Water the plants according to their needs. A drip irrigation system can help automate this process.
- Regularly check for pests and diseases, and prune as needed to encourage healthy growth.
7. Enjoy Your Vertical Garden
- Watch your plants grow and enjoy the beauty and benefits of your vertical garden!
Tips
- Start Small: If you’re new to gardening, begin with a few plants and expand as you gain confidence.
- Mix Plants: Combine different types of plants for a diverse and visually appealing garden.
- Seasonal Changes: Consider changing plants seasonally to keep your garden fresh and interesting.
If you have specific questions or need more detailed information, feel free to ask!
9. Piggy Bank


Make your own piggy bank for your kids instead of purchasing one from Ceramics! You are essentially done when you make the hole in the container for the coins to pass through. But that doesn’t seem like much fun, does it?
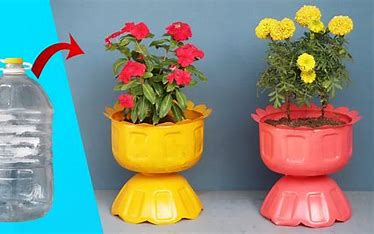
10. DIY Plastic Water Bottle Planter
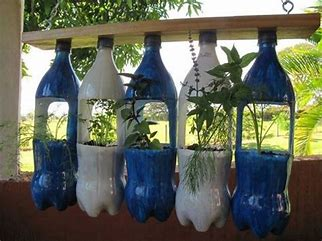
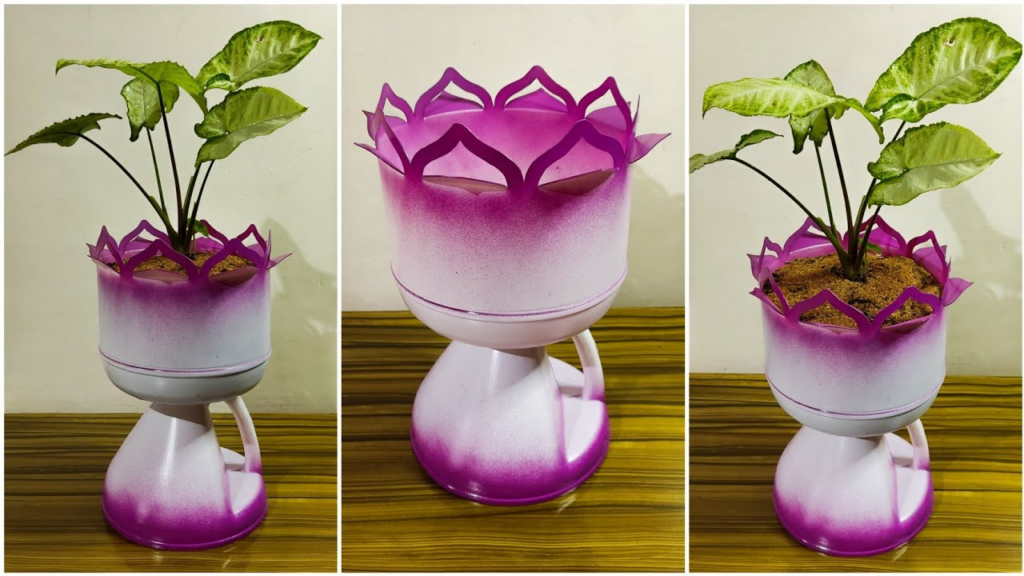
Creating a DIY plastic water bottle planter is an easy and eco-friendly way to recycle bottles while growing your favorite plants. Here’s a step-by-step guide to help you get started:
Materials Needed
- Plastic water bottles (1-2 liters)
- Scissors or a utility knife
- Drill or a sharp object (for making drainage holes)
- Potting soil
- Plants or seeds (herbs, flowers, succulents, etc.)
- Optional: Paint, markers, or decorative materials for personalization
Instructions
1. Prepare the Bottle
- Clean the Bottle: Rinse out the plastic water bottle to remove any residue.
- Cut the Bottle: Using scissors or a utility knife, cut the bottle in half vertically. You can also make a horizontal cut near the bottom if you prefer a shallow planter.
2. Create Drainage Holes
- Drill Holes: Use a drill or a sharp object to poke several small holes in the bottom half of the bottle to allow excess water to drain out. This is crucial to prevent overwatering.
3. Add Soil
- Fill with Soil: Add potting soil to the bottom half of the bottle, leaving some space at the top for planting.
4. Plant Your Seeds or Plants
- Choose Plants: Select small plants or seeds that fit well in your planter.
- Planting: If using seeds, follow the instructions on the seed packet for planting depth. If using small plants, gently place them in the soil and cover the roots.
5. Water the Plants
- Initial Watering: After planting, give your plants a good watering. Be sure to water until you see it draining from the bottom holes.
6. Personalize Your Planter
- Decorate: If desired, paint or decorate the outside of the bottle to add a personal touch. You can also use markers or stickers.
7. Display Your Planter
- Choose a Location: Place your planter in a sunny spot, such as a windowsill or outdoor area, depending on the plant’s light requirements.
Tips
- Vertical Planters: For a vertical garden effect, you can attach several bottle planters to a wall or fence using hooks or strings.
- Herb Garden: Consider using multiple bottles to create a small herb garden, placing different herbs in each bottle.
- Regular Maintenance: Keep an eye on the moisture levels and water as needed, ensuring the soil is damp but not soggy.
This DIY project is a great way to recycle plastic bottles while adding greenery to your space! If you have any questions or need further assistance, feel free to ask!
11. Snack Storage
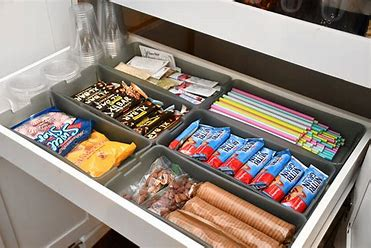
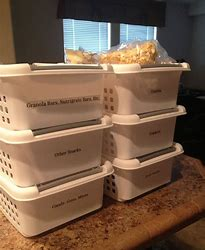
It’s not necessary to always dash to the mall in search of a canister filled with kitchen essentials like condiments. A clear plastic bottle can be recycled and used to make a new container for salt, sugar, coffee creamer, or other similar items.
Perhaps you need a homemade salt and pepper shaker? Simply drill a hole in the cap, and it should function exactly like a regular container.
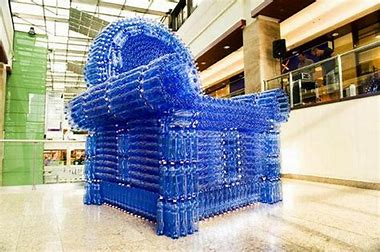
12. DIY Plastic Bottle Chair
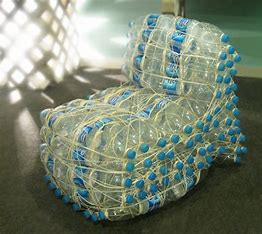
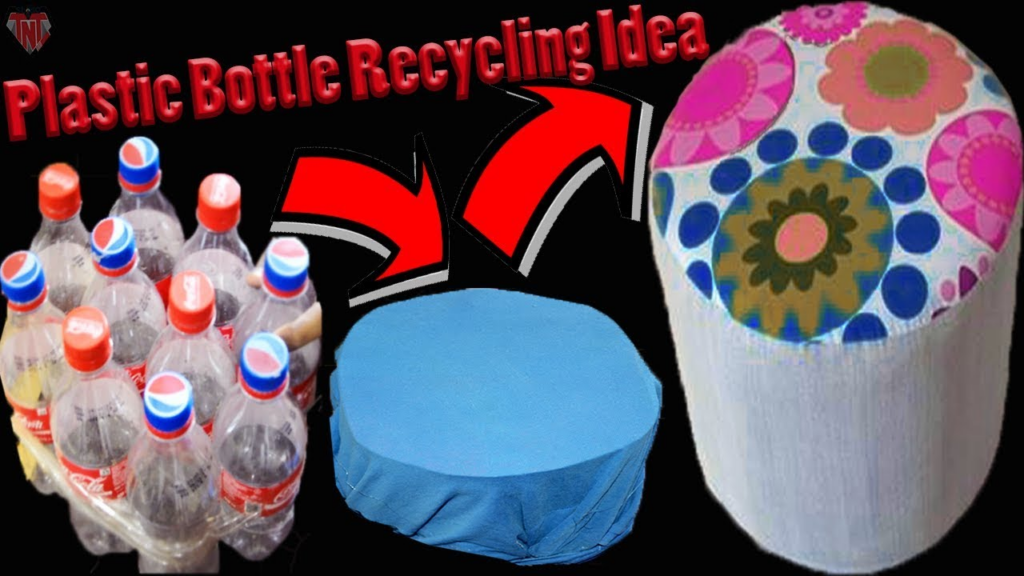
Creating a DIY plastic bottle chair is a fantastic way to recycle and repurpose materials while making a unique piece of furniture. Here’s how to do it:
Materials Needed
- Plastic bottles (about 20-30, depending on the size of the chair)
- Wooden or metal frame (for support)
- Strong adhesive (like hot glue or epoxy)
- Cushions or padding (optional, for comfort)
- Paint or fabric (optional, for decoration)
Instructions
1. Prepare the Bottles
- Clean the Bottles: Rinse out the plastic bottles to remove any residue. Remove labels for a neater appearance.
- Cut the Bottles: Cut the bottles in half to create two parts. You can also leave them whole if you prefer a rounder shape.
2. Create the Structure
- Build a Frame: Use a wooden or metal frame to form the base of your chair. This can be a simple square or rectangular structure. If you’re skilled, you can also make a frame using wood or PVC pipes.
- Secure the Frame: Make sure the frame is sturdy and can support weight.
3. Attach the Bottles
- Arrange the Bottles: Start attaching the plastic bottles to the frame. Use strong adhesive to secure each bottle in place, ensuring they are tightly fitted together.
- Layering: You can layer the bottles vertically or horizontally, depending on the desired design and comfort.
4. Create the Seat
- Add More Bottles: Use additional bottles to create a seat surface. Arrange them closely together to ensure a flat, stable seat.
- Secure All Bottles: Make sure all bottles are securely attached and there are no gaps.
5. Add Cushions (Optional)
- Cushion the Seat: For added comfort, place cushions or padding on the seat. You can secure them with fabric or tape.
6. Paint or Decorate (Optional)
- Personalize Your Chair: If desired, paint the bottles or cover them with fabric for a more finished look.
7. Allow to Dry
- Drying Time: Let the adhesive dry completely before using the chair.
Tips
- Stability: Ensure the chair is stable and can hold weight. Test it gently before regular use.
- Design: Feel free to get creative with the shape and design! You can make a simple stool or a more elaborate chair.
- Outdoor Use: If you plan to use the chair outdoors, consider sealing it with a waterproof coating.
This DIY plastic bottle chair is not only an innovative way to recycle but also a fun project that can enhance your outdoor space or home. If you have any questions or need further assistance, let me know!
basil
Please me website register