Sure! Here’s a list of easy and fun crafts for kids that are perfect for home or classroom activities. These projects use simple materials and are great for boosting creativity and fine motor skills.
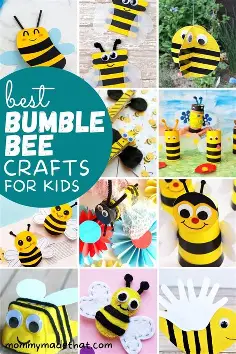
🎨 Easy Crafts for Kids: Fun Art and Craft Ideas
1. Paper Plate Animals
- What You Need: Paper plates, paint/crayons, googly eyes, glue, scissors
- How To Make: Decorate the paper plate like an animal face—add ears, whiskers, and eyes using cut-out paper or craft foam.
- Fun Tip: Try making a lion, bunny, or frog!
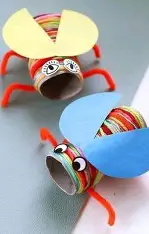
2. Toilet Paper Roll Creatures
- What You Need: Empty toilet paper rolls, markers, glue, colored paper
- How To Make: Wrap the roll in paper and turn it into animals, robots, or even superheroes.
- Fun Tip: Add pipe cleaner arms or wings for extra flair.
3. Handprint Art
- What You Need: Paint, paper, markers
- How To Make: Paint the child’s hand and press it onto paper. Let it dry, then turn it into animals (like turkeys or fish) by adding features with markers.
- Fun Tip: Use different hand poses for creative shapes!
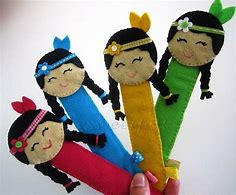
4. Popsicle Stick Crafts
- What You Need: Popsicle sticks, glue, paint, googly eyes
- How To Make: Create mini houses, picture frames, or stick puppets.
- Fun Tip: Make a puppet theater and put on a show!
5. Tissue Paper Collage
- What You Need: Tissue paper, glue, cardstock
- How To Make: Tear tissue paper into pieces and glue them onto cardstock to create colorful collages or mosaic shapes.
- Fun Tip: Use black outlines to shape things like balloons or butterflies.
6. DIY Paper Crowns
- What You Need: Construction paper, scissors, glue, stickers, markers
- How To Make: Cut out a crown shape, decorate it, and tape it to fit the child’s head.
- Fun Tip: Add gems or glitter for a royal touch!
7. Egg Carton Critters
- What You Need: Egg cartons, paint, googly eyes, glue
- How To Make: Cut out individual cups and turn them into bugs or animals.
- Fun Tip: Make a caterpillar by connecting several cups together.
8. Salt Dough Ornaments
- What You Need: Salt, flour, water, paint
- How To Make: Mix and shape salt dough, bake it, and decorate. Great for seasonal crafts!
- Fun Tip: Use cookie cutters for shapes like stars or hearts.
9. Button Tree Art
- What You Need: Buttons, glue, markers, paper
- How To Make: Draw a tree trunk and branches, then glue on buttons as leaves.
- Fun Tip: Use seasonal colors—green for spring, red/orange for fall!
10. Paper Bag Puppets
- What You Need: Paper lunch bags, markers, construction paper, glue
- How To Make: Decorate the flap side as a face, then add arms and clothes.
- Fun Tip: Put on a puppet show with a few characters!
Would you like me to turn this into a printable activity sheet or a PDF guide?
- Fun Tissue Paper Flower Rainbow Craft for Kids
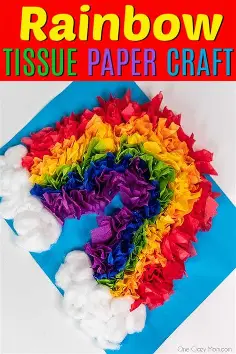
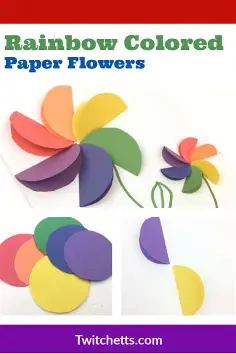
Use the Tissue Paper Flower Rainbow Craft on Kids Activity Zone to get creative. This craft technique is ideal for using little hands because it explains every step and makes creating a vibrant rainbow with tissue paper flowers really easy.
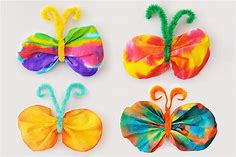
2. Simple Coffee Filter Butterflies

Sure! Here’s a simple and fun craft for kids:
🦋 Simple Coffee Filter Butterflies
These colorful butterflies are easy to make using coffee filters and a few basic supplies. Kids will love watching the colors blend!
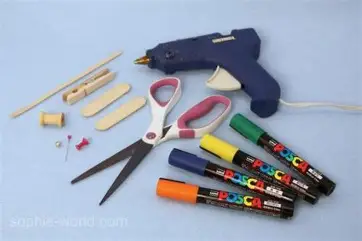
🧰 Materials Needed:
- White coffee filters (1–2 per butterfly)
- Washable markers
- Spray bottle with water (or a small cup and paintbrush)
- Pipe cleaners (any color)
- Clothespins (optional, for a sturdier body)
- Paper towels or tray (for drying)
✂️ Instructions:
- Flatten the Coffee Filter
Place the coffee filter on a flat surface. You can put it on top of newspaper or a tray to catch any mess. - Decorate with Markers
Use washable markers to draw colorful patterns or scribbles all over the filter. Bright colors work best! - Spray with Water
Lightly mist the filter with water using the spray bottle. Watch the colors blend together like magic!
(If you don’t have a spray bottle, gently dab water onto the filter with a brush or sponge.) - Let It Dry
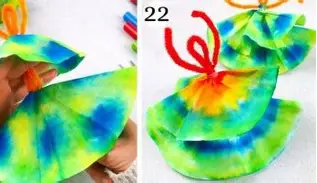
Set the wet filter on a paper towel and let it dry completely. This may take about 30 minutes. - Shape the Butterfly
Once dry, pinch the middle of the filter to form two wings. Twist a pipe cleaner around the center to hold it in place. Leave the ends of the pipe cleaner sticking up and curl them to make antennae. - (Optional) Use a Clothespin
Instead of a pipe cleaner, you can clip the middle of the coffee filter with a decorated clothespin to make the butterfly’s body.
🌈 Extra Tips:
- Try using two coffee filters stacked together for a fuller butterfly.
- Add glitter glue or stick-on gems for sparkle.
- Hang them from string to make a butterfly mobile!
Would you like a printable version of this craft or more butterfly-themed activities?
3. Make a Fairy House Craft for 5 Year Old’s
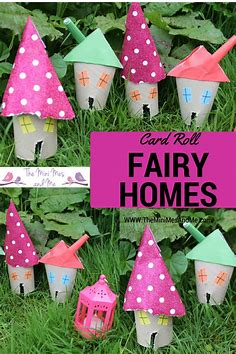
Give your kids a magical do-it-yourself fairy house activity to unleash their imagination! This craft is ideal for children with small hands and large imaginations since it fosters the development of fine motor skills while encouraging children to explore their creative side. Create a beautiful abode that is ideal for fairy visitors with commonplace supplies like craft sticks, vibrant buttons, and repurposed containers. It’s the perfect way to make the most of those craft supplies that are collecting dust and to spend time with each other. Are you prepared to create magical memories? Explore Living Well Mom’s comprehensive guide and begin crafting right now!
4. Free Printable Ice Cream Template
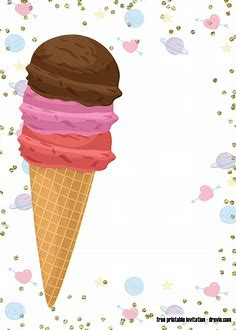
Here are some free printable ice cream templates perfect for coloring, cutting, crafting, and summertime fun:
🍦 Where to Get the Templates
- Simple Mom Project offers a double-scoop ice cream outline you can print and decorate—great for coloring and learning fine motor skills thebestideasforkids.com+12simplemomproject.com+12superstarworksheets.com+12.
- Inviting Creativity has a full set of coloring pages, including simple cone outlines and fun sundae scenes, available in free PDFs printabulls.com+2invitecreativity.com+2easypeasyandfun.com+2.
- Easy Peasy and Fun provides a variety of ice cream coloring sheets—from cones to popsicles—ideal for kids of all ages easypeasyandfun.com+1thebestideasforkids.com+1.
- Pattern Universe features a clean-cut cone silhouette in PDF format, perfect for craft templates and stencils iheartcraftythings.com+12patternuniverse.com+12superstarworksheets.com+12.
🧩 Craft & Creativity Ideas
- Color & Cut Shapes
Color your ice cream scoops and cones, then cut them out for collage art or DIY garlands invitecreativity.com+12liltigers.net+12thebestideasforkids.com+12. - Decorate With Patterns
Use markers, stickers, or glitter to make each scoop unique—great for learning color and design. - Educational Games
Turn crafted scoops into counting exercises (e.g., scoop #1, #2…) or pattern-making cards liltigers.net. - Garland Decoration
Punch a hole at the top of each cone and thread string through to make a festive banner printabulls.com+12liltigers.net+12simplemomproject.com+12. - Stencils for Crafts
Use the simple outline as a template for painting, chalk art, or tracing on fabric bestcoloringpagesforkids.com+12invitecreativity.com+12superstarworksheets.com+12.
🎁 Quick Printable Guide
| What to Do | Instructions |
|---|---|
| Step 1 | Choose a template (cone outline, double-scoop, popsicle, etc.) and download its free PDF. |
| Step 2 | Print it on plain paper or cardstock for sturdiness. |
| Step 3 | Let kids color with crayons, markers, or watercolors. |
| Step 4 | Cut out pieces and use them in crafts—collages, garlands, learning games, and more! |
| Step 5 (Optional) | Laminate the finished pieces to preserve them or create durable décor. |
If you’d like direct download links, extra coloring pages (like sundaes or ice cream trucks), or themed printable kits, just let me know!
5. Very Easy Kaleidoscope Using Cardboard Tube
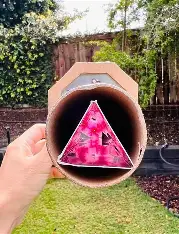
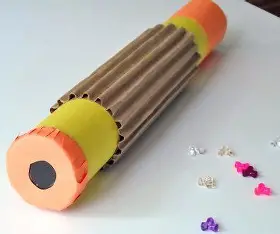
This easy DIY kaleidoscope for kids can inspire creativity and pleasure. Collect everyday household things for a fun activity. This entertaining and educational game is ideal for a cold day spent indoors. Start creating your own kaleidoscope.
The results are stunning, and the technique is simple. Rekindle your love of vibrant colours and patterns. This do-it-yourself project is perfect for creating special memories with your family. It’s also a great approach to study the fundamentals of science and foster creativity. Now is the time to begin creating those enchanted kaleidoscope views!
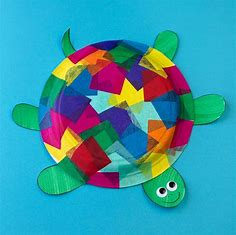
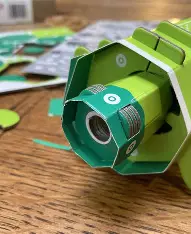
6. Tissue Paper and Paper Plate Turtle Craft
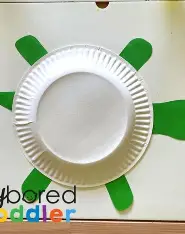
Absolutely! Here’s a fun and colorful Tissue Paper and Paper Plate Turtle Craft that’s perfect for kids of all ages.
🐢 Tissue Paper and Paper Plate Turtle Craft
This simple turtle craft is a great way to explore textures and colors while working on fine motor skills. It’s also a fantastic classroom or rainy day activity!
🧰 Materials Needed:
- 1 paper plate (plain white or green)
- Green construction paper
- Green tissue paper (various shades)
- Googly eyes (or draw your own)
- Glue stick or school glue
- Scissors
- Pencil or marker
✂️ Instructions:
- Prepare the Shell
- Flip the paper plate upside down (the bottom becomes the turtle’s shell).
- Tear or cut tissue paper into small squares or pieces (about 1×1 inch).
- Glue the tissue paper pieces all over the plate to make a colorful, textured shell. Overlapping is fine!
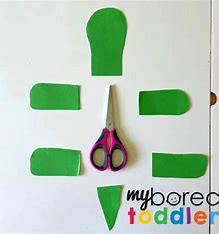
- Make the Turtle’s Head, Legs, and Tail
- Draw and cut out 1 head, 4 legs, and 1 tail from green construction paper.
- The head should be slightly rounded; legs can be oval-shaped; the tail can be a small triangle.
- Attach the Body Parts
- Flip the plate over and glue the head to the front edge, legs to the sides, and the tail to the back.
- You can staple the pieces for extra strength if needed.
- Add Eyes and Face
- Glue on googly eyes or draw eyes with a marker.
- Add a smile or any fun expression on the turtle’s face.
🌈 Fun Variations:
- Use different tissue paper colors to create a rainbow turtle shell.
- Add glitter or sequins for a sparkly shell.
- Write the child’s name on the shell to personalize it.
🧠 Educational Tie-Ins:
- Talk about sea turtles and their habitats.
- Use it for a lesson on shapes and textures.
- Great for reinforcing cutting and pasting skills.
Would you like a printable instruction sheet or turtle part templates to go with this craft?
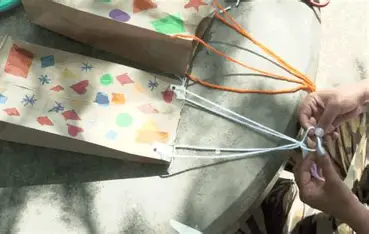
7. Cardboard Box Into Epic Marble Run
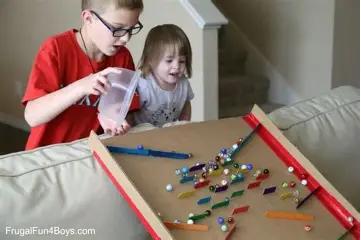
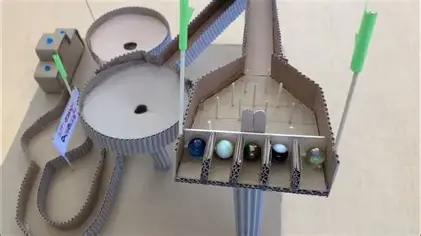
Turn a plain cardboard box into an exciting marble run adventure to up your craft game! Kids may get involved in an interesting engineering project using everyday objects like craft sticks, hot glue, and paper cups. Where will the marbles land? This imaginative project challenges the laws of motion.
This project, created by Aidan and popular with younger fans, promotes collaboration and creative thinking without the distractions of technology. Wondering how everything fits together? Get the detailed instructions and other creative suggestions at Frugal Fun For Boys and Girls. Marbles are not for mouths, so have fun safely!
8. How to Make Your Own Paper Fish
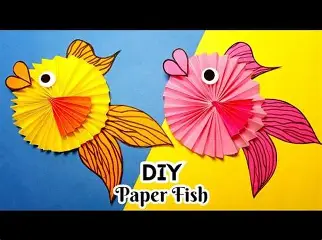

Of course! Here’s a fun and easy guide for kids to make their own paper fish using basic craft supplies.
🐟 How to Make Your Own Paper Fish
This craft is colorful, creative, and perfect for ocean-themed projects, classroom decorations, or just for fun at home!
🧰 Materials Needed:
- Colored construction paper or plain paper
- Scissors
- Glue stick or school glue
- Markers or crayons
- Googly eyes (optional)
- Stapler (optional)
✂️ Step-by-Step Instructions:
1. Fold the Paper
- Take a square piece of paper (any size, but 6×6 inches is great for kids).
- Fold it in half diagonally to make a triangle.
2. Cut the Fish Shape
- Keep the triangle folded.
- Cut a curved shape from one point of the triangle to the opposite side (like you’re making a teardrop shape). When you unfold it, it should look like a basic fish body.
3. Make the Tail
- Use one end of the fish body as the tail. You can cut small slits into it to make a fringed or fan-shaped tail.
4. Add Fins
- Cut small triangle or oval shapes from leftover paper to use as top and side fins.
- Glue them to the fish body.
5. Decorate the Fish
- Add googly eyes or draw eyes with a marker.
- Use markers, crayons, or more paper to add patterns like stripes, scales, or spots.
6. (Optional) 3D Fish
- Want a 3D look? Cut long strips of paper and loop or curl them before gluing onto the fish to make it pop!
🌈 Creative Ideas:
- Make a whole school of fish in different colors and sizes!
- Hang them with string to create an underwater mobile.
- Use shiny paper or foil to make “rainbow fish”.
🧠 Learning Extension:
- Great for lessons on marine life, shapes, symmetry, and color mixing.
- Pair with a reading of “The Rainbow Fish” or an ocean-themed book.
Would you like a free printable fish template or a visual step-by-step guide for this craft?
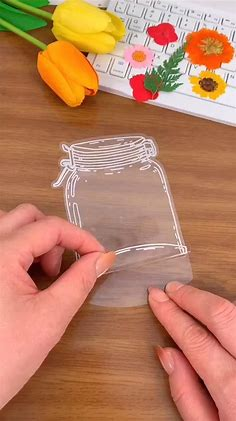
9. Confetti Bookmark Craft for Students

With DIY Candy’s tutorial on creating kid-friendly DIY confetti bookmarks, go on a vibrant craft project. Crafters of all ages can enjoy this entertaining project, which doesn’t require any prior knowledge. You can create a fun addition to your reading excursions with commonplace supplies like cardstock, tissue paper, and clear contact paper.
This simple and enjoyable exercise is perfect for parents and kids to do together. It fosters creativity and provides a lively start to the school year. Prepare yourself for a creative session that will add some fun to your regular reading regimen!
10. Good Monster Windsock With Cardstock Paper

Sure! Here’s a fun and easy guide for making a Good Monster Windsock using cardstock paper — perfect for Halloween, a monster-themed party, or just a silly craft day!
👾 Good Monster Windsock Craft (Using Cardstock)
This craft turns colorful cardstock into a fun, friendly monster that blows in the wind! Great for hanging on porches, in classrooms, or near windows.
🧰 Materials Needed:
- Colored cardstock paper (for the monster’s body)
- Crepe paper streamers or strips of tissue paper (for the windsock “tails”)
- Googly eyes or white paper to make eyes
- Glue stick or school glue
- Tape or stapler
- Scissors
- Markers or crayons
- Hole punch (optional)
- String or ribbon (for hanging)
✂️ Instructions:
1. Make the Monster’s Body
- Take a sheet of cardstock (A4 or letter size).
- Roll it into a cylinder and glue or staple the edges together to make the windsock body.
2. Decorate the Face
- Use googly eyes or cut out circles from white and black paper to make silly monster eyes — you can add one, two, or even five!
- Draw a friendly mouth, funny teeth, or even a mustache!
- Add paper horns, ears, or hair on the top using extra cardstock.
3. Add the Streamers
- Cut long strips of crepe paper or tissue paper (about 1–2 inches wide and 10–12 inches long).
- Glue or tape them around the inside bottom edge of the cylinder — these will blow in the wind like a real windsock!
4. Attach a String to Hang It
- Punch two holes at the top of the windsock (on opposite sides).
- Tie a string or ribbon through the holes to hang your monster.
5. Hang and Enjoy!
- Hang your good monster windsock near a fan, a window, or outside on a calm day and watch it dance in the breeze!
🌈 Extra Creative Ideas:
- Use glitter glue or stickers to decorate your monster.
- Make a family of monsters with different expressions and colors.
- Add arms or wings using paper or pipe cleaners.
Would you like a printable template for the eyes, teeth, or decorations to go with this craft?
11. Recycled Cardboard Sun Crafts for 5th Grader
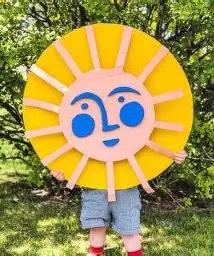
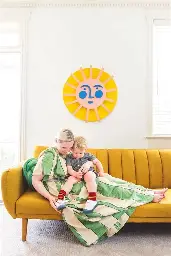
Engage in hands-on DIY projects that encourage creativity and individuality in people of all ages. Create a recycled cardboard sun as a creative way to honour Earth Day! This activity, which was inspired by Alexander Girard’s well-known designs, is ideal for teaching children about creativity and recycling while bringing a little sunshine into your house.
All you need is the included template, some simple craft tools, and some cardboard boxes—many of us have plenty of these days. This eco-friendly craft is perfect for an easy and significant Earth Day activity because it not only makes your area look better but also teaches you an important lesson about sustainability. Are you prepared to share some joy? The House That Lars Built has the whole blueprint and instructions.
12. Paper Bag Kite Project for Kids

Absolutely! Here’s a fun and simple Paper Bag Kite Project for kids — perfect for a breezy day, classroom activity, or craft time at home.
🪁 Paper Bag Kite Project for Kids
Make your own mini kite using a paper lunch bag and a few craft supplies. This easy DIY kite really flies and is great for preschoolers and elementary kids!
🧰 Materials Needed:
- 1 paper lunch bag (any color)
- Crayons, markers, or stickers (for decorating)
- String or yarn (about 2–3 feet long)
- Crepe paper or ribbon (for the tail)
- Stapler or tape
- Scissors
- Hole punch (optional)
- Craft sticks, straws, or thin dowel (optional, for extra support)
✂️ Instructions:
1. Decorate the Paper Bag
- Lay the paper bag flat.
- Use markers, crayons, stickers, or stamps to decorate it with fun colors, patterns, or designs.
- Let kids get creative — rainbows, stars, animals, or even superhero themes!
2. Attach the Tail
- Cut 3–5 long strips of crepe paper or ribbon (around 12–18 inches each).
- Tape or staple them to the bottom (open end) of the bag to create the kite’s tail. This helps it fly straighter.
3. Add the String
- Punch a small hole near the top of the bag (closed end), or carefully poke one with scissors.
- Tie a piece of string or yarn through the hole. This will be your kite’s flying line.
- You can also tie the string to a popsicle stick or pencil for easier handling.
4. Add Support (Optional)
- For a sturdier kite, tape a lightweight straw, wooden skewer, or craft stick across the back of the bag horizontally (inside or outside) to help keep its shape.
5. Go Fly Your Kite!
- On a breezy day, take your paper bag kite outside and run with it! Watch it float and flutter in the air.
🌈 Creative Ideas:
- Add googly eyes to make it look like a flying creature.
- Make a dragon kite with flames and scales.
- Use multiple colors of tissue or crepe paper for a rainbow tail.
🧠 Learning Tie-In:
- Use this craft to teach kids about wind, weather, and air movement.
- Great for units on transportation or seasons.
Would you like a printable instruction sheet or a classroom version of this project with step-by-step visuals?
13. Cool Construction Paper Ladybug on a Leaf
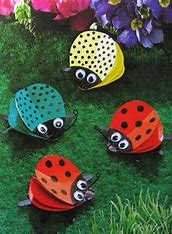
Use our simple Construction Paper Ladybird on a Leaf lesson to embark on a creative journey. This craft, which uses basic supplies like construction paper, glue and markers to create a charming ladybird, is perfect for encouraging children’s creativity in the spring.
It’s a great activity for instructors to improve classroom décor and appropriate for older kids to make on their own. Enjoy the pleasures of crafting and create a pretty ladybird on a display-ready leaf. Prepare to create a cute paper masterpiece by cutting, adhering, and decorating!
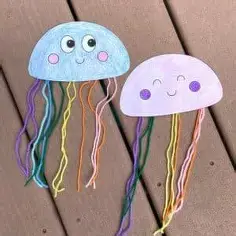
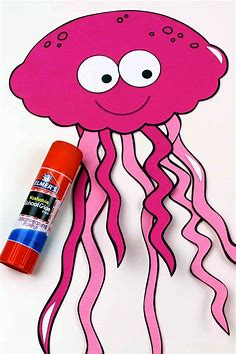
14. Easy Paper Jellyfish Craft for Kindergarteners
Of course! Here’s a super fun and simple Paper Jellyfish Craft that’s perfect for kindergarteners.
🪼 Easy Paper Jellyfish Craft for Kindergarteners
This adorable jellyfish craft is bright, wiggly, and so easy to make! It’s great for ocean-themed units, summertime fun, or just a creative afternoon at home or in class.
🧰 Materials Needed:
- Colored construction paper (for jellyfish body)
- Crepe paper, yarn, or ribbon (for tentacles)
- Googly eyes (or white/black paper to make eyes)
- Glue stick or school glue
- Scissors
- Crayons or markers (optional for decoration)
- Stapler (optional)
✂️ Instructions:
1. Make the Jellyfish Body
- Cut a semi-circle (half a circle) out of construction paper.
(You can fold a circle in half and cut it to make it easier.) - This will be the jellyfish’s head.
2. Decorate the Face
- Glue on googly eyes or draw eyes with a marker.
- Add a smiley face or silly expression to make it friendly!
3. Add the Tentacles
- Cut 4–8 strips of crepe paper, yarn, or ribbon (about 8–10 inches long).
- Glue or tape them to the straight edge of the semi-circle, so they hang down like wiggly tentacles.
4. Optional: Add Extra Decorations
- Use stickers, glitter glue, or crayons to decorate the jellyfish body with patterns or spots.
5. Display Your Jellyfish!
- Hang it with string from the ceiling, in a window, or make a jellyfish mobile with a few!
🌈 Fun Variations:
- Use metallic or shiny ribbon for sparkly tentacles.
- Make a rainbow jellyfish using different colored paper for each tentacle.
- Turn it into a puppet by gluing it onto a craft stick.
🧠 Educational Connection:
- Perfect for ocean animal units.
- Helps practice cutting, gluing, and fine motor skills.
- Great opportunity to talk about jellyfish habitats and movement.
Would you like a free printable jellyfish template or a visual step-by-step guide for this craft?
15. Best Backpack Charm Using Duck Tape
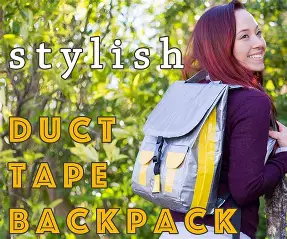
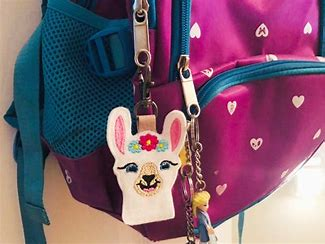
Personalised DIY backpack charms will add flair to your back-to-school attire! Using Duck Tape in the colours and patterns of your choice, explore a world of imagination. Crafters of all ages will love this easy project, which turns plain school bags into distinctive fashion statements in a matter of minutes.
You can thread beads, mix and combine tape designs, and show off your unique style without any special expertise. Go to Mod Podge Rocks for comprehensive directions and further crafting ideas. This enjoyable, mess-free project is a great way to add a little handcrafted charm to the start of the school year!
16. Unicorn Toilet Paper Roll for 7 Year Old’s
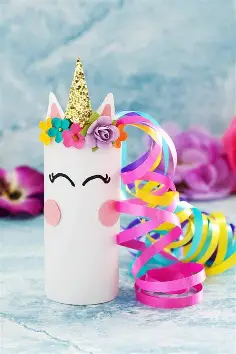

Sure! Here’s a fun and easy Unicorn Toilet Paper Roll Craft designed just for 7-year-olds. It’s colorful, creative, and perfect for kids who love magical creatures!
🦄 Unicorn Toilet Paper Roll Craft for 7-Year-Olds
This simple craft turns a toilet paper roll into a sparkly unicorn friend. Great for craft time at home, school projects, or birthday party fun!
🧰 What You Need:
- 1 empty toilet paper roll
- White paper or white paint
- Colored paper (pink, blue, purple, yellow, etc.)
- Glitter or shiny paper (for the horn)
- Glue stick or white glue
- Scissors
- Googly eyes (or draw your own)
- Crayons or markers
- Optional: yarn or ribbon (for the mane), stickers, small paper flowers
✂️ Instructions:
1. Make the Body
- Wrap the toilet paper roll with white paper and glue it down.
(Or paint it white and let it dry.)
2. Add the Face
- Glue on googly eyes near the top front of the roll.
- Draw a smile, nose, and cute cheeks with markers or crayons.
- Add eyelashes for extra charm!
3. Make the Ears
- Cut out 2 white triangles (for ears) and 2 smaller pink triangles (for inner ears).
- Glue the pink pieces inside the white ones.
- Attach the ears to the inside top edge of the roll.
4. Add the Horn
- Cut a small triangle from gold glitter paper (or color one with a yellow crayon).
- Glue it between the ears to create the unicorn horn.
5. Create the Mane
- Cut thin strips of colorful paper, yarn, or ribbon.
- Glue them behind the horn and ears to flow down the back of the roll like a mane.
(Use lots of colors for a rainbow effect!)
6. Decorate
- Add stickers, glitter, stars, or hearts on the unicorn’s body.
- You can even glue a tiny paper flower crown under the horn!
🌈 Optional Fun:
- Turn it into a puppet by adding a stick.
- Make multiple unicorns in different colors for a unicorn family!
- Add a tail using curled yarn or ribbon at the back.
🧠 Learning Benefits:
- Encourages creativity and imagination
- Builds fine motor skills (cutting, gluing, decorating)
- Fun way to practice following step-by-step instructions
Would you like a printable unicorn face template or a PDF version of this craft to use in a classroom or group activity?
17. Make Your Own Binocular
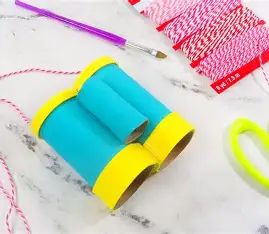
With this enjoyable and simple craft, you can unleash your child’s creativity! Presenting the inventive project that is ideal for promoting outdoor exploration: the DIY Toilet Paper Roll Binoculars. Children will enjoy making their own binoculars out of basic supplies like ribbon, craft paint, and toilet paper rolls. This creation transforms commonplace objects into an adventure in your garden, making it perfect for nature walks, bird viewing, or simply staring at clouds. Go to the website of Rae Ann Kelly for a detailed guide. Encourage your youngster to love the outdoors by getting them involved in crafts!
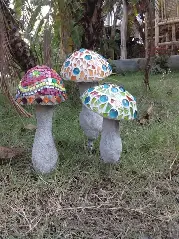
18. Torn Construction Paper Mosaic Mushroom Art
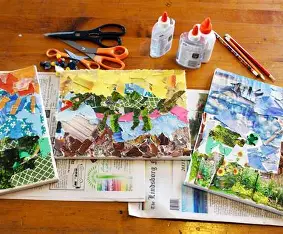
Sure! Here’s a fun and easy project idea for kids: Torn Construction Paper Mosaic Mushroom Art. This activity is great for creativity, fine motor skills, and color recognition!
🍄 Torn Construction Paper Mosaic Mushroom Art
Make a colorful mushroom picture using torn pieces of construction paper! This craft is perfect for preschoolers, kindergarteners, and early elementary kids.
🧰 Materials Needed:
- Construction paper in various colors (red, brown, white, green, etc.)
- A base sheet of paper (white or blue)
- Pencil (to draw mushroom outline)
- Glue stick or white glue
- Scissors (optional – but tearing is encouraged!)
✂️ Instructions:
1. Draw the Mushroom Shape
- Use a pencil to lightly draw a simple mushroom shape on the base paper.
- A round top (cap)
- A rectangle or oval bottom (stem)
2. Tear Construction Paper
- Tear pieces of red or any bright color for the mushroom cap.
- Tear white or beige paper for the stem.
- Tear green for grass or background, and other colors for decorations if you’d like.
3. Glue Down the Pieces
- Apply glue inside the mushroom cap shape and stick the red torn pieces to fill it in.
- Do the same for the stem with white or light brown pieces.
- Add green pieces at the bottom for grass or create a fun background around your mushroom.
4. Add Details
- Tear small white paper bits and glue them on the mushroom cap as spots.
- You can also draw or glue on little bugs, flowers, or a sun for more fun.
🌈 Creative Tips:
- Use different textures like tissue paper or foil for extra effect.
- Make a forest scene with multiple mushrooms.
- Try using fall colors for a seasonal look.
🧠 Educational Benefits:
- Helps with fine motor skills and hand strength
- Encourages creativity and color matching
- Great for lessons on plants, nature, or seasons
Would you like a printable mushroom outline to go with this craft?
19. How to Make a Clothespin Airplane

Make rainy days enjoyable by spending quality time together doing simple activities at home. Make adorable clothespin aeroplanes with your children as a fun, hands-on project! A clothespin, a wooden bead, popsicle sticks, mini craft sticks, markers or paints, glue, and washi tape for embellishment are all you’ll need.
As you colour, adhere, and build your tiny flying marvels, this captivating exercise fosters creativity and improves fine motor abilities. Ideal for playing or as a customised accent piece for any child’s space. Go to Hello Rascal Kids for a detailed tutorial. Prepare to see your works of art soar!
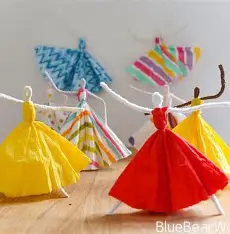
20. Useful Coffee Filter Dancers
Absolutely! Here’s a fun and creative craft: Coffee Filter Dancers — easy to make and great for encouraging imagination and storytelling.
💃 Useful Coffee Filter Dancers Craft
These charming little dancers made from coffee filters and basic materials are perfect for kids to play with or display. They spin, twirl, and can even be used as puppets or party decorations!
🧰 Materials Needed:
- White coffee filters
- Wooden craft sticks (popsicle sticks) or pipe cleaners
- Markers, crayons, or watercolors
- Scissors
- Glue or tape
- Googly eyes (optional)
- Small beads, stickers, or sequins (optional for decorations)
- Tissue paper or yarn (for hair — optional)
✂️ Instructions:
1. Color the Coffee Filter Skirt
- Flatten a coffee filter and decorate it using markers or watercolors.
- Let it dry if using paint or heavy marker ink.
- This will be the ballerina’s skirt.
2. Make the Dancer’s Body
- Use a craft stick for the body.
- Draw a face at the top of the stick using a marker or glue on googly eyes and a smile.
- You can also add a small piece of tissue paper or yarn for hair.
3. Create the Skirt
- Fold the coffee filter in half, then make a small cut in the center (big enough to slide the stick through).
- Slide the decorated coffee filter up the stick until it sits like a tutu or dress.
4. Secure the Skirt
- Use a dot of glue or tape on the back to keep the skirt in place, if needed.
5. Decorate
- Add glitter, sequins, or small stickers to the skirt to make it sparkle.
- You can also add arms by gluing small paper strips or pipe cleaner loops to the sides.
🌈 Fun Variations:
- Make a group of dancers in different poses and colors.
- Use pipe cleaners instead of craft sticks for poseable dancers.
- Create a stage or theater scene using a shoebox!
🧠 Educational Tie-In:
- Talk about movement, rhythm, and dance.
- Practice fine motor skills through cutting, coloring, and assembling.
- Use them for storytelling or puppet shows!
Would you like a template for the dancer’s face or outfit pieces to go along with this craft?
21. Indoor Pom Pom Shooter Activities for Kids
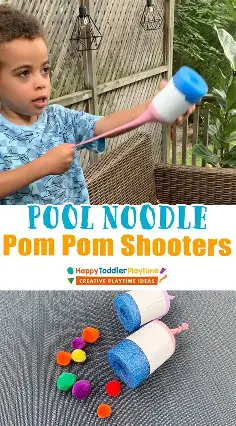
Create your own pom pom shooters to explore a world of indoor amusement with this easy and entertaining activity! These do-it-yourself launchers are a great way to get kids involved in hands-on creative and are ideal for rainy days or any time you need a little fun. Using everyday household objects like toilet paper rolls, balloons, and a little bit of craft supplies, you can create vibrant pom pom shooters that are sure to provide hours of entertainment.
Wondering how to make these fun devices? At Little Bins for Little Hands, follow the recommended steps to turn commonplace materials into sources of happiness and laughter. This project is ideal for indoor play and is a great addition to your collection of enjoyable, instructive crafts because it not only keeps kids entertained but also gently teaches them to fundamental physics concepts.